
Popular categories
Looking for a yarn?


Comments / Questions (41)
![]() Sigrid Forsthuber wrote:
Sigrid Forsthuber wrote:
Ich habe eine Frage bezüglich der Mütze Drops Design Cactus. Bei der Anleitung Zeile 5, heisst es nach 20 cm, nach einer Runde 2re./2 li, jeweils die 3. und 4. in M1 li. zusammenstricken > 72 M. dann> 2 Runden mit 2 re./1 M. Muster (abwechslungsweise re. und li.) stricken > das verstehe ich nicht Genau so verstehe ich nicht in der 7. Zeile, 2 Runden mit 1re./1M.Muster
08.12.2025 - 18:15DROPS Design answered:
Liebe Frau Forsthuber, bei einer Reihe wie die letzte Reihe M.1 stricken Sie (2 M re, 2 M li zusammen) die ganze Runde (22 Mal), so nehmen Sie 22 Maschen ab, dann stricken Sie diese 3 Maschen jedem Rapport wie die 3 ersten Maschen M.1: (1 M rechts, 1 M abwechslungsweise links und rechts, dh krausrechts). Viel Spaß beim Stricken!
09.12.2025 - 08:37
![]() Giovanna wrote:
Giovanna wrote:
Diritto e rovescio verso l'alto significa diritto e rovescio ritorti? Grazie
14.01.2025 - 08:42DROPS Design answered:
Buongiormo Giovanna, no, si intende il proseguimento del lavoro. Buon lavoro!
15.01.2025 - 07:56
![]() Blanka wrote:
Blanka wrote:
Dobrý den, z těchto stránek jsem upletla hodně různých pletenin a moc za ně děkuji.I tato čepice je moc pěkná. Jen mám jednu připomínku. Nezkušená pletařka neuplete požadovaný vzor podle schématu M.1. Pleteno v kruhových řadách=2 hladce pořád nad sebou ano, ale 2 další očka=1 hladce, 1 obratce, v dalších řadách nad hladkým okem obratce, nad obrácený okem hladce=hráškový vzor, to je český název.
01.12.2024 - 11:01
![]() Laroche Thérèse wrote:
Laroche Thérèse wrote:
Bonjour ' J'ai terminé de tricoter ensemble les 3e et 4e mailles. Il me reste donc 66 mailles. Ensuite lorsque je tricote ces mailles ensemble deux par deun comme indiqué, il me reste 33 mailles alors qu'il est indiqué qu'il doit en rester 44. Merci de bien vouloir m'indiquer ce que je ne comprend pas. Cordialement
08.12.2023 - 19:47DROPS Design answered:
Bonjour Mme Laroche, vous tricotez ensemble 2 par 2 toutes les mailles endroit, pas toutes les mailles, autrement dit, quand vous avez 66 mailles, vous avez des côtes (2 m end, 1 m env), tricotez ensemble à l'endroit les 2 m end ainsi (2 m ens à l'end, 1 m env), vous allez ainsi diminuer 22 mailles, il va donc ainsi rester 66-22=44 mailles. Bon tricot!
11.12.2023 - 07:24
![]() Hege wrote:
Hege wrote:
Hei. Jeg strikker denne nå, og er kommet til fellinga, etter første felling der maske 3-4 skal strikkes vrangt sammen så sitter jeg igjen med 72 masker, men så skal jeg felle neste, der står det at jeg skal strikke alle maskene 2 og 2 rett sammen å sitte igjen med 48 masker, hvordan er det mulig? Jeg sitter igjen med 36 masker... Skal det være 36 masker eller er det jeg som har forstått fellingen feil? 72/2=36
24.09.2022 - 17:21DROPS Design answered:
Hei Hege. Når du har 72 masker og det skal felles igjen, skal det ikke strikkes 2 og 2 rett sammen, men alle 2 rett sammen til 1 rett sammen. Altså du har 72 masker som er 2 rett - 1 vrang - 2 rett - 1 vrang osv, og nå skal alle rett maskene strikkes sammen. Du vil da få 48 masker som er 1 rett - 1 vrang - 1 rett - 1 vrang osv. Neste gang det skal felles så strikkes 1 rett og 1 vrang sammen og du vil da sitte igjen med 24 masker. mvh DROPS Design
26.09.2022 - 10:35
![]() Rahman Bananer wrote:
Rahman Bananer wrote:
Abdur Rahmān Mohmand (Pashto: عبدالرحمان بابا; 1632–1706)[1] or Rahmān Bābā (Pashto: رحمان بابا), was a renowned Pashtun[2][3] Sufi Dervish and poet from Mohmand Agency in Peshawar during the Mughal era. He, along with his contemporary Khushal Khan Khattak, is considered to be one of the most popular poets among the ethnic Pashtuns.[4] His poetry expresses the mystical side of Islam, in line with his Sufi-oriented nature.[5]
26.04.2022 - 08:55
![]() MARIAN wrote:
MARIAN wrote:
I, too. have had great difficulty in reading and understanding this pattern. Since I have been knitting for 70 + years, I decided to go through it word by word. I have now written it out to what I think, is meant by various instructions and my next job will be to try knitting the pattern, using my own instructions. To help other knitters I suggest you use English instructions rather than American, as the English instructions have been around for many many years.
23.12.2021 - 05:04
![]() Barbara Biertz wrote:
Barbara Biertz wrote:
Ich verstehe die Anleitung für das Stricken der Herrenmütze „Alaska“ nicht ab der Maschenabnahme. Habe 88 Maschen und nach Anleitung gestrickt bis zuletzt „nach einer Runde mit 2 re. / 2 li. – jeweils die 3. und 4. M. in M1 li. zusammenstricken = 66. M. Bis dahin alles okay. Aber wie geht es dann weiter? Nachfolgende Anleitung völlig unklar. Egal wie ich sie versuche umzusetzen, Es kommt nicht mehr hin und auch nicht auf 44 Maschen. Bitte dringend um Hilfe!
18.12.2021 - 02:04DROPS Design answered:
Liebe Frau Biertz, nach dieser Abnahmen stricken Sie die 3 ersten maschen in M.1 (= 2 Maschen rechts, 1 Masche Kraus rechts = abwechslungsweise rechts und links) Viel spaß beim stricken!
20.12.2021 - 07:13
![]() Camilla wrote:
Camilla wrote:
Det är något fel eller mycket otydligt skrivet i mönstret där intagningen börjar. Fick dock rätsida på mönstret då jag också kan finska och kunde läsa den finska beskrivningen. Annars mycket nöjd med mönstret och era mönster överlag
27.08.2021 - 20:52
![]() Judy wrote:
Judy wrote:
This is the most confusing pattern I have ever had to follow and believe me I have been knitting for over 50 years. I am going to give up on it and find another pattern for touques. M.1 is absolutely impossible to understand. Does 'M' mean 'make one' or is it just a symbol for the pattern?
18.12.2020 - 00:11DROPS Design answered:
Dear Judy, The DROPS patterns are knitted and crocheted by thousands and thousands of people around the world. We understand however that in certain countries, with different knitting/crochet traditions than Scandinavia, our patterns might be written in a way that differs from what some are used to. But of course we want everyone to understand our patterns, so that’s why we have created an extensive library of tutorial videos as well as step by step lessons that explain how to follow the techniques we use and how to read the diagrams in our patterns. M.1 is here refering to the diagram at the bottom of the pattern. Give them a try!
18.12.2020 - 07:36
|
|||||||
Cactus#cactushat |
|||||||
|
|
|||||||
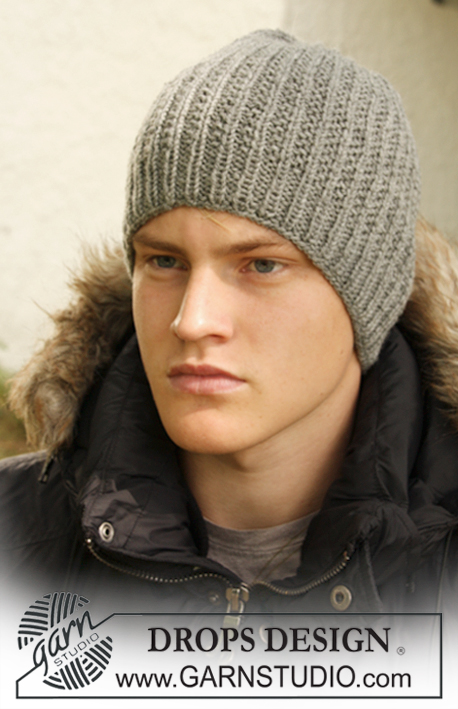
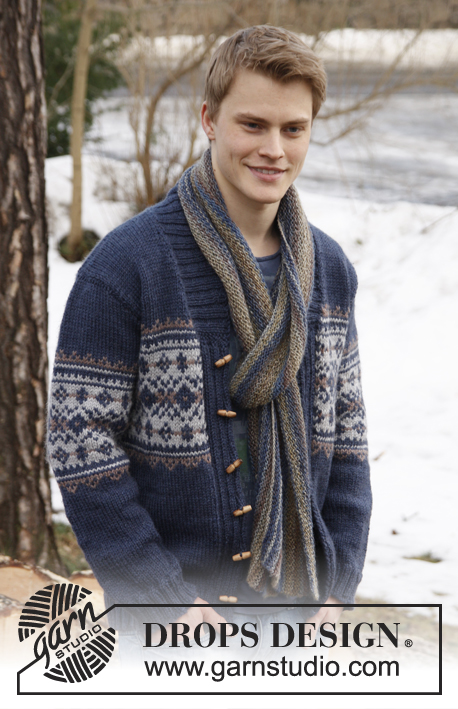
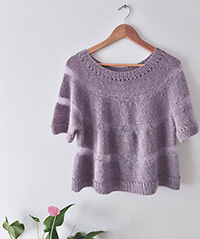
Knitted DROPS men's hat in ”Alaska”.
DROPS Extra 0-814 |
|||||||
|
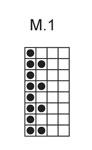
PATTERN: See diagram M.1 (= 4 sts). Diagram shows all rounds in the pattern seen from RS. -------------------------------------------------------- HAT: Worked in the round on circular needle, switch to double pointed needles when needed. Cast on 88-96 sts on circular needle size 3.5 mm / US 4 with dark blue Alaska. K 1 round. Then work 4 rounds rib (= K 2/P 2). Switch to circular needle size 4.5 mm / US 7 and light gray and work diagram M.1 – see explanation above (make sure that 2 K sts are worked over 2 K sts in the rib). REMEMBER THE GAUGE! When piece measures 18-20 cm / 7"-8" – adjust so that last round is a round with K 2/P 2 - on next round P tog every 3rd and 4th st in diagram M.1 = 66-72 sts. Work 2 rounds with K 2/P 1 pattern (alternately K and P upwards). On next round, K all 2 K sts tog to 1 K st = 44-48 sts. Work 2 rounds with K 1/P 1 pattern. Then K2 tog around = 22-24 sts. K 1 round, then on next round K2 tog around again = 11-12 sts remain on needle. Pull the yarn through all sts, tighten tog and fasten. The hat measures approx. 22-24 cm / 8¾"-9½" vertically. |
|||||||
Diagram explanations |
|||||||
|
|||||||
 |
|||||||
Have you finished this pattern?Tag your pictures with #dropspattern #cactushat or submit them to the #dropsfan gallery. Do you need help with this pattern?You'll find 12 tutorial videos, a Comments/Questions area and more by visiting the pattern on garnstudio.com. © 1982-2026 DROPS Design A/S. We reserve all rights. This document, including all its sub-sections, has copyrights. Read more about what you can do with our patterns at the bottom of each pattern on our site. |
|||||||

With over 40 years in knitting and crochet design, DROPS Design offers one of the most extensive collections of free patterns on the internet - translated to 17 languages. As of today we count 324 catalogs and 12210 patterns - 12200 of which are translated into English (US/in).
We work hard to bring you the best knitting and crochet have to offer, inspiration and advice as well as great quality yarns at incredible prices! Would you like to use our patterns for other than personal use? You can read what you are allowed to do in the Copyright text at the bottom of all our patterns. Happy crafting!
Post a comment to pattern DROPS Extra 0-814
We would love to hear what you have to say about this pattern!
If you want to leave a question, please make sure you select the correct category in the form below, to speed up the answering process. Required fields are marked *.