
Popular categories
Looking for a yarn?


Comments / Questions (13)
![]() E Van Schie wrote:
E Van Schie wrote:
Hoe moet ik de steken meerderen in ieder recht deel langs de hals in de voorbies en toch netjes de boordsteek door laten lopen??
20.02.2025 - 23:18DROPS Design answered:
Dag E Van Schie,
Door het meerderen wijzigt de boordsteek naar 2 averecht, 3 recht in dat gedeelte.
19.04.2025 - 09:50
![]() Gail Guenther wrote:
Gail Guenther wrote:
Can you recommend a very soft wool yarn for this pattern? It needs to be soft!
06.02.2024 - 15:12DROPS Design answered:
Dear Mrs Guenther, use the yarn converter to see different possible alternatives, you can for ex. try Big Merino (1 strand) or Baby Merino (2 strands). Your DROPS store can even help you choosing the best alternative matching your sensitivity. Happy knitting!
07.02.2024 - 08:05
![]() Jules wrote:
Jules wrote:
Nachdem ich am Nadelspiel nicht in Hin- und Rückreihen stricke, heißt das ich muss zum Abketten der Ärmel auf Rundnadeln wechseln?
03.03.2022 - 10:51DROPS Design answered:
Lieber Jules, wie Sie es am besten möchten, Sie können entweder in Hin und Rückreihen mit dem Nadelspiel oder mit der Rundnadel weiterstricken. Viel Spaß beim stricken!
03.03.2022 - 14:12
![]() Jules wrote:
Jules wrote:
Wie kettet man den Ärmel beidseitig am Anfang der Reihe ab? Sind das bei 8 M dann jeweils 4 rechts von der Markierung und 4 links? Am Nadelspiel stricke ich nur in Hinreihen, wie werden die M rechts von der Markierung richtig abgekettet?
02.03.2022 - 23:06DROPS Design answered:
Lieber Jules, Sie sollen jetzt 8 Maschen am Anfang der nächsten 12 Reihen abketten: *Am Anfang der Hinreihe (nach der Markierung, 1. Reihe = Teilung) ketten Sie die ersten 8 Maschen ab, stricken Sie die Reihen bis zur Ende, wenden, am Anfang der Rückreihe ketten Sie die ersten 8 Maschen ab, stricken Sie die Reihen bis zur Ende*, von *-* stricken Sie insgesamt 6 Mal (= 6 Mal 8 Maschen werden beidseitig abgekettet). Viel Spaß beim stricken!
03.03.2022 - 10:17
![]() Jules wrote:
Jules wrote:
Wenn in der Blende in jeder Reihe rechts eine Masche aufgenommen wird, dann passt die Abfolge "1 Randm in Krausrippe, 1 re., * 2 li., 2 re. *, von *-* wiederholen" nicht mehr... ist es am besten die Masche direkt nach der Randmasche aufzunehmen oder gibt es eine bessere Stelle?
21.02.2022 - 17:19DROPS Design answered:
Lieber Jules, ja richtig, Bündchen ist nicht mehr 2 li, 2 re überall, die Maschen stricken Sie dann wie sie erscheinen, also immer 2 li, 2 r unten bis die Zunahmen und 2 li, 3 re für den Kragen (von der Vorderseite gesehen). Viel Spaß beim stricken!
22.02.2022 - 09:20
![]() Jules wrote:
Jules wrote:
Was bedeutet ‘die Arbeit teilen’? Heißt das ich muss die Maschen des Vorderteils auf eine andere Nadel verschieben?
15.02.2022 - 23:19DROPS Design answered:
Lieber Jules, ja genau, entweder auf eine andere Nadel oder auf einen Faden (siehe Video und jetzt stricken Sie die Maschen für den Rückenteil in Hin- und Rückreihen. Viel Spaß beim stricken!
16.02.2022 - 11:11
![]() Sarah wrote:
Sarah wrote:
Bei der linken Blende beginne ich das Bündchen mit Randm in Krausrippe, 1 re. im Nacken und wdh. das in jeder Reihe immer im Nacken? Das heißt die Reihe beginnt oder endet im Nacken immer mit 2 rechten Maschen? Und das gleiche bei der rechten Blende? Danke!
08.11.2015 - 19:54DROPS Design answered:
Ja genau, im Nacken treffen, wenn Sie beide Blenden gestrickt haben, jeweils 1 kraus-re-M aufeinander und daneben liegt 1 M glatt re. Wenn Sie die Blendenteile dann innerhalb 1 Rand-M zusammennähen, ergeben sich somit hinten 2 M re zwischen den je 2 M li, sodass das Rippenmuster dann wieder genau richtig ist.
12.11.2015 - 20:17Kari Dahl wrote:
Jeg strikker oppskrift nr. 135-21. På kanten foran, som er tverr-ribbe, så står det at det skal økes 9 masker på en rad etter 6 cm. Jeg skjønner ikke hvordan jeg skal øke 9 masker UTEN å bryte 2r/2v. Kari
05.05.2014 - 23:32
![]() Sarah wrote:
Sarah wrote:
Hallo, wird M1 glatt rechts gestrickt?
20.01.2014 - 23:48DROPS Design answered:
Liebe Sarah, ja es wird glatt re gestrickt.
21.01.2014 - 08:15
![]() Erica wrote:
Erica wrote:
Perfekt att jag hitta något som jag kan göra till make. Så denna ska jag minsann göra :) Ps: webbsidan säger varje gång att min webbsida har fel format men jag har inget w w w i min adress tyvärr det får ni allt fixa
08.04.2013 - 08:23
|
||||||||||
Cedric#cedricjacket |
||||||||||
 |
 |
|||||||||
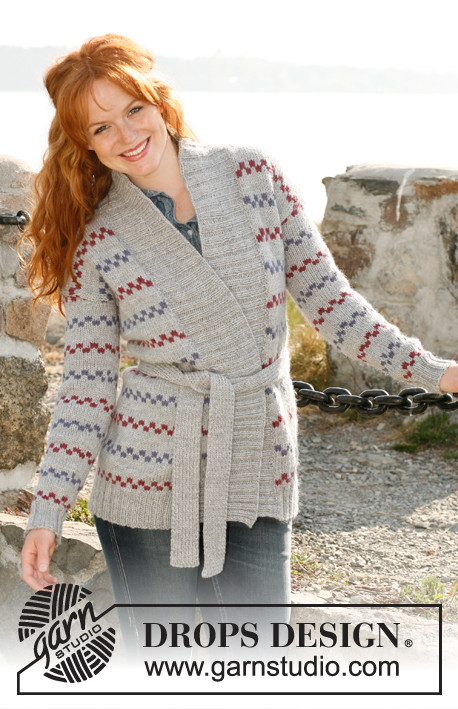
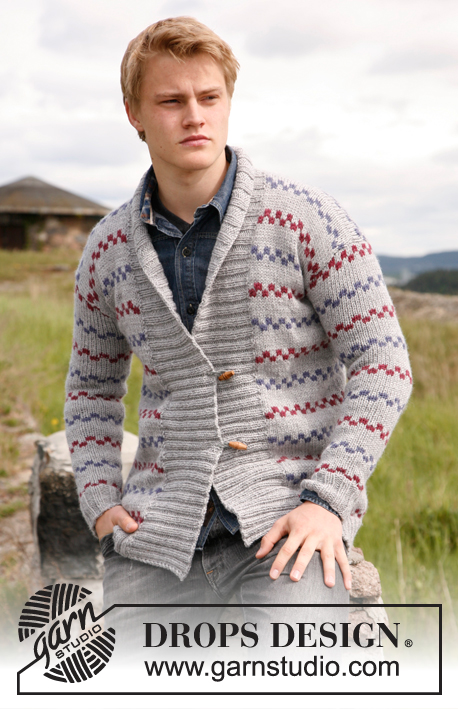
Knitted Pippi jacket for men with shawl collar and sripes, in DROPS Alaska. Sizes S - XXXL.
DROPS 135-21 |
||||||||||
|
GARTER ST: K all rows. PATTERN: See diagram M.1 - diagram is worked in stockinette st. DECREASE TIP: Dec by K 2 sts tog. INCREASE TIP: Inc 1 st by making 1 YO. On next round K YO twisted (i.e. work in back loop of st instead of front) to avoid holes. Work the new sts in the pattern. -------------------------------------------------------- BODY: Worked back and forth on circular needle. Cast on 144-156-168-184-200-220 sts (includes 1 edge st in each side) on circular needle size 4.5 mm / US 7 with light gray. On 1st row (= RS) work rib as follows: 1 edge st in garter st, * K 2, P 2 *, repeat from *-* and finish with K 2, 1 edge st in garter st. When piece measures 8-8-9-9-10-10 cm / 3⅛"-3⅛"-3½"-3½"-4"-4", dec 12-12-12-16-16-16 sts evenly in rib on next row from WS =132-144-156-168-184-204 sts. Now switch to circular needle size 5 mm / US 8. Work next row (= from RS) as follows: 1 edge st in garter st, work diagram M.1 until 3 sts remain, finish with the first 2 sts in diagram M.1 and 1 edge st in garter st. REMEMBER THE GAUGE! Continue like this until piece measures 53-54-55-56-57-58 cm / 21"-21¼"-21⅝"-22"-22½"-22¾", insert 2 markers in the piece; 28-31-34-36-39-44 sts (= front piece) in from each side (back piece = 76-82-88-96-106-116 sts). Now divide the piece at the markers and finish each part separately. BACK PIECE: = 76-82-88-96-106-116 sts. Continue with diagram M.1 until piece measures 68-70-72-74-76-78 cm / 26¾"-27½"-28⅜"-29⅛"-30"-30¾". On next row, bind off the middle 16-16-16-20-24-24 sts for neck and finish each shoulder separately. Bind off 2 sts on next row from neck = 28-31-34-36-39-44 sts remain on shoulder. Loosely bind off all sts when piece measures 70-72-74-76-78-80 cm / 27½"-28⅜"-29⅛"-30"-30¾"-31½ . RIGHT FRONT PIECE: = 28-31-34-36-39-44 sts. Continue with diagram M.1 until piece measures 70-72-74-76-78-80 cm / 27½"-28⅜"-29⅛"-30"-30¾"-31½", loosely bind off all sts. LEFT FRONT PIECE: Work as right front piece but reversed. SLEEVE: Worked in the round on double pointed needles. Cast on 36-40-40-44-48-52 sts with light gray on double pointed needles size 4.5 mm / US 7 and work rib as follows: * K 2, P 2 *, repeat from *-*. Work rib for 7 cm / 2¾", then switch to double pointed needles size 5 mm / US 8 and continue with diagram M.1. Insert a marker at the beg of the round. When piece measures 8 cm / 3⅛", inc 1 st on each side of marker - Read explanation above = 2 new sts on round. Repeat inc every 5-5-5-4½-4½-4 cm / 2"-2"-2"-1¾"-1¾"-1½" a total of 10 times in all sizes = 56-60-60-64-68-72 sts. When piece measures 58-57-56-55-53-51 cm / 22¾"-22½"-22"-21⅝"-21"-20" (shorter measurements in the larger sizes because of broader shoulder width), work back and forth - At the same time bind off for sleeve cap (beg on next row from RS) as follows: bind off 6-6-6-7-8-8 sts at beg of the next 6 rows. Bind off the remaining 20-24-24-22-20-24 sts on next row from RS. ASSEMBLY: Sew shoulder seams from RS with stitches. Sew in sleeves in front loop of outermost sts. LEFT FRONT BAND: Worked back and forth on needle. Beg mid back of neck, knit up from RS approx. 140-180 sts inside 1 edge st around the neck and along left front piece on circular needle size 4.5 mm / US 7 with light gray. On next row (= WS) adjust no of sts to 146-150-158-166-174-178 sts (divisible by 4 + 2) while at the same time P the sts. Work rib on next row from RS as follows: 1 edge st in garter st, K 1, * P 2, K 2 *, repeat from *-*. Continue with rib until band measures 7-7-7-8-8-8 cm / 2¾"-2¾"-2¾"-3⅛"-3⅛"-3⅛". Insert a marker from RS after the first 34-34-38-38-42-42 sts on needle. Now inc 1 st in every K-section (seen from RS) over the 34-34-38-38-42-42 sts = 8-8-9-9-10-10 new sts in the neck. Repeat inc when band measures 11-11-11-12-12-12 cm / 4½"-4½"-4½"-4¾"-4¾"-4¾" = 162-166-176-184-194-198 sts. When band measures 12-12-12-13-13-13 cm / 4¾"-4¾"-4¾"-5"-5"-5", bind off all sts with K over K and P over P. RIGHT FRONT BAND: Work up along right front piece from bottom edge until mid back of neck. P 1 row from WS and adjust no of sts as on left front band. 1st row in rib is worked as follows from RS: * K 2, P 2 *, repeat from *-* and finish with K 1 and 1 edge st in garter st mid back of neck. Work and inc in the neck as on left front band. ASSEMBLY: Sew bands tog mid back of neck inside 1 edge st. STRAP: Crochet a strap approx. 22-23-24-25-26-27 cm / 8¾"-9"-9½"-9¾"-10¼"-10⅝" from bottom edge on right front band. Work with light gray on hook size 4.5 mm/US 7 as follows: Insert hook through band approx. 1 cm / ⅜" from the edge and pull the yarn through. Then ch for approx. 6 cm / 2⅜", pull yarn through last ch and fasten yarn end on the back. Work another strap approx. 12 cm / 4¾" over the first strap the same way. Sew the buttons on to the left front band. |
||||||||||
Diagram explanations |
||||||||||
|
||||||||||
 |
||||||||||
Have you finished this pattern?Tag your pictures with #dropspattern #cedricjacket or submit them to the #dropsfan gallery. Do you need help with this pattern?You'll find 18 tutorial videos, a Comments/Questions area and more by visiting the pattern on garnstudio.com. © 1982-2026 DROPS Design A/S. We reserve all rights. This document, including all its sub-sections, has copyrights. Read more about what you can do with our patterns at the bottom of each pattern on our site. |
||||||||||


With over 40 years in knitting and crochet design, DROPS Design offers one of the most extensive collections of free patterns on the internet - translated to 17 languages. As of today we count 325 catalogs and 12298 patterns - 12288 of which are translated into English (US/in).
We work hard to bring you the best knitting and crochet have to offer, inspiration and advice as well as great quality yarns at incredible prices! Would you like to use our patterns for other than personal use? You can read what you are allowed to do in the Copyright text at the bottom of all our patterns. Happy crafting!
Post a comment to pattern DROPS 135-21
We would love to hear what you have to say about this pattern!
If you want to leave a question, please make sure you select the correct category in the form below, to speed up the answering process. Required fields are marked *.