
Popular categories
Looking for a yarn?


Comments / Questions (15)
![]() Bloem wrote:
Bloem wrote:
Hi, does the garment have any negative ease? I would like the top to be tight fitted. Normally i am a size S, should i follow XS in this pattern to make it fitted?
09.09.2025 - 23:26DROPS Design answered:
Hi Bloem, please see the lesson DROPS HERE. Happy knitting!
12.09.2025 - 10:54
![]() Ann wrote:
Ann wrote:
Vilken längd ska det vara på rundstickan?
27.08.2025 - 14:03DROPS Design answered:
Hej Ann. 80 cm bör fungera fint här. Mvh DROPS Design
28.08.2025 - 07:22
![]() Tuva Borgfelt wrote:
Tuva Borgfelt wrote:
Jag gör alltså storlek L/XL
26.03.2025 - 06:53
![]() Tuva Borgfelt wrote:
Tuva Borgfelt wrote:
Hej. Jag gör den utan ärm. När man avmaskat för ärmhål och alltså separerat delarna, bör det inte då vara 87 maskor kvar på fram- och bakstycke, eftersom man tagit bort 3 maskor på varje sida om markören? Eller är det meningen att ta bort 6 maskor i varje sida, alltså 12 och sedan 1 m 6 ggr?
26.03.2025 - 06:50DROPS Design answered:
Hej Tuva. Du har 180 maskor totalt och avmaskar de mittersta 6 maskorna i varje sida till ärmhål. 180-6-6= 168m. 168/2= 84 maskor, du har alltså 84 maskor på framstycke och 84 maskor på bakstycke. Mvh DROPS Design
26.03.2025 - 07:45
![]() Jo wrote:
Jo wrote:
What size cable do you recommend using?
12.11.2024 - 12:15DROPS Design answered:
Dear Jo, use a cable needle matching the needle size you are using, ours are in size 2.5 mm and 4 mm - see here. Happy knitting!
12.11.2024 - 15:57
![]() Susanna wrote:
Susanna wrote:
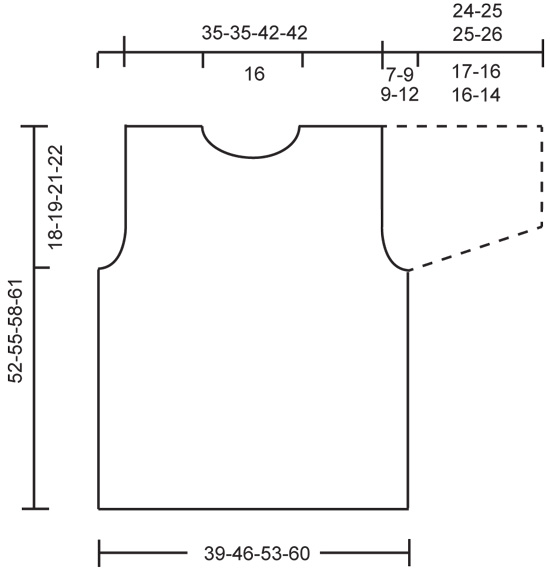
Hi there! I'm not totally clear on the finished measurements. Is size XS/S 52 cm long or 78? Thanks so much for your help, I'm new to knitting and don't yet know the ins and outs.
12.11.2023 - 05:34DROPS Design answered:
Dear Susanna, the measurements at the top are wrong and outdated; the correct measurements are the ones in the schematic, at the end of the pattern instructions. So the finished length is 52cm. Happy knitting!
12.11.2023 - 21:07
![]() Le Terrier wrote:
Le Terrier wrote:
Bonjour Comment tricoter ce modèle avec aiguille droite et non circulaire Merci
09.10.2023 - 19:22DROPS Design answered:
Bonjour, Ce modèle se tricote en rond et, donc, il faut le tricoter avec aiguilles circulaires. Bon tricot!
10.10.2023 - 08:58
![]() Helle Saniel-Nielsen wrote:
Helle Saniel-Nielsen wrote:
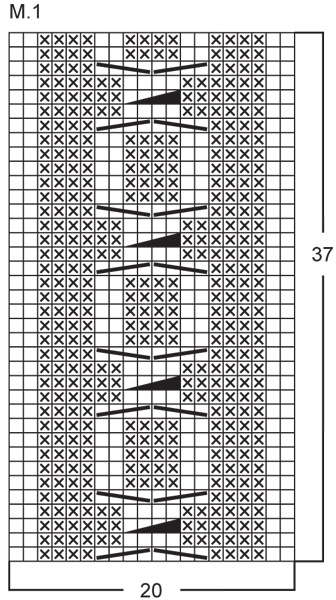
Er i gang med mønster M1 over de 20 midterste masker foran. Jeg har 78 m. og der skal således være 29 m. på hver side af M1. Snoninger starter forskudt for ribmønstret og det bliver helt forkert. M1 skal vel starte over de 2 retmasker og ikke over en vr.maske? Vh Helle
24.01.2023 - 10:48DROPS Design answered:
Hei Helle. Vrangborden strikkes som 2 rett og 4 vrang, og du skal sette 2 merketråder midt mellom 2 rett masker. 1. merketråden blir da mellom 1. og 2. maske på omgangen (altså ikke starten på omgange, men 1 maske etter starten) og 2. merketråd settes etter 78 masker fra 1. merketråd. Når du skal strikke M.1 starter du 29 masker etter 1. merketråden og da strikkes det 2 rett som går de 2 rette fra vrangborden og de 4 vrangmaskene i M.1 går over de 4 vrangmaskene fra vrangborden osv. mvh DROPS Design
30.01.2023 - 10:09
![]() Nicky wrote:
Nicky wrote:
Zijn er bij top zonder mouw langs het armsgat 2 av steken of ook nog een kansteek? In beschrijving staat nl zonder mouw 2 av steken (en met mouw 1 av steek). Echter bij breitips steken minderen wordt over 3 (resp. 2) kantsteken gesproken? Waar komt die extra steek vandaan of is het een typefout, moet bij breitips ook 2 (resp. 1) kantst. staan?
22.04.2022 - 20:15
![]() Carol MacDonald wrote:
Carol MacDonald wrote:
Pattern 1 is NOT highlighted on the pattern. Is it: Put 2 sts on cable needle in back of work, K 2, P 2 from cable needle? I'm A.D.D and have trouble reading patterns, I need every detail explained - thanks
02.08.2020 - 16:59DROPS Design answered:
Hi Carol, Row 1 in Pattern 1 is K2, P4, place 2 stitches on cable needle in front of piece, P2, K2 from cable needle, place 2 stitches on cable needle behind the piece, K2, P2 from cable needle, P4 and K2, Hope this helps and happy knitting!
03.08.2020 - 07:14
|
||||||||||||||||
DROPS 78-2 |
||||||||||||||||
 |
 |
|||||||||||||||
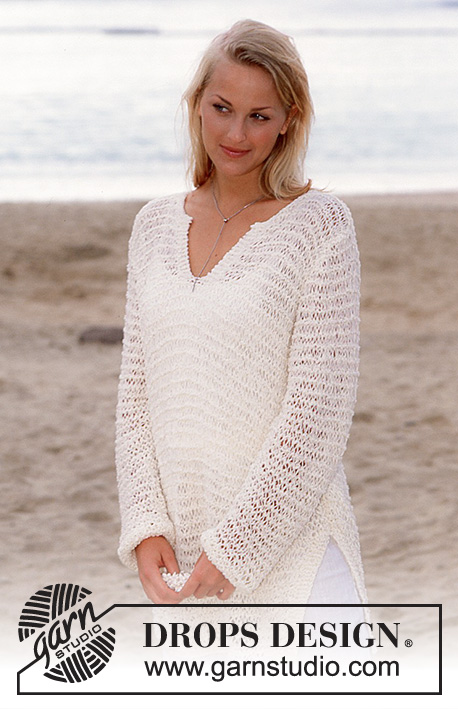
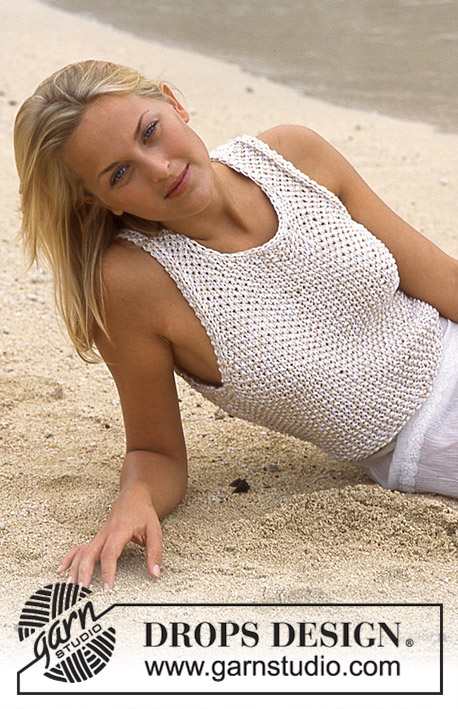
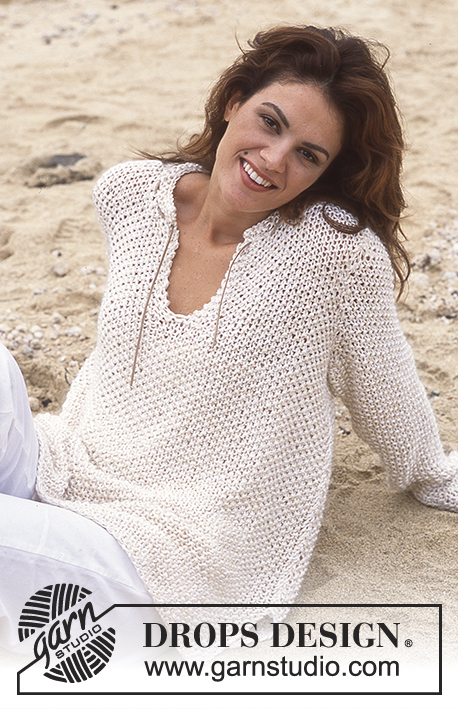
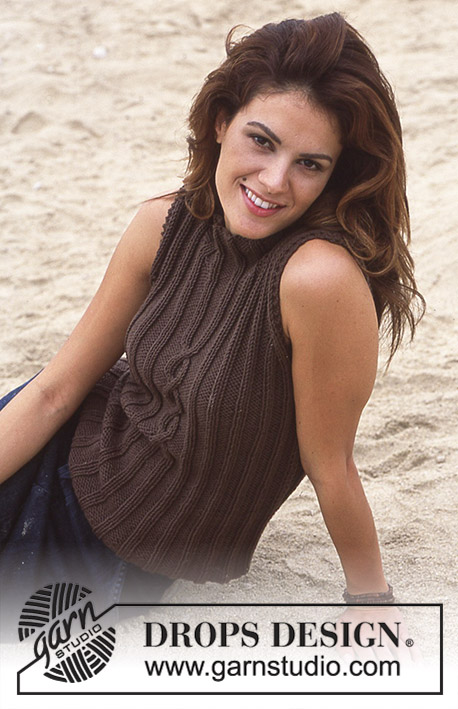
DROPS Top in Paris with or without sleeves
DROPS 78-2 |
||||||||||||||||
|
Gauge: 17 sts x 22 rows = 10 x 10 cm in stockinette st. Rib: * K 2, P 4 *, repeat from * - *. Pattern: See chart. The pattern is seen from the right side. Garter st, when knitting flat: Knit all sts, all rows. Knitting tips (for armhole): All decs are made from right side. Without sleeve: Dec inside 3 edge sts knit as follows from edge (as seen from the right side): K 3 With sleeve: Dec inside 2 edge sts knit as follows from edge (as seen from the right side): K 2 After edge sts: Slip 1 st as if to knit, K 1, psso. Before edge sts: K 2 tog. Body: If there are different measurements or numbers for the version with or without sleeve, instructions for the version without sleeve will come before ( ) and the version with sleeve will be inside ( ). If the instructions are the same, there will not be ( ). Cast on 132-156-180-204 sts on circular needles; join and knit rib. Place a marker at each side in the center of a K 2 rib (there will be 66-78-90-102 sts between markers). Read entire next section before knitting: When the piece measures 19-21-23-25 cm knit Pattern 1 over the 20 sts at center front (knit the remaining sts the same as before). After Pattern 1 knit rib over all sts. Without sleeve: At the same time when the piece measures 33-35-36-38 cm knit 4 rows garter st over 10 sts at each side (= 5 sts each side of marker), then bind off the center 6 sts at each side for armhole. Knit each side separately. With sleeve: At the same time when the piece measures 34-36-37-39 cm bind off 8 sts at each side for armhole (= 4 sts each side of marker). Knit each side separately. Front: = 60-72-84-96 (58-70-82-94) sts. Keep 2 (1) sts in garter st at each armhole edge and dec 1 st for armhole at each side every other row 0-6-6-12 times - see knitting tips = 60-60-72-72 (58-58-70-70) sts. When the piece measures 44-47-50-53 cm put the center 12 sts on a st holder for the neck. Then bind off at each neck edge every other row: 2 sts 2 times and 1 st 4 times = 16-16-22-22 (15-15-21-21) sts remain on each shoulder. Bind off in pattern when the piece measures 52-55-58-61 cm. Back: = 60-72-84-96 (58-70-82-94) sts. Bind off for armhole as on front. When the piece measures 50-53-56-59 cm put the center 24 sts on a st holder for the neck. Then bind off 2 sts at each neck edge on the next row = 16-16-22-22 (15-15-21-21) sts remain on each shoulder. Bind off in pattern when the piece measures 52-55-58-61 cm. Sleeve: Cast on 48-48-54-54 sts on double-pointed needles; join and place a marker at the join. Knit rib, with marker in the center of a K 2 rib. When the piece measures 5-4-3-2 cm inc 1 st each side of the K 2 with marker every 10-5-5-3 rows a total of 3-5-6-8 times - P the increased sts = 54-58-66-70 sts. When the piece measures 17-16-16-14 cm bind off 4 sts each side of marker and knit back and forth on needles. Bind off for sleeve cap at each side every other row: 2 sts 3-2-3-3 times and 1 st 1-2-2-5 times, then bind off 2 sts at each side until the piece measures 23-24-24-25 cm, then bind off 3 sts at each side 1 time. Bind off the remaining sts, the piece measures approx. 24-25-25-26 cm. Assembly: Sew shoulder seams. Neckband: Pick up 72 sts (divisible by 6, incl. sts on st holders) around the neck on double-pointed needles; join and knit rib - match up rib at center front and center back. Bind off in pattern when the collar measures approx. 8 cm. Sew in sleeves. |
||||||||||||||||
Diagram explanations |
||||||||||||||||
|
||||||||||||||||
 |
||||||||||||||||
 |
||||||||||||||||
Have you finished this pattern?Tag your pictures with #dropspattern or submit them to the #dropsfan gallery. Do you need help with this pattern?You'll find 21 tutorial videos, a Comments/Questions area and more by visiting the pattern on garnstudio.com. © 1982-2026 DROPS Design A/S. We reserve all rights. This document, including all its sub-sections, has copyrights. Read more about what you can do with our patterns at the bottom of each pattern on our site. |
||||||||||||||||


With over 40 years in knitting and crochet design, DROPS Design offers one of the most extensive collections of free patterns on the internet - translated to 17 languages. As of today we count 324 catalogs and 12290 patterns - 12280 of which are translated into English (US/in).
We work hard to bring you the best knitting and crochet have to offer, inspiration and advice as well as great quality yarns at incredible prices! Would you like to use our patterns for other than personal use? You can read what you are allowed to do in the Copyright text at the bottom of all our patterns. Happy crafting!
Post a comment to pattern DROPS 78-2
We would love to hear what you have to say about this pattern!
If you want to leave a question, please make sure you select the correct category in the form below, to speed up the answering process. Required fields are marked *.