DROPS Alpaca
DROPS Alpaca
100% Alpaca
from 4.85 $ /50g
DROPS Kid-Silk
DROPS Kid-Silk
75% Mohair, 25% Silk
from 6.75 $ /25g
Get the yarn to make this pattern from 62.85$.

The yarn cost is calculated from the pattern’s smallest size and the yarn’s cheapest product type. Looking for an even better price? You might find it on the DROPS Deals!

DROPS Super Sale

Fairy Feelings

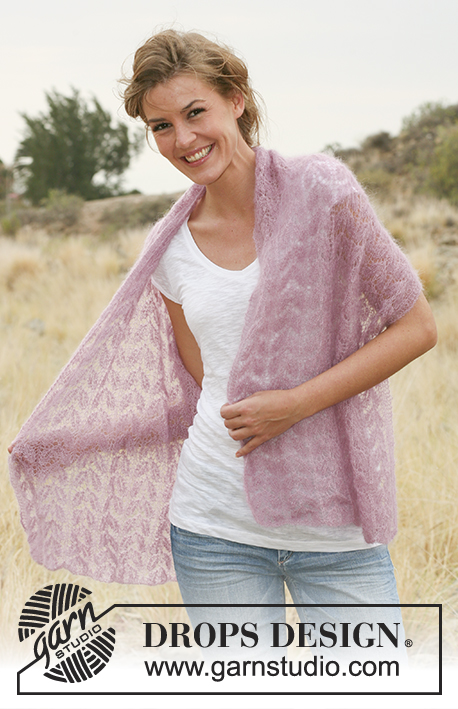
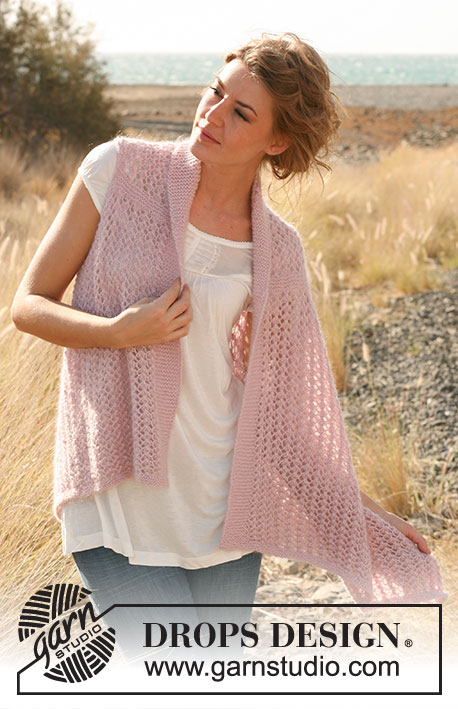
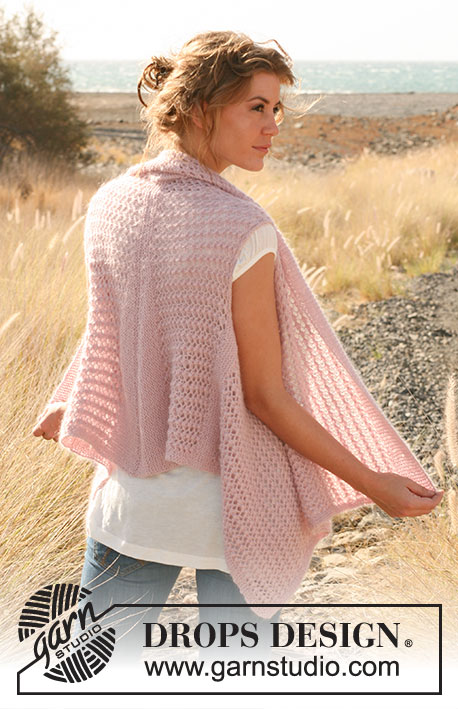
Knitted DROPS vest with lace pattern worked sideways in "Alpaca" and "Kid-Silk". Size: S - XXXL

DROPS 127-32
DROPS design: Pattern no Z-540
---------------------------------------------------------
Size: S - M - L - XL - XXL - XXXL
NOTE: Because of st direction and because the garment is loose the vest will be approx. 3-5 cm / 1-2'' longer than the measurements in the chart when worn.

Materials: DROPS ALPACA from Garnstudio
Color no 3112, powder pink: 300-300-350-350-400-450 g
And use: DROPS KID-SILK from Garnstudio
Color no 03, light pink: 125-125-125-150-150-175 g

DROPS CIRCULAR NEEDLE size 4.5 mm / US 7 (80 cm / 32'') - or size needed to get 18 sts x 23 rows in stockinette st with 1 thread Alpaca and 1 thread Kid-Silk = 10 x 10 cm / 4'' x 4'', and 14 sts with lace pattern = width 10 cm / 4''.
DROPS CIRCULAR NEEDLE size 4 mm / US 6 (80 cm / 32'') - for garter st.

-------------------------------------------------------

Alternative Yarn – See how to change yarns here
Yarn Groups A to F – Use the same pattern and change the yarn here
Yarn usage using an alternative yarn – Use our yarn converter here

-------------------------------------------------------

DROPS Alpaca
DROPS Alpaca
100% Alpaca
from 4.85 $ /50g
DROPS Kid-Silk
DROPS Kid-Silk
75% Mohair, 25% Silk
from 6.75 $ /25g
Get the yarn to make this pattern from 62.85$.

The yarn cost is calculated from the pattern’s smallest size and the yarn’s cheapest product type. Looking for an even better price? You might find it on the DROPS Deals!

DROPS Super Sale

SAVE 30% on 6 cotton favorites!
Valid until 04.12.2024

Pattern instructions

NOTE: This pattern is written in American English. All measurements in charts are in cm. For conversion from inches to cm - click here. There are different terms for crocheting in American and British English. If this pattern includes crochet, click for "crochet terms" here. For this pattern in British English, please click here.
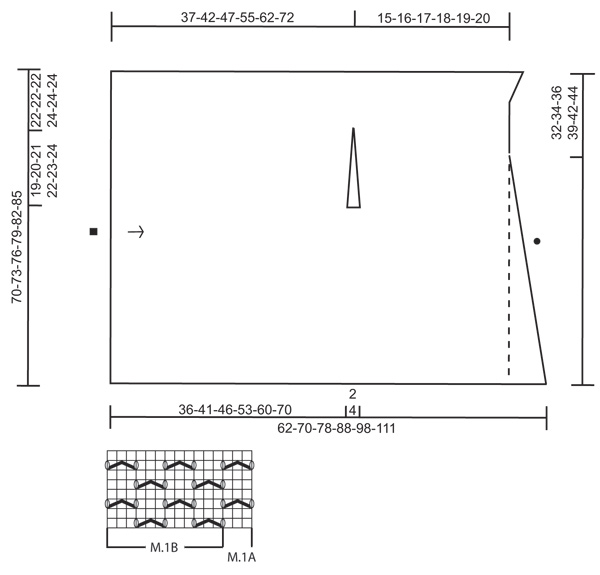
PATTERN: See diagram M.1. The diagram shows the pattern from RS.

GARTER ST (back and forth on needle): K all rows.
---------------------------------------------------------

VEST:
The garment is knitted back and forth on circular needle because of no of sts. Work the jacket from mid front on left front piece and out towards the side, bind off for sleeve and continue until mid back before casting/binding off. Then work right front piece the same way but reversed from mid front before the garment is sewn tog mid back.

LEFT FRONT PIECE:
LOOSELY cast on 126-131-137-142-148-153 sts on circular needle size 4 mm / US 6 with 1 thread Alpaca and 1 thread Kid-Silk.
Work in 6 rows in GARTER ST - see explanation above - back and forth over all sts. On next row, K 1 row from RS while AT THE SAME TIME dec 24-29-23-25-31-30 sts evenly = 102-102-114-117-117-123 sts. Switch to circular needle size 4.5 mm / US 7. Work next row from WS as follows: 11-11-11-14-14-14 sts in Garter st, P until 4 sts remain, 4 sts in Garter st.
Continue to work as follows (1st row = from RS): 4 sts in Garter st, M.1A, repeat M.1B until 11-11-11-14-14-14 sts remain which are worked in Garter st.
REMEMBER THE GAUGE!
When piece measures approx. 35-40-45-52-59-69 cm / 13 3/4"-15 3/4"-17 3/4"-20½"-23 1/4"-27 1/8" - adjust so that next row is worked from RS - switch back to circular needle size 4 mm / US 6. K next row from RS while AT THE SAME TIME inc 24-29-23-25-31-30 sts evenly (do not inc over sts in garter st in each side) = 126-131-137-142-148-153 sts. K 1 row from WS and K 1 row from RS and K 1 row from WS over all sts. Now slip the outermost 74-76-78-83-84-86 sts in the left side of piece (seen from RS) on a stitch holder. Work 8-8-8-14-14-14 rows in garter st (= approx. 2-2-2-4-4-4 cm / 3/4"-3/4"-3/4"-1½"-1½"-1½") over the remaining 52-55-59-59-64-67 sts on needle. Then slip these sts on a stitch holder. Cut the thread. Slip the 74-76-78-83-84-86 sts from the first stitch holder back on circular needle size 4 mm / US 6 and work armholes as follows from RS:
Size S + M + L: bind off the first 34-36-38 sts at beg of row, work the remaining 40 sts on needle in garter st. Now insert a marker in the outermost st in the right side of needle (seen from RS - this marks mid on top of sleeve). Turn piece, work the 40 sts in garter st and then cast on 34-36-38 new sts at the end of row. Cut the thread.
Size XL + XXL + XXXL: bind off the first 20-20-21 sts at beg of row, work the remaining 63-64-65 sts on needle in garter st, turn piece. Work the 63-64-65 sts in garter st, turn piece. Bind off the first 20-21-22 sts at beg of row, work the remaining 43 sts in garter st. Now insert a marker in the outermost st in the right side of needle (seen from RS - this marks mid on top of sleeve). Turn piece, work the 43 sts in garter st and cast on 20-21-22 new sts at the end of row, turn piece. Work the 63-64-65 sts on the needle in garter st, turn piece. Work the 63-64-65 sts on needle in garter st and cast on 20-20-21 new sts at the end of row. Cut the thread.
ALL SIZES: Now slip the 52-55-59-59-64-67 sts from the stitch holder back on needle. Then K 1 row from RS and K 1 row from WS over all the 126-131-137-142-148-153 sts. On next row, K 1 row from RS while AT THE SAME TIME dec 24-29-23-25-31-30 sts evenly = 102-102-114-117-117-123 sts. Switch back to circular needle size 4.5 mm / US 7. On next row from WS continue as follows: 11-11-11-14-14-14 sts in Garter st, P until 4 sts remain, 4 sts in Garter st.
Continue to work as follows (1st row = from RS): 4 sts in Garter st, M.1A, repeat M.1B until 11-11-11-14-14-14 sts remain which are worked in Garter st.
When piece measures 51-57-63-72-80-91 cm / 20"-22½"-24 3/4"-28 3/8"-31½"-35 3/4" (measured in left side of piece seen from RS, piece measures approx. 52-58-64-74-82-93 cm / 20½"-22 3/4"-25 1/4"-29 1/8" in the right side), K 1 row from WS as before. K 1 row over all sts from RS while AT THE SAME TIME inc 24-29-23-25-31-30 sts evenly (do not inc over sts in garter st in each side) = 126-131-137-142-148-153 sts. Switch back to circular needle size 4 mm / US 6. Then continue in garter st over all sts while AT THE SAME TIME working with short rows to add extra width mid back as follows (start at beg of row from WS = from neckline):
Work the first 58-61-65-70-76-79 sts on needle and then slip these sts on a stitch holder, work the remaining sts on the needle, turn piece and work back over all sts, * work the first 5-4-3-3-3-3 sts on the needle, then slip sts on the same stitch holder and work the remaining sts on the needle, turn piece and work back over all sts *, repeat from *-* a total of 13-16-19-19-21-24 times. Turn piece, work the remaining 3-6-15-15-9-2 sts. Now slip all sts back on needle (= 126-131-137-142-148-153 sts) and K 2 rows over all sts. Then loosely bind off the first 106-111-117-122-128-133 sts at beg of row from RS = mid back of vest. The piece now measures approx. 52-58-64-73-81-92 cm / 20½"-22 3/4"-25 1/4"-28 3/4"-32"-36 1/4" in the left side (seen from RS) and 62-70-78-88-98-111 cm / 24 3/8"-27½"-30 3/4"-34 5/8"-38½"-43 3/4" in the right side, measured in knitting direction! 20 sts remain on needle for collar. Continue in garter st back and forth over all sts, AT THE SAME TIME at beg of every row from RS bind off 2 sts. Continue like this until all sts have been bind off.

RIGHT FRONT PIECE:
Cast on and work as left front piece but reversed, i.e. all measurements that were done in the left side of piece (seen from RS) are now done in the right side of piece (seen from RS). When working the 8-8-8-14-14-14 rows under the sleeve adjust so that the first row is worked from WS (instead of RS) and the outermost 74-76-78-83-84-86 sts in the left side of piece (seen from WS, not RS) are slipped on a stitch holder. Continue to follow explanation for sleeve from WS (instead of RS). Finish by working short rows mid back by starting at beg of row from RS (instead of beg of row from WS).

ASSEMBLY:
Sew the vest tog mid back inside bind off edge.

Diagram

All measurements in charts are in cm.

symbols = knitting direction
symbols = mid front
symbols = mid back
symbols = K from RS, P from WS
symbols = 1 YO between 2 sts
symbols = slip 1 st as if to K, K 2 tog, psso
diagram
Do you have a question? See a list of frequently asked questions (FAQ)

Knitting tension is what determines the final measurements of your work, and is usually measured per 10 x 10 cm. It is provided like so: number of stitches in width x number of rows in height - eg: 19 stitches x 26 rows = 10 x 10 cm.

The knitting tension is very individual; some people knit/crochet loosely while others work tightly. You adjust the knitting tension with the needle size, which is why the suggested needle size only serve as a guide! You need to adjust this (up or down) to ensure that YOUR knitting tension matches the knitting tension provided in the pattern. If you work with a different knitting tension than provided you will have a different yarn consumption, and your work will have different measurements than what the pattern suggests.

The knitting tension also determines which yarns can replace each other. As long as you achieve the same knitting tension you can replace one yarn with another.

See DROPS lesson: How to measure your tension/gauge

See DROPS video: How to make a gauge tension swatch

The required amount of yarn is provided in grams, eg: 450 g. To calculate how many balls you’ll need you first need to know how many grams are in 1 ball (25g, 50g or 100g). This information is available if you click on the individual yarn quality on our pages. Divide the amount required with the amount of each ball. For example, if each ball is 50g (the most common amount), the calculation will be as follows: 450 / 50 = 9 balls.

The important thing when changing from one yarn to another is that the knitting/crochet tension remains the same. This is so that the measurements of the finished piece will be the same as on the sketch provided. It is easier to achieve the same knitting tension using yarns from the same yarn group. It is also possible to work with multiple strands of a thinner yarn to achieve the knitting tension of a thicker one. Please try our yarn converter. We recommend you to always work a test swatch.

Please NOTE: when changing yarn the garment might have a different look and feel to the garment in the photo, due to individual properties and qualities of each yarn.

See DROPS lesson: Can I use a different yarn than the one mentioned in the pattern?

All our yarns are categorised into yarn groups (from A to F) according to thickness and knitting tension – group A contains the thinnest yarns and group F the thickest. This makes it easier for you to find alternative yarns to our patterns, should you wish to switch yarn. All yarns within the same group have a similar knitting tension and can easily replace each other. However, different yarn qualities have different structures and properties which will give the finished work a unique look and feel.

Click here for an overview of the yarns in each yarn group

At the top of all our patterns you’ll find a link to our yarn converter, which is a helpful tool should you wish to use a different yarn than suggested. By filling in the yarn quality you wish to replace, the amount (in your size) and number of strands, the converter will present good alternative yarns with the same knitting tension. Additionally it will tell you how much you’ll require in the new qualities and whether you’ll need to work with multiple strands. Most skeins are 50g (some are 25g or 100g).

If the pattern is worked with multiple colours, every colour will have to be converted separately. Similarly, if the pattern is worked with several strands of different yarns (for example 1 strand Alpaca and 1 strand Kid-Silk) you will have to find alternatives for each, individually.

Click here to see our yarn converter

Since different yarns have different qualities and textures we have chosen to keep the original yarn in our patterns. However, you can easily find options among our available qualities by using our yarn converter, or simply pick a yarn from the same yarn group.

It is possible that some retailers still have discontinued yarns in stock, or that someone has a few skeins at home that they would like to find patterns for.

The yarn converter will provide both alternative yarn as well as required amount in the new quality.

If you think it's hard to decide what size to make, it can be a good idea to measure a garment you own already and like the size of. Then you can pick the size by comparing those measures with the ones available in the pattern's size chart.

You'll find the size chart at the bottom of the pattern.

See DROPS lesson: How to read size chart

The needle size provided in the pattern serves only as a guide, the important thing is to follow the knitting tension. And since knitting tension is very individual, you will have to adjust the needle size to ensure that YOUR tension is the same as in the pattern – maybe you’ll have to adjust 1, or even 2 needle sizes, up or down to achieve the correct tension. For this, we recommend that you work test swatches.

Should you work with a different knitting tension than the one provided, the measurements of the finished garment might deviate from the measurement sketch.

See DROPS lesson: How to measure your tension/gauge

See DROPS video: How to make a gauge tension swatch

Working a garment top-down provides more flexibility and room for personal adjustment. For example it is easier to try the garment on while working, as well as making adjustments to length of yoke and shoulder caps.

The instructions are carefully explaining every step, in the correct order. Diagrams are adjusted to the knitting direction and are worked as usual.

The diagram depicts all rows/rounds, and every stitch seen from the right side. It is read from bottom to top, from right to left. 1 square = 1 stitch.

When working back and forth, every other row is worked from the right side and every other row is worked from the wrong side. When working from the wrong side, the diagram will have to be worked reversed: from left to right, knit stitches are purled, purl stitches are knit etc.

When working in the round every round is worked from the right side and the diagram are worked from right to left on all rounds.

See DROPS lesson: How to read knitting diagrams

The diagram depicts all rows/rounds, and every stitch seen from the right side. It is worked from bottom to top, from right to left.

When working back and forth every other row is worked from the right side: from right to left and every other row is worked from the wrong side: from left to right.

When working in the round, every row in the diagram are worked from the right side, from right to left.

When working a circular diagram you start in the middle and work your way outwards, counter clockwise, row by row.

The rows usually start with a given number of chain stitches (equivalent to the height of the following stitch), this will either be depicted in the diagram or explained in the pattern.

See DROPS lesson: How to read crochet diagrams

Instructions for working several diagrams after each other on the same row/round, will often be written like so: “work A.1, A.2, A.3 a total of 0-0-2-3-4 times". This means you work A.1 once, then A.2 is worked once, and A.3 is repeated (in width) the number of times provided for your size – in this case like so: S = 0 times, M = 0 times, L=2 times, XL= 3 times and XXL = 4 times.

The diagrams are worked as usual: begin with the first row in A.1, then work the first row in A.2 etc.

See DROPS lesson: How to read knitting diagrams

See DROPS lesson: How to read crochet diagrams

The total width of the garment (from wrist-to-wrist) will be larger in the larger sizes, despite the actual sleeves being shorter. The larger sizes have longer sleeve caps and wider shoulders, so there will be a good fit in all sizes.

The measurement sketch/schematic drawing provides information regarding the full length of the garment. If it’s a jumper or a jacket the length is measured from the highest point on the shoulder (usually closest to the neckline), and straight down to the bottom of the garment. It is NOT measured from the tip of shoulder. Similarly, the length of yoke is measured from the highest point on the shoulder and down to where yoke is split into body and sleeves.

See DROPS lesson: How to read a schematic drawing

Diagrams are often repeated on the round or in height. 1 repeat is the diagram the way it appears in the pattern. If it says to work 5 repeats of A.1 in the round, then you work A.1 a total of 5 times after/next to each other in the round. If it says to work 2 repeats of A.1 vertically/in height you work the entire diagram once, then begin again at the start and work the entire diagram one more time.

Chain stitches are slightly narrower than other stitches and to avoid working the cast-on edge too tight, we simply chain more stitches to begin with. The stitch count will be adjusted on the following row to fit the pattern and measurement sketch.

The rib edge is more elastic and will contract slightly compared to, for example, stocking stitch. By increasing before the rib edge, you avoid a visible difference in width between the rib edge and the rest of the body.

It’s very easy to cast off too tightly, and by making yarn overs while casting off (and simultaneously casting these off) you avoid a too tight cast off edge.

See DROPS video: How to bind off with yarn overs (yo)

To achieve an even increase (or decrease) you can increase on, for example: every 3rd and 4th row alternately, like so: work 2 rows and increase on the 3rd row, work 3 rows and increase on the 4th. Repeat this until the increase is complete.

See DROPS lesson: Increase or decrease 1 st on every 3rd and 4th row alternately

Should you prefer to work in the round instead of back and forth, you may of course adjust the pattern. You’ll need to add steeks mid-front (usually 5 stitches), and follow the instructions. When you would normally turn and work from the wrong side, simply work across the steek and continue in the round. At the end you’ll cut the piece open, pick up stitches to work bands, and cover the cut edges.

See DROPS video: How to knit steeks and cut open

Should you prefer to work back and forth instead of in the round, you may of course adjust the pattern so you work the pieces separately and then assemble them at the end. Divide the stitches for the body in 2, add 1 edge stitch in each side (for sewing) and work the front and back pieces separately.

See DROPS lesson: Can I adapt a pattern for circular needles into straight needles?

Pattern repeats can vary slightly in the different sizes, in order to get the correct proportions. If you’re not working the exact same size as the garment in the photo, yours might deviate slightly. This has been carefully developed and adjusted so that the complete impression of the garment is the same in all sizes.

Make sure to follow instructions and diagrams for your size!

If you have found a pattern you like which is available in women’s size it’s not very difficult to convert it to men’s size. The biggest difference will be the length of sleeves and body. Start working on the women size that you think would fit across the chest. The additional length will be worked right before you cast off for the armhole/sleeve cap. If the pattern is worked top-down you can add the length right after the armhole or before the first decrease on sleeve.

Regarding additional yarn amount, this will depend on how much length you add, but it is better with a skein too many than too few.

All yarns will have excess fibres (from production) that might come off as lint or shedding. Brushed yarns (ie hairier yarns) have more of these loose, excess fibres, causing more shedding.

Shedding also depends on what is worn under or over the garment, and whether this pulls at the yarn fibres. It’s therefore not possible to guarantee that there will be no shedding

Below are some tips on how to get the best result when working with hairier yarns:

1. When the garment is finished (before you wash it) shake it vigorously so the looser hairs come off. NOTE: do NOT use a lint roller, brush or any method that pulls at the yarn.

2. Place the garment in a plastic bag and put it in your freezer - the temperature will cause the fibres to become less attached to each other, and excess fibres will come off easier.

3. Leave in the freezer for a few hours before taking it out and shaking it again.

4. Wash the garment according to the instructions on the yarn label.

Pilling is a natural process that happens to even the most exclusive of fibers. It's a natural sign of wear and tear that is hard to avoid, and that is most visible in high friction areas of your garment like a sweater's arms and cuffs.

You can make your garment look as new by removing the pilling, using a fabric comb or a pill/lint remover.

Still can't find the answer you need? Then scroll down and leave your question so one of our experts can try to help you. This will be done normally within 5 to 10 working days.
In the meantime, you can read the questions and answers that others have left to this pattern or join the DROPS Workshop on Facebook to get help from fellow knitters/crocheters!

You might also like...

Post a comment to pattern DROPS 127-32

We would love to hear what you have to say about this pattern!

If you want to leave a question, please make sure you select the correct category in the form below, to speed up the answering process. Required fields are marked *.

Comments / Questions (6)

country flag SusanT wrote:

On a small size... when short row starts, it doesn't seem the number of short rows is correct. it says work 13 times. However, if I start with 126 stitches, - 58 that i slip on the stitch holder + another 5 on the stitch holder, and the starting the repeat... then I only need to work 12 more times so I will have 3 stitches left before slipping all sts back on the needle, k2 rows...etc. Can you confirm it is only 12 times instead of 13 times for small size for the short row section? Thanks.

16.07.2016 - 05:52

DROPS Design answered:

Dear SusanT, You first slip on a st holder the first 58 sts, then every 2 row the first 5 sts a total of 13 times (13x5=65 sts are on the st holder + the first 58 sts = 123 sts on a st holder, 3 sts remain on needle. Happy knitting!

18.07.2016 - 08:55

country flag Linda wrote:

I am trying to understand why the pattern wants decreased stitches once the garter st fix 6 rows for the first few rows of the pattern? i.e. decrease 24 sts in row 7. Thanks for your help.

21.03.2016 - 01:10

DROPS Design answered:

Dear Linda, you have to dec evenly 24 sts on row 7 to get the correct width and correct number of sts for pattern worked afterwards. Happy knitting!

21.03.2016 - 10:31

country flag Dupire wrote:

Bjr est il possible de le tricoter avec des aiguilles normales et pas circulaires ? si oui doit on conserver les memes dimensions ? si non existe t il un modele avec aiguilles droites ? merci pour votre aide cldt françoise

04.01.2013 - 17:39

DROPS Design answered:

Bonjour Madame Dupire, ce gilet se tricote en allers retours, le choix de l'aiguille circulaire est fait pour avoir suffisamment de place pour y loger toutes les mailles, il est donc réalisable sur aiguilles droites mais les mailles seront beaucoup plus serrées sur les aiguilles. Bon tricot !

05.01.2013 - 12:29

country flag Elisabeth wrote:

Sød vest/sjal :)

09.01.2011 - 17:10

country flag Clara Megre wrote:

Gosto muito,é muito pratico

08.01.2011 - 13:47

country flag Agnes wrote:

Är det en väst eller sjal?

14.12.2010 - 20:20