
Popular categories
Looking for a yarn?


Comments / Questions (28)
![]() Cecilia Söderkvist wrote:
Cecilia Söderkvist wrote:
Hej Jag bara älskar denna kofta och vill gärna virka den men förstår inte diagrammet. Finns det möjlighet att kunna få det lite mer detaljerat eller beskrivet per rad? Vore väldigt tacksam.
04.06.2026 - 12:55
![]() ROXANNE SHEELAGH HUNTERSON wrote:
ROXANNE SHEELAGH HUNTERSON wrote:
Hi, I don't seem to be able to find a download button, could someone please advise me, Thanking you in advance
09.04.2025 - 19:23DROPS Design answered:
Dear Mrs Sheelagh Hunterson, our patterns can only be printed, but choosing a virtual printer will allow you to save them as .PDF. Happy crocheting!
10.04.2025 - 09:42
![]() Ettina wrote:
Ettina wrote:
Een klein gehaakte poncho van ice wordt hier ook uitgelegd, volgens mij hoort deze er niet bij, klopt dat?Bij de uitleg telpatroon staat meerder in deze tour. Volgens mij gaat dat over de poncho en niet over het vest, klopt dat? Kan het zijn dat ik de vijfde tour begin met 3 halve vaste?
24.07.2023 - 10:14
![]() Eri Q wrote:
Eri Q wrote:
Hej, eftersom garnet i beskrivningen utgått och ni tipsar om tre olika ersättare så undrar jag jag kan läsa mönstret rakt av? Jag behöver inte räkna om antal maskor och så?
26.07.2022 - 16:13DROPS Design answered:
Hej, Om du håller virkfastheten på 9 dbl-st = 10 cm (enligt beskrivningen), så är det bara att virka enligt mönstret för att få måttet enligt måttskissen :)
04.08.2022 - 08:23
![]() Diana wrote:
Diana wrote:
Has anyone out there actually written this design out? I cannot get it right. I keep getting more stitches than I should. The sl st at the beginning of rows 5 & 6 do not look right. The on row 7, how do you to the starting point? It doesn’t show slip stitches, just to start on the 2nd stitch. How do you get there? Can anyone help me? I’ve frogged the whole back two times and am stuck again! Thanks for any help you can give.
02.10.2020 - 06:25DROPS Design answered:
Dear Diana, at the end of row 4 and 5 you crochet 1 sc in the last ch-space, turn and at the beg of row 5 and 6 you crochet slip stitches so that the row starts somewhat higher than in the bottom of chain-space, ie crochet 3 sl st (= 1 sl st in first 3 ch) and continue chain-spaces as before starting with 1 sc in the ch-space. At the beg of last row, crochet 4 chains (see on the right side) to replace first treble. Happy crocheting!
02.10.2020 - 08:40
![]() Diana wrote:
Diana wrote:
You chart is very hard to read
27.09.2020 - 06:27DROPS Design answered:
Dear Diana, you will find how to read crochet diagrams here to help you. Happy crocheting!
28.09.2020 - 11:12
![]() Teresa wrote:
Teresa wrote:
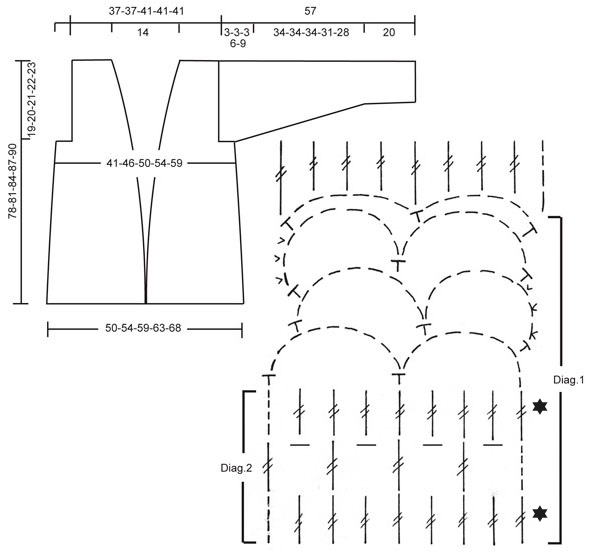
Neck shaping- what does center front mean? Am I technically deceasing 2 dec at the begging of each repeat of Diag 1 on the 2nd and 3rd repeat than continue 3 more times at the row with the *? I am sorry I keep reaching out to you but the shop I ordered my yarn from site has been down and i can't reach them :(
24.01.2018 - 16:22DROPS Design answered:
Dear Teresa, center front is the side towards front band (opposite to side towards back piece). You will decrease for neck in row 1 and 2 at the beg from RS on right front piece a total of 5-7-9 times (see size) every time you work the row with a star in Diag. 1. Happy crocheting!
25.01.2018 - 07:32
![]() Teresa Rey wrote:
Teresa Rey wrote:
I've gotten to row 5 finished the chains now I need to begin row 6 from left to right of pattern. No indication to slip stitch as on row 7 so am I to chain 2 sc than begin next row of chain 9"s?
22.01.2018 - 01:46DROPS Design answered:
Dear Mrs Rey, at the beginning of row 6 crochet 3 sl st (see symbol "v" in diagram and under key) then 1 sc in ch-space, then chain 6, 1 sc in next ch-space, ..; happy crocheting!
22.01.2018 - 10:33Teresa Rey wrote:
I too love this pattern but not good at reading and understanding the diagram I do better with written instruction Is it possible to get a written pattern? once i get going than the diagram starts to make sense
27.12.2017 - 23:02DROPS Design answered:
Dear Teresa, the diagram is not available in a form that is written out in more detail than it already is, however, you can always can get in person help in teh store you bought your DROPS yarn from. Happy crafting!
29.12.2017 - 10:05
![]() Mariette wrote:
Mariette wrote:
Ik snap het voorpand niet helemaal. Minder je aan beide kanten? En het stukje waar staat minder vanaf een hoogt van 20 cm 5-7-5-7-9 x 1 dstk. Wat wordt daar mee bedoeld? Ik begin met 39 ls en daarna 25 dstk. Bij de gewone minderingen en de mouwen zit ik al op nog maar 15 Stokjes.
03.04.2016 - 22:43DROPS Design answered:
Hoi Mariette. Je mindert aan de zijkant zoals je deed op het achterpand (dus dit alleen voor de zijkant) en daarbij moet je ook minderen voor de hals (= middenvoor) vanaf 20 cm. Je mindert 5-7-5-7-9 keer 1 dstk (het aantal keer afhankelijk van welke maat je maakt) op de toer gemarkeerd met een sterretje op het telpatroon.
05.04.2016 - 13:20
|
||||||||||||||||
DROPS 90-15 |
||||||||||||||||
|
|
||||||||||||||||
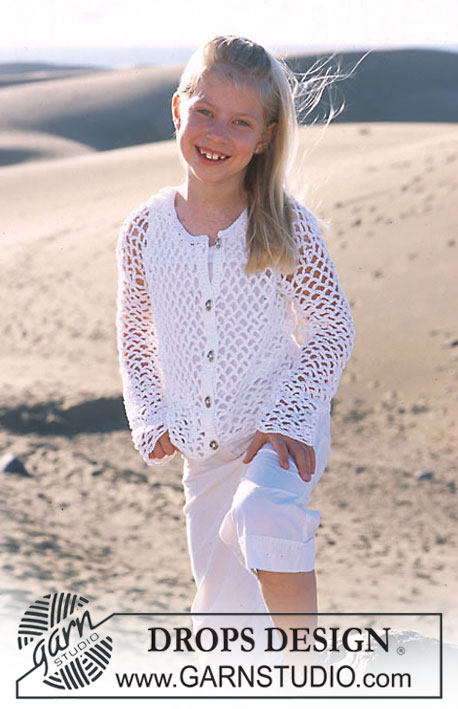
DROPS Long Crocheted Cardigan in Ice with Knit buttonband.
DROPS 90-15 |
||||||||||||||||
|
CARDIGAN: Crochet gauge: 9 tc = approx. 10 cm in width 1 row of tc measures approx. 3 cm in height. Pattern: See the Diagrams. The pattern is seen from the right side. Rib: * K 3, P 3 *, repeat * - *. Crochet tip: At the beginning of every row with tc replace 1st tc with ch 4. Crochets in every tc from previous row, not between them. Decreasing tips: Dec or bind off as follows: At the beginning of row: replace each tc to be decreased with 1 sl st. At the end of row: turn piece when the number of tc to be decreased remains, and crochet back. Measuring tips: measure piece when lying flat. Back: Ch 69-75-81-87-93. Crochet the first row as follows: 1 tc in 5th ch from hook, * skip over 1 ch, 1 tc in the next 2 ch *, repeat * - * and finish with 1 tc in last ch = 45-49-53-57-61 tc. Now crochet pattern following Diagr.1. At the same time on the 1st and 3 rows the 2nd and 3rd repeats of Diagr.1, dec 1 tc at each side = 37-41-45-49-53 tc – see decreasing tips above. When the piece measures approx. 59-61-63-65-67 cm – adjust length so that you bind off on a row with tc (if you bind off on the 2nd row of Diagr.1, 1 ch = 1 tc when bound off) – bind off 2-4-4-6-8 tc at each side for armhole = 33-33-37-37-37 tc. When you have repeated Diagr.1 a total of 4 times (the piece measures approx. 75 cm), repeat the first row in Diagr.1 to finished measurements (that is, continue in tc, be sure the number of tc stays the same). When the piece measures 75-78-81-84-87 cm crochet the last row with only 10-10-12-12-12 tc at each side for shoulder. Cut yarn and fasten, the piece measures approx. 78-81-84-87-90 cm. Right front: Read entire section before crocheting: Ch 33-39-39-45-51. Crochet the first row as follows: 1 tc in 5th ch from hook, * skip over 1 ch, 1 tc in the next 2 ch *, repeat * - * and finish with 1 tc in last ch = 21-25-25-29-33 tc. Now crochet pattern following Diagr.1. Side decs: On the 1st and 3 rows the 2nd and 3rd repeats of Diagr.1, dec 1 tc at the side as on back. Neck shaping: When the piece measures 20 cm dec 1 tc at the center front every row marked with a star (*) in Diagr.1 a total of 5-7-5-7-9 times – see decreasing tips above. When the piece measures approx. 59-61-63-65-67 cm – adjust to match back – bind off for armhole at the side as on back. After all decs 10-10-12-12-12 tc remain on shoulder. When you have repeated Diagr.1 a total of 4 times (the piece measures approx. 75 cm), repeat the first row in Diagr.1 to finished measurements as on back. Cut yarn and fasten when the piece measures 78-81-84-87-90 cm. Left front: Crochet same as the right, reversing shaping. Sleeve: Ch 33-39-39-45-51. Crochet the first row as follows: 1 tc in 5th ch from hook, * skip over 1 ch, 1 tc in the next 2 ch *, repeat * - * and finish with 1 tc in last ch = 21-25-25-29-33 tc. Repeat Diagr.1 a total of 2 times, and then follow Diagr.2 to finished measurements. At the same time when Diagr.1 has been crocheted 1 time (the piece measures approx. 21 cm) inc 1 tc at each side every row marked with a star (*) in diagram a total of 5-4-4-4-4 times at each side = 31-33-33-37-41 tc. When the piece measures approx. 54-54-54-51-48 cm put a marker at each side (markers show where the sleeves will be sewn into armhole). Crochet 1-1-1-2-3 row more, then cut yarn and fasten, the piece measures approx. 57 cm. Assembly: Sew shoulder seams edge to edge. Sew side seams edge to edge. Sew sleeve seams in the same manner up to the marker and sew in sleeves – the marker on sleeves should match up with the side seams on Body. Make sure the seams are not too tight. Edge: Pick up and knit approx. 195-219 sts (divisible by 6 + 3) along right front, back neck and down left front. K 2 rows (1st row = wrong side). Then knit rib, keeping 3 sts in garter st at each end, and begin rib with K 3 (as seen from the right side). When the rib measures approx. 7 cm inc all K 3 to K 4 (as seen from the right side) over the center 21 sts in back neck. When edge measures 12 cm, bind off all sts loosely in rib – as you are binding off, inc all P 3 to P 4 (as seen from the right side) over the center 21 sts in back neck. |
||||||||||||||||
Diagram explanations |
||||||||||||||||
|
||||||||||||||||
 |
||||||||||||||||
Have you finished this pattern?Tag your pictures with #dropspattern or submit them to the #dropsfan gallery. Do you need help with this pattern?You'll find 12 tutorial videos, a Comments/Questions area and more by visiting the pattern on garnstudio.com. © 1982-2026 DROPS Design A/S. We reserve all rights. This document, including all its sub-sections, has copyrights. Read more about what you can do with our patterns at the bottom of each pattern on our site. |
||||||||||||||||


With over 40 years in knitting and crochet design, DROPS Design offers one of the most extensive collections of free patterns on the internet - translated to 17 languages. As of today we count 325 catalogs and 12298 patterns - 12288 of which are translated into English (US/in).
We work hard to bring you the best knitting and crochet have to offer, inspiration and advice as well as great quality yarns at incredible prices! Would you like to use our patterns for other than personal use? You can read what you are allowed to do in the Copyright text at the bottom of all our patterns. Happy crafting!
Post a comment to pattern DROPS 90-15
We would love to hear what you have to say about this pattern!
If you want to leave a question, please make sure you select the correct category in the form below, to speed up the answering process. Required fields are marked *.