
Popular categories
Looking for a yarn?


Comments / Questions (43)
![]() Sussi Beck wrote:
Sussi Beck wrote:
I str. xxxl består forstk. af 59m. Efter raglan 28 gange, hals 17m på tråd, luk 3m 2 gange og 2m 3 gange. Dvs der er 2m tilbage. Så skal man lukke en maske til arb måler 68 cm. Det kan ikke lade sig gøre da der jo kun er 2m tilbage af forstk. Skal jeg lukke ind over ærmet?
15.09.2025 - 19:03DROPS Design answered:
Hei Sussi. Ja. Men sjekk at strikkefastheten din stemmer i høyden. mvh DROPS Design
29.09.2025 - 13:38
![]() Carine M wrote:
Carine M wrote:
Serait-il possible d'avoir de l'aide pour tricoter cette magnifique veste avec des manches longues ?
01.12.2022 - 06:24DROPS Design answered:
Bonjour Carine, nous ne sommes malheureusement pas en mesure de pouvoir adapter chacun de nos modèles à chaque demande. Vous pourrez trouver ici toutes nos vestes tricotées de bas en haut avec manches longues avec une tension de 17-16 mailles, vous y trouverez peut être l'inspiration nécessaire. Merci pour votre compréhension. Bon tricot!
01.12.2022 - 11:31
![]() Fabienne Rodrigo wrote:
Fabienne Rodrigo wrote:
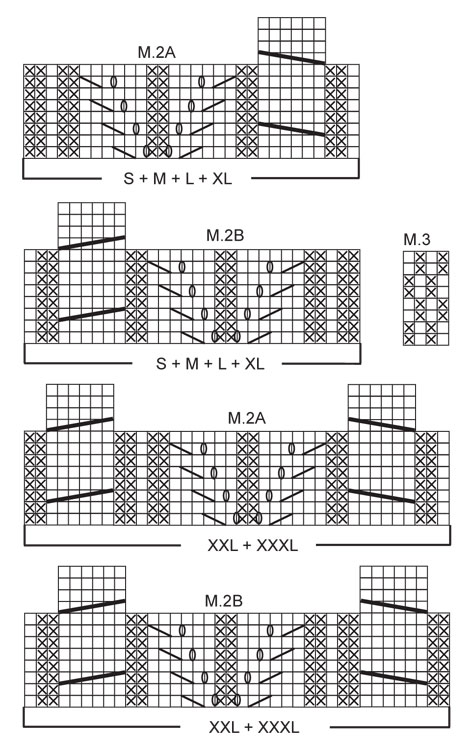
Pourquoi dans les diagrammes M2 À et M2 B il y a plus de mailles pour la torsades sur 6 mailles que pour le reste du motif? Comment le comprendre? Faut-il tricoter les autres mailles comme elles viennent ou reprendre le motif au rang 1
17.01.2022 - 11:59DROPS Design answered:
Bonjour Mme Rodrigo, le point ajouré de M.2A/B se tricote sur moins de rangs que les torsades; autrement dit, veillez à bien tricoter une torsade tous les 6 rangs, et répétez en même temps les 8 rangs du point ajouré entre les torsades. Bon tricot!
17.01.2022 - 15:24
![]() Beatriz wrote:
Beatriz wrote:
No entiendo Esto: “AL MISMO TIEMPO cuando la labor mida 50-52-53-55-56-58 cm desl 9-11-11-14-14-17 pts al inicio de las sig 2 filas a un gancho aux para el escote.” Cuantas pasadas hay que tejer con esos puntos en el gancho auxiliar?
25.02.2019 - 09:38DROPS Design answered:
Hola Beatriz. Estos puntos se dejan en espera hasta trabajar el cuello. Lee el apartado ELEVACIÓN EN EL CENTRO DE LA ESPALDA.
25.02.2019 - 19:47
![]() Sussi Beck wrote:
Sussi Beck wrote:
Hej. Ved halsindtagning skal man lukke 1m til 64 cm (I str xl), skal jeg lukke ind over ærmet?
26.11.2018 - 12:05DROPS Design answered:
hei Sussi. Du skal felle 1 maske mot halsåpningen. Du feller i begynnelsen av hver pinnen fra hver side. Du fortsetter altså å felle til halsåpning på samme måte som tidligere, men nå felles kun 1 maske. God fornøyelse
03.12.2018 - 09:10Christa wrote:
Regarding "M2A & M2B" the first 8 rows are 30 sts across and the rows 9-12 show only the 6 sts with cable. How do I work the pattern correctly? I am not sure what to do after row 8.
02.10.2017 - 07:04DROPS Design answered:
Dear Christa, when the lace pattern in M.2 A /B is finished, repeat the lace pattern from row 1, and continue the cable as in diagram, when the cable pattern is finished, repeat from row 1. Happy knitting!
02.10.2017 - 11:50
![]() Eveline Patist wrote:
Eveline Patist wrote:
Ik zie m2a en m2b niet meer op de patroonbeschrijving
11.02.2017 - 17:28DROPS Design answered:
Hoi Eveline. Jawel, je breit beide op het lijf en ze staan onderaan het patroon.
13.02.2017 - 13:38Sarah wrote:
Hi Could you tell me ehat m3 vorresponds too please? Its not in the instructions. Kind regards Sarah
26.01.2017 - 15:44DROPS Design answered:
Dear Sarah, M.3 is a diagram worked over 4 sts and 8 rows you will find on the right-hand side of M.2B in size S + M + L + XL. You will work M.3 on body before yoke and on yoke then. Happy knitting!
26.01.2017 - 15:49
![]() Agnes wrote:
Agnes wrote:
Bonjour même problème que "Marie-France 14.10.2013 kl.21:41" et votre réponse ne m'aide pas. taille L. à 53cm de hauteur mettre sur un arrêt de maille 11 m au début des 2 rgs suivants. on met sur l'arrêt de maille les 6 m point mousse de la bordure et les 5 suivantes? possible de nous mettre en contact avec marie france? merci
14.11.2015 - 19:25DROPS Design answered:
Bonjour Agnès, oui tout à fait, vous placez en attente les 6 m point mousse de la bordure devant + les 5 m suivantes soit 11 m au total au début des 2 rangs suivants (11 m en attente sur l'endroit, 11 m en attente sur l'endroit) pour chacun des 2 devants. Bon tricot!
02.12.2015 - 17:08
![]() Lily Thijssen wrote:
Lily Thijssen wrote:
Wat voor lengte, van de rondbreinaald heb ik nodig, voor bijv. patroon 121-21?
07.11.2014 - 22:47DROPS Design answered:
Hoi Lily. Dit staat boven aan het patroon: DROPS BREINLD ZONDER KNOP en RONDBREINLD (80 cm) 5 mm - of de maat die u nodig heeft voor een stekenverhouding van 17 st x 22 nld in tricotst = 10 x 10 cm. Veel breiplezier.
11.11.2014 - 16:11
|
||||||||||||||||||||||||||||
Coastal Blues#coastalbluescardigan |
||||||||||||||||||||||||||||
|
|
||||||||||||||||||||||||||||
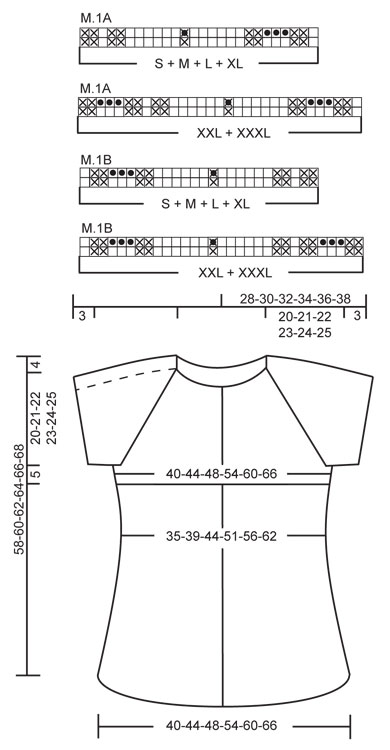
Knitted DROPS jacket with short raglan sleeves in ”Alaska”. Size S - XXXL.
DROPS 121-21 |
||||||||||||||||||||||||||||
|
GARTER ST (back and forth on circular needle): K all rows. GARTER ST (in the round): K 1 round, P 1 round. PATTERN: See diagram M.1 to M.3. Diagram shows the pattern from RS. See diagram for your size. KNITTING TIP (applies to front bands): To avoid front bands becoming too tight because of the garter st work shortened rows on front band after every 4th row as follows: * beg mid front and K 1 row on the 6 front band sts only, turn piece, tighten thread and K the 6 front band sts. Turn piece and work 4 rows as before on all sts *, repeat from *-* until finished measurements. DECREASING TIP-1 (applies to body piece): Make all dec from RS! Dec as follows after marker: slip 1 st as if to K, K1, psso. Dec as follows before marker: K2 tog. DECREASING TIP-2 (applies to raglan): Make all dec from RS! Dec as follows in each transition between body piece and sleeves (beg 2 sts before marker): K2 tog, marker, slip 1 st as if to K, K1, psso. INCREASING TIP (applies to body piece): Make all inc from RS! Inc 1 st by picking up st from previous row, and K this. BUTTONHOLES: Make buttonholes on right front band. 1 buttonhole = K tog 2nd and 3rd st from mid front and make 1 YO. Make buttonholes when piece measures: SIZE S: 4, 13, 22, 31, 40, 49 cm / 1½",5⅛",8¾",12¼",15¾",19¼". SIZE M: 4, 13, 23, 32, 42, 51 cm / 1½",5⅛",9",12½",16½",20". SIZE L: 5, 14, 24, 33, 43, 52 cm / 2",5½",9½",13",17",20½". SIZE XL: 4, 14, 24, 34, 44, 54 cm / 1½",5½",9½",13⅜",17¼",21¼". SIZE XXL: 7, 14, 21, 28, 35, 42, 49, 55 cm / 2¾",5½",8¼",11",13¾",16½",19¼",21⅝". SIZE XXXL: 8, 15, 22, 29, 36, 43, 50, 57 cm/ 3⅛",6",8¾",11⅜",14¼",17",19¾,22½". -------------------------------------------------------- JACKET: Worked back and forth on circular needle from mid front. BODY PIECE: See KNITTING TIP! Cast on 148-162-176-196-216-236 sts (includes 6 front band sts each side towards front edge) on circular needle size 4.5 mm / US 7 with Alaska. Work 6 rows GARTER ST back and forth on needle - see above. Change to circular needle size 5 mm / US 8 and work next row as follows from RS: 6 front band sts in garter st, M.1A (= 26 sts in SIZE S + M + L + XL and 31 sts in SIZE XXL + XXXL), 84-98-112-132-142-162 stockinette sts, M.1B (= 26 sts in SIZE S + M + L + XL and 31 sts in SIZE XXL + XXXL) and 6 front band sts in garter st. After 1 vertical repeat of M.1 there are 156-170-184-204-230-250 sts on needle. On next row from RS work M.2A instead of M.1A and M.2B instead of M.1B (work remaining sts as before – remember diagram for your size). REMEMBER KNITTING GAUGE and BUTTONHOLES ON RIGHT FRONT BAND! AT THE SAME TIME when piece measures 5-5-5-8-8-8 cm / 2"-2"-2"-3⅛"-3⅛"-3⅛" insert 4 markers in piece as follows: marker 1 after 36-36-36-36-44-44 sts (= right after M.2A), marker 2 after another 28-34-39-49-53-62 sts, marker 3 after another 28-30-34-34-36-38 sts and marker 4 after another 28-34-39-49-53-62 sts (= right before M.2B) – there are now 36-36-36-36-44-44 sts after the last marker. AT THE SAME TIME on next row from RS dec as follows - see DECREASING TIP-1: Dec 1 st after marker 1 and 2 and 1 st before marker 3 and 4 (= 4 dec). Repeat the dec on every 5-5-5-6-6-6 cm / 2"-2"-2"-2⅜"-2⅜"-2⅜" a total of 4-4-4-3-3-3 times = 140-154-168-192-218-238 sts. When piece measures 24-25-25-25-25-26 cm / 9½"-9¾"-9¾"-9¾"-9¾"-10¼" inc 1 st after marker 1 and 2 and 1 st before marker 3 and 4 (= 4 inc) - see INCREASING TIP. Repeat the inc on every 1.5-1.5-1.5-2-2.5-3 cm / ½"-½"-½"-¾"-⅞"-1⅛" a total of 4-4-4-3-3-3 times = 156-170-184-204-230-250 sts. When piece measures approx 29-30-31-32-33-34 cm / 11⅜"-11¾"-12¼"-12½"-13"-13⅜" - adjust to after at least 1 row after a cable and to next row being worked from RS (inc are complete) - change to circular needle size 4 mm / US 6. Continue in garter st back and forth on all sts, AT THE SAME TIME dec 4-4-4-4-7-7 sts on M.2 each side (i.e. dec by K2 tog on the 6 sts in each cable, and P tog the 2 middle P sts in lace pattern) = 148-162-176-196-216-236 sts. When the garter st measures 4 cm / 1½" (make sure to have a buttonhole in the middle of this garter st section), K 1 row from RS. Change to circular needle size 5 mm / US 8 and work M.3 (front bands continue in garter st). After 3 rows in M.3 (piece measures approx 34-35-36-37-38-39 cm / 13⅜"-13¾"-14¼"-14½"-15"-15¼") work next row as follows from RS: work 37-41-44-49-54-59 sts (= right front piece), bind off 6 sts for armhole, work 62-68-76-86-96-106 sts (= back piece), bind off 6 sts for armhole and work remaining 37-41-44-49-54-59 sts (= left front piece). Put piece aside and knit the sleeves. SLEEVE: Cast on 48-50-52-54-58-62 sts on double pointed needles size 4.5 mm / US 7 with Alaska. Work GARTER ST in the round - see above. When piece measures 3 cm / 1⅛" change to double pointed needles size 5 mm / US 8. K 2 rounds, AT THE SAME TIME on round 1 inc 10-12-12-14-14-14 sts evenly = 58-62-64-68-72-76 sts. On next round bind off 6 sts mid under sleeve = 52-56-58-62-66-70 sts left on needle. Put piece aside and knit the other sleeve. YOKE: Slip sleeves on the same circular needle as body piece where bind off for armholes = 240-262-280-308-336-364 sts. Insert a marker in each transition between body piece and sleeves (= 4 markers). READ ALL OF THE FOLLOWING SECTION BEFORE CONTINUING! Work first row as follows from WS: 6 front band sts in garter st, continue M.3 as before on the next 30-34-37-42-47-52 sts, work 54-58-60-64-68-72 stockinette sts (= P from WS, K from RS), continue M.3 on the next 60-66-74-84-94-104 sts as before, work 54-58-60-64-68-72 stockinette sts, continue M.3 on the next 30-34-37-42-47-52 sts and finish with 6 front band sts in garter st. Continue in pattern like this, AT THE SAME TIME on first row from RS dec for raglan in each transition between body piece and sleeves as follows - See DECREASING TIP-2: Beg on first row from RS and then dec on every 4th row (i.e. every other row from RS) a total of 4-3-3-2-0-0 times and then on every other row a total of 15-18-19-22-26-28 times. AT THE SAME TIME when piece measures 50-52-53-55-56-58 cm / 19¾"-20½"-21"-21⅝"-22"-22¾" slip 9-11-11-14-14-17 sts at beg of the next 2 rows on a stitch holder for neck. Bind off to shape the neckline at the beg of every row from mid front as follows: 3 sts 1-1-1-1-2-2 times and 2 sts 2-2-3-3-3-3 times, then 1 st at the beg of every row until piece measures 58-60-62-64-66-68 cm / 22¾"-23⅝"-24⅜"-25¼"-26"-26¾" from shoulder (piece measures approx 54-56-58-60-62-64 cm / 21¼"-22"-22¾"-23⅝"-24⅜"-25¼" measured from mid back). After all dec for raglan and neck are complete there are approx 54-78 sts left on needle. ELEVATION MID BACK: Pick up from RS approx 90-140 sts round neck (includes sts on needle and stitch holders) on circular needle size 5 mm / US 8 with Alaska. Work 1 row from WS with front bands in garter st as before, M.3 continue as before and stockinette st on remaining sts as before, AT THE SAME TIME dec evenly to 80-82-84-86-88-90 sts (do not dec on front bands). Continue in pattern back and forth as before, AT THE SAME TIME work elevation mid back as follows – NOTE: When turning mid piece, slip first st and tighten thread before working return row. Beg from RS on right front piece and work row to marker on left front piece (i.e. in the middle of raglan at the front), turn piece and work row to marker on right front piece (i.e. in the middle of raglan at the front the other side). Turn piece, and work row until 7 sts remain before marker on left front piece, turn piece and work row until 7 sts remain before marker on right front piece. Turn piece, work row to marker on left side on back piece, turn piece and work row to marker on right side on back piece. Turn piece and work row to end. NECKLINE: Change to circular needle size 4.5 mm / US 7 and K 1 row from WS on all sts. K 1 row from RS, AT THE SAME TIME inc evenly to 111-117-117-123-123-129 sts (do not inc on front bands). Work next row as follows from WS: 6 front band sts in garter st, * P3, K3 *, repeat from *-* and finish with P3 and 6 front band sts in garter st. Continue in rib like this. When rib measures 3 cm / 1⅛" inc all K3 to K4 (as seen from RS). When neck measures 7 cm / 2¾" inc all P3 to P4 (as seen from RS). Bind off with K over K and P over P when rib measures approx 10-11-12-13-14-15 cm / 4"-4⅜"-4¾"-5⅛"-5½-6". ASSEMBLY: Sew openings under sleeves. Sew on buttons. |
||||||||||||||||||||||||||||
Diagram explanations |
||||||||||||||||||||||||||||
|
||||||||||||||||||||||||||||
 |
||||||||||||||||||||||||||||
 |
||||||||||||||||||||||||||||
Have you finished this pattern?Tag your pictures with #dropspattern #coastalbluescardigan or submit them to the #dropsfan gallery. Do you need help with this pattern?You'll find 19 tutorial videos, a Comments/Questions area and more by visiting the pattern on garnstudio.com. © 1982-2026 DROPS Design A/S. We reserve all rights. This document, including all its sub-sections, has copyrights. Read more about what you can do with our patterns at the bottom of each pattern on our site. |
||||||||||||||||||||||||||||


With over 40 years in knitting and crochet design, DROPS Design offers one of the most extensive collections of free patterns on the internet - translated to 17 languages. As of today we count 325 catalogs and 12298 patterns - 12288 of which are translated into English (US/in).
We work hard to bring you the best knitting and crochet have to offer, inspiration and advice as well as great quality yarns at incredible prices! Would you like to use our patterns for other than personal use? You can read what you are allowed to do in the Copyright text at the bottom of all our patterns. Happy crafting!
Post a comment to pattern DROPS 121-21
We would love to hear what you have to say about this pattern!
If you want to leave a question, please make sure you select the correct category in the form below, to speed up the answering process. Required fields are marked *.