
Popular categories
Looking for a yarn?


Comments / Questions (7)
![]() DROPS Deutsch wrote:
DROPS Deutsch wrote:
Die Anleitung ist jetzt angepasst.
08.01.2012 - 17:21
![]() Sabine Hartwig wrote:
Sabine Hartwig wrote:
Ich bitte zu ändern: statt VIERECK 4 DREIECK 4 oder Segment 4, desgleichen für die Segmente 6,9,11 ... Statt: Am Schluss des 3.Vierecks auf einer neuen Nadel 10 neue M anschlagen muss es heissen: 1 neue M anschlagen. statt für diese Randdreiecke Maschen dazu anzuschlagen, die Maschen zunehmen, indem aus der Randmasche zwei Maschen herausgestrickt werden, der Rand wird dann schöner. Herzliche Grüße Sabine Hartwig
08.01.2012 - 07:39
![]() Nina Andersen wrote:
Nina Andersen wrote:
Var det muligt at lave en trøje i dette mønstre. Jeg har strikket en hue. Men er hel vild med resultatet. Hedder det ikke Neverkon??? strik
19.07.2010 - 18:03
![]() Elvira wrote:
Elvira wrote:
Riktigt härlig färgsammansättning
17.07.2010 - 16:27Mahin wrote:
I'd love wearing it this winter!
10.06.2010 - 16:11
![]() Christa Nielsen wrote:
Christa Nielsen wrote:
Nyt og anderledes. Det vil jeg helt sikkert strikke
05.06.2010 - 10:47
![]() Marie wrote:
Marie wrote:
Très bel ouvrage
04.06.2010 - 21:44
|
||||
Mirage#mirageheadband |
||||
 |
 |
|||
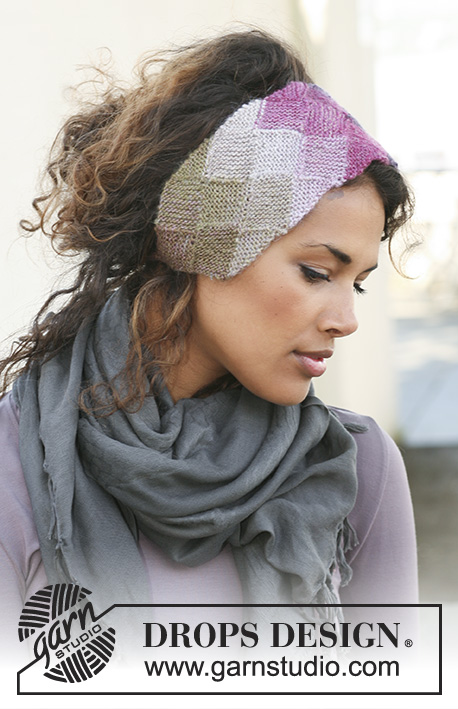
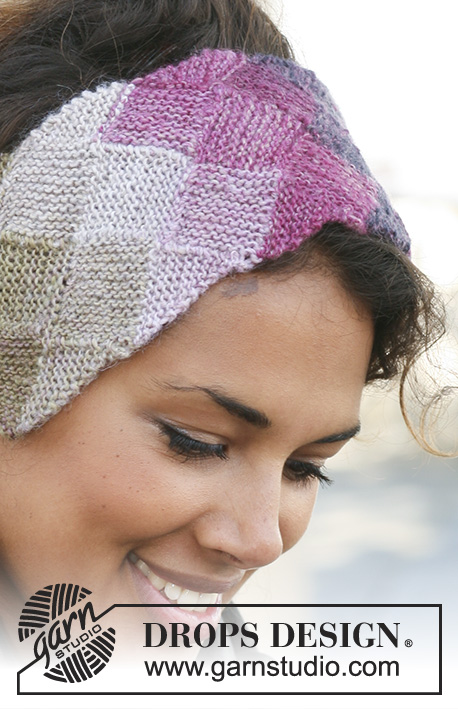
Knitted DROPS head band with entrelac pattern in ”Delight”.
DROPS 126-13 |
||||
|
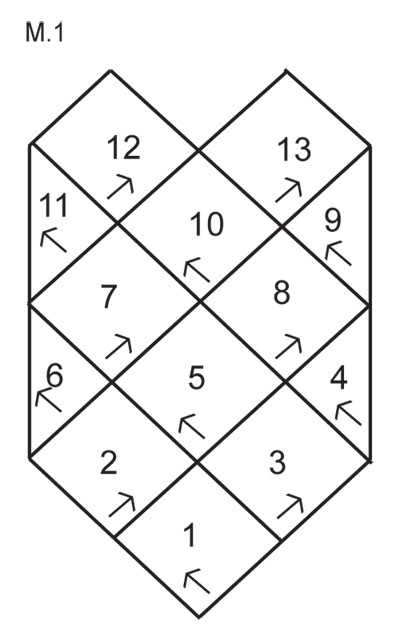
PATTERN: Diagram M.1 shows how the head band is knitted. -------------------------------------------------------- HEAD BAND: Worked back and forth on double pointed needles. The whole head band is worked in GARTER ST, i.e. K every row. Start at the bottom corner. See M.1. SQUARE 1: Cast on 10 sts on double pointed needles size 2.5 mm / US 1 with Delight. Work back and forth on these 10 sts until piece measures approx 4 cm / 1½" (last row worked from RS). Leave sts on needle. SQUARE 2: Cast on 10 new sts at the end of sts from Square 1 on a new needle. Work back and forth on these 10 sts, AT THE SAME TIME at the end of every row from WS work 1 st from previous square back on needle and at the beg of every row from RS K tog the first 2 sts. Continue until all sts from Square 1 have been knitted = 10 sts on needle (last row worked from WS). Leave sts on needle. Cut the thread. SQUARE 3: Pick up 10 sts on a new needle along the edge of Square 1 from RS. Work back and forth on these sts for approx 4 cm / 1½" (last row worked from WS). Leave sts on needle. SQUARE 4: Cast on 1 new st at the end of sts on Square 3 on a new needle. Work back and forth on this new st, AT THE SAME TIME at the end of every row from WS cast on 1 new st a total of 9 times, AT THE SAME TIME at the end of every row from RS work 1 st from square 3 back on needle and at the beg of every row from WS K tog the first 2 sts. Continue until all sts from Square 3 have been knitted = 10 sts on needle (last row worked from RS). Leave sts on needle. SQUARE 5: Pick up 10 sts along the edge of Square 3 on a new needle. Work back and forth on these 10 sts, AT THE SAME TIME at the end of every row from RS work 1 st from Square 2 back on needle and at the beg of every row from WS K tog the first 2 sts. Continue until all sts from Square 2 have been knitted = 10 sts on needle (last row worked from RS). Leave sts on needle. SQUARE 6: Pick up 10 sts along the edge of Square 2 on a new needle. Work back and forth on these 10 sts, AT THE SAME TIME at the end of every row from RS K 2 tog a total of 9 times = 1 st left. Pull thread through the last st. Cut the thread. SQUARE 7: Pick up 10 sts along the edge of Square 6 from RS on a new needle. Work back and forth on these 10 sts, AT THE SAME TIME at the end of every row from WS work 1 st from Square 5 back on needle and at the beg of every row from RS K tog the first 2 sts. Continue until all sts from Square 5 have been knitted = 10 sts on needle (last row worked from WS). Leave sts on needle. Cut the thread. SQUARE 8: Pick up 10 sts along the edge of Square 5 from RS on a new needle. Work back and forth on these 10 sts, AT THE SAME TIME at the end of every row from WS work 1 st from Square 4 back on needle and at the beg of every row from RS K tog the first 2 sts. Continue until all sts from Square 4 have been knitted = 10 sts on needle (last row worked from WS). Leave sts on needle. SQUARE 9: Work like Square 4. SQUARE 10: Work like Square 5. SQUARE 11: Work like Square 6. SQUARE 12: Work like Square 7. SQUARE 13: Work like Square 8. Continue this pattern until the head band measures 38 cm / 15" or to desired measurement, bind off sts on the last square (worked like square 8). LAST SQUARE: Work like Square 5 and bind off . TUBE KNITTING: Cast on 4 sts. * K 1 st, slip 1 st as if to P with thread in front of sts *, repeat from *-* on all rows until the tube measures 25 cm / 9¾". Pull a thread through sts and tighten tog. Make 2 tubes and attach to each end of head band. |
||||
Diagram explanations |
||||
|
||||
 |
||||
Have you finished this pattern?Tag your pictures with #dropspattern #mirageheadband or submit them to the #dropsfan gallery. Do you need help with this pattern?You'll find 6 tutorial videos, a Comments/Questions area and more by visiting the pattern on garnstudio.com. © 1982-2026 DROPS Design A/S. We reserve all rights. This document, including all its sub-sections, has copyrights. Read more about what you can do with our patterns at the bottom of each pattern on our site. |
||||


With over 40 years in knitting and crochet design, DROPS Design offers one of the most extensive collections of free patterns on the internet - translated to 17 languages. As of today we count 325 catalogs and 12298 patterns - 12288 of which are translated into English (US/in).
We work hard to bring you the best knitting and crochet have to offer, inspiration and advice as well as great quality yarns at incredible prices! Would you like to use our patterns for other than personal use? You can read what you are allowed to do in the Copyright text at the bottom of all our patterns. Happy crafting!
Post a comment to pattern DROPS 126-13
We would love to hear what you have to say about this pattern!
If you want to leave a question, please make sure you select the correct category in the form below, to speed up the answering process. Required fields are marked *.