
Popular categories
Looking for a yarn?


Comments / Questions (68)
![]() Lesley wrote:
Lesley wrote:
I am having difficulties with adding the sleeves to the main body . There does not seem to be enough to stretch
22.02.2026 - 19:16
![]() Inger Sara wrote:
Inger Sara wrote:
STR S feil i oppskriften: Man skal felle fra 280 m til 210 m, da må man strikke 2 m, så 2 sammen runden rundt=210 m. Å felle etter 3 m, så 4 m = 228 masker, som det står i oppskriften, tilsvarer str M.
16.10.2025 - 11:09
![]() Inger Sara wrote:
Inger Sara wrote:
Hei. Nå skjønner jeg ikke noe, det står: Når arb måler 12 cm byttes det til rundp 3. Strikk 1 omg glstrikk SAMTIDIG som hver 3.og 4.m omg rundt strikkes r sm = 210. Står null om hvor mange m pr omg, el hvor mange omg. På bildet ser det ut som 3-4 omg før mønster?
16.10.2025 - 09:28DROPS Design answered:
Hei Inger Sara, Du skal bare felle på den første omgangen ved å strikke hver 3. og 4. masken sammen omgangen rundt. Etter denne omgangen begynner du M.1 og første omgangen i diagrammet er strikket rett med grønn/turkis mix. Hilsen Drops Team.
17.10.2025 - 07:08
![]() Kirsten wrote:
Kirsten wrote:
Selve diagrammet er der ikke længere, heller ikke når jeg forsøger via Pinterest. Kan I hjælpe. Jeg er midt i bærestykket, men diagrammet forsvandt. Resten af opskriften er der.
04.10.2025 - 09:07
![]() Rinske wrote:
Rinske wrote:
Overal waar ik kijk is kleur 4010 licht lavendel. Kleur 9020 is een zeer licht grijs. Welke kleur is in dit patroon gebruikt?
29.08.2025 - 21:11DROPS Design answered:
Dag Rinske,
Je hebt gelijk. Dit staat fout aangegeven in het patroon. Het moet inderdaad licht lavendel zijn. Ik zal het doorgeven aan de ontwerpafdeling om aan te passen.
30.08.2025 - 10:43
![]() Marion wrote:
Marion wrote:
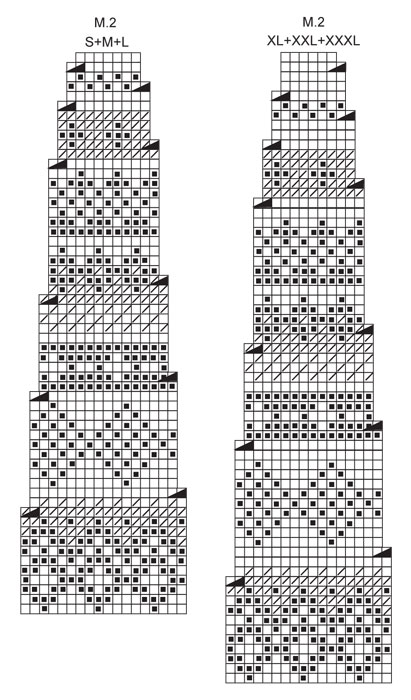
In patroon M2 staat dat je 2 steken moet samen breien. Is dat aan het eind of begin van de naald? Of anders? Alvast bedankt.
01.02.2025 - 16:08DROPS Design answered:
Dag Marion,
Je leest het patroon van rechts naar links en dit herhaal je steeds in de breedte. Als er een schuin zwart driehoekje staat over 2 steken, dan brei je deze 2 steken samen. Je herhaalt het patroon meerdere keren in de breedte, dus als je een naald hebt waarbij 2 steken samen gebreid moeten worden, doe je dit ook meerdere keren op de naald.
05.02.2025 - 20:22
![]() Marion wrote:
Marion wrote:
Welk patroon kan ik als inspiratie voor lange(re) mouwen gebruiken? De link in het antwoord uit 2015 loopt dood. Alvast bedankt.
24.08.2024 - 20:01DROPS Design answered:
Dag Marion,
Sorry voor de later reactie. Je zou dit patroon kunnen gebruiken. Let er wel op dat het aantal steken onderaan de mouw bij de manchet deelbaar is door 6 steken voordat je het patroon erin breit. Als de mouw bijna klaar is, kun je het aantal steken opnieuw aanpassen, zodat het aantal steken overeen komt met dit patroon.
18.09.2024 - 15:04
![]() Marion wrote:
Marion wrote:
In de legenda voor M.1 en M.2 staat het streepje voor grijs/groen mix andersom t.o.v. de patronen zelf. Ik neem aan dat dit toch voor de mix bedoeld is?
31.05.2024 - 10:29DROPS Design answered:
Dag Marion,
Oh ja, ik zie het, dit is inderdaad voor voor grijs/groen mix.
03.06.2024 - 20:32
![]() Yarle Rooth wrote:
Yarle Rooth wrote:
Hej Om jag ska ha längd 40cm tills avmaskning för ärmhål? När ska jag börja med M2 ? Förstår inte när jag ska börja, stickar storlek L Mvh Yarle Rooth
09.02.2024 - 17:56DROPS Design answered:
Hej Yarle, du starter M.2 når du har sat stykkerne samme og strikket 5 omgange med perlegrå :)
22.02.2024 - 10:54
![]() Johanna wrote:
Johanna wrote:
Hallo, vielen Dank für die tolle Anleitung. Ich würde ihn gerne mit langen Ärmeln stricken. Am 03.11.2015 hat dies schon mal jemand gefragt, der von Ihnen angegebene Link zu einem ähnlichen Strickstück funktioniert aber leider nicht mehr. Können Sie nochmal einen Link veröffentlichen? Vielen Dank
14.10.2023 - 12:01DROPS Design answered:
Liebe Johanna, hier finden Sie Pullover mit langen Ärmeln und Maschenprobe 25-23 Maschen um Ihnen inspirieren zu lassen. Viel Spaß zum stricken!
16.10.2023 - 08:58
|
|||||||||||||
Winter Moss#wintermosssweater |
|||||||||||||
|
|
|||||||||||||
Knitted DROPS jumper in ”Alpaca” with short raglan sleeves and Norwegian pattern. Size S to XXXL.
DROPS 122-41 |
|||||||||||||
|
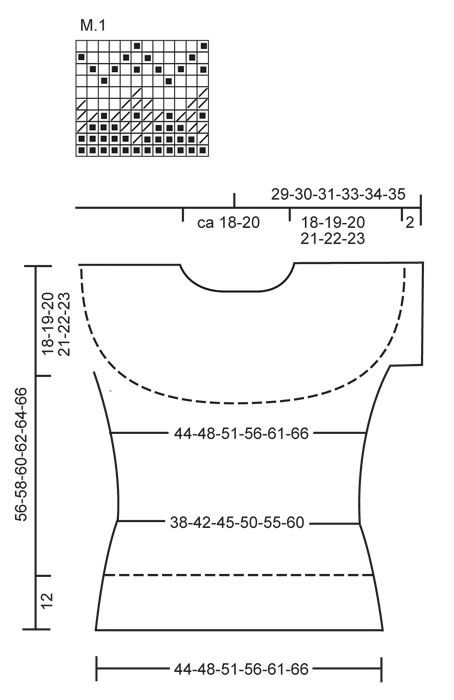
PATTERN: See diagram M.1 and M.2 – entire pattern worked in stockinette st. -------------------------------------------------------- BODY PIECE: Worked in the round. Cast on 350-380-410-450-490-530 sts on circular needle size 2.5 mm / US 1 with green/turquoise mix. Work 3 rounds rib, K2/P3. On next round dec all P3 to P2 = 280-304-328-360-392-424 sts and continue with K2/P2. When piece measures 12 cm / 4¾" change to circular needle size 3 mm / US 2or3. Work 1 round stockinette st, AT THE SAME TIME K tog every 3rd and 4th st = 210-228-246-270-294-318 sts. Work 1 vertical repeat M.1 and then continue in light lavender. REMEMBER THE GAUGE! AT THE SAME TIME on round 2 after M.1 dec 28 sts evenly = 182-200-218-242-266-290 sts. Insert a marker each side (= 91-100-109-121-133-145 sts on front and back piece). When piece measures 18-19-20-21-22-23 cm / 7"-7½"-8"-8¼"-8 ¾"-9" inc 1 st each side of both markers. Repeat the inc on every 8th round a total of 7 times = 210-228-246-270-294-318 sts. When piece measures 38-39-40-41-42-43 cm / 15-15¼"-15¾"-16⅛"-16½"-17" bind off 12 sts each side (i.e. 6 sts each side of marker) = 93-102-111-123-135-147 sts left on front and back piece. SLEEVE EDGE: Worked in the round on small circular needle. Cast on 96-104-108-116-124-128 sts on circular needle size 2.5 mm / US 1 with light lavender. Work rib, K2/P2 for 2 cm / ¾" and work next round as follows from RS: * K4, K2 tog *, repeat from *-* until 6-2-0-2-4-2 sts remain, K these = 81-87-90-97-104-107 sts. On next round bind off the first 12 sts = 69-75-78-85-92-95 sts. Put piece aside and knit the other sleeve edge. YOKE: Slip sleeve edges on the same circular needle as body pieces where bind off for armhole = 324-354-378-416-454-484 sts. Round now beg in transition between one of the sleeves and back piece. K 1 round with light lavender, AT THE SAME TIME dec 18-12-18-20-22-16 sts evenly = 306-342-360-396-432-468 sts. Work 0-2-5-1-4-7 rounds in light lavender before continuing in M.2 – see diagram for your size. After M.2 there are 119-133-140-132-144-156 sts on needle. Now complete piece in light lavender. Insert a marker mid back and now work elevation as follows: K 8 sts past marker mid back, turn, tighten thread and P 16 sts, turn, tighten thread and K 24 sts, turn. Continue like this with 8 more sts before each turn until you have knitted over a total of 96-96-112-112-112-128 sts, turn and K 1 row to mid back. K 1 round on all sts, AT THE SAME TIME dec evenly to 112-116-120-124-128-132 sts. NECKLINE: Change to circular needle size 2.5 mm / US 1 and work 5 rounds rib, K2/P2 with light lavender. Bind off with K over K and P over P. ASSEMBLY: Sew tog openings under sleeves. |
|||||||||||||
Diagram explanations |
|||||||||||||
|
|||||||||||||
 |
|||||||||||||
 |
|||||||||||||
Have you finished this pattern?Tag your pictures with #dropspattern #wintermosssweater or submit them to the #dropsfan gallery. Do you need help with this pattern?You'll find 18 tutorial videos, a Comments/Questions area and more by visiting the pattern on garnstudio.com. © 1982-2026 DROPS Design A/S. We reserve all rights. This document, including all its sub-sections, has copyrights. Read more about what you can do with our patterns at the bottom of each pattern on our site. |
|||||||||||||


With over 40 years in knitting and crochet design, DROPS Design offers one of the most extensive collections of free patterns on the internet - translated to 17 languages. As of today we count 324 catalogs and 12272 patterns - 12262 of which are translated into English (US/in).
We work hard to bring you the best knitting and crochet have to offer, inspiration and advice as well as great quality yarns at incredible prices! Would you like to use our patterns for other than personal use? You can read what you are allowed to do in the Copyright text at the bottom of all our patterns. Happy crafting!
Post a comment to pattern DROPS 122-41
We would love to hear what you have to say about this pattern!
If you want to leave a question, please make sure you select the correct category in the form below, to speed up the answering process. Required fields are marked *.