
Popular categories
Looking for a yarn?


Comments / Questions (47)
![]() Edith Schmitt wrote:
Edith Schmitt wrote:
Sehr geehrte Damen und Herren, laut Anleitung werden nach 44 cm bei Gr. XL auf beide Seiten für dei Armlöcher die Maschen abgekettet. Laut Zeichnung werden nach 66 cm die Maschen für die Armlocher abgekettet. Welche Anleitung in cm stimmt. Liebe Grüße Edith
21.12.2025 - 16:26DROPS Design answered:
Liebe Edith, die 66 cm sind die Gesamtlänge. Die Angabe 44 cm sind korrekt. Wenn Sie in der Skizze die 22 cm des Armausschnitts von den 66 cm Gesamtlänge abziehen, kommen Sie auch auf die 44 cm. Viel Spaß beim Stricken!
24.02.2026 - 22:06
![]() Uli wrote:
Uli wrote:
Hi wie kann man die Jacke auch noch größer stricken? Schönen Tag Uli
09.11.2023 - 12:24DROPS Design answered:
Liebe Ulli, leider können wir nicht unsere Anleitungen nach jeder Anfrage umrechnen, vielleicht kann Ihen aber damit Ihr Wollladen - auch per Telefon oder per E-Mail weiterhelfen? Danke im voraus für Ihr Verständnis.
09.11.2023 - 15:58
![]() Melanie wrote:
Melanie wrote:
Hallo, ich habe eine Frage zu den Abnahmen für das Armloch. Werden die Abnahmen in jeder Reihe oder in jeder zweiten Reihe gemacht?
16.07.2021 - 22:38DROPS Design answered:
Liebe Melanie, die Maschen für die Armlöcher werden beim Rückenteil beidseitig abgkettet, dh am Anfang jeder Reihe (Hin- sowie Rückreihe), z.B. 4 M am Anfang jeder 2 nächsten Reihe, dann 3 Maschen am Anfang jeder von den 0 bis 8 (siehe Grösse) nächsten Reihen (= 0 bis 4 Mal beidseitig), dann 2 Maschen am Anfang jeder 4 bis 10 näcshten Reihen (= 2 bis 5 M beidseitig) usw. Viel Spaß beim stricken!
19.07.2021 - 08:13
![]() Els wrote:
Els wrote:
In het patroon staat bij achterkant: Als ik de 2e naald brei: 1 st in ribbel (is recht), 21 steken recht, 10 st ribbel (is recht), 15 st. recht, dan heb ik een hele pen recht. Aan het eind staat er 7 steken over waarvan 6 recht en 1 ribbel (is recht) dus dan geen 21 steken ? dan wordt het rechts en links vh achter pand niet gelijk. Als ik naar het plaatje kijk, is re en li dat wel. graag uw visie hierop. Alvast dank !! hartelijke groet, Els
09.03.2021 - 13:38DROPS Design answered:
Dag Els,
In de praktijk komt het er op neer dat je deze naald aan de goede kant helemaal recht breit, maar op de verkeerde kant worden de ribbelsteken in recht gebreid en waar je op de goede kant recht hebt gebreid, brei je op de verkeerde kant averecht (zodat er tricotsteek ontstaat.
18.03.2021 - 10:51
![]() Anne M wrote:
Anne M wrote:
Hei. Det er meg igjen. :-) Jeg har nå strikket opp til der hvor rillen består av to masker. Jeg synes den blir litt \"buklete\", men det ser litt sånn ut på bildet også, men ikke så galt som min. Jeg sliter også med strikkefastheten. For å få den til stemme, må jeg strikke veldig fast. Ville foretrukket å strikke løsere og burde kanskje egentlig brukt pinnestørrelse 3,5. Jeg vurderer å rekke opp det hele og starte på nytt. Men kanskje det vil rette seg bare med litt damping?
21.09.2019 - 20:21
![]() Anne M wrote:
Anne M wrote:
Hei, Jeg synes oppskriften er litt merkelig forklart. Jeg har nettopp startet på bakstykket. Rett over rett må vel bety at det strikkes vrangt annenhver pinne, dvs glattstrikk. Siden RILLE strikkes rett begge veier, er denne like mye rett over rett som glattstrikkpartiet, hvis jeg ikke har misforstått dette. Jeg vil gjerne ha en tilbakemelding på om jeg har misforstått.
15.09.2019 - 21:03DROPS Design answered:
Hei Anne. Ja, det skal strikkes slik at det blir glattstrikk mellom rillestrikk feltene, se bildet. Oppskriften vil få en bedre formulering. Takk for at du gjorde oss oppmerksom på dette. God Fornøyelse!
16.09.2019 - 09:24
![]() Tonjr wrote:
Tonjr wrote:
Hei. Jeg fikk det til. Har tenkt feil. Jeg tenkte 119 + 2 masker.
25.01.2019 - 16:40
![]() Tonje wrote:
Tonje wrote:
Hei. Jeg får ikke maskene til å gå opp i opp. Jeg strikker med 121 masker og skal da til slutt ha 7 masker igjen, men sitter igjen med 9. Gjør jeg feil eller?
21.01.2019 - 17:55DROPS Design answered:
Hei Tonje. Hvor er det du har 121 masker? Kan ikke finne noe sted i oppskriften du skal ha det, så klarer ikke skjønne helt hvor du er. Og hvilken størrelse strikker du? hilsen Drops
24.01.2019 - 15:18
![]() Catriona Hansen wrote:
Catriona Hansen wrote:
Hei. Det står i oppskriften pinne nr 3,5 til riller. Vi det si at man legger opp antall masker, på pinne nr 4 og strikker rillene med en annen pinne str 3,5? Jeg er ganske fersk på dette:)
06.04.2018 - 14:52DROPS Design answered:
Hei Catriona, Man ofte legger opp masker med en pinne størrelse større slik at oppleggskanten ikke er stram. Deretter går man ned en størrelse for å strikke videre. God fornøyelse!
09.04.2018 - 08:23
![]() Helene Grønli wrote:
Helene Grønli wrote:
Kan man strikke denne på rundpinne?
11.11.2017 - 22:55DROPS Design answered:
Hej Helene, ja det kan du godt, men vi kan desværre ikke hjælpe dig med at skrive opskriften om. God fornøjelse!
13.11.2017 - 14:32
|
|||||||
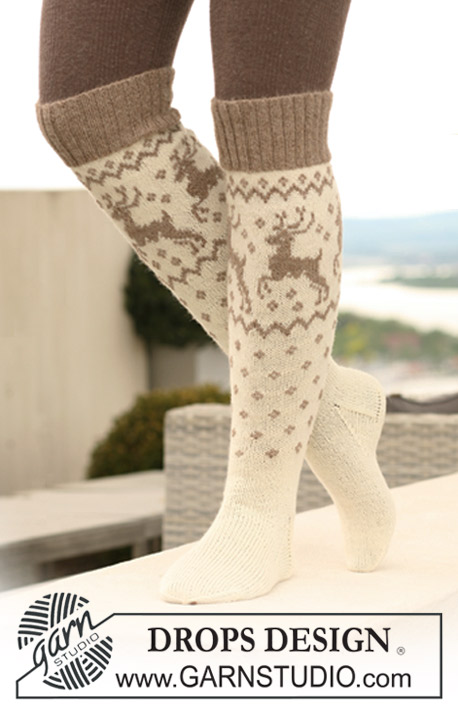
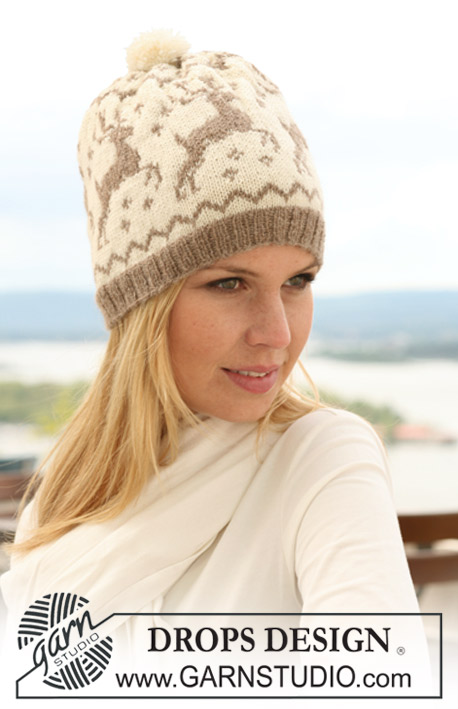
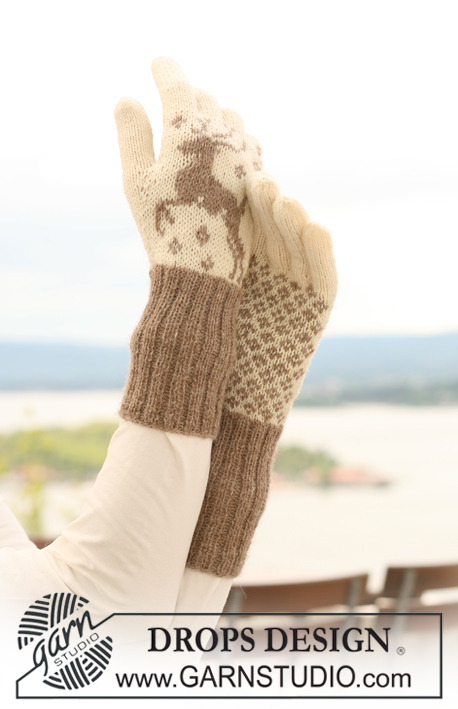
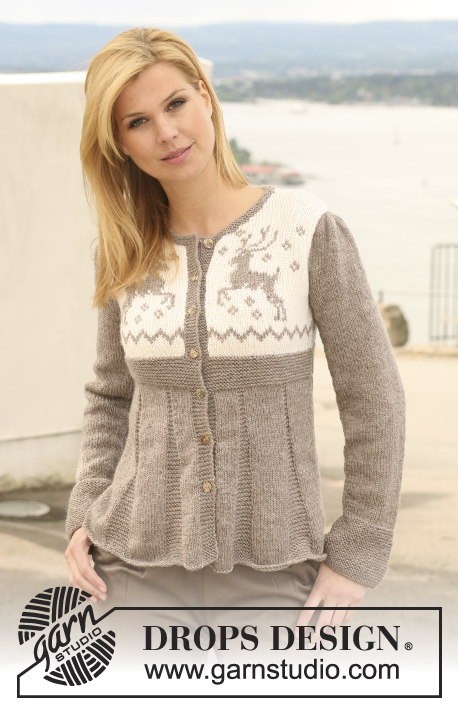
Oh Deer!#ohdeercardigan |
|||||||
 |
 |
||||||
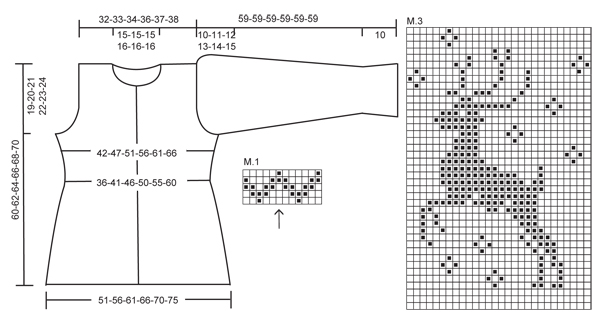
Knitted DROPS jacket in ”Karisma” with puff sleeves and reindeer pattern on yoke. Size S to XXXL.
DROPS 122-10 |
|||||||
|
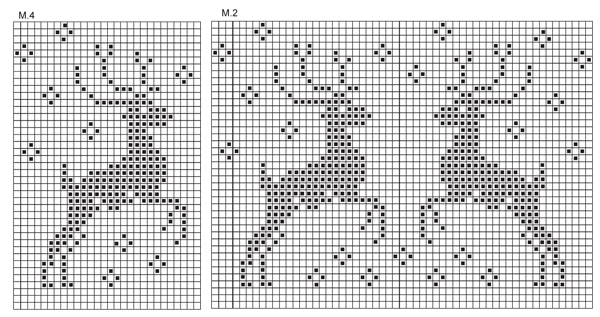
PATTERN: See diagrams M.1 to M.4 – all diagrams worked in stockinette st. GARTER ST (back and forth on needle): K all rows. BUTTONHOLES: Make buttonholes on front band on right front piece. 1 BUTTONHOLE = K tog third and fourth st from mid front and make 1 YO. Make buttonholes when piece measures: SIZE S: 12, 19, 26, 33, 40 and 47 cm / 4¾",7½",10¼",13",15¾" and 18½". SIZE M: 13, 20, 27, 34, 41 and 48 cm / 5⅛",8",10⅝",13⅜",16⅛" and 19". SIZE L: 14, 21, 28, 35, 42 and 49 cm / 5½",8¼",11",13¾",16½" and 19¼". SIZE XL: 14, 21, 29, 36, 44 and 51 cm / 5½",8¼",11⅜",14¼",17¼" and 20". SIZE XXL: 14, 22, 30, 37, 45 and 52 cm / 5½",8¾",11¾",14½",17¾" and 20½". SIZE XXXL: 14, 22, 30, 38, 46 and 54 cm / 5½",8¾",11¾",15",18" and 21¼". The last buttonhole is made on neckline. DECREASING TIP (applies to body piece): Make all dec from RS. Dec at the beg and at the end of all garter st sections alternately by K2 tog (i.e. for first dec K tog the first 2 sts and for second dec K tog the last 2 sts, etc). -------------------------------------------------------- BACK PIECE: Worked back and forth on needle. Cast on 109-119-129-139-149-159 sts (includes 1 edge st each side) on needle size 4 mm / US 6 with light beige brown. K 1 row from WS and work next row as follows from RS: 1 edge st in GARTER ST – see above, K 17-19-21-23-25-27, * 10 garter sts, K 11-13-15-17-19-21 *, repeat from *-* until 7 sts remain, K6 and 1 edge st in garter st. Continue with K over K and garter st over garter st. REMEMBER THE GAUGE! When piece measures 5 cm / 2" dec 1 st in each of the 4 garter st-sections (from RS) – SEE DECREASING TIP - repeat the dec on every 8th row a total of 8 times = 77-87-97-107-117-127 sts. There are now 2 sts left in all garter st-sections. Continue until piece measures 28 cm / 11" for all sizes. Change to needle size 3.5 mm / US 4, work 4 cm / 1½" garter st on all sts. Change to needle size 4 mm / US 6 and off-white. Work 6-6-8-8-10-10 rows stockinette st – AT THE SAME TIME on row 1 inc 12 sts evenly (inc by making a YO and work YO into back of loop on next row to avoid a hole) = 89-99-109-119-129-139 sts. Continue with M.1 – make sure to have st marked with arrow mid back. After M.1 continue in M.2 on the middle 57 sts (work remaining sts in off-white stockinette st). AT THE SAME TIME when piece measures 41-42-43-44-45-46 cm / 16⅛"-16½"-17"-17¼"-17¾"-18" bind off for armhole at the beg of every row each side: 4 sts 1 time, 3 sts 0-1-2-2-3-4 times, 2 sts 2-2-3-4-4-5 times and 1 st 3-4-3-4-5-4 times = 67-69-71-75-77-79 sts left on needle. After M.2 complete piece in off-white stockinette st. When piece measures 58-60-62-64-66-68 cm / 22¾"-23⅝"-24⅜"-25¼"-26"-26¾" bind off the middle 27-27-27-29-29-29 sts for neck and complete each shoulder separately. Bind off 2 sts on neckline on next row = 18-19-20-21-22-23 sts left on shoulder. Bind off when piece measures 60-62-64-66-68-70 cm / 23⅝"-24⅜"-25¼"-26"-26¾"-27½". LEFT FRONT PIECE: Worked back and forth on needle. Cast on 61-66-71-76-81-86 sts (includes 6 front band sts towards front edge and 1 edge st at the side) on needle size 4 mm / US 6 with light beige brown. K 1 row from WS. Work next row as follows (from RS): 1 edge st in garter st, K 17-19-21-23-25-27, 10 garter sts, K 11-13-15-17-19-21, 10 garter sts, K 6-7-8-9-10-11 and 6 front band sts in garter st. Continue with K over K, garter st over garter st and front band and edge st in garter st. When piece measures 5 cm / 2" dec 1 st in each of the 2 garter st-sections (from RS) – SEE DECREASING TIP – repeat the dec on every 8th row a total of 8 times = 45-50-55-60-65-70 sts. When piece measures 28 cm / 11" change to needle size 3.5 mm / US 4 and work 4 cm / 1½" garter st on all sts. Now slip the 6 front band sts on a stitch holder = 39-44-49-54-59-64 sts on needle. Change to off-white and needle size 4 mm / US 6, work 6 rows stockinette st, AT THE SAME TIME on first row cast on 1 new st towards front edge and inc 6 sts evenly = 46-51-56-61-66-71 sts. READ ALL OF THE FOLLOWING SECTION BEFORE CONTINUING! PATTERN: After 6-6-8-8-10-10 rows continue in M.1 – adjust so that pattern fits pattern on back piece at the side. After M.1 continue as follows (from RS): 16-21-26-31-36-41 sts off-white, M.3 (= 28 sts) and 2 sts off-white. After M.3 complete piece in off-white stockinette st on all sts. ARMHOLE: When piece measures 41-42-43-44-45-46 cm / 16⅛"-16½"-17"-17¼"-17¾"-18" bind off for armhole at the side as described for back piece = 35-36-37-39-40-41 sts. NECKLINE: When piece measures 53-55-56-58-59-61 cm / 21"-21⅝"-22"-22¾"-23¼"-24" slip 7-7-7-8-8-8 sts towards front edge on a stitch holder for neck and bind off to shape the neckline at the beg of every row from mid front: 3 sts 1 time, 2 sts 2 times and 1 st 3 times = 18-19-20-21-22-23 sts left on shoulder. Bind off when piece measures 60-62-64-66-68-70 cm / 23⅝"-24⅜"-25¼"-26"-26¾"-27½". FRONT BAND: Slip the 6 sts on stitch holder back on needle size 3.5 mm / US 4. Work garter st back and forth on needle with light beige brown until front band measures nearly the same as front piece up to neckline – slip sts back on stitch holder. Sew front band to front piece – stretch front band slightly. RIGHT FRONT PIECE: Cast on and work like left front piece but mirrored. Instead of M.3 work M.4 on yoke. When piece measures 12-13-14-14-14-14 cm / 4¾"-5⅛"-5½"-5½"-5½"-5½" make BUTTONHOLES – see above! SLEEVE: Worked back and forth on needle. Cast on 56-58-60-64-66-68 sts (includes 1 edge st each side) on needle size 3.5 mm / US 4 with light beige brown. Work garter st. When piece measures 4 cm / 1½" dec 6 sts evenly, and repeat the dec when piece measures 9 cm / 3½" = 44-46-48-52-54-56 sts. When piece measures 10 cm / 4" change to needle size 4 mm / US 6 and complete piece in stockinette st. AT THE SAME TIME when piece measures 12-14-12-12-14-14 cm / 4¾"-5½"-4¾"-4¾"-5½"-5½" inc 1 st each side. Repeat the inc on every 2.5-2-2-2-1.5-1.5 cm / ⅞"-¾"-¾"-¾"-½"-½" a total of 15-16-17-17-18-19 times = 74-78-82-86-90-94 sts. When piece measures 49-48-47-46-45-44 cm / 19¼"-19"-18½"-18"-17¾"-17¼" (less for the larger sizes because of longer sleeve cap and wider shoulder) bind off for sleeve cap at the beg of every row each side: 3 sts 1 time, 2 sts 1 time and 1 st 2 times. Continue until piece measures 57 cm / 22½", now bind off 2 sts 2 times each side = 52-56-60-64-68-72 sts. On next row K3 tog on the middle 42-42-48-48-54-54 sts (for puff at top of sleeve) = 24-28-28-32-32-36 sts. Bind off remaining sts. Sleeve measures approx 59 cm / 23¼" for all sizes. ASSEMBLY: Sew shoulder seams. NECKLINE: Pick up approx 80 to 100 sts (includes sts on stitch holders) on needle size 3.5 mm / US 4 with light beige brown. K 5 rows back and forth on needle, AT THE SAME TIME on row 2 make 1 buttonhole in line with the others on front band. After 5 rows bind off with K sts from RS. Set in sleeves, sew sleeve and side seams inside 1 edge st. Sew on buttons. |
|||||||
Diagram explanations |
|||||||
|
|||||||
 |
|||||||
 |
|||||||
Have you finished this pattern?Tag your pictures with #dropspattern #ohdeercardigan or submit them to the #dropsfan gallery. Do you need help with this pattern?You'll find 24 tutorial videos, a Comments/Questions area and more by visiting the pattern on garnstudio.com. © 1982-2026 DROPS Design A/S. We reserve all rights. This document, including all its sub-sections, has copyrights. Read more about what you can do with our patterns at the bottom of each pattern on our site. |
|||||||


With over 40 years in knitting and crochet design, DROPS Design offers one of the most extensive collections of free patterns on the internet - translated to 17 languages. As of today we count 325 catalogs and 12298 patterns - 12288 of which are translated into English (US/in).
We work hard to bring you the best knitting and crochet have to offer, inspiration and advice as well as great quality yarns at incredible prices! Would you like to use our patterns for other than personal use? You can read what you are allowed to do in the Copyright text at the bottom of all our patterns. Happy crafting!
Post a comment to pattern DROPS 122-10
We would love to hear what you have to say about this pattern!
If you want to leave a question, please make sure you select the correct category in the form below, to speed up the answering process. Required fields are marked *.