Comments / Questions (40)
![]() Cath Bat wrote:
Cath Bat wrote:
Modèle 122- 6 Col châle. J'ai relevé 150 mailles et dois tricoter 1 rang end sur envers. En même temps il faut ajuster le nbre de mailles à 167 173 179 etc... Je ne comprends pas. Faut- il ajouter 29 mailles pour la taille L ? Pourquoi ne pas indiquer le nbre exact de mailles à relever dès le début ? Merci.
05.09.2025 - 18:55DROPS Design answered:
Bonjour Mme Bat, le nombre de mailles que vous allez relever peut dépendre de différents facteurs, mais pour le col, vous devez ensuite ajuster le nombre de mailles à 179, si vous en avez relevé 150, alors vous allez effectivement augmenter 29 mailles au tout premier rang, utilisez la caculette en bas de page si besoin. Bon tricot!
08.09.2025 - 10:02
![]() Beatriz Sánchez wrote:
Beatriz Sánchez wrote:
Referente a este modelo la sisa me gustaría hacerla más ancha, para que no me quede ajustada. ¿Tengo que coger una talla más de la manga o cómo podría hacer la modificación? Haré el jersey de talla L, ¿puedo hacer las mangas con la talla XL? Y la última pregunta, ¿el ancho se mide con la medida del pecho dividiéndola en dos partes iguales? Gracias.
04.11.2023 - 22:49
![]() Sherry wrote:
Sherry wrote:
Thank you for your reply. I assume after casting off the 8 Stitches at underarm I continue in back and forth stocking stitch until the top and THEN decrease to form the cap of the sleeve? I was always taught the cap of the sleeve started at the underarm and went to the shoulder, but I gather this pattern is different.
26.01.2023 - 05:11DROPS Design answered:
Dear Sherry, you first cast off (not decrease) 8 sts mid under sleeve, then continue back and forth on needle from mid under sleeve casting off at the beginning of each row on each side (= both from RS and WS) for the sleeve cap: 2 sts 3 times (= 2 sts at the beg of next 6 rows), etc.. so that you cast off the same number of sts on each side of the sleeve. So this pattern is not different. Happy knitting!
26.01.2023 - 10:18
![]() Sherry wrote:
Sherry wrote:
It says to continue until sleeve measures 22”, which is less than 3” from start of underarm decrease (19 1/4”.) With all of the decreases ( including the initial 8) this only adds up to 9 rows, which is nowhere near the 7 1/2” to fit into the body of the sweater.
24.01.2023 - 18:27DROPS Design answered:
Dear Sherry, sleeve should be 22½'' in total minus 19 1/4" when you start sleeve cap - ie a total of 3,25" = ca 8 cm. Hope it can help. Happy knitting!
25.01.2023 - 11:40
![]() Sherry wrote:
Sherry wrote:
Hi Drops Design… Thank you for your prompt reply. At the underarm of the sleeve I had 58 stitches and 19 1/4” in length, as per the pattern. I bound off 8 stitches ( all in 1 row- now 50 stitches) under the arm, then 2 stitches at the beginning of the row 3 times ( 6 rows and now 44 stitches, and 1 stitch once both sides(2 rows-42 stitches).
24.01.2023 - 18:25DROPS Design answered:
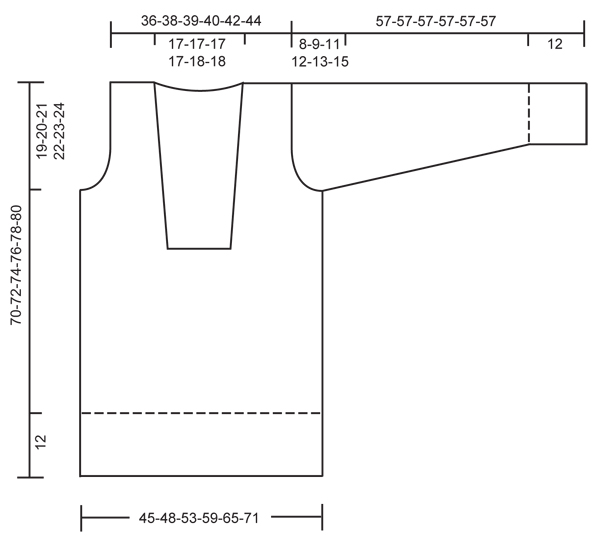
Dear Sherry, the total length of sleeve cap for size S should be 8 cm (see chart) and all the cast off stitches should be sewn along the whole armhole, should you have increased then cast off as in the pattern, then the sleeve should fit nicely around armhole. Happy knitting!
25.01.2023 - 11:37
![]() Sherry wrote:
Sherry wrote:
I am making this sweater in size small and the body piece from the underarm to the shoulder is 7 1/2” , however when I knit the sleeve the length from the underarm to the shoulder is only 3 inches. Is there a correction for the sleeve cap, as 3” is far too small. Thank you and I look forward to your reply.
22.01.2023 - 05:05DROPS Design answered:
Hi Sherry, The sleeve cap and top of sleeve should fit into the armhole (so be bigger than your 3 inches). Have you followed all the increases correctly and worked the sleeve cap back and forth to finish? Happy knitting!
22.01.2023 - 08:16
![]() Eva-Helena Hall wrote:
Eva-Helena Hall wrote:
Hej ! På denna beskrivning står det att man ska lägga upp maskor från båda garnsorterna samtidigt, då undrar jag varför man tipsar att byta nystan så att färgerna stämmer vid bytet av nystan?????? Eva-Helena
07.01.2022 - 12:51
![]() Janet Ter Meer wrote:
Janet Ter Meer wrote:
Bij het afslanken voor de mouw staat aan het begin van elke naald. Is dat dan elke heen en teruggaande naald of alleen elke heengaande naald. Dit laatste heb ik namelijk gedaan maar dit lijkt mij niet juist.
10.12.2019 - 21:22DROPS Design answered:
Dag Janet,
Je kant voor de mouw af aan het begin van elke naald, dus zowel op de heengaande als de teruggaande naald.
12.12.2019 - 09:01
![]() Kath Wilmott wrote:
Kath Wilmott wrote:
I hope this is the last question I have to ask, but on the collar instructions, it says "work all sts from stitch holder and every 3 sts work this together with next st." Does this mean knit 2 together on every three sts, which will mean decreasing 6 sts on each stitch holder totalling 12 sts. So why then does it say I should have 202 sts left? because, I had 202 stitches before I started the decreases, therefore, I should have 190 sts left.??
26.11.2019 - 22:16DROPS Design answered:
Dear Mrs Willmott, when you worked the short rows, you left 3 sts unworked at the end of each row. When working all stitches back, you might have a small gap every third stitch due to the short rows. To avoid these gaps, pick up the thread before the next stitch and put it twisted on needle and work these both stitch (= thread picked up + next stitch) together; this will happen every 3rd stitch = this won't change your number of stitches, you should still have 202 sts at the end of this row. Happy knitting!
27.11.2019 - 07:55
![]() Kath Wilmott wrote:
Kath Wilmott wrote:
Sorry, me again! Are you sure you mean dec. '3' stitches because the pattern says '2' stitches 3 times? Also you say 'then 1 stitch 2 times (4 decreaes) ? Surely 1 x 2 is 2, not 4?
28.10.2019 - 17:37DROPS Design answered:
Hi Kath, Each decrease is at both ends of the row - each time you start a new row you cast off; so decrease 1 two times means 1 at each end x 2, so 4 stitches decreased. Hope this helps.
29.10.2019 - 07:15
Autumn Sunset#autumnsunsetsweater |
|
|
|
|
Knitted DROPS jumper in ”Delight” and ”Alpaca” with shawl collar. Size S to XXXL
DROPS 122-6 |
|
|
NEW BALL OF YARN TIP: To make the color transitions in Delight neat when starting a new ball of yarn it is important to use a ball beg with the same shade as finished the previous ball. GARTER ST (back and forth on needle): K all rows. DECREASING TIP (applies to neckline): Make all dec from RS. Dec as follows at beg of row: K1, slip 1 st as if to K, K1, psso. Dec as follows at the end of row: Work row until 3 sts remain, K2 tog and K1. -------------------------------------------------------- BODY PIECE: Worked in the round. See NEW BALL OF YARN TIP! Cast on 228-240-270-300-330-360 sts on circular needle size 4 mm / US 6 with 1 strand of each quality. Work 1 round stockinette st and continue in rib K3/P3. When piece measures 12 cm / 4¾" change to circular needle size 5 mm / US 8. K 1 round, AT THE SAME TIME K tog every 2nd and 3rd st across the round = 152-160-180-200-220-240 sts. Continue in stockinette st. Insert a marker at beg of round and 1 marker after 76-80-90-100-110-120 sts (to mark the sides). REMEMBER THE GAUGE! When piece measures 37-38-39-40-41-42 cm / 14½"-15"-15¼"-15¾"-16⅛"-16½" work next round as follows: K 27-29-34-39-43-48 sts, P 22-22-22-22-24-24 sts and then K remaining sts on round. Work next round as follows: K 28-30-35-40-44-49 sts, bind off 20-20-20-20-22-22 sts (= for neck mid front), K remaining sts on round to where sts were bind off. Now continue back and forth on needle from mid front with 1 GARTER ST - see above – each side towards neckline. READ ALL OF THE FOLLOWING SECTION BEFORE CONTINUING! DEC FOR NECK: When piece measures 42-43-44-45-46-47 cm / 16½"-17"-17¼"-17¾"-18"-18½" dec 1 st each side of neck – SEE DECREASING TIP! Repeat the dec on every 5 cm / 2" a total of 4 times. ARMHOLE: At the same time when piece measures 51-52-53-54-55-56 cm / 20"-20½"-21"-21¼"-21⅝"-22" bind off 8 sts each side for armhole (i.e. 4 sts each side of marker). Complete each piece separately. LEFT FRONT PIECE: Continue dec for neck – AT THE SAME TIME bind off for armhole at the beg of every row from the side: 2 sts 1-1-2-4-5-6 times and 1 st 1-2-4-4-5-7 times. When all dec are complete there are 17-18-19-20-21-22 sts on shoulder. Continue until piece measures 70-72-74-76-78-80 cm / 27½"-28⅜"-29⅛"-30"-30¾"-31½, bind off. RIGHT FRONT PIECE: Like left piece, but mirrored. BACK PIECE: = 68-72-82-92-102-112 sts. Bind off for armhole at the beg of every row each side as described for front piece = 62-64-66-68-72-74 sts. When piece measures 68-70-72-74-76-78 cm / 26¾"-27½"-28⅜"-29⅛"-30"-30¾" bind off the middle 24-24-24-24-26-26 sts for neck and complete each shoulder separately. Dec 2 sts on neckline on next row = 17-18-19-20-21-22 sts left on shoulder. Bind off when piece measures 70-72-74-76-78-80 cm / 27½"-28⅜"-29⅛"-30"-30¾"-31½. SLEEVE: Worked in the round. Cast on 48-48-54-54-60-60 sts with 1 strand of each quality on double pointed needles size 4 mm / US 6. K 1 round and continue in rib K3/P3. When piece measures 12 cm / 4¾" change to double pointed needles size 5 mm / US 8 and continue in stockinette st. Insert a marker at beg of round = mid under sleeve. When piece measures 14 cm / 5½" inc 1 st each side of marker, repeat the inc on every 8-5-6-4-4.5-3 cm / 3⅛"-2"-2⅜"-1½"-1¾"-1⅛" a total of 5-7-6-8-7-9 times = 58-62-66-70-74-78 sts. When piece measures 49-48-46-45-44-42 cm / 19¼"-19"-18"-17¾"-17¼"-16½" (less for the larger sizes because of longer sleeve cap and wider shoulder) bind off 8 sts mid under sleeve and complete piece back and forth on needle. Bind off for sleeve cap at the beg of every row each side: 2 sts 3 times and 1 st 1-2-4-5-6-9 times, then 2 sts each side until piece measures 56 cm / 22", now bind off 3 sts 1 time each side. Bind off remaining sts, piece measures approx 57 cm / 22½" for all sizes. ASSEMBLY: Sew shoulder seams. SHAWL COLLAR: The collar is worked back and forth on circular needle from mid front. Pick up sts with 1 strand of each quality on circular needle size 4 mm / US 6 inside 1 edge st as follows: approx 60 to 70 sts from where sts were bind off for neck mid front and along right side of neck, approx 30 to 33 sts along neckline on back piece and 60 to 70 sts down along the other side of neck = approx 150 to 173 sts. NOTE: Do not pick up sts on the 20-20-20-20-22-22 sts bind off mid front. K 1 row from WS at the same time adjust no of sts to 167-173-179-185-191-197 sts. Work next row as follows from RS: 1 garter st, * K3, P3 *, repeat from *-* and finish with K3 and 1 garter st. Continue in rib like this – AT THE SAME TIME insert a marker after 43 sts from each side (= 81-87-93-99-105-111 sts between markers). When collar measures 3 cm / 1⅛" inc 1 st in each of the 13-14-15-16-17-18 P-sections (as seen from RS) between the markers by P2 in the middle st = 180-187-194-201-208-215 sts. When collar measures 5-5-5-6-6-6 cm / 2"-2"-2"-2⅜"-2⅜"-2⅜" inc 1 st in each of the 14-15-16-17-18-19 K-sections (as seen from RS) between markers by K2 in the middle st = 194-202-210-218-226-234 sts. Continue with K over K and P over P until collar measures approx 6-6-6-7-7-7 cm / 2⅜"-2⅜"-2⅜"-2¾"-2¾"-2¾" (adjust so that next row is from RS). Work the 25 first sts as before, now slip them on a stitch holder, work row until 25 sts remain and slip these on a stitch holder. Continue as before on the remaining sts, at the same time slip 3 sts at the end of every row on the stitch holders a total of 6 times each side (= a total of 43 sts on each stitch holder). The collar is now 12-12-12-13-13-13 cm / 4¾"-4¾"-4¾"-5⅛"-5⅛"-5⅛" wide mid back. On next row (= from WS) work all sts from stitch holder on the right side of piece back on needle (to avoid holes pick up 1 st every time sts were slipped on stitch holder - i.e. every 3 sts – and work this tog with next st). On next row work all sts on stitch holder on the left side of piece back on needle in the same way = 194-202-210-218-226-234 sts. Work next row from WS as follows: Work K over K and P over P until 24 sts remain, now cast on 4 new sts for buttonhole loop, continue until 15 sts remain, cast on 4 new sts for buttonhole loop, continue until 6 sts remain, cast on 4 new sts for buttonhole loop, work remaining sts. On next row bind off all sts with K over K and P over P – bind off the 4 sts on each buttonhole loop with K sts. FURTHER ASSEMBLY: Place the 2 collar parts over one another with the part with buttonhole loops at the top. Sew the collar to the 20-20-20-20-22-22 sts bind off mid front – place the garter st row on collar over garter st row on the opening and sew neatly. Set in sleeves and sew buttons on collar to fit the buttonhole loops. |
|
 |
|
Have you finished this pattern?Tag your pictures with #dropspattern #autumnsunsetsweater or submit them to the #dropsfan gallery. Do you need help with this pattern?You'll find 23 tutorial videos, a Comments/Questions area and more by visiting the pattern on garnstudio.com. © 1982-2025 DROPS Design A/S. We reserve all rights. This document, including all its sub-sections, has copyrights. Read more about what you can do with our patterns at the bottom of each pattern on our site. |




Post a comment to pattern DROPS 122-6
We would love to hear what you have to say about this pattern!
If you want to leave a question, please make sure you select the correct category in the form below, to speed up the answering process. Required fields are marked *.