
Looking for a yarn?


Comments / Questions (97)
![]() Sandra Cloughley wrote:
Sandra Cloughley wrote:
Is M1 worked over 3 rows? It doesn't explain. Very obscure intructions, particularly at armholes. Is there a tutorial?
21.07.2025 - 20:48DROPS Design answered:
Dear Mrs Cloughley, correct, M.1 is worked over 3 rows. Read more about diagrams here and do not hesitate if you have further questions. Happy knitting!
25.07.2025 - 16:07
![]() Violette wrote:
Violette wrote:
Bonjour, je souhaite comme la dame italienne réaliser la veste sans le volant du bas, est ce que le nombre de mailles restant soit 192 en taille S inclus les mailles des bordures,6 à droite 6 à gauche ou est ce que je dois les rajouter pour avoir la bonne dimension. Merci, cordialement
29.01.2025 - 21:03DROPS Design answered:
Bonjour Violette, si vous ne voulez pas le volant du bas, vous pouvez effectivement probablement commencer directement par les 192 mailles (y compris les 6 m de bordure devant de chaque côté). Dans ce modèle, avant le volant, on a 2 côtes mousse (4 rangs endroit), à vous d'ajuster le bas de la veste comme vous le souhaitez. Tricotez ensuite jusqu'à 45 cm - en taille S et continuez comme indiqué. Bon tricot!
30.01.2025 - 10:01
![]() Daniela Picchi wrote:
Daniela Picchi wrote:
Vorrei realizzare questo golfino con filato fabel e ferri n. 3/3.5..come calcolo il numero di maglie occorrenti per una taglia L/M? Grazie per la cortesia
23.08.2022 - 16:56DROPS Design answered:
Buonasera Daniela, per un'assistenza così personalizzata può rivolgersi al suo rivenditore DROPS di fiducia. Buon lavoro!
24.08.2022 - 15:27
![]() Anita wrote:
Anita wrote:
Salve! Mi piacerebbe realizzare il maglione, ma senza il volant sul fondo. Mi direste, per favore, quale è la parte riguardante il fondo arricciato? Così, semplicemente la elimino e concludo con un bordo dritto. Grazie molte della risposta!
26.11.2019 - 17:28DROPS Design answered:
Buongiorno Anita. La parte del volant è quella iniziale e termina con questa frase: Dopo 1 motivo di M.1 in altezza, rimangono 192-204-216-240-264-288 m sul f. Da qui vengono lavorati i ferri a legaccio (la fotografia può aiutarla) e poi prosegue a maglia rasata con le prime 6 e le ultime 6 maglie a legaccio. Buon lavoro!
26.11.2019 - 19:29
![]() Bourguignon wrote:
Bourguignon wrote:
J'ai réalisé ce modèle dans un autre fil et je ne le regrette pas. Je porte ce long gilet pratiquement au quotidien en saison froide. J'aime le volant en bas et la capuche. Il est parfait.
05.02.2019 - 14:09
![]() Dixie J Houston wrote:
Dixie J Houston wrote:
Do you ever write out a pattern row by row ?
26.07.2018 - 18:27DROPS Design answered:
Dear Dixie, no the patterns are not written out row by row, because everyone's gauge might be slightly different and it is a lot easier to adjust the piece, and modify the pattern this way. Howevr more complicated rows are explained in details. If you still have problems making sense of a pattern do not forget that you can always ask for help in person in the store you bought your DROPS yarn from. Happy knitting!
27.07.2018 - 23:52
![]() Allinson Sherratt wrote:
Allinson Sherratt wrote:
Love this & am currently knitting it in Melody shade 08. Struggling a bit with the M1 bit, but with the help of Wool Warehouse, getting there. Thanks Rachel & others. Just when you think you're learning how to interpret Drops patterns, you get stuck. It won't put me off though as I love the designs & practice will win.............Ok that's an excuse to knit more.
25.01.2017 - 16:13
![]() Anja wrote:
Anja wrote:
Als Alternativgarn war nur die Melody angegeben. Merino würde ich gerne nehmen, sie hat aber eine komplett andere Lauflänge und Nadelstärke.
07.05.2016 - 11:16DROPS Design answered:
Liebe Anja, unter Material finden Sie Merino extra fine (in Kombination mit Kid Silk) als Alternative. Es wird viel weniger "haarig" als das Original oder als Melody. Wenn Sie einen ganz andere Textur wünschen, empfehlen wir, ein anderes Modell auszusuchen. Die Textur ist Teil des Designs.
09.05.2016 - 20:38
![]() Anja wrote:
Anja wrote:
Würde diese süße Jacke gerne stricken, mag aber keine "Mohair" Wolle. Gibt es noch andere alternative Wolle?
06.05.2016 - 11:22DROPS Design answered:
Liebe Anja, Sie finden unter Material die alternativen Garnvorschläge, MERINO EXTRA FINE zum Beispiel ist eine ganz glatte Wolle.
07.05.2016 - 07:55
![]() Margareta G. wrote:
Margareta G. wrote:
Liebes Team! Ich stricke mit Drops "Melody" diese Jacke in Gr. S! Nach 9 cm ist von der Vorderseite wie folgt zu stricken: 6 M. Krausrippe (= Blendenm.), M1 über alle M. bis noch 6 M. übrig sind = Blendenm. M1 ist einmal in der Höhe zu stricken und es müssten folglich 192 M. auf der Nadel sein! Frage: Wenn ich M1 einmal in der Höhe stricke, habe ich mehr M. auf der Nadel! Könnte hier das Diagramm nicht richtig übertragen worden sein? Sind 192 M. inkl. der Blendenm. oder exkl.
04.10.2015 - 14:32DROPS Design answered:
Sie haben ja 372 M angeschlagen. je 6 M sind für die Blenden, bleiben 360 M für das Muster. In der ersten R von M.1 stricken Sie jede 5. und 6. M zusammen, d.h. Sie nehmen in dieser R 60 M ab. Bleiben 300 M + 12 Blenden-M übrig. In der 3. R von M.1 nehmen Sie in der ganzen R 120 M ab (Sie stricken die 1. und 2. M und die 4. und 5. M zusammen), bleiben 180 M + 12 Blenden-M übrig = 192 M.
04.10.2015 - 21:22
|
|||||||
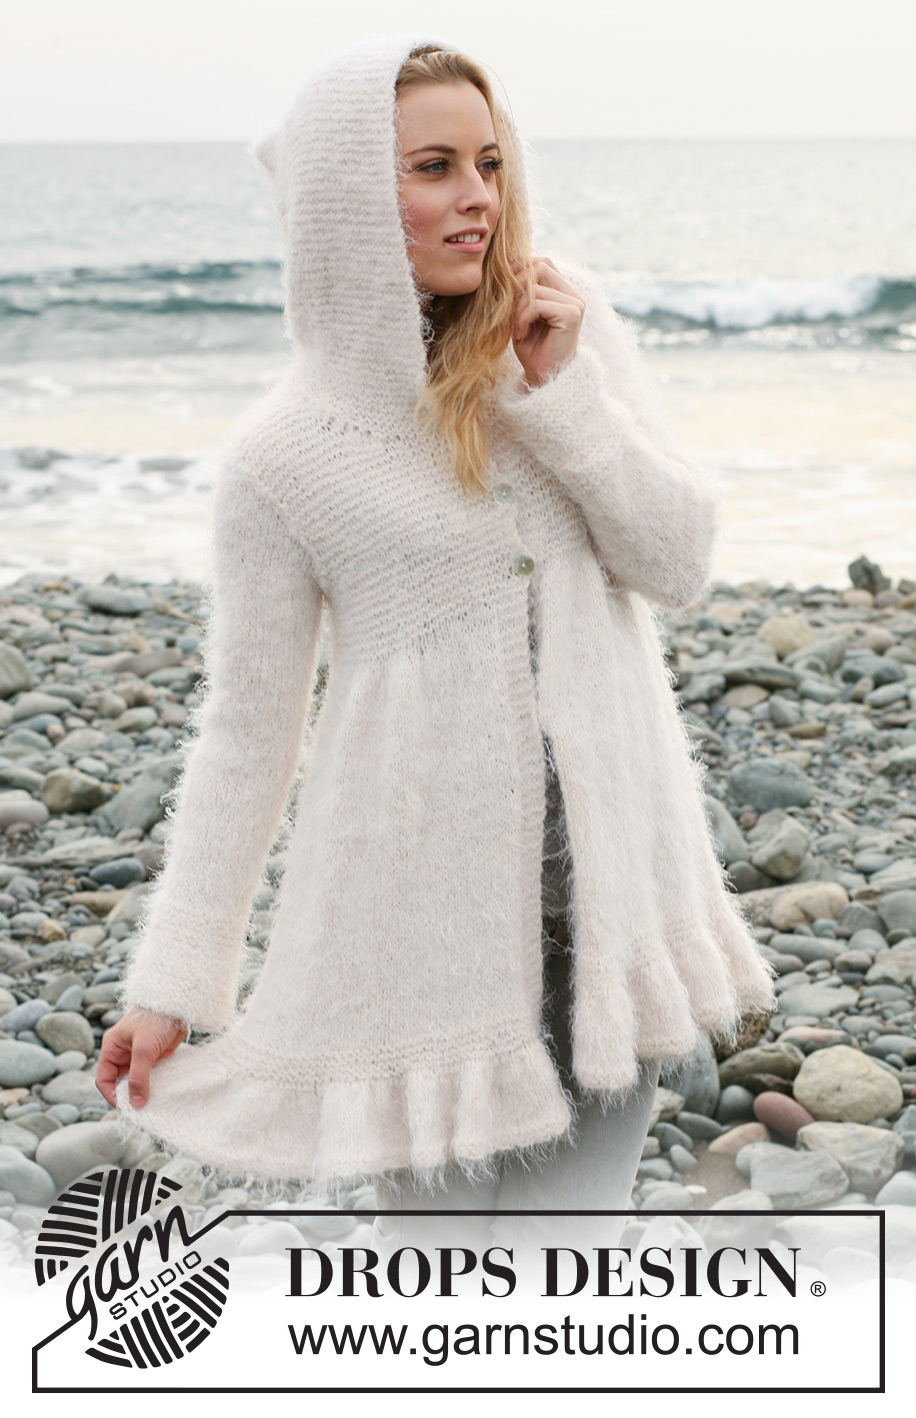
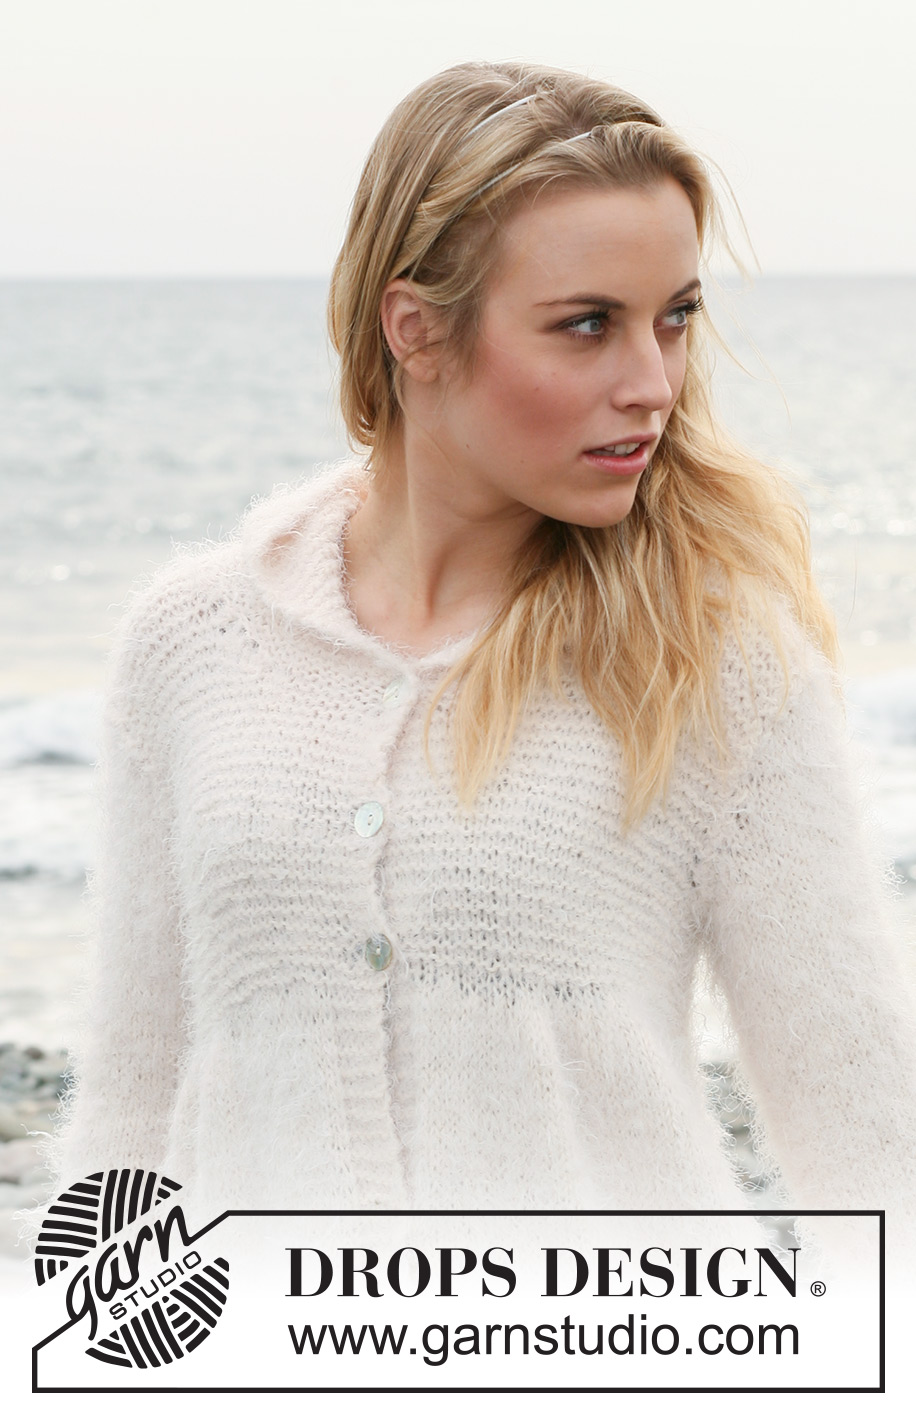
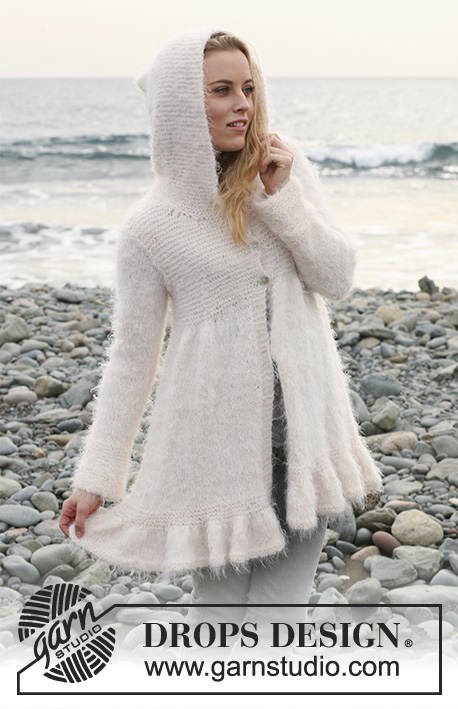
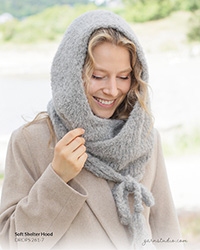
A Winter Tale#awintertalejacket |
|||||||
 |
 |
||||||
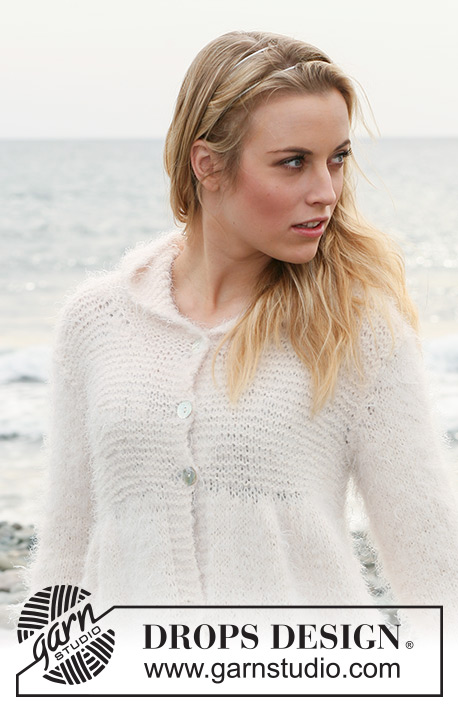
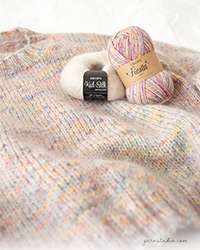
Knitted DROPS jacket with flounce border and hood in 1 thread ”Symphony” or 1 thread Melody or 1 thread ”Merino Extra Fine” + 1 thread ”Kid-Silk”. Size S-XXXL.
DROPS 120-2 |
|||||||
|
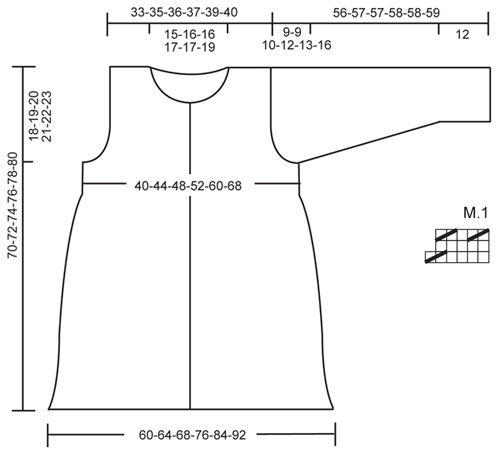
MEASUREMENT TIP: Because of the weight of the yarn make all measurements while the garment is hanging, otherwise it will be too long when worn. GARTER ST (back and forth on needle): K all rows. GARTER ST (in the round): K 1 round, P 1 round. PATTERN: See diagram M.1. (= 6 sts). Diagram shows the pattern from RS. BUTTONHOLES: Make buttonholes on right front band. 1 buttonhole = bind off 4th front band st from mid front and cast on 1 new st on next row. Make buttonholes when piece measures: Size S: 46, 54, 62 cm / 18", 21¼", 20½" Size M: 48, 56, 64 cm / 19", 22", 25¼" Size L: 49, 57, 65 cm / 19¼", 22½", 25½" Size XL: 50, 58, 66 cm / 19¾", 22¾", 26" Size XXL: 51, 57, 63, 69 cm / 20", 22½", 24¾", 27⅛" Size XXXL: 50, 57, 64, 71 cm / 19¾", 22½", 25¼", 28" -------------------------------------------------------- -------------------------------------------------------- JACKET: Worked back and forth on circular needle. Knit with Symphony (as pictured) or 1 thread Melody . Or use 1 thread Merino Extra Fine + 1 thread Kid-Silk or 1 thread Alpaca och 1 thread Vivaldi (= 2 threads) Cast on 372-396-420-468-516-564 sts (includes 6 front band sts each side) on circular needle size 6 mm / US 10. K 4 rows and continue in stockinette st. SEE MEASUREMENT TIP! REMEMBER THE GAUGE! When piece measures 9 cm / 3½" work next row from RS as follows: 6 GARTER STS – see above - M.1 on all sts until 6 sts remain and work these in 6 garter st. The 6 garter sts each side = front bands, work these in garter st throughout. After 1 vertical repeat of M.1 there are 192-204-216-240-264-288 sts on needle. P 1 row from WS, K 8 rows and continue in stockinette st. READ ALL OF THE FOLLOWING SECTION BEFORE CONTINUING! When piece measures 45-46-47-48-49-50 cm / 17¾"-18"-18½"-19"-19¼"-19¾" work next row from RS as follows: 6 garter sts, 7-7-8-8-11-14 stockinette sts, M.1 a total of 5-5-5-6-6-6 times, 16-22-26-26-33-40 stockinette sts, M.1 a total of 5-5-5-6-6-6 times, 14-14-16-16-20-24 stockinette sts, M.1 a total of 5-5-5-6-6-6 times, 16-22-26-26-33-40 stockinette sts, M.1 a total of 5-5-5-6-6-6 times, 7-7-8-8-11-14 stockinette sts, 6 garter sts. After 1 vertical repeat of M.1 like this there are 132-144-156-168-192-216 sts on needle. P 1 row from WS. Change to circular needle size 5.5 mm / US 9. Insert 2 markers in piece, 36-39-42-45-51-57 sts in from each side (back piece = 60-66-72-78-90-102 sts). Continue in garter st on all sts. AT THE SAME TIME when piece measures 46-48-49-50-51-50 cm / 18"-19"-19¼"-19¾"-20"-19¾" make BUTTONHOLES on right front band – see above! When piece measures 52-53-54-55-56-57 cm / 20½"-21"-21¼"-21⅝"-22"-22½" bind off 6 sts each side (= 3 sts each side of marker) and complete front and back pieces separately. BACK PIECE: = 54-60-66-72-84-96 sts. Bind off to shape the armhole each side at the beg of every row: 2 sts 1-1-2-3-4-6 times and 1 st 0-2-2-2-5-6 times = 50-52-54-56-58-60 sts. Continue in garter st. When piece measures 68-70-72-74-76-78 cm / 26¾"-27½"-28⅜"-29⅛"-30"-30¾" bind off the middle 20-22-22-24-24-26 sts for neck and complete each shoulder separately. Bind off 1 st on neckline on next row = 14-14-15-15-16-16 sts left on shoulder. Bind off when piece measures 70-72-74-76-78-80 cm / 27½"-28⅜"-29⅛"-30"-30¾"-31½. LEFT FRONT PIECE: = 33-36-39-42-48-54 sts. Bind off for armhole at the side as described for back piece = 31-32-33-34-35-36 sts. When piece measures 63-65-67-68-70-72 cm / 24¾"-25½"-26⅜"-26¾"-27½"-28⅜" slip 11 sts towards mid front on a stitch holder. Bind off to shape the neckline at the beg of every row from mid front: 2 sts 3 times and 1 st 0-1-1-2-2-3 times = 14-14-15-15-16-16 sts left on shoulder. Bind off when piece measures 70-72-74-76-78-80 cm / 27½"-28⅜"-29⅛"-30"-30¾"-31½. RIGHT FRONT PIECE: Like left front piece, but mirrored. NOTE! Remember BUTTONHOLES! SLEEVE: Worked in the round on double pointed needles. Cast on 34-34-36-36-38-40 sts on double pointed needles size 5.5 mm / US 9. Work GARTER ST – see above! Insert a marker at beg of round. When piece measures 12 cm / 4¾" change to double pointed needles size 6 mm / US 10 and continue in stockinette st on all sts. When piece measures 13 cm / 5⅛" inc 1 st each side of marker and repeat the inc on every 6-4-3.5-3-2.5-2 cm / 2⅜"-1½"-1¼"-1⅛"-⅞"-¾" a total of 6-8-9-11-12-12 times = 46-50-54-58-62-64 sts. When piece measures 47-47-47-46-45-43 cm / 18½"-18½"-18½"-18"-17¾"-17" - NOTE! Less for the larger sizes because of longer sleeve cap and wider shoulder – bind off 6 sts mid under sleeve (= 3 sts each side of marker) and complete piece back and forth on needle. Bind off for sleeve cap each side at the beg of every row: 2 sts 1-2-2-2-2-1 times, 1 st 5-3-4-6-7-12 times, then 2 sts each side until piece measures 55-55-56-57-57-58 cm / 21⅝"-21⅝"-22"-22½"-22½"-22¾", now bind off 3 sts 1 time each side and bind off remaining sts. Piece measures approx 56-56-57-58-58-59 cm / 22"-22"-22½"-22¾"-22¾"-23¼". ASSEMBLY: Sew shoulder seams. Set in sleeves. Sew on buttons. HOOD: Worked back and forth on circular needle. Pick up 70-74-74-78-78-84 sts round neckline (includes sts on stitch holders) on circular needle size 5.5 mm / US 9. K 3 rows, then K 1 row, AT THE SAME TIME inc 14-14-14-16-16-18 sts evenly (do not inc on 6 sts each side over front bands) = 84-88-88-94-94-102 sts. Continue in garter st and bind off when hood measures 36-36-37-37-38-38 cm / 14¼"-14¼"-14½"-14½"-15"-15". Fold hood double and sew tog at the top. |
|||||||
Diagram explanations |
|||||||
|
|||||||
 |
|||||||
Have you finished this pattern?Tag your pictures with #dropspattern #awintertalejacket or submit them to the #dropsfan gallery. Do you need help with this pattern?You'll find 23 tutorial videos, a Comments/Questions area and more by visiting the pattern on garnstudio.com. © 1982-2025 DROPS Design A/S. We reserve all rights. This document, including all its sub-sections, has copyrights. Read more about what you can do with our patterns at the bottom of each pattern on our site. |
|||||||

With over 40 years in knitting and crochet design, DROPS Design offers one of the most extensive collections of free patterns on the internet - translated to 17 languages. As of today we count 319 catalogs and 12048 patterns - 12038 of which are translated into English (US/in).
We work hard to bring you the best knitting and crochet have to offer, inspiration and advice as well as great quality yarns at incredible prices! Would you like to use our patterns for other than personal use? You can read what you are allowed to do in the Copyright text at the bottom of all our patterns. Happy crafting!
Post a comment to pattern DROPS 120-2
We would love to hear what you have to say about this pattern!
If you want to leave a question, please make sure you select the correct category in the form below, to speed up the answering process. Required fields are marked *.