
Popular categories
Looking for a yarn?


Comments / Questions (23)
![]() Betty wrote:
Betty wrote:
Totally beautiful. How do I get the pattern in english?
19.04.2010 - 05:06
![]() MOREAU wrote:
MOREAU wrote:
Super modèle et votre site extra, enfin des modèles modernes !
24.02.2010 - 14:27
![]() Lisbe wrote:
Lisbe wrote:
Koska saan ohjeet suomeksi? pian alan etsia alkuperaisella kielella kun kevat koittaa
12.02.2010 - 14:39
![]() INGER wrote:
INGER wrote:
Yndig bluse
30.01.2010 - 17:14
![]() Pia-charlotte wrote:
Pia-charlotte wrote:
Endelig en bluse med bærestykke de er der ikke mange der er og især ikke med mønstre
28.01.2010 - 00:41
![]() Anne wrote:
Anne wrote:
Kjempefin! Halsen er super - og jeg kunne godt tenke meg den med lange ermer, ja
25.01.2010 - 13:05Janette wrote:
Wonderful design! love it.
25.01.2010 - 11:18
![]() Eva wrote:
Eva wrote:
Nydelig hals - en riktig fin jakke.
17.01.2010 - 22:30
![]() Sara wrote:
Sara wrote:
Mycket vacker blus. Väntar i spänning på mønstret...
16.01.2010 - 01:17
![]() Renate wrote:
Renate wrote:
Ser fram emot mönster,min favorit!!
15.01.2010 - 09:44
|
|||||||||||||||||||
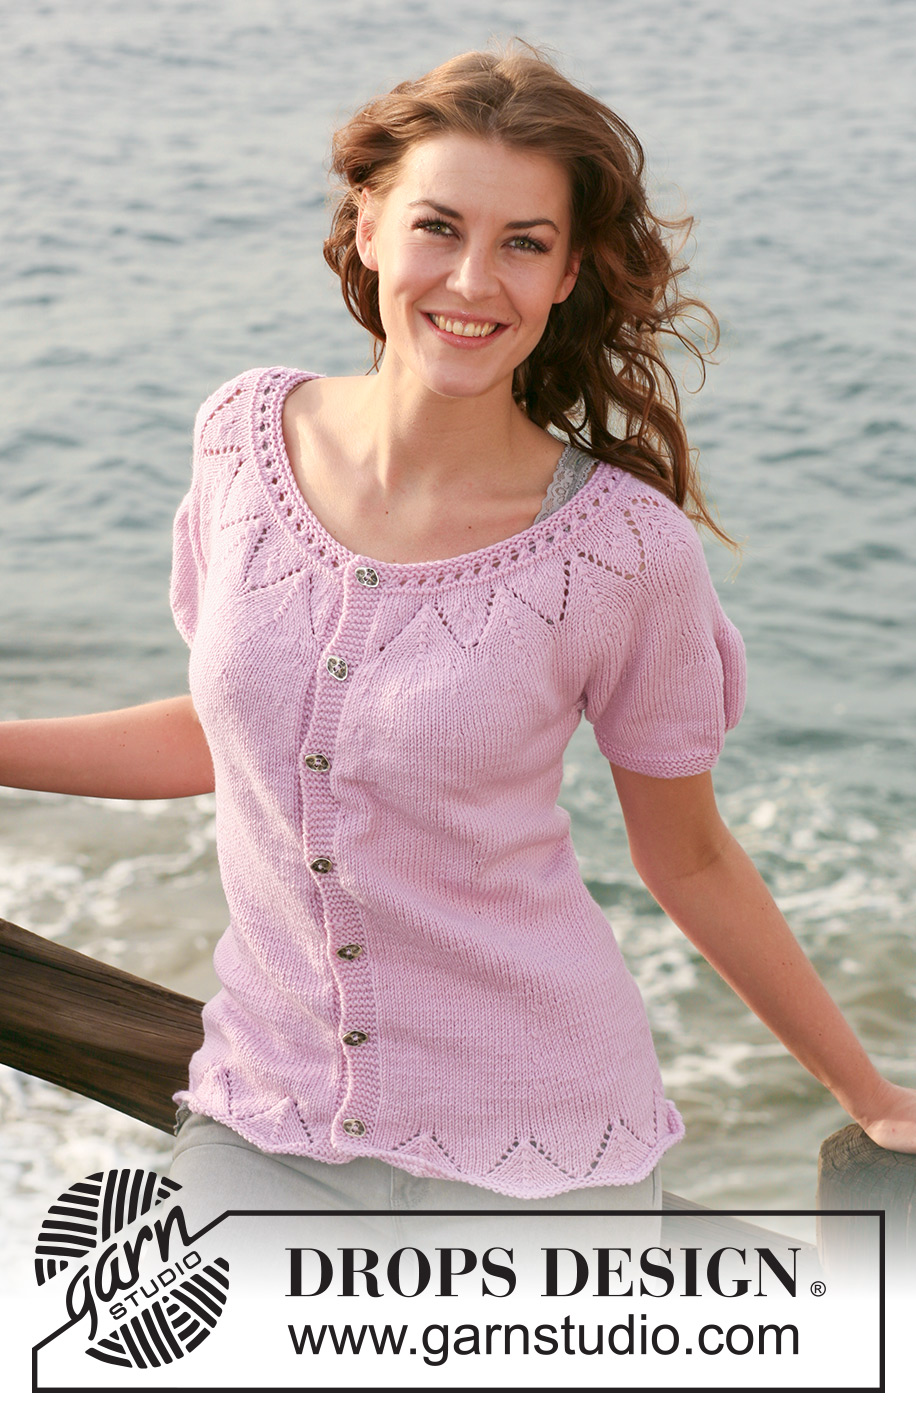
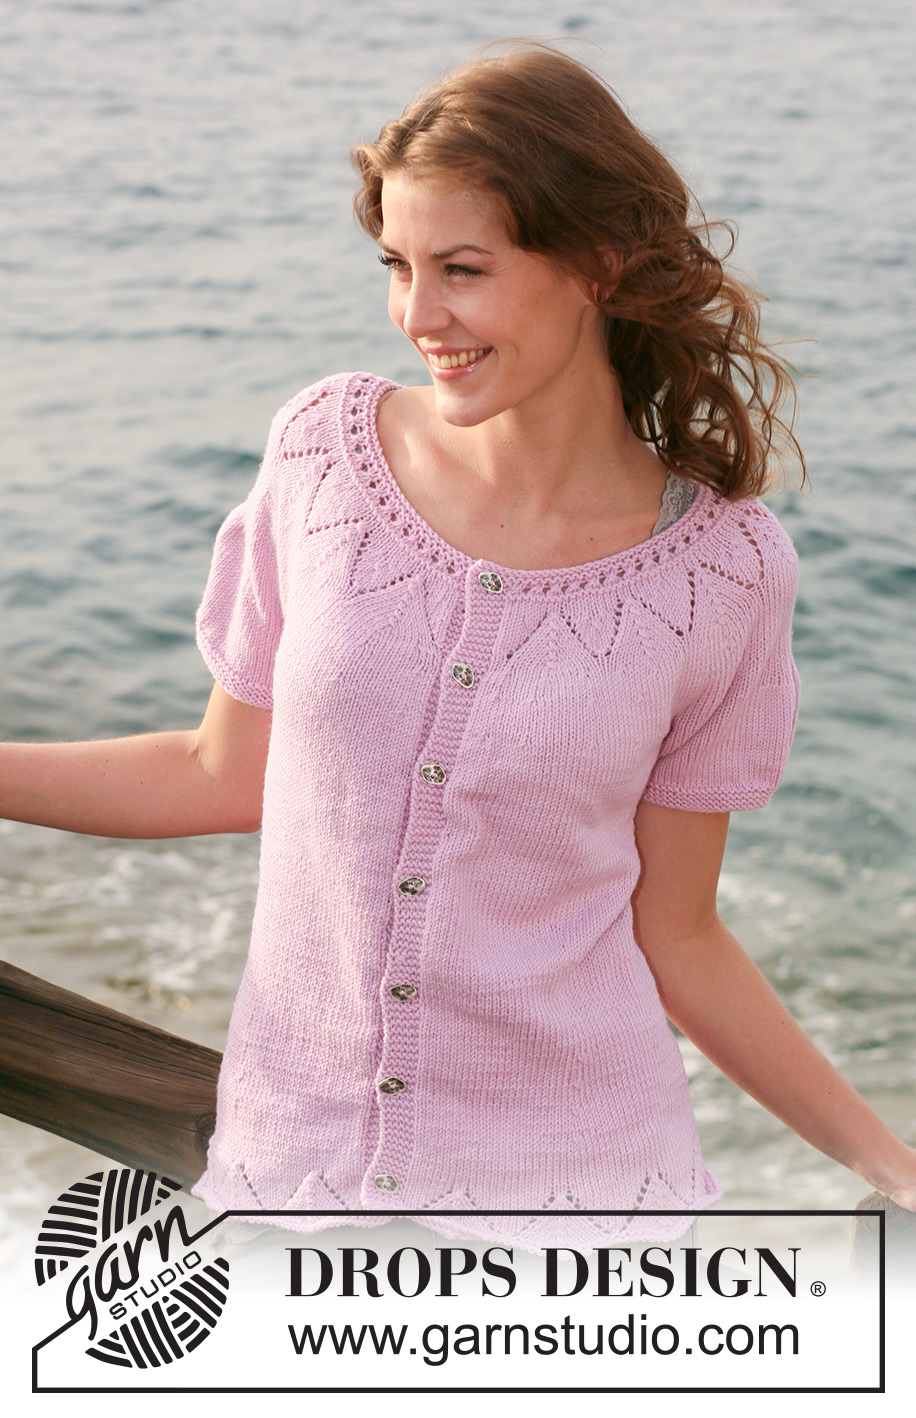
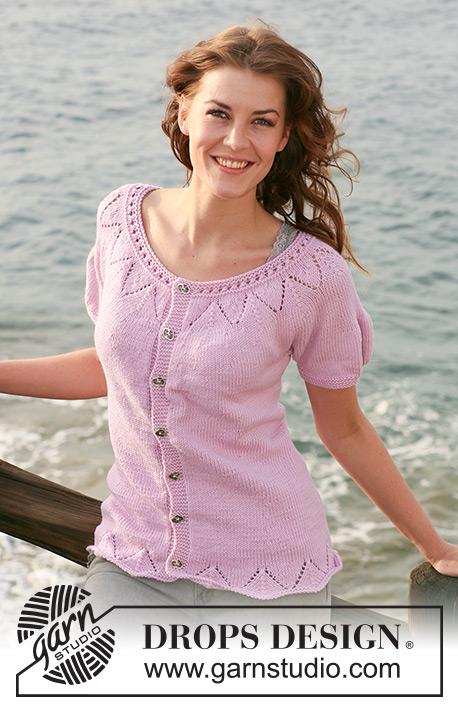
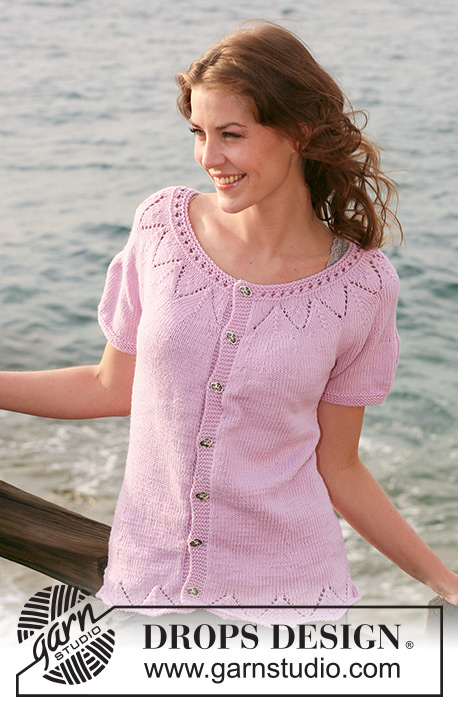
Sweet Cherie#sweetcheriecardigan |
|||||||||||||||||||
 |
 |
||||||||||||||||||
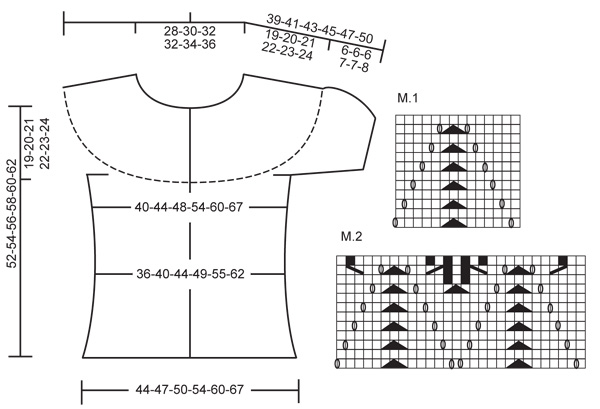
Knitted DROPS jacket with lace pattern and round yoke in ”Merino Extra Fine”. Size S - XXXL.
DROPS 119-36 |
|||||||||||||||||||
|
GARTER ST (back and forth on needle): K all rows. GARTER ST (in the round): K 1 round, P 1 round. PATTERN: See diagram M.1 and M.2. Diagrams show the pattern from RS. First row in diagram = RS. DECREASING TIP (applies to darts front and back): Dec as follows after marker-1 and -3: K2 tog. Dec as follows before marker-2 and -4: slip 1 st as if to K, K1, psso. BUTTONHOLES: Make buttonholes on right front band. 1 buttonhole = bind off 4th front band st from mid front and cast on 1 new st on next row. Make buttonholes when piece measures: SIZE S: 3, 11, 19, 27, 35, 43, 51 cm / 1⅛",4⅜",7½",10⅝",13¾",17",20" SIZE M: 3, 12, 20, 29, 37, 45, 53 cm / 1⅛",4¾",8",11⅜",14½",17¾",21". SIZE L: 3, 12, 21, 30, 38, 47, 55 cm / 1⅛",4¾",8¼",11¾",15",18½",21⅝" SIZE XL: 3, 12, 21, 30, 39, 48, 57 cm / 1⅛",4¾",8¼",11¾",15¼",19",22½" SIZE XXL: 3, 13, 22, 32, 41, 50, 59 cm / 1⅛",5⅛",8¾",12½",16⅛",19¾",23¼" SIZE XXXL: 3, 13, 23, 33, 42, 51, 61 cm / 1⅛",5⅛",9",13",16½",20",24" -------------------------------------------------------- -------------------------------------------------------- BODY PIECE: Worked back and forth on circular needle from mid front. Fold circular needle double and cast on using 2 needles (to make cast on row elastic). Cast on 195-209-223-237-265-293 sts (includes 6 front band sts each side towards mid front) with Merino Extra Fine. Remove 1 needle and work 2 rows GARTER ST - see above (first row = RS). Now work 2 rows stockinette st with the 6 front band sts each side in garter st. Work next row as follows from RS: 6 front band sts in garter st, M.1 on the next 182-196-210-224-252-280 sts, 1 stockinette st and 6 front band sts in garter st. Continue in pattern like this - REMEMBER BUTTONHOLES on right front band - see above! After 1 vertical repeat of M.1 continue in stockinette st with front bands in garter st as before. AT THE SAME TIME when piece measures 6 cm / 2⅜" insert 4 markers in piece as follows (for darts front and back): work 28-28-30-30-32-33 sts, insert marker-1 before next st, work 48-54-58-64-74-86 sts, insert marker-2 before next st, work 43-45-47-49-53-55 sts, insert marker-3 before next st, work 48-54-58-64-74-86 sts, insert marker-4 before next st and work remaining 28-28-30-30-32-33 sts on needle. Now dec on next row from RS: 1 st after marker-1 and -3 and 1 st before marker-2 and -4 – see DECREASING TIP, and repeat the dec on every 4-4-4-6-6-6 row a total of 8-7-7-5-5-5 times = 163-181-195-217-245-273 sts. When piece measures 19-19-20-20-21-21 cm / 7½"-7½"-8"-8"-8¼"-8¼" inc 1 st after marker-1 and -3 and 1 st before marker-2 and -4 - inc 1 st by picking up st from previous row and work this in stockinette st. Inc on every 8th row a total of 4-4-5-5-5-5 times = 179-197-215-237-265-293 sts. When piece measures 33-34-35-36-37-38 cm / 13"-13⅜"-13¾"-14¼"-14½"-15" work next row as follows from WS: Work 44-48-53-58-65-72 sts, bind off 8 sts for armhole, work 75-85-93-105-119-133 sts (= back piece), bind off 8 sts for armhole and work remaining 44-48-53-58-65-72 sts. Put piece aside and knit the sleeves. SLEEVE: Worked in the round on double pointed needles. Cast on 58-60-62-64-68-72 sts on double pointed needles size 3.5 mm / US 4. Insert a marker at beg of round (= mid under sleeve). Work GARTER ST - see above – for approx 2 cm / ¾". Change to double pointed needles size 4 mm / US 6. Now insert 1 marker after 20-21-21-22-23-25 sts and 1 marker after 38-39-41-42-45-47 sts (= 18-18-20-20-22-22 sts between markers mid upper sleeve). Work next round as follows: 20-21-21-22-23-25 stockinette sts, work 2 sts in each of the next 18-18-20-20-22-22 sts mid upper sleeve and work stockinette st on the last 20-21-21-22-23-25 sts. There are now 76-78-82-84-90-94 sts on round. Continue in stockinette st on all sts. AT THE SAME TIME on the first round in stockinette st after the inc mid upper sleeve inc 1 st each side of marker mid under sleeve, and repeat the inc on every other row a total of 3-3-4-5-5-5 times = 82-84-90-94-100-104 sts. When piece measures 6-6-6-7-7-8 cm / 2⅜"-2⅜"-2⅜"-2¾"-2¾"-3⅛" work next round as follows: bind off 4 sts, work 19-20-21-23-24-26 stockinette sts, K2 tog on the next 36-36-40-40-44-44 sts, work 19-20-21-23-24-26 stockinette sts and bind off the remaining 4 sts = 56-58-62-66-70-74 sts on needle. Cut the thread, put piece aside and knit the other sleeve. YOKE: Slip sleeves on the same circular needle as body piece where bind off for armholes = 275-297-323-353-389-425 sts. Insert a marker in piece. Work stockinette st back and forth on needle (first row = RS). When piece measures 2-3-3-2-3-3 cm / ¾"-1⅛"-1⅛"-¾"-1⅛"-1⅛" measured from marker work next row from RS and dec as follows - NOTE: do not dec on front bands and on the 18-18-20-20-22-22 sts between markers mid upper sleeve. SIZE S: Dec 12 sts evenly. Then dec 13 sts evenly when piece measures 5 and 8 cm / 2" and 3⅛" from marker = 237 sts. SIZE M: Dec 20 sts evenly. Repeat the dec when piece measures 6 and 9 cm / 2⅜" and 3½" from marker = 237 sts. SIZE L: Dec 15 sts evenly. Repeat the dec when piece measures 5 cm / 2" from marker. Then dec 14 sts evenly when piece measures 7 and 9 cm / 2¾" and 3½" from marker = 265 sts. SIZE XL: Dec 22 sts evenly. Repeat the dec when piece measures 5, 8 and 11 cm / 2", 3⅛" and 4⅜" from marker = 265 sts. SIZE XXL: Dec 24 sts evenly. Repeat the dec when piece measures 6, 9 and 12 cm / 2⅜", 3½" and 4¾" from marker = 293 sts. SIZE XXXL: Dec 27 sts evenly. Repeat the dec when piece measures 6 cm / 2⅜" from marker. Then dec 26 sts evenly when piece measures 8, 10 and 12 cm / 3⅛", 4" and 4¾" from marker = 293 sts. ALL SIZES: When yoke measures 10-11-12-13-14-15 cm / 4"-4⅜"-4¾"-5 ⅛"-5½-6" work next row as follows from RS: 6 front band sts, M.2 on the next 224-224-252-252-280-280 sts, 1 stockinette st and 6 front band sts. Continue in pattern like this, AT THE SAME TIME dec as shown in diagram. After 1 vertical repeat of M.2 there are 189-189-211-211-233-233 sts left on needle. Work 3 rows stockinette st (first row = RS), AT THE SAME TIME on first row dec 18-6-16-16-26-14 sts evenly (do not dec on front bands) = 171-183-195-195-207-219 sts. K 1 row from WS and then work 2 rows stockinette st. Now work eyelet row as follows: 6 front band sts, K3 tog, * 1 YO, K3 tog *, repeat from *-* and finish with 6 front band sts = 117-125-133-133-141-149 sts left on needle. Work 2 rows stockinette st, K 1 row from WS and K 1 row from RS. Bind off loosely with K sts from WS. Piece measures approx 52-54-56-58-60-62 cm / 20½"-21¼"-22"-22¾"-23⅝"-24⅜". ASSEMBLY: Sew openings under sleeves. Sew on buttons. |
|||||||||||||||||||
Diagram explanations |
|||||||||||||||||||
|
|||||||||||||||||||
 |
|||||||||||||||||||
Have you finished this pattern?Tag your pictures with #dropspattern #sweetcheriecardigan or submit them to the #dropsfan gallery. Do you need help with this pattern?You'll find 23 tutorial videos, a Comments/Questions area and more by visiting the pattern on garnstudio.com. © 1982-2026 DROPS Design A/S. We reserve all rights. This document, including all its sub-sections, has copyrights. Read more about what you can do with our patterns at the bottom of each pattern on our site. |
|||||||||||||||||||


With over 40 years in knitting and crochet design, DROPS Design offers one of the most extensive collections of free patterns on the internet - translated to 17 languages. As of today we count 325 catalogs and 12291 patterns - 12281 of which are translated into English (US/in).
We work hard to bring you the best knitting and crochet have to offer, inspiration and advice as well as great quality yarns at incredible prices! Would you like to use our patterns for other than personal use? You can read what you are allowed to do in the Copyright text at the bottom of all our patterns. Happy crafting!
Post a comment to pattern DROPS 119-36
We would love to hear what you have to say about this pattern!
If you want to leave a question, please make sure you select the correct category in the form below, to speed up the answering process. Required fields are marked *.