
Popular categories
Looking for a yarn?


Comments / Questions (28)
![]() Nicole Caplier wrote:
Nicole Caplier wrote:
Bonjour, j'ai un doute dans l'envoi et la réception de mon message la semaine dernière. Je m'interrogeais par rapport au fait de rabattre les premières mailles après les 4 rangs de côtes. Cela me parait bizarre; on obtient un décroché ou ai-je mal interprété les explications? merci
16.06.2025 - 18:59DROPS Design answered:
Bonjour Mme Caplier, tout à fait, c'est bien juste ainsi; vous diminuez ensuite pour l'échancrure du devant, dans la continuité de ces mailles rabattues. Bon tricot!
17.06.2025 - 09:14
![]() Audrey wrote:
Audrey wrote:
Bonjour, j’aimerais des explications par rapport au moment des augmentations et diminutions au niveau du Col, Encolure et côté. J’avoue être un peu perdue et ne pas comprendre et ne pas savoir quoi faire. Pouvez vous m’aider svp. Quelle est la différence entre la partie col et encolure?
05.11.2024 - 18:21DROPS Design answered:
Bonjour Audrey, pour le col: on va augmenter à 3 m du bord et tricoter toutes les nouvelles mailles en jersey envers pour ainsi former le col; pour l'encolure, on va diminuer après (pour le devant droit) / avant (pour le devant gauche) toutes les mailles du col, autrement dit, le nombre de mailles jersey envers va augmenter pour le col et le nombre de mailles jersey endroit diminue pour former l'encolure. Bon tricot!
06.11.2024 - 07:56
![]() Marie-Christine G wrote:
Marie-Christine G wrote:
Bonsoir, je rencontre des problèmes quand je commence les augmentations et diminutions col/encolure: il est noté de faire les augmentations sur l’envers, or si c’est tous les 3 rangs, cela donne une alternance, une fois sur l’envers, une fois sur l’endroit. Pour les diminutions tous les 4 rangs, c’est bon. D’autre part, le col ne fait pas comme sur la photo, il se rentre sur l’envers du tricot et non sur l’endroit. Pouvez-vous m’aider? Merci. Marie-Christine g
19.11.2021 - 17:08DROPS Design answered:
Bonjour Marie-Christine, les augmentations du col se faisant tous les 3 rangs vous les ferez effectivement alternativement sur l'endroit et sur l'envers mais elles se tricoteront en jersey envers = à l'envers sur l'endroit et à l'endroit sur l'envers. S'il se retourne sur l'envers même à la fin, un blocage devrait l'aider à le retourner dans le bon sens. Bon tricot!
22.11.2021 - 07:13
![]() Anneke Dumoulin wrote:
Anneke Dumoulin wrote:
Welke kant bedoeld men en hoe do je daLees het onderstaande eerst goed door voordat u verder gaat: Brei bij een hoogte van 8 cm 4 nld boordst over 7-9-9-9-11 st op het middenvoorpand kant (incl. de 3 kantst die worden doorgebreid zoals eerst – brei de overige st in tricotst). Kant vervolgens de buitenste 4-6-6-6-8t die 6 steken afkanten?
18.01.2021 - 11:31DROPS Design answered:
Dag Anneke,
De steken die je af moet kanten is aan de kant van van midden voor, dus aan de kant waar je ook gaat minderen voor de v-hals.
22.01.2021 - 16:05
![]() Anneke Dumoulin wrote:
Anneke Dumoulin wrote:
. Kant vervolgens de buitenste 4-6-6-6-8 st af in patroon.
18.01.2021 - 11:28
![]() Yvonne wrote:
Yvonne wrote:
Direct na het meerderen voor de kraag moet je ook beginnen met minderen. Maar dan zijn er naalden waarbij een meerdering en een mindering naast elkaar komen. Klopt dat?
28.11.2020 - 18:52DROPS Design answered:
Dag Yvonne,
Ja dat klopt; de meerderingen worden gemaakt om het stuk in averechte tricotsteek breder te maken en de minderingen worden gedaan om de v-hals te creëren.
30.11.2020 - 20:07
![]() Tholozan wrote:
Tholozan wrote:
Bonjour, je suis sur lexplication du devant. et je ne comprends pas les 9m de cotes en plein milieu a 8 cm de hauteur? cela fait deux fois que je detricote car je ne comprends pas ... merci de maider a bientot,marie
12.11.2020 - 08:12DROPS Design answered:
Bonjour Marie, vous tricotez simplement 4 rangs de côtes sur les 9 mailles (tailles M, L et XL) côté milieu devant = encolure - tricotez les autres mailles en jersey comme avant, puis rabattez les 6 premières de ces 9 mailles pour former la bordure de la taille = il reste 3 mailles que vous tricotez comme avant: 1 m lis au point mousse, 1 m end, 1 m env. Bon tricot!
12.11.2020 - 09:30
![]() Rosanne wrote:
Rosanne wrote:
Dat zie ik nog niet voor me hoe dat moet, moeten de steken dan niet eerst afgekant worden?
16.12.2019 - 14:41DROPS Design answered:
Dag Rosanne,
Ze zouden ook afgekant kunnen worden en daarna aan elkaar genaaid, maar deze ontwerper heeft het op deze manier bedacht, wellicht om ervoor te zorgen dat de naad wat minder dik wordt.
16.12.2019 - 16:45
![]() Rosanne wrote:
Rosanne wrote:
De vorige vraag heb ik inmiddels opgelost. Echter: Wat doe ik bij de afwerking van de kraag (het uiterste deel dat achterin de nek komt) met de 6 steken die op een hulpdraad zijn gezet? Hoe naai/krijg ik die aan elkaar?
09.12.2019 - 22:45DROPS Design answered:
Dag Rosanne,
Het is de bedoeling dat je de kraag midden achter dicht maast, dus de 2 korte kanten waar je de steken op de hulpdraden hebt gezet, worden ten elkaar aan genaaid.
16.12.2019 - 13:56
![]() Rosanne wrote:
Rosanne wrote:
Hallo, ik heb een vraag over de kraag op de voorpanden. Er staat: Kraag: begin de vlgde nld de meerderingen voor de kraag naast de 3 kantst. Meerder 17x 1 st in elke 3e nld. Halsmindn: minder tegelijkertijd na de 1e meerd. voor de kraag (voor mt M/L) 22x 1 st. “ Moet dit ook in elke 3e nld? Bij de tips staat: alle minderingen komen op de goede kant naast de 3 kantst. Maar dan heb je een meerdering en een mindering naast elkaar. Logischer lijkt me om de minderingen naast de kraag te doen.
10.11.2019 - 18:41
|
|
DROPS 80-15 |
|
|
|
|
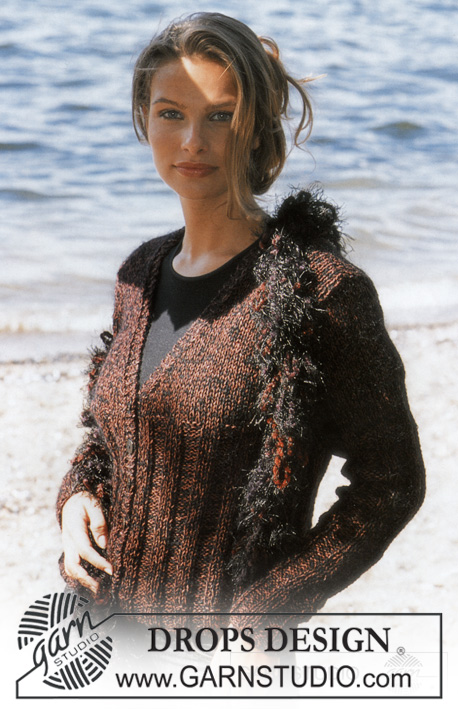
DROPS Cardigan in Alaska
DROPS 80-15 |
|
|
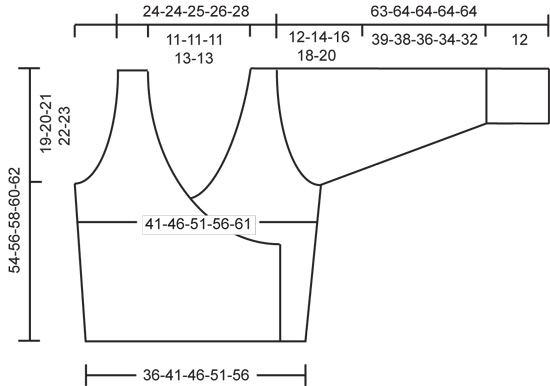
CARDIGAN: Gauge: 16 sts x 20 rows on larger needles in stockinette st = 10 x 10 cm Rib: * K 1, P 1 *. Repeat from * - *. Lace Rib Pattern: Row 1 (right side): * K 1, yo, sl 1 as if to P *, repeat from * - *. Row 2 (wrong side): * P 1 st and yo tog, K 1 *, repeat from * - *. Repeat rows 1 - 2. Knitting tips (for front shaping): All decs are made from right side. Dec 1 st inside 3 edge sts (knit as: K 1 (edge st knit in garter st), K 1, P 1) + the sts increased for collar, as follows: After edge/collar sts: Slip 1 st as if to knit, K 1, psso. Before edge/collar sts: K 2 tog. Back: Cast on 60-68-76-84-92 sts on smaller needles and knit 4 rows garter st. Change to larger needles and stockinette st. When the piece measures 12 cm inc 1 st at each side every 5-5-5-6-6 cm 4 times = 68-76-84-92-100 sts. When the piece measures 35-36-37-38-39 cm bind off 3-4-5-6-8 sts at each side. Dec 1 st for armhole at each side every other row 12-15-17-19-20 times = 38-38-40-42-44 sts. When the piece measures 52-54-56-58-60 cm bind off the center 16-16-16-18-18 sts for the neck. On the next row dec 1 st at each neck edge = 10-10-11-11-12 sts remain on each shoulder. Bind off when the piece measures 54-56-58-60-62 cm. Right Front: Cast on 44-52-60-68-76 sts on smaller needles and knit 4 rows garter st. Change to larger needles and stockinette st, keeping the 3 edge sts (buttonband) knit as follows from edge (seen from the right side): K 1 (edge st knit in garter st), K 1 and P 1. Read the entire next section before knitting: When the piece measures 8 cm knit 4 rows rib over the 7-9-9-9-11 sts at center front edge (incl. the 3 edge sts knit as before – knit the remaining sts in stockinette st). Then bind off the outermost 4-6-6-6-8 sts in rib. Collar: On the next row begin to inc for the collar inside 3 edge sts knit as before. Inc by pulling up sts from previous row – knit increased sts in reverse stockinette st. Inc 1 st every 3rd row a total of 17 times. Neck shaping: At the same time after 1st inc for collar, dec 1 st (see knitting tips): 16-18-22-27-29 times: Sizes XS, S/M and M/L: every 4th row. Sizes XL and XXL: alternately every 2nd and every 4th row. Side inc: When the piece measures 12 cm inc at the side as on back. Armhole: When the piece measures 35-36-37-38-39 cm bind off for armhole at the side as on back. After all shaping is complete 30-30-31-31-32 sts remain. When the piece measures 54-56-58-60-62 cm bind off the 10-10-11-11-12 shoulder-sts. Continue to knit the 20 collar sts in reverse stockinette st (with the 3 edge sts as before) for approx. 6-6-6-7-7 cm, then put sts on a st holder. Left front: Cast on and knit the same as the right, reversing shaping. Sleeve: Cast on 38-40-42-44-46 sts on larger needles. Knit lace rib pattern – see instructions above. When the piece measures 12 cm change to stockinette st. When the piece measures 13 cm inc 1 st at each side every 4-3.5-3-2.5-2.5 cm 10-11-11-12-12 times = 58-62-64-68-70 sts. When the piece measures 51-50-48-46-44 cm bind off for sleeve cap at each side every other row: 3 sts 1 time and 2 sts 2-2-1-1-1 times, then dec 1 st at each side until the piece measures 62-63-63-63-63 cm, then bind off 3 sts at each side 1 time. The piece measures approx. 63-64-64-64-64 cm, bind off the remaining sts. Assembly: Sew shoulder seams. Sew the collar at center back. Sew the collar to neckband. Sew in sleeves. Sew sleeve and side seams using edge sts as a seam allowance, leaving an opening approx. 2 cm in the right side seam for belt – start opening 7 cm from lower edge. Belt: Pick up 11 sts on smaller needles along left front – start where neck shaping begins and pick up over approx. 4 cm below. Knit rib, keeping 1 st in garter st at each edge and begin rib with K 1. When belt measures 3 and 6 cm dec 1 st at each side (inside of edge st) = 7 sts. Knit until belt measures approx. 70-75-80-85-90 cm, bind off in rib. Repeat on right front. SCARF: Measurement: approx. 20 x 180 cm [7⅞" x 70⅞"] Materials: Garnstudio HIGHLANDER 90% wool, 10% nylon/50 g./80 m./87 yards 150 gr nr 14, red variegated DROPS 8 mm [US 11] needles, or size needed to obtain correct gauge. Gauge: 10 sts x 16 rows in rib = 10 x 10 cm. Rib: * K 3, P 3 *, repeat from * - *. Scarf: Cast on 20 sts loosely and knit rib, keeping 1 edge st at each side as follows: slip the edge st at the beginning of each row, K the edge st at the end of each row. When the piece measures 180 cm bind off all sts in rib. |
|
 |
|
Have you finished this pattern?Tag your pictures with #dropspattern or submit them to the #dropsfan gallery. Do you need help with this pattern?You'll find 19 tutorial videos, a Comments/Questions area and more by visiting the pattern on garnstudio.com. © 1982-2026 DROPS Design A/S. We reserve all rights. This document, including all its sub-sections, has copyrights. Read more about what you can do with our patterns at the bottom of each pattern on our site. |


With over 40 years in knitting and crochet design, DROPS Design offers one of the most extensive collections of free patterns on the internet - translated to 17 languages. As of today we count 324 catalogs and 12290 patterns - 12280 of which are translated into English (US/in).
We work hard to bring you the best knitting and crochet have to offer, inspiration and advice as well as great quality yarns at incredible prices! Would you like to use our patterns for other than personal use? You can read what you are allowed to do in the Copyright text at the bottom of all our patterns. Happy crafting!
Post a comment to pattern DROPS 80-15
We would love to hear what you have to say about this pattern!
If you want to leave a question, please make sure you select the correct category in the form below, to speed up the answering process. Required fields are marked *.