
Popular categories
Looking for a yarn?


Comments / Questions (26)
![]() Reese Curtis wrote:
Reese Curtis wrote:
Hello! I just finished knitting the squares, and I want to block the squares before I sew them together. About how big should each square be after blocking? Thank you so much!
31.12.2025 - 21:28DROPS Design answered:
Hi Reese, difficult to say. It depends on your tension. I would sew the squares together first, but not too tigh, and then block the blanket. Happy knitting!
05.01.2026 - 13:42
![]() Mari Sømme wrote:
Mari Sømme wrote:
Hei, Dette står i oppskriften: ØKETIPS: Alle økninger gjøres fra retten. Det økes 1 m ved å lage ett kast innenfor 1 m, på neste p strikkes kastet vridd rett (dvs strikk i bakre del av m istedenfor fremre) for å unngå hull. I diagrammet står det ikke at noen masker skal strikkes vridd RETT (sort sirkel er kast og vridd VRANGT). Er det en feil i oppskriften, eller så lurer jeg på hvor det skal strikkes VRIDD RETT?
01.02.2023 - 10:40DROPS Design answered:
Hej Mari, du finder ØKETIPS'et på "KORTSIDEN" :)
03.02.2023 - 11:15
![]() Mari Sømme wrote:
Mari Sømme wrote:
Hei, ang øketips; det står at kastet strikkes vridd rett. Det står ikke i mønsteret hvilke kast det gjelder? Er det de inni bladet eller de langs kanten av mønsteret? På bildet ser det ut som de ikke strikkes vridd, da hullene er godt synlige.
26.01.2023 - 00:29DROPS Design answered:
Hei Mari. Om du ser på teksten til diagramforklaringen vil du se hvilken kast skal strikkes vridd (sort oval sirklet) og hvilken kast skal strikkes slik at det blir et godt synlig hull (oval sirkel med en strek i midten). mvh DROPS Design
30.01.2023 - 11:37
![]() Eeva Hänninen wrote:
Eeva Hänninen wrote:
Hei, kuvion keskivaiheilla tulee kavennuksia 2 silmukkaa ja samalla kerroksella lisäyksiä 2 silmukkaa kuvion molemmissa reunoissa, kuviossa kuitenkin piirretty että silmukat lisääntyy, niin mitä kohtaa en nyt ymmärrä, missä kohdassa pitää vielä lisätä silmukoita.
21.07.2021 - 21:18
![]() Jacqueline Veilleux wrote:
Jacqueline Veilleux wrote:
Bonjour, pourquoi commencer ce patron sur aiguilles à deux pointes si on le termine avec une broche circulaire en aller-retour. merci
01.11.2019 - 16:03DROPS Design answered:
Bonjour Mme Veilleux, chaque carré se tricote en rond, d'abord sur les doubles pointes puis, quand on n'a plus suffisamment de place, on continue sur aiguille circulaire. On met les mailles en attente pour les reprendre pour la bordure. Bon tricot!
04.11.2019 - 15:19Linda wrote:
Do you have a recommendation for a replacement for Vivaldi? I want to make this pattern so badly for a friend of ours. I love the dark green, but cannot find anything similar in yarn group C to match Alpaca in group A.
06.08.2016 - 20:39DROPS Design answered:
Dear Linda, DROPS Brushed Alpaca Silk is a great alternative to Vivaldi - but you can also use 2 strands Kid-Silk to replace Vivaldi - read more here. Click here for more informations when using an alternative. Happy knitting!
08.08.2016 - 09:29
![]() Lieselotte Geens wrote:
Lieselotte Geens wrote:
Hoi, het eerste geedeelte begrijp ik niet. Zoals ik het begrijp, moet ik 2 steken opzetten en emke naald aan elke kant meederen tot ik 8 steken heb en dan naar m1. Maar dat klopt niet, dus hoe moet ik het dan doen? bedankt!
21.03.2016 - 13:40DROPS Design answered:
Hoi Lieselotte. Nee, zoals er staat , zet je 8 st op en verdeelt ze vervolgens over 4 breinaalden = 2 st per naald. Je breit verder in de rondte over de 8 st en volgens het patroon
23.03.2016 - 14:17
![]() Linda wrote:
Linda wrote:
This is beautiful!! I am going to have to make this for a good friend.
20.03.2016 - 05:23
![]() Bibiana wrote:
Bibiana wrote:
How many skeins of Alpaca Uni Color I need for this blanket?
29.01.2015 - 20:08DROPS Design answered:
Dear Bibiana, you need 600 g Alpaca / 50 g a ball Alpaca = 12 balls + 350 g Vivaldi/50 g a ball Vivaldi = 7 balls for the blanket - you work throughout with 1 strand each qualitiy held together. Happy knitting!
30.01.2015 - 09:07
![]() Merete wrote:
Merete wrote:
Kan man strikke tæppet større? Ex ca 150 x 200 cm. Og er der et godt alternativ til Vivaldi, hvis det fnulrer?
15.07.2012 - 12:24DROPS Design answered:
Hej, Hvis du vil have det større er det bare at strikke flere ruder. Nej men Vivaldi fnulrer ikke! God fornøjelse!
18.07.2012 - 08:06
|
||||||||||||||||||||||
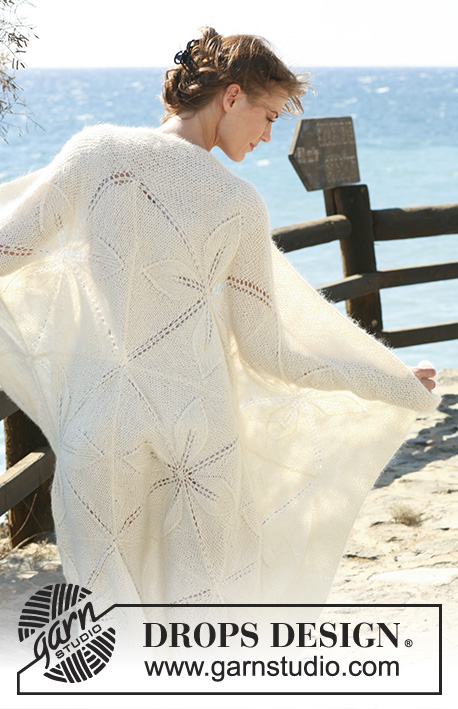
Sugar Flowers#sugarflowersblanket |
||||||||||||||||||||||
 |
 |
|||||||||||||||||||||
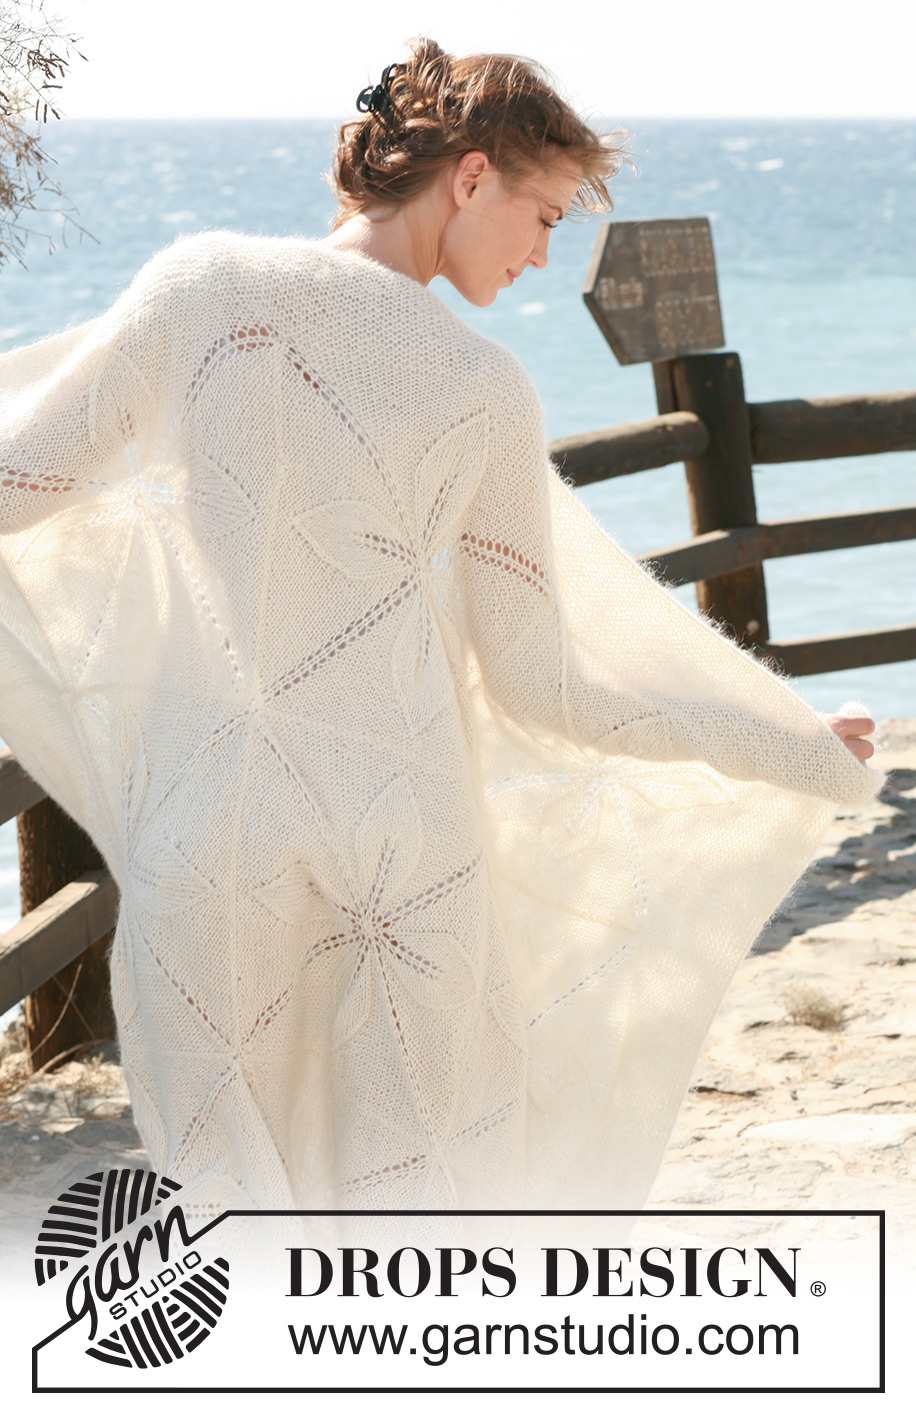
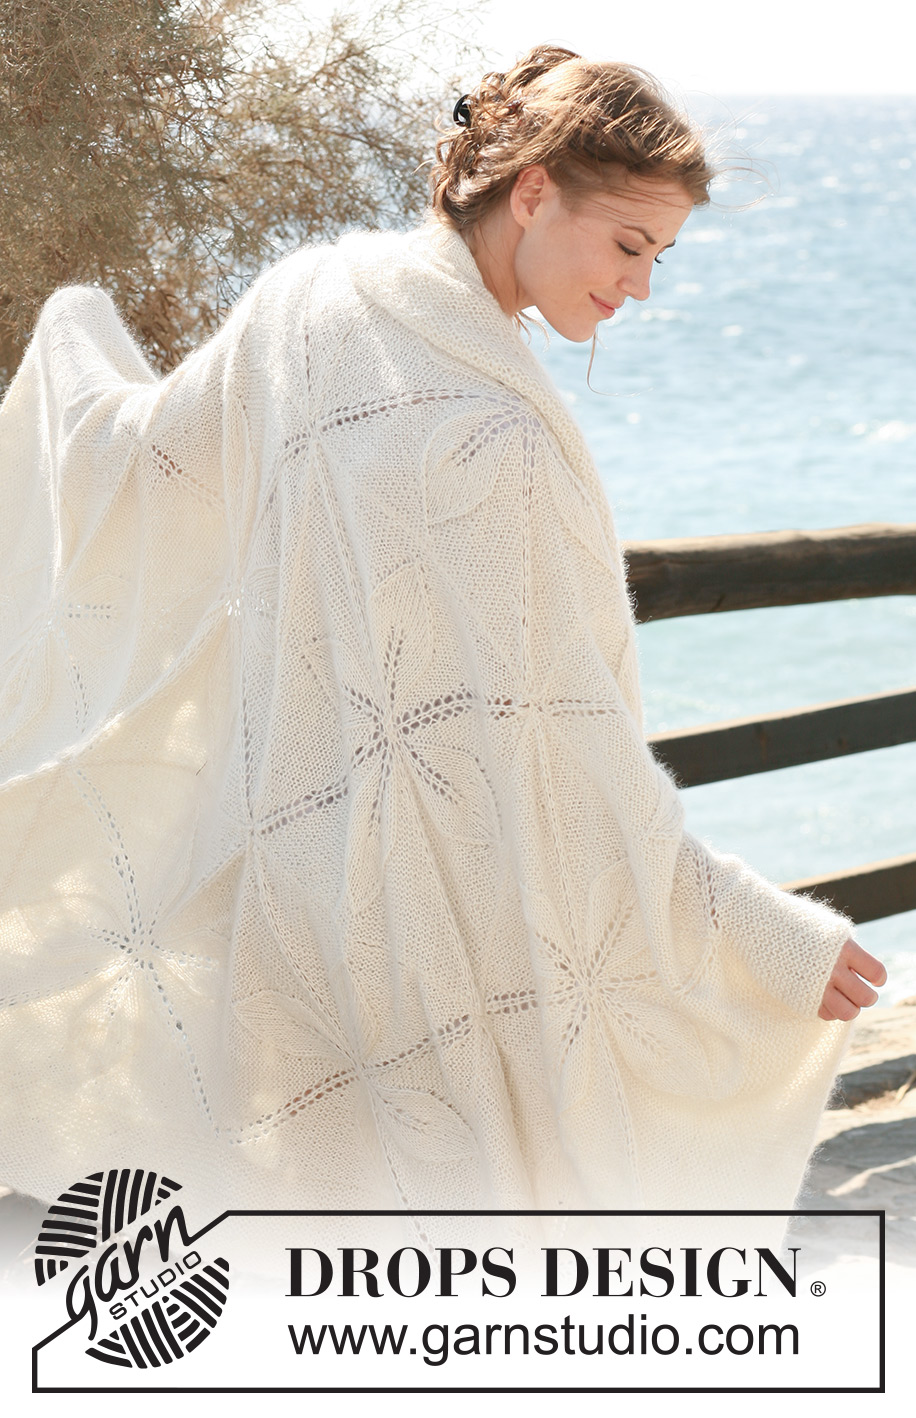
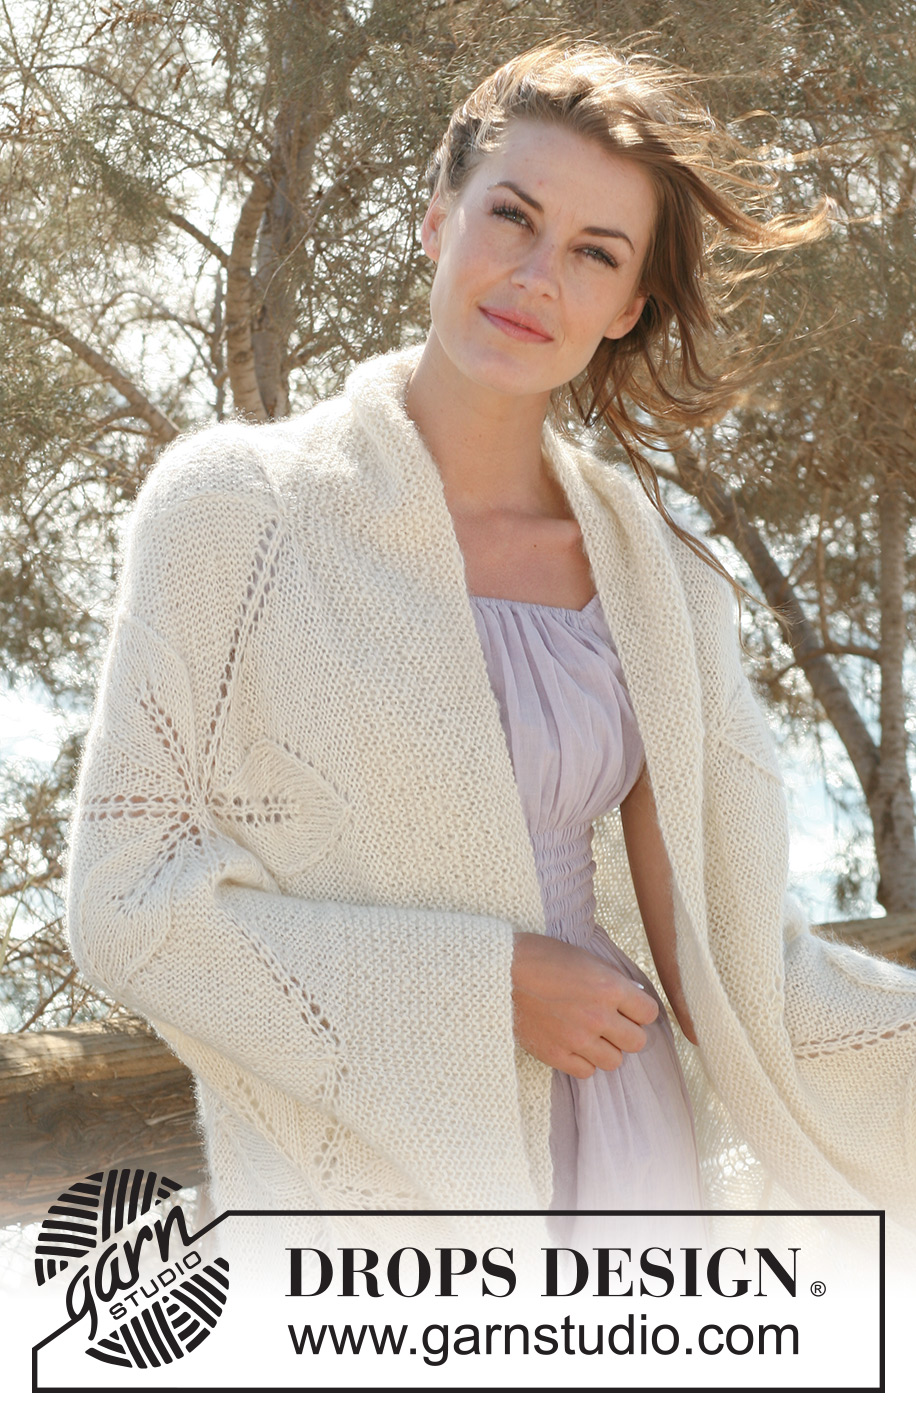
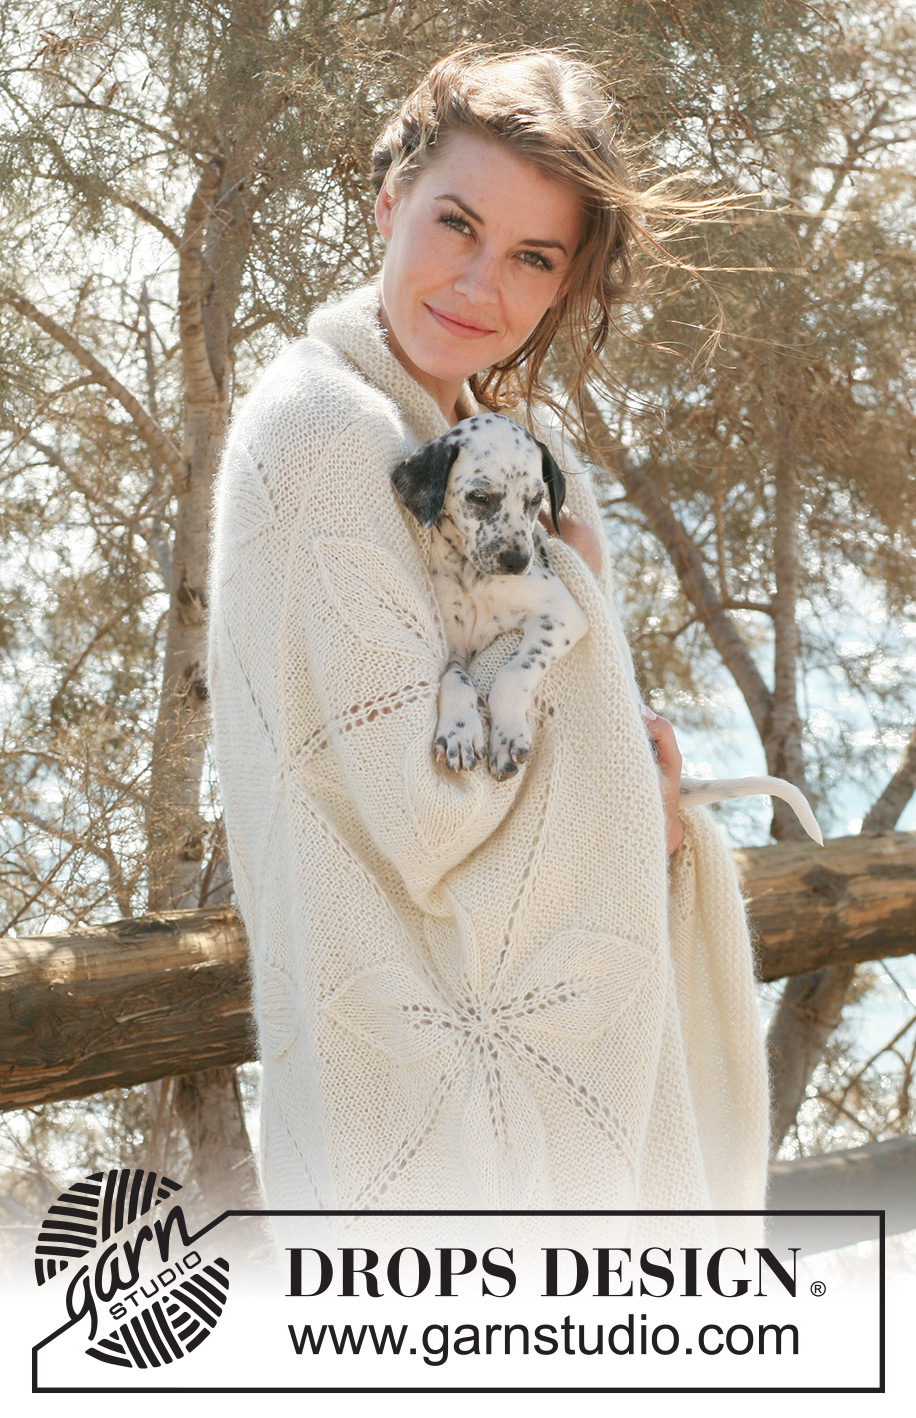
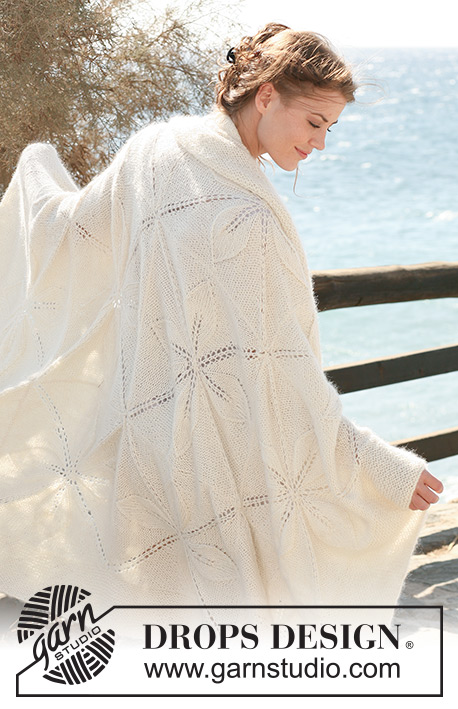
Knitted DROPS blanket with flower squares in Alpaca and Vivaldi or Alpaca and Brushed Alpaca Silk.
DROPS 118-42 |
||||||||||||||||||||||
|
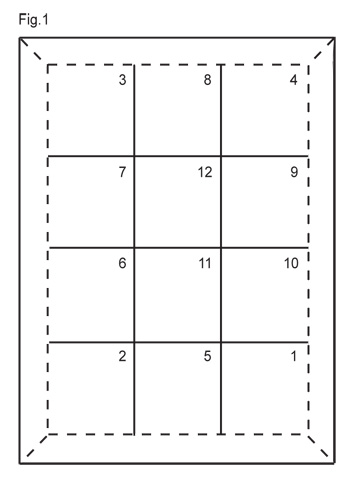
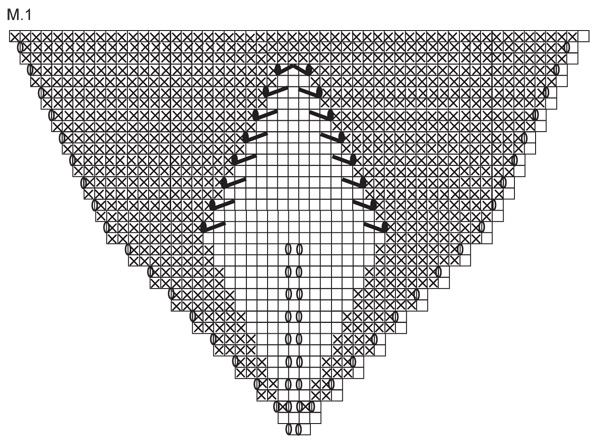
PATTERN: See diagram M.1. Diagram shows the pattern from RS. BINDING OFF TIP: When binding off make 1 YO each side of st in each corner and bind off the YO in the same way as the other sts (to make edge even). GARTER ST (back and forth on needle): K all rows. INCREASING TIP: Make all inc from RS. Inc 1 st by making 1 YO and K YO into back of loop on return row to avoid a hole. -------------------------------------------------------- -------------------------------------------------------- BLANKET: Worked in the round on double pointed needles/circular needle. Cast on 8 sts on double pointed needles size 5.5 mm / US 9 with 1 thread of each quality. Insert a marker at beg of round. Distribute sts on 4 needles with 2 sts per needle. K 1 round. Continue in M.1 in the round (= 4 times). REMEMBER THE GAUGE! Change to circular needle size 5.5 mm / US 9 when there are enough sts. After 1 vertical repeat of M.1 there are 216 sts on needle. bind off the first 108 sts - see BINDING OFF TIP - slip the next 54 sts on a stitch holder and slip the last 54 sts on another stitch holder (Square 1 in Fig.1). Work another 3 squares in the same way = 4 corner squares (Square 2, 3 and 4 in Fig.1). Now cast on for a square and work it as before, but bind off the first 162 sts - see BINDING OFF TIP - and slip the last 54 sts on a stitch holder. Work another 5 squares in the same way = 6 side squares (Square 5, 6, 7, 8, 9 and 10 in Fig.1). Cast on for a square and work it as before, but now bind off all sts – see BINDING OFF TIP! Work 1 more square in the same way = 2 middle squares (Square 11 and 12 in Fig.1). You now have a total of 12 squares. Place the squares as shown in Fig.1 (with sts on stitch holders towards the sides – broken line in Fig 1). Sew squares tog in outer loops of sts to avoid chunky seams. All edges now have sts on stitch holders. SHORT SIDE: Slip sts from the 3 stitch holders at bottom edge (Square 2, 5 and 1 in Fig.1) back on circular needle size 5.5 mm / US 9 = 162 sts. Work GARTER ST back and forth on needle - see above - AT THE SAME TIME inc 1 st each side - see INCREASING TIP - on every other row a total of 18 times = 198 sts. Bind off loosely. Repeat the other end of blanket (Square 4, 8 and 3 in Fig 1). LONG SIDE: Slip sts from the 4 stitch holders at the side of blanket (Square 1, 10, 9 and 4 in Fig.1) back on circular needle size 5.5 mm / US 9 = 216 sts. Work GARTER ST back and forth on needle, AT THE SAME TIME inc 1 st each side on every other row a total of 18 times = 252 sts. Bind off loosely. Repeat along the other side of blanket (Square 3, 7, 6 and 2 in Fig.1). ASSEMBLY: Sew edges tog in all 4 corners. Sew in outer loops of sts to avoid chunky seams. |
||||||||||||||||||||||
Diagram explanations |
||||||||||||||||||||||
|
||||||||||||||||||||||
 |
||||||||||||||||||||||
 |
||||||||||||||||||||||
Have you finished this pattern?Tag your pictures with #dropspattern #sugarflowersblanket or submit them to the #dropsfan gallery. Do you need help with this pattern?You'll find 17 tutorial videos, a Comments/Questions area and more by visiting the pattern on garnstudio.com. © 1982-2026 DROPS Design A/S. We reserve all rights. This document, including all its sub-sections, has copyrights. Read more about what you can do with our patterns at the bottom of each pattern on our site. |
||||||||||||||||||||||


With over 40 years in knitting and crochet design, DROPS Design offers one of the most extensive collections of free patterns on the internet - translated to 17 languages. As of today we count 324 catalogs and 12290 patterns - 12280 of which are translated into English (US/in).
We work hard to bring you the best knitting and crochet have to offer, inspiration and advice as well as great quality yarns at incredible prices! Would you like to use our patterns for other than personal use? You can read what you are allowed to do in the Copyright text at the bottom of all our patterns. Happy crafting!
Post a comment to pattern DROPS 118-42
We would love to hear what you have to say about this pattern!
If you want to leave a question, please make sure you select the correct category in the form below, to speed up the answering process. Required fields are marked *.