
Popular categories
Looking for a yarn?


Comments / Questions (208)
![]() Ana Oliveira wrote:
Ana Oliveira wrote:
Bom dia, é possível adaptar a capa para ombros para uma camisola? Como poderia fazer? Obrigada
19.01.2026 - 07:49DROPS Design answered:
Bom dia, A única forma de poder adaptar esta capa seria levantar malhas à volta do rebordo inferior para prolongar o encaixe, depois, separar esse encaixe em costas, frente e mangas e continuar como se fosse um modelo de pulôver tricotado de cima para baixo, mas implica fazer várias adaptações e cálculos, por sua iniciativa. Bons tricôs!
19.01.2026 - 12:19
![]() Jo wrote:
Jo wrote:
Ma demande est partie trop vite Aiguilles n° 5 Pouvez vous me donner les dimensions hauteur largeur que je puisse adapter Merci de votre réponse
14.01.2026 - 20:15DROPS Design answered:
Bonjour Jo, nous ne sommes malheureusement pas en mesure de pouvoir adapter chacun de nos modèles à chaque demande, toutefois, le lien de la réponse précédente pourra peut-être vous aider; bon tricot!
15.01.2026 - 10:31
![]() Jo wrote:
Jo wrote:
Bonsoir Je désire faire le chauffe épaule avec des aiguilles n° ( etsans torsade, tout simple au point mousse. Que me conseillez vous ? Merci
14.01.2026 - 20:12DROPS Design answered:
Bonjour Jo, vous pouvez probablement le faire ainsi, sans les torsades et juste au point mousse (il vous faudra peut-être davantage de laine car le point mousse est plus gourmand), retrouvez par ex. nos modèles de tours de cou au pont mousse, tricotés dans le sens de la longueur ici. Bon tricot!
15.01.2026 - 10:31
![]() Alicia wrote:
Alicia wrote:
Bonjour , Les rangs raccourcis se tricotent-Ils sur l'endroit et l'envers de l'ouvrage et à chaque torsade tricotée dès que l'on commence celle-ci et en répétant ceci jusqu'à la fin des 10-11 torsades tricotées ? merci de votre réponse
03.11.2025 - 14:00DROPS Design answered:
Bonjour Alicia, les rangs raccourcis commencent sur l'endroit, mais lorsqu'en début de rang sur l'endroit, on ne tricote pas tout le rang, on tourne et on tricote sur l'envers le même nombre de mailles qu'au rang précédent, ces mailles sont à tricoter en suivant les diagrammes. les torsades vont donc se répéter sur le même nombre de rangs entre chaque torsades. Bon tricot!
03.11.2025 - 16:32
![]() Alicia wrote:
Alicia wrote:
Bonjour, Les rangs raccourcis se font-ils en fin de rang ( pour le bonnet) ou juste après la torsade? Merci de votre réponse
15.10.2025 - 16:10DROPS Design answered:
Bonjour Alicia, en fin du rang, la torsade est au debut du rang. Repetez cela: "tricoter en rangs raccourcis en allers retours en commençant sur l'endroit ainsi : *2 rangs sur toutes les mailles, 2 rangs sur 36-40 mailles, 2 rangs sur 34-38 mailles, 2 rangs sur 31-35 mailles *, répéter de *à* jusqu'à obtenir 10-11 motifs de M1 en hauteur, l'ouvrage mesure alors environ 50-55 cm dans la partie la plus longue (cote torsade). Bon tricot!
16.10.2025 - 09:58
![]() Anna wrote:
Anna wrote:
What method of shot rows are being used in this pattern?
10.10.2025 - 16:44DROPS Design answered:
Dear Anna, the short rows are indicated in the pattern: *2 rows on all sts, 2 rows on 36-40 sts, 2 rows on 34-38 sts, 2 rows on 31-35 sts* for the hat and * 1 row on all sts, 1 row on 20 sts, turn, work return row on 20 sts, 1 row on all sts, 2 rows on 37-41-45 sts, 2 rows on 33-37-41 sts, 2 rows on 29-33-37 sts, 2 rows on all sts, 2 rows on 37-41-45 sts, 2 rows on 33-37-41 sts, 2 rows on 29-33-37 sts * for the shoulder wrap. You can check how these are worked here Happy knitting!
12.10.2025 - 18:54
![]() Alicia wrote:
Alicia wrote:
Bonjour, En ce qui concerne les rangs raccourcis pour le bonnet , doit-on ne pas tricoter les mailles en fin de rang ou bien est-ce les mailles suivant la torsade ? Merci de votre réponse
10.10.2025 - 14:03DROPS Design answered:
Bonjour Alicia, la torsade se tricote en début de rang sur l'endroit, on va la tricoter tous les rangs, mêmes aux rangs raccourcis qui se tricotent aussi sur l'endroit, ce sont les mailles côté "pointe" du bonnet que l'on ne va pas tricoter à chaque fois dan les rangs raccourcis. Bon tricot!
15.10.2025 - 07:20
![]() Alicia wrote:
Alicia wrote:
Bonsoir, J'ai du mal à commencer la torsade ; Dois-je commencer en tricotant 4M endroit et ensuit glisser 4M devant et derrière l'ouvrage (en alternant) et cela tout le long du rang ? D'autre part, 4M tricotées et 4 autres glissées me paraissent peu ; quand je regarde le modèle du bonnet , on dirait que les torsades comptent plus de mailles Merci de votre réponse
08.10.2025 - 20:27
![]() Alicia wrote:
Alicia wrote:
Bonsoir, J'ai du mal pour commencer la torsade ; Dois-je commencer en tricotant 4M et en glissant les autres mailles en alternant 4M devant ou derrière et cela tout le long de l'ouvrage ? d'autre part , 4M me paraissent peu, quand je regarde le modèle du bonnet, on dirait que les torsades sont plus longues merci de votre réponse
08.10.2025 - 20:24DROPS Design answered:
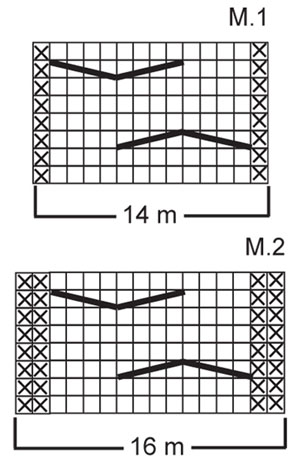
Bonjour Alicia, dans M.1 aussi bien que dans M.2, la 1ère torsade se fait sur les 8 premières mailles endroit: vous placez les 4 premières mailles devant, vous tricotez les 4 m suivantes puis les 4 m de l'aiguille à torsades et les 4 m suivantes à l'endroit = 12 m de torsades. Vous tricotez 3 rangs puis vous tricotez: 4m end, 4 m derrière, 4 m end et les 4 m de l'aiguille à torsades = 12 m de torsades; et vous continuez ainsi. N'hésitez pas à vous entraîner sur un échantillon si besoin. Bon tricot!
09.10.2025 - 08:41
![]() Anna wrote:
Anna wrote:
What method of short rows are used in this pattern?
08.10.2025 - 19:17
|
|||||||||||||
Chocolate Fudge#chocolatefudgeset |
|||||||||||||
|
|
|||||||||||||
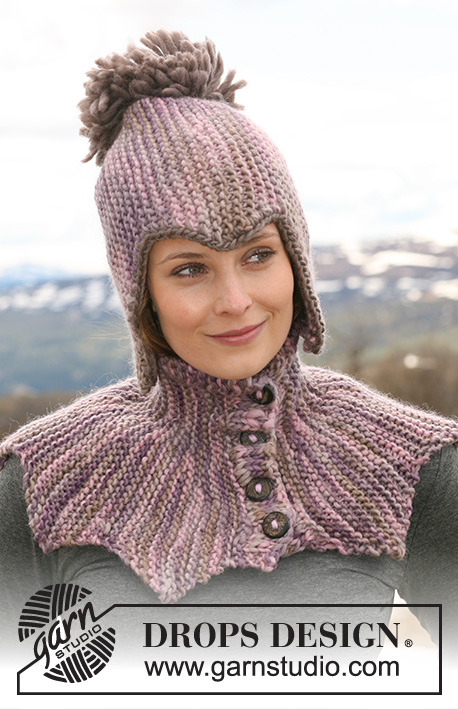
Set comprises: DROPS hat and shoulder wrap knitted from side to side with cables and garter st in ”Snow”.
DROPS 114-31 |
|||||||||||||
|
HAT: -------------------------------------------------------- GARTER ST (back and forth on needle): K all rows. PATTERN: See diagram M.1. Diagram shows the pattern from RS. -------------------------------------------------------- -------------------------------------------------------- HAT: Worked from side to side, back and forth on needle. Work the first 2 sts from RS with double thread (to make edge firmer) in GARTER ST throughout - see above. Cast on 38-42 sts on needle size 7 mm / US 10½ with Snow and work PATTERN as follows from RS: 2 garter sts – see above - M.1 (= 14 sts), 22-26 garter sts. Continue in pattern like this, AT THE SAME TIME work shortened rows, back and forth on needle, with start from RS as follows: * 2 rows on all sts, 2 rows on 36-40 sts, 2 rows on 34-38 sts, 2 rows on 31-35 sts *, repeat from *-*. REMEMBER THE GAUGE! Continue like this until there are 10-11 vertical repeats of M.1, piece measures approx 50-55 cm / 19¾"-21⅝" where longest. Bind off loosely on the last row in the last pattern repeat. ASSEMBLY: Sew cast on row to bind off row, edge to edge. Run a thread through sts at the top of hat, tighten and fasten. -------------------------------------------------------- SHOULDER WRAP: -------------------------------------------------------- GARTER ST (back and forth on needle): K all rows. PATTERN: See diagram M.2. Diagram shows the pattern from RS. BUTTONHOLES: Make buttonholes when piece measures 2 cm / ¾" as follows from RS: Work 7-7-7 sts, bind off 1 st, * work 8-9-10 sts, bind off 1 st *, repeat from *-* a total of 4 times, finish with 3 sts = 5 buttonholes. Cast on new sts over bind off sts on return row. -------------------------------------------------------- -------------------------------------------------------- SHOULDER WRAP: Worked from side to side, back and forth on circular needle. Cast on 47-51-55 sts on circular needle size 8 mm / US 11 with Snow. Work GARTER ST – see above - AT THE SAME TIME work the first 2 sts on every row from RS with double thread throughout. AT THE SAME TIME when piece measures 2 cm / ¾" make BUTTONHOLES on next row from RS – see above! When piece measures 4 cm / 1½" inc as follows on row from WS: Work garter st on the first 4 sts, inc 6 sts evenly on the next 10 sts, garter st on the next 17-21-25 sts, inc 6 sts evenly on the next 10 sts, complete row in garter st = 59-63-67 sts. READ ALL OF THE FOLLOWING SECTION BEFORE CONTINUING! Continue in pattern and shortened rows as follows from RS: 2 garter sts, P 4 (K from WS), M.2 (= 16 sts), P2 (K from WS), garter st on the next 15-19-23 sts, M.2 (=16 sts), 4 garter sts - AT THE SAME TIME work shortened rows starting on RS as follows: * 1 row on all sts, 1 row on 20 sts, turn, work return row on 20 sts, 1 row on all sts, 2 rows on 37-41-45 sts, 2 rows on 33-37-41 sts, 2 rows on 29-33-37 sts, 2 rows on all sts, 2 rows on 37-41-45 sts, 2 rows on 33-37-41 sts, 2 rows on 29-33-37 sts *, repeat from *-*. REMEMBER THE GAUGE! Continue in pattern like this. When piece measures 128-148-168 cm / 50⅜"-58⅛"-66" measured along bottom edge (adjust to after a full repeat of M.2) work next row from RS as follows: Work garter st, AT THE SAME TIME dec 6 sts evenly on all cables = 47-51-55 sts. Continue in garter st on all sts. Bind off when edge in garter st measures 4 cm / 1½". Sew on buttons. |
|||||||||||||
Diagram explanations |
|||||||||||||
|
|||||||||||||
 |
|||||||||||||
Have you finished this pattern?Tag your pictures with #dropspattern #chocolatefudgeset or submit them to the #dropsfan gallery. Do you need help with this pattern?You'll find 12 tutorial videos, a Comments/Questions area and more by visiting the pattern on garnstudio.com. © 1982-2026 DROPS Design A/S. We reserve all rights. This document, including all its sub-sections, has copyrights. Read more about what you can do with our patterns at the bottom of each pattern on our site. |
|||||||||||||


With over 40 years in knitting and crochet design, DROPS Design offers one of the most extensive collections of free patterns on the internet - translated to 17 languages. As of today we count 325 catalogs and 12298 patterns - 12288 of which are translated into English (US/in).
We work hard to bring you the best knitting and crochet have to offer, inspiration and advice as well as great quality yarns at incredible prices! Would you like to use our patterns for other than personal use? You can read what you are allowed to do in the Copyright text at the bottom of all our patterns. Happy crafting!
Post a comment to pattern DROPS 114-31
We would love to hear what you have to say about this pattern!
If you want to leave a question, please make sure you select the correct category in the form below, to speed up the answering process. Required fields are marked *.