White Teddy

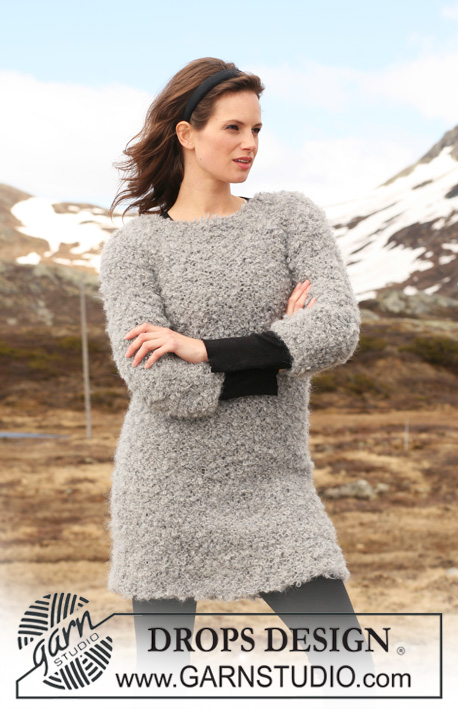
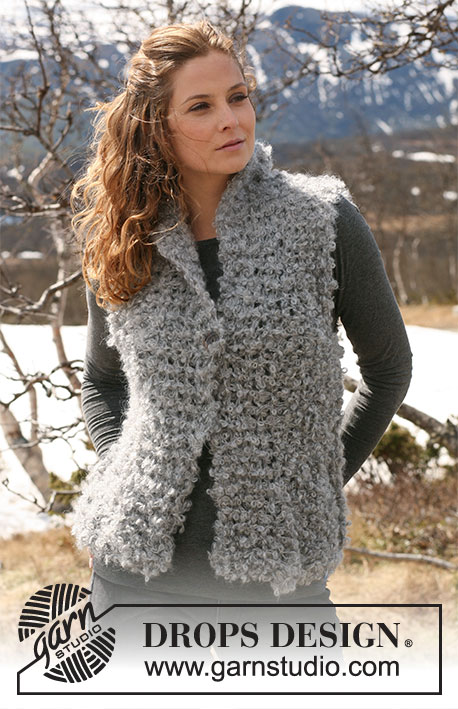
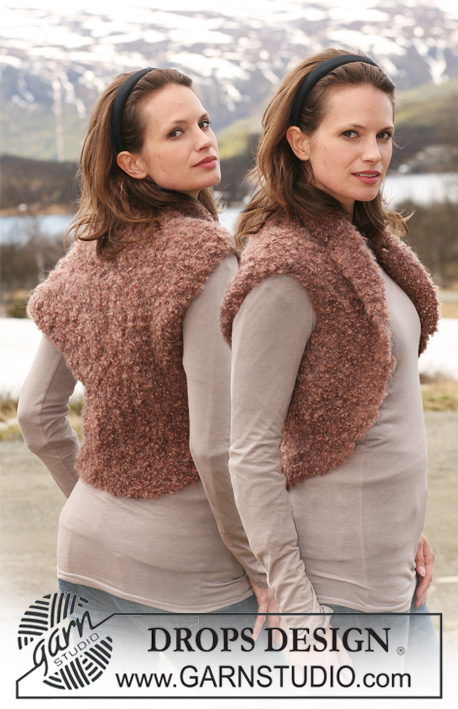
Knitted DROPS sleeveless top with split at the side and garter st edges in ”Puddel”. Size S - XXXL.

DROPS 115-28
DROPS design: Pattern no V-043

Size: S - M - L - XL - XXL - XXXL
Finished measurements:
Bust: 80-88-94-106-116-128 cm / 31½"-34⅝"-37"-41¾"-45¾"-50⅜"
Full length: 72-74-76-78-80-82 cm / 28⅜"-29⅛"-30"-30¾"-31½"-32¼"

Materials: DROPS PUDDEL from Garnstudio
350-400-450-500-550-600 g, color no 06, light gray

DROPS CIRCULAR NEEDLE (60 cm / 24") size 6 mm – or size needed to get 11 sts x 15 rows in stockinette st = 10 x 10 cm / 4" x 4".

DROPS Mother-of-Pearl buttons no 540: 3 pcs.

-------------------------------------------------------

Alternative Yarn – See how to change yarns here
Yarn Groups A to F – Use the same pattern and change the yarn here
Yarn usage using an alternative yarn – Use our yarn converter here

-------------------------------------------------------

Pattern instructions

NOTE: This pattern is written in American English. All measurements in charts are in cm. For conversion from inches to cm - click here. There are different terms for crocheting in American and British English. If this pattern includes crochet, click for "crochet terms" here. For this pattern in British English, please click here.
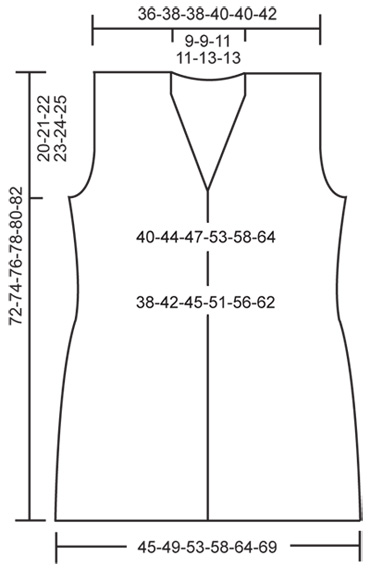
GARTER ST (back and forth on needle): K all rows.

DECREASING TIP (apply to neck and armhole): Dec 1 st by K2 tog.

BUTTONHOLES:
Make buttonholes on right front band. 1 buttonhole: work 3 sts from mid front, bind off the next 2 sts, work remaining sts on row. Cast on 2 new sts over the bind off sts on return row.
Make buttonholes when piece measures:
Size S: 28, 36, 44 cm / 11", 14¼", 17¼"
Size M: 29, 37, 45 cm / 11⅜", 14½", 17¾"
Size L: 30, 38, 46 cm / 11¾", 15", 17¾"
Size XL: 31, 39, 47 cm / 12¼", 15¼", 18½"
Size XXL: 32, 40, 48 cm / 12½", 15¾", 18"
Size XXXL: 33, 41, 49 cm / 13",16⅛", 19¼"
--------------------------------------------------------
--------------------------------------------------------

BACK PIECE:
Worked back and forth on circular needle. Cast on 52-56-60-66-72-78 sts on circular needle size 6 mm / US 10 (includes 1 edge st each side). Work GARTER ST – see above - back and forth on needle until piece measures 12 cm / 4¾". Now continue in stockinette st with 5 garters sts each side. When piece measures 26 cm / 10¼" work stockinette st on all sts. REMEMBER THE GAUGE! Insert 2 markers in piece, 1 after 17-19-21-23-26-29 sts and 1 after 35-37-39-43-46-49 sts. When piece measures 27 cm / 10⅝" dec 1 st on the outside (i.e. towards the side) of both markers and repeat the dec on every 2 cm / ¾" a total of 4 times = 44-48-52-58-64-70 sts. When piece measures 37 cm / 14½" inc 1 st on the outside of both markers = 46-50-54-60-66-72 sts. When piece measures 50-51-52-53-54-55 cm / 19¾"-20"-20½"-21"-21¼"-21⅝" work 4 rows garter st on 5-6-7-7-9-10 sts each side with remaining sts in stockinette st as before. Now bind off for armhole each side: 3-4-5-5-7-8 sts 1 time = 40-42-44-50-52-56 sts. Continue in stockinette st with 2 garter sts each side, AT THE SAME TIME bind off to shape the armhole inside 2 garter sts each side on every other row – see DECREASING TIP: 1 st a total of 0-0-1-3-4-5 times = 40-42-42-44-44-46 sts. When piece measures 68-70-72-74-76-78 cm / 26¾"-27½"-28⅜"-29⅛"-30"-30¾" work 4 rows garter sts on the middle 26-26-28-28-30-30 sts (work remaining sts in stockinette st with 2 garter sts each side as before). Now bind off the middle 8-8-10-10-12-12 sts for neck and complete each side separately. Bind off 1 st on neckline on next row = 15-16-15-16-15-16 sts left on shoulder. Bind off when piece measures 72-74-76-78-80-82 cm / 28⅜"-29⅛"-30"-30¾"-31½"-32¼".

LEFT FRONT PIECE:
Worked back and forth on needle.
Cast on 30-32-34-37-40-43 sts (includes 1 edge st at the side) on circular needle size 6 mm / US 10. Work garter st back and forth on needle until piece measures 12 cm / 4¾". Continue in stockinette st with 5 garter sts towards the side and 8 garter sts towards mid front (= front band). Work front band in garter st throughout. When piece measures 26 cm / 10¼" continue in stockinette st on all sts. Insert a marker in piece, 17-19-21-23-26-29 sts from the side. Now dec and inc on the outside of marker (i.e. towards the side) as described for back piece. When piece measures 45-46-47-48-49-50 cm / 17¾"-18"-18½"-19"-19¼"-19¾" work 2 rows garter st, back and forth on only the 8 front band sts (to make neckline neat). On next row dec 1 st inside the 8 front band sts to shape the neckline – see DECREASING TIP! Repeat the dec on every 3-3-2.5-2.5-2.5-2.5 cm / 1⅛"-1⅛"-⅞"-⅞"-⅞"-⅞"- a total of 9-9-10-10-11-11 times. AT THE SAME TIME when piece measures 50-51-52-53-54-55 cm / 19¾"-20"-20½"-21"-21¼"-21⅝" work garter st and bind off for armhole at the side as described for back piece = 15-16-15-16-15-16 sts left on shoulder. Bind off when piece measures 72-74-76-78-80-82 cm / 28⅜"-29⅛"-30"-30¾"-31½"-32¼".

RIGHT FRONT PIECE:
Like left front piece, but mirrored. AT THE SAME TIME beg making BUTTONHOLES when piece measures 28-29-30-31-32-33 cm / 11"-11⅜"-11¾"-12¼"-12½"-13" – see above.

ASSEMBLY:
Sew side seams inside 1 edge st, but leave 25 cm / 9¾" towards bottom edge for split. Sew shoulder seams. Sew on buttons.

This pattern has been corrected.

Updated online: 31.08.2016
LEFT FRONT PIECE:..When piece measures 26 cm continue in stocking st on all sts. Insert a marker in piece, 17-19-21-23-26-29 sts from the side. Now dec and inc on the outside of marker (i.e. towards the side) as described for back piece...

Diagram

All measurements in charts are in cm.

diagram measurements
Do you have a question? See a list of frequently asked questions (FAQ)

Knitting tension is what determines the final measurements of your work, and is usually measured per 10 x 10 cm. It is provided like so: number of stitches in width x number of rows in height - eg: 19 stitches x 26 rows = 10 x 10 cm.

The knitting tension is very individual; some people knit/crochet loosely while others work tightly. You adjust the knitting tension with the needle size, which is why the suggested needle size only serve as a guide! You need to adjust this (up or down) to ensure that YOUR knitting tension matches the knitting tension provided in the pattern. If you work with a different knitting tension than provided you will have a different yarn consumption, and your work will have different measurements than what the pattern suggests.

The knitting tension also determines which yarns can replace each other. As long as you achieve the same knitting tension you can replace one yarn with another.

See DROPS lesson: How to measure your tension/gauge

See DROPS video: How to make a gauge tension swatch

The required amount of yarn is provided in grams, eg: 450 g. To calculate how many balls you’ll need you first need to know how many grams are in 1 ball (25g, 50g or 100g). This information is available if you click on the individual yarn quality on our pages. Divide the amount required with the amount of each ball. For example, if each ball is 50g (the most common amount), the calculation will be as follows: 450 / 50 = 9 balls.

The important thing when changing from one yarn to another is that the knitting/crochet tension remains the same. This is so that the measurements of the finished piece will be the same as on the sketch provided. It is easier to achieve the same knitting tension using yarns from the same yarn group. It is also possible to work with multiple strands of a thinner yarn to achieve the knitting tension of a thicker one. Please try our yarn converter. We recommend you to always work a test swatch.

Please NOTE: when changing yarn the garment might have a different look and feel to the garment in the photo, due to individual properties and qualities of each yarn.

See DROPS lesson: Can I use a different yarn than the one mentioned in the pattern?

All our yarns are categorised into yarn groups (from A to F) according to thickness and knitting tension – group A contains the thinnest yarns and group F the thickest. This makes it easier for you to find alternative yarns to our patterns, should you wish to switch yarn. All yarns within the same group have a similar knitting tension and can easily replace each other. However, different yarn qualities have different structures and properties which will give the finished work a unique look and feel.

Click here for an overview of the yarns in each yarn group

At the top of all our patterns you’ll find a link to our yarn converter, which is a helpful tool should you wish to use a different yarn than suggested. By filling in the yarn quality you wish to replace, the amount (in your size) and number of strands, the converter will present good alternative yarns with the same knitting tension. Additionally it will tell you how much you’ll require in the new qualities and whether you’ll need to work with multiple strands. Most skeins are 50g (some are 25g or 100g).

If the pattern is worked with multiple colours, every colour will have to be converted separately. Similarly, if the pattern is worked with several strands of different yarns (for example 1 strand Alpaca and 1 strand Kid-Silk) you will have to find alternatives for each, individually.

Click here to see our yarn converter

Since different yarns have different qualities and textures we have chosen to keep the original yarn in our patterns. However, you can easily find options among our available qualities by using our yarn converter, or simply pick a yarn from the same yarn group.

It is possible that some retailers still have discontinued yarns in stock, or that someone has a few skeins at home that they would like to find patterns for.

The yarn converter will provide both alternative yarn as well as required amount in the new quality.

If you think it's hard to decide what size to make, it can be a good idea to measure a garment you own already and like the size of. Then you can pick the size by comparing those measures with the ones available in the pattern's size chart.

You'll find the size chart at the bottom of the pattern.

See DROPS lesson: How to read size chart

The needle size provided in the pattern serves only as a guide, the important thing is to follow the knitting tension. And since knitting tension is very individual, you will have to adjust the needle size to ensure that YOUR tension is the same as in the pattern – maybe you’ll have to adjust 1, or even 2 needle sizes, up or down to achieve the correct tension. For this, we recommend that you work test swatches.

Should you work with a different knitting tension than the one provided, the measurements of the finished garment might deviate from the measurement sketch.

See DROPS lesson: How to measure your tension/gauge

See DROPS video: How to make a gauge tension swatch

Working a garment top-down provides more flexibility and room for personal adjustment. For example it is easier to try the garment on while working, as well as making adjustments to length of yoke and shoulder caps.

The instructions are carefully explaining every step, in the correct order. Diagrams are adjusted to the knitting direction and are worked as usual.

The diagram depicts all rows/rounds, and every stitch seen from the right side. It is read from bottom to top, from right to left. 1 square = 1 stitch.

When working back and forth, every other row is worked from the right side and every other row is worked from the wrong side. When working from the wrong side, the diagram will have to be worked reversed: from left to right, knit stitches are purled, purl stitches are knit etc.

When working in the round every round is worked from the right side and the diagram are worked from right to left on all rounds.

See DROPS lesson: How to read knitting diagrams

The diagram depicts all rows/rounds, and every stitch seen from the right side. It is worked from bottom to top, from right to left.

When working back and forth every other row is worked from the right side: from right to left and every other row is worked from the wrong side: from left to right.

When working in the round, every row in the diagram are worked from the right side, from right to left.

When working a circular diagram you start in the middle and work your way outwards, counter clockwise, row by row.

The rows usually start with a given number of chain stitches (equivalent to the height of the following stitch), this will either be depicted in the diagram or explained in the pattern.

See DROPS lesson: How to read crochet diagrams

Instructions for working several diagrams after each other on the same row/round, will often be written like so: “work A.1, A.2, A.3 a total of 0-0-2-3-4 times". This means you work A.1 once, then A.2 is worked once, and A.3 is repeated (in width) the number of times provided for your size – in this case like so: S = 0 times, M = 0 times, L=2 times, XL= 3 times and XXL = 4 times.

The diagrams are worked as usual: begin with the first row in A.1, then work the first row in A.2 etc.

See DROPS lesson: How to read knitting diagrams

See DROPS lesson: How to read crochet diagrams

The total width of the garment (from wrist-to-wrist) will be larger in the larger sizes, despite the actual sleeves being shorter. The larger sizes have longer sleeve caps and wider shoulders, so there will be a good fit in all sizes.

The measurement sketch/schematic drawing provides information regarding the full length of the garment. If it’s a jumper or a jacket the length is measured from the highest point on the shoulder (usually closest to the neckline), and straight down to the bottom of the garment. It is NOT measured from the tip of shoulder. Similarly, the length of yoke is measured from the highest point on the shoulder and down to where yoke is split into body and sleeves.

See DROPS lesson: How to read a schematic drawing

Diagrams are often repeated on the round or in height. 1 repeat is the diagram the way it appears in the pattern. If it says to work 5 repeats of A.1 in the round, then you work A.1 a total of 5 times after/next to each other in the round. If it says to work 2 repeats of A.1 vertically/in height you work the entire diagram once, then begin again at the start and work the entire diagram one more time.

Chain stitches are slightly narrower than other stitches and to avoid working the cast-on edge too tight, we simply chain more stitches to begin with. The stitch count will be adjusted on the following row to fit the pattern and measurement sketch.

The rib edge is more elastic and will contract slightly compared to, for example, stocking stitch. By increasing before the rib edge, you avoid a visible difference in width between the rib edge and the rest of the body.

It’s very easy to cast off too tightly, and by making yarn overs while casting off (and simultaneously casting these off) you avoid a too tight cast off edge.

See DROPS video: How to bind off with yarn overs (yo)

To achieve an even increase (or decrease) you can increase on, for example: every 3rd and 4th row alternately, like so: work 2 rows and increase on the 3rd row, work 3 rows and increase on the 4th. Repeat this until the increase is complete.

See DROPS lesson: Increase or decrease 1 st on every 3rd and 4th row alternately

Should you prefer to work in the round instead of back and forth, you may of course adjust the pattern. You’ll need to add steeks mid-front (usually 5 stitches), and follow the instructions. When you would normally turn and work from the wrong side, simply work across the steek and continue in the round. At the end you’ll cut the piece open, pick up stitches to work bands, and cover the cut edges.

See DROPS video: How to knit steeks and cut open

Should you prefer to work back and forth instead of in the round, you may of course adjust the pattern so you work the pieces separately and then assemble them at the end. Divide the stitches for the body in 2, add 1 edge stitch in each side (for sewing) and work the front and back pieces separately.

See DROPS lesson: Can I adapt a pattern for circular needles into straight needles?

Pattern repeats can vary slightly in the different sizes, in order to get the correct proportions. If you’re not working the exact same size as the garment in the photo, yours might deviate slightly. This has been carefully developed and adjusted so that the complete impression of the garment is the same in all sizes.

Make sure to follow instructions and diagrams for your size!

If you have found a pattern you like which is available in women’s size it’s not very difficult to convert it to men’s size. The biggest difference will be the length of sleeves and body. Start working on the women size that you think would fit across the chest. The additional length will be worked right before you cast off for the armhole/sleeve cap. If the pattern is worked top-down you can add the length right after the armhole or before the first decrease on sleeve.

Regarding additional yarn amount, this will depend on how much length you add, but it is better with a skein too many than too few.

All yarns will have excess fibres (from production) that might come off as lint or shedding. Brushed yarns (ie hairier yarns) have more of these loose, excess fibres, causing more shedding.

Shedding also depends on what is worn under or over the garment, and whether this pulls at the yarn fibres. It’s therefore not possible to guarantee that there will be no shedding

Below are some tips on how to get the best result when working with hairier yarns:

1. When the garment is finished (before you wash it) shake it vigorously so the looser hairs come off. NOTE: do NOT use a lint roller, brush or any method that pulls at the yarn.

2. Place the garment in a plastic bag and put it in your freezer - the temperature will cause the fibres to become less attached to each other, and excess fibres will come off easier.

3. Leave in the freezer for a few hours before taking it out and shaking it again.

4. Wash the garment according to the instructions on the yarn label.

Pilling is a natural process that happens to even the most exclusive of fibers. It's a natural sign of wear and tear that is hard to avoid, and that is most visible in high friction areas of your garment like a sweater's arms and cuffs.

You can make your garment look as new by removing the pilling, using a fabric comb or a pill/lint remover.

Still can't find the answer you need? Then scroll down and leave your question so one of our experts can try to help you. This will be done normally within 5 to 10 working days.
In the meantime, you can read the questions and answers that others have left to this pattern or join the DROPS Workshop on Facebook to get help from fellow knitters/crocheters!

Post a comment to pattern DROPS 115-28

We would love to hear what you have to say about this pattern!

If you want to leave a question, please make sure you select the correct category in the form below, to speed up the answering process. Required fields are marked *.

Comments / Questions (10)

country flag A Van Gent wrote:

Kan dit patroon ook op gewone naalden gebreid worden Zoja,moet ik dan iets aanpassen of kan ik he5 patroon zo nabreien? M vr Gr Anja

27.09.2021 - 15:57

DROPS Design answered:

Dag A van Gent,

Ja, dat kan bij dit patroon. Om een patroon aan te passen om op rechte naalden te breien hebben we een instructie gemaakt. Deze vind je hier.

30.09.2021 - 11:04

country flag A Van Gent wrote:

Kan dit patroon ook met gewone naalden Moe5 ik dan iets aanpassen

27.09.2021 - 15:52

country flag Melina wrote:

Bonjour, Je rencontre un soucis pour comprendre comment réaliser le devant du gilet. Pour la taille M je démarre avec 32 mailles puis je dois augmenter 1 fois donc ça fait 33m puis je dois diminuer au niveau de l'encolure 10 fois j'ai donc 23m puis enfin rabattre 4m pour l'emmanchure ce qui donne 19m hors a ce niveau là des explications je devrais avoir 16m. Où me suis-je trompée?

07.12.2015 - 11:50

DROPS Design answered:

Bonjour Melina, il faut en fait diminuer et augmenter comme pour le dos (les diminutions manquaient, la correction a été faite), ainsi on a 32 m - 4 dim + 1 augm - 10 dim - 3 dim = 16 m. Bon tricot!

07.12.2015 - 13:57

country flag Pernille wrote:

Kan denne strikkes på alm pinde i stedet for rundpinde?

07.10.2013 - 11:04

DROPS Design answered:

Hej Pernille. Ja, det tror jeg sagtens du kan. God fornöjelse.

07.10.2013 - 14:41

country flag DROPS Design NL wrote:

Hallo Ria. Wij passen helaas niet de patronen aan voor individuele gebruikers. Maat XXXL is ongeveer vergelijkbaar met 46+. Onderaan het patroon staat ook een maattekening in cm. U kunt deze eventueel zelf aanpassen in de lengte en breedte (denk aan de steekverhouding). Succes. Tine

07.09.2009 - 10:17

country flag RiaG wrote:

Kan ik dit patroontje ook in maat 52tot 54 ontvangen alvast bedankt hoor

04.09.2009 - 18:02

country flag Elaine wrote:

Looks flattering to the older and larger Me. pretty.

30.07.2009 - 02:47

country flag Sarah wrote:

En så fin väst! Längtar efter att få sätta igång !

29.06.2009 - 20:55

country flag Yvonne wrote:

Vilken tur att den här västen kom med :-)

25.06.2009 - 12:56

country flag Wendy wrote:

If I had a big pile of Puddel, it would be fun to spend it on this. I love to make vests, and the long ones seem more rare. I like how the sides are split.

25.06.2009 - 05:14