Tiny Mountaineer

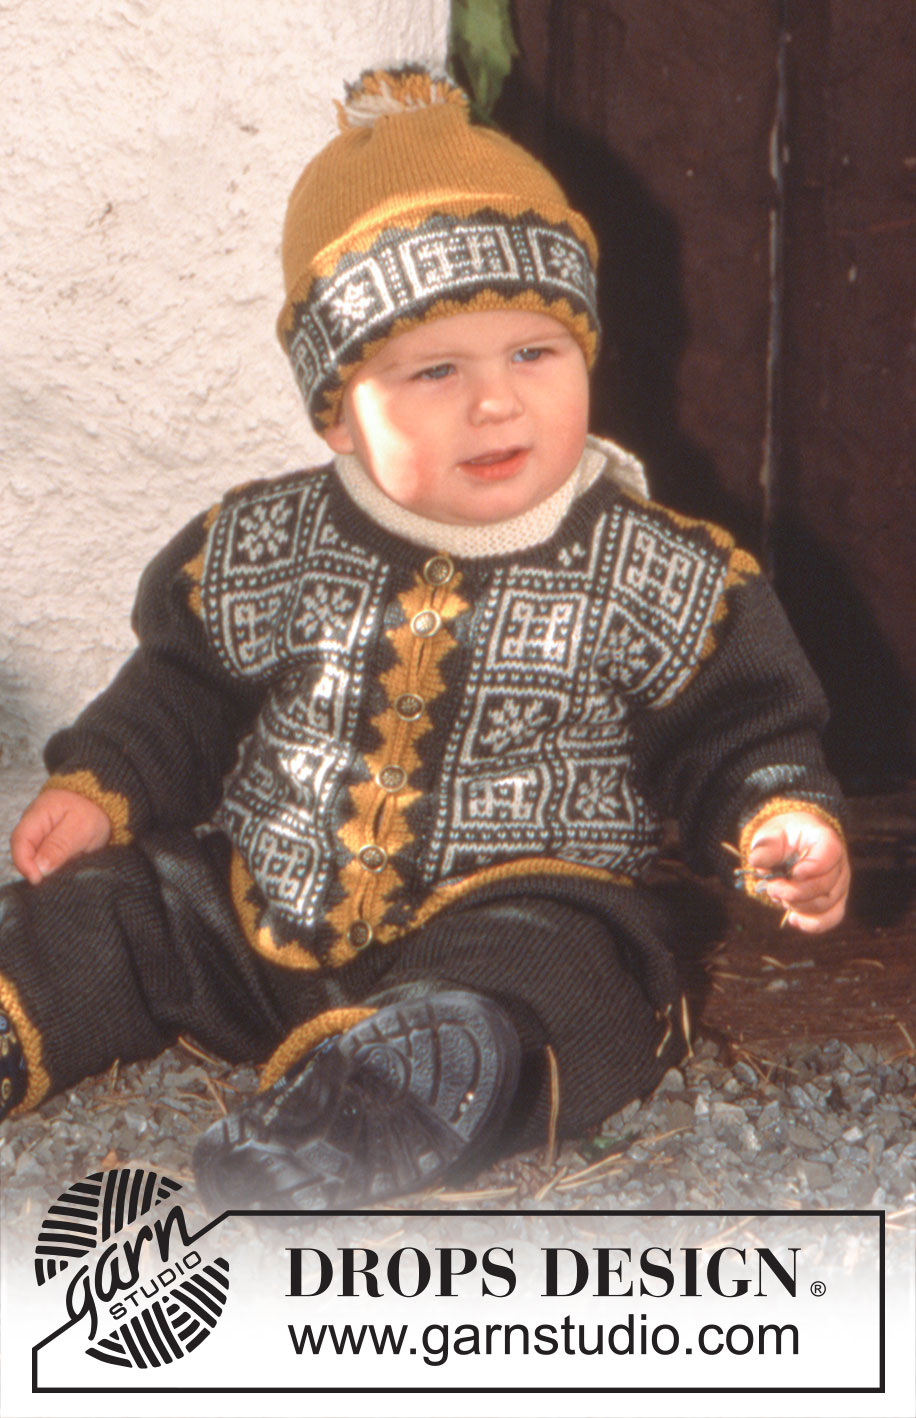
Cardigan, trousers and hat in Camelia or BabyMerino with stars and squares.

DROPS Baby 6-14
Sizes: 0/3 - 6/9 - 12/18 months (2 - 3/4 - 5/6 years)

Yarn: DROPS CAMELIA from Garnstudio
For entire set:
250-250-300 (300-300-350) g. Col. No. 03, brown
150-150-150 (200-200-200) g. Col. No. 36, yellow
50-50-50- (100-100-100) g. Col. No. 08, natural
For cardigan:
150-150-150 (200-200-250) g. Col. No. 03, brown
50-50-100 (100-100-100) g. Col. No. 36, yellow
50-50-50 (50-100-100) g. Col. No. 08, natural
For trousers:
150-150-150 (200-200-200) g. Col. No. 03, brown
50-50-50 (50-50-50) g. Col. No. 36, yellow
For hat:
50-50-100 (100-100-100) g. Col. No. 36, yellow
50-50-50 (50-50-50) g. Col. No. 08, natural
50-50-50 (50-50-50) g. Col. No. 03, brown

Or use:
DROPS BABY MERINO from Garnstudio
For entire set:
250-250-300 (300-300-350) g. Col. No. 18, brown
150-150-150 (200-200-200) g. Col. No. 36, orange
50-50-50- (100-100-100) g. Col. No. 02, off white
For cardigan:
150-150-150 (200-200-250) g. Col. No. 18, brown
50-50-100 (100-100-100) g. Col. No. 36, orange
50-50-50 (50-100-100) g. Col. No. 02, off white
For trousers:
150-150-150 (200-200-200) g. Col. No. 18, brown
50-50-50 (50-50-50) g. Col. No. 36, off white
For hat:
50-50-100 (100-100-100) g. Col. No. 36, orange
50-50-50 (50-50-50) g. Col. No. 02, off white
50-50-50 (50-50-50) g. Col. No. 18, brown

DROPS 2.5 mm [US 1] and 3 mm [US 2] circular needles and double pointed needles, or sizes needed to obtain correct gauge.
DROPS 2.5 mm [US B] Crochet hook
DROPS Inka metal buttons (no. 531)6-6-7 (7-8-8)

Gauge: 24 sts and 32 rows on larger needle in stockinette st = 10 x 10 cm [4" x 4"].

-------------------------------------------------------

Alternative Yarn – See how to change yarns here
Yarn Groups A to F – Use the same pattern and change the yarn here
Yarn usage using an alternative yarn – Use our yarn converter here

-------------------------------------------------------

Pattern instructions

NOTE: This pattern is written in American English. All measurements in charts are in cm. For conversion from inches to cm - click here. There are different terms for crocheting in American and British English. If this pattern includes crochet, click for "crochet terms" here. For this pattern in British English, please click here.
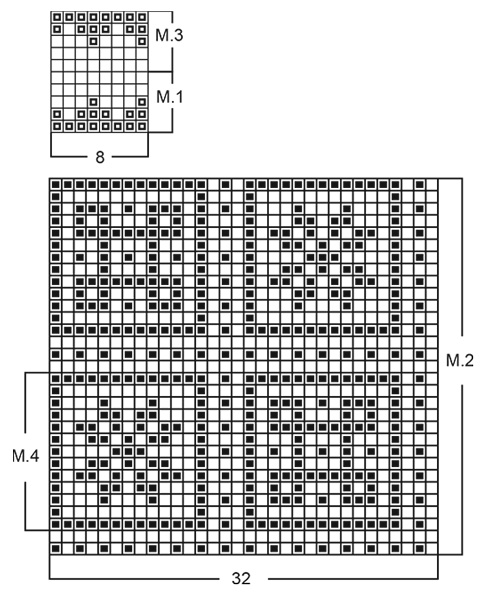
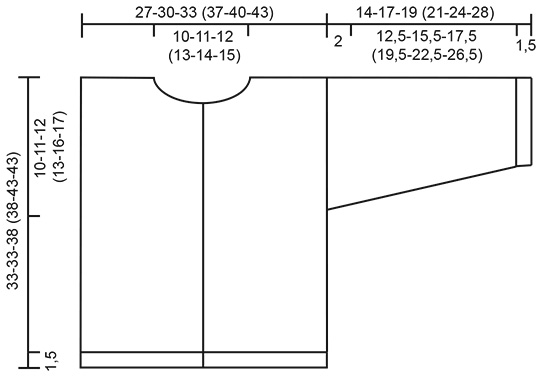
CARDIGAN

Finished measurements: 54-60-66 (74-80-86) cm [21.25" - 23-5/8" - 26" (29-1/8" - 31.5" - 33-7/8")]

Pattern: See charts. (1 chart = 1 repeat). The pattern is seen from the right side and is knit entirely in stockinette st.

Rib: *knit 1, purl 1*. Repeat from * - *.

Body: Knit the cardigan in the round on circular needles with steeks cut up for armholes and center front. Cast on 136-152-168 (184-200-216) sts (the first 5 sts are the steek sts - these sts should not be knit into the pattern) on smaller circular needles with brown, join and place a marker at the join. Knit 4 rows stockinette st, then with right side facing, change to yellow/orange, knit 1 row, purl 1 row (for the folding-edge - measure the work from here). Knit Pattern 1, keeping the first 5 sts for the center front steek not in pattern. Change to larger circular needles and knit Pattern 2.
When the work measures 23-22-26 (25-27-26) cm [9" - 8-5/8" - 10.25" (9-7/8" - 10-5/8" - 10.25")], knit the next row as follows: 5 steek sts, 33-37-41 (45-49-53) sts for the front, inc 5 sts for armhole steek, 64-72-80 (88-96-104) sts for the back, inc 5 sts for armhole steek, 34-38-42 (46-50-54) sts for the front, (the increased sts are for the steeks and should not be knit into the pattern).
When the work measures 29-29-33 (33-37-37) cm [11-3/8" - 11-3/8" - 13" (13" - 14.5" - 14.5")], bind off for the neck on the front, bind off: 8-9-10 (12-13-14) sts before the marker, 5 steek sts, 9-10-11 (13-14-15) sts after the steek sts. Knit the rest back and forth on the needles. Bind off at the neck edge every other row: 2 sts 2 times, 1 st 1 time.
When the work measures approx. 31-31-36 (36-41- 41) cm [12.25" - 12.25" - 14-1/8" (14-1/8" - 16-1/8" - 16-1/8")] (adjust to obtain a whole square of Pattern 2), knit Pattern 3 and at the same time bind off the center 18-20-22 (26-28-30) sts for the back neck. Bind off at each back neck edge: 2 sts 1 time, 1 st 1 time. After Pattern 3 knit 1 row yellow/orange and bind off, the work measures approx. 33-33-38 (38-43-43) cm [13" - 13" - 14-7/8" (14-7/8" - 16-7/8" - 16-7/8")].

Sleeves: Cast on 40-44-44 (48-48-52) sts on smaller double pointed needles with brown, join and place a marker at the join. Knit 4 rows stockinette st, change to yellow/orange, knit 1 row stockinette st (right side facing), purl 1 row (for the folding-edge - measure the work from here). Knit Pattern 1. Change to larger double pointed needles and knit stockinette st with brown. At the same time inc 1 st each side of marker: 4-4-7 (7-14-15) times:
Sizes 0/3 mos. + 2 years: every 8th row
Size 6/9 mos.: every 9th row
Size 12/18 mos.: every 7th row
Size 3/4 years: alternately every 4th and 5th row
Size 5/6 years: every 5th row
= 48-52-58 (62-76-82) sts. At the same time, when the work measures 12-15-17 (19-22-26) cm [4.75" - 5-7/8" - 6.75" (7.5" - 8-5/8" - 10.25")], knit Pattern 3, then knit 1 row yellow. The work measures approx. 14-17-19 (21-24-28) cm [5.5" - 6.75" - 7.5" (8.25" - 9.5" - 11")]. Change to brown, knit 2 cm [0.75"] reverse stockinette st for a seam allowance over the cut edge on the body, bind off.

Assembly: Sew a marker thread down into the center of the steek sts on each side and in the center front. Sew two machine seams around the marker thread, 1st seam = 1/2 stitch from the marker thread, 2nd seam = 1/2 stitch from the 1st seam. Cut up for armholes and in the center front.
Sew shoulder seams. Pick up approx. 73-73-85 (93-105-113) sts (divisible by 4 sts + 1 st) with brown on smaller needle along the left front and knit Pattern 3, purl 1 row (for the folding-edge), change to brown, knit 5 rows stockinette st, bind off and fold the edge over double against the wrong side and sew. Now work a row of single crochet (sc) with yellow/orange down along the folding-edge of the placket. Repeat along the right front, but replace 3 sc with 3 chain sts for buttonholes evenly distributed - 6-6-7 (7-8-8) times.
Pick up approx. 70-110 sts around the neck on smaller needle with brown and knit 4 rows stockinette st, purl 1 row (for the folding edge), 3 rows stockinette st, bind off and fold over double against the wrong side and sew.
Sew the sleeves to the body from the right side as follows: Sew alternately 1 st in the last row of knitting on the sleeve before the seam allowance and 1 st on the body after the machine seam. Turn the cardigan inside out and sew the seam allowance from the sleeve over the cut edge on the body by hand. Sew on buttons.


TROUSER

Size:
Entire length = 38-42-47 (52-58-64) cm
[14-7/8" - 16.5" - 18.5" (20.5" - 22-7/8" 25.25")]
Leg length = 18-22-25 (27-35-41) cm
[7" - 8-5/8" - 9-7/8" (10-5/8" - 13.75" - 16-1/8")]

DROPS 2.5 mm [US 1] and 3 mm [US 2] circular needles and double pointed needles, or sizes needed to obtain correct gauge.

Gauge: 24 sts and 32 rows on larger needle in stockinette st = 10 x 10 cm [4" x 4"].

Pattern: See charts. (1 chart = 1 repeat). The pattern is seen from the right side and is knit entirely in stockinette st.

Border: Knit 3 cm [1.25"] stockinette st, purl 1 row (for the folding edge), knit 3 cm [1.25"] stockinette st.

Left leg: Cast on 68-76-76 (84-84-84) sts on smaller double pointed needles with yellow/orange; join and place a marker at the join. Knit 5 rows stockinette st, purl 1 row (for the folding edge - measure the work from here), then knit Pattern 1. Change to larger double pointed needles and brown and knit stockinette st. At the same time inc 1 st each side of marker 4-3-3 (3-3-3) times every 2-3-4 (5-7-9) cm [every 0.75" - 1.25" - 1.5" (2" - 2.75" - 3.5")] = 76-82-82 (90-90-90) sts. When the work measures 17-21-24 (26-34-40) cm [6.75" - 8.25" - 9.5" (10.25" - 13-3/8" - 15.75")], divide it at the marker for the inside of the leg and knit the rest back and forth on the needles. Inc 1 st on each side for seam = 78-84-84 (92-92-92) sts. When the work measures 18-22-25 (27-35-41) cm [7" - 8-5/8" - 9-7/8" (10-5/8" - 13.75" - 16-1/8")] bind off 4-6-3 (4-4-4) sts on each side = 70-72-78 (84-84-84) sts. Put the work aside.

Right leg: Knit like the left.

Trouser: Put the right and left leg together on the same larger circular needles; join and place a marker at the joins = 140-144-156 (168-168-168) sts. Knit 3 rows and then inc 1 st on each side of the marker in the center back (two sts in from the marker) every other row 6 times, then every 4th row 2 times. At the same time dec 1 st on each side of the marker at the center front (1 st in from the marker) every other row 6 times, then every 4th row 2 times = 140-144-156 (168-168-168) sts.
When the work measures 35-39-44 (49-55-61) cm [13.75" - 15.25" - 17.25" (19.25" - 21-5/8" - 24")], dec 20-24-30 (28-28-28) sts evenly distributed across the row = 120-120-126 (140-140-140) sts. Change to smaller needles and knit border, bind off all sts. The work measures approx. 38-42-47 (52-58-64) cm [14-7/8" - 16.5" - 18.5" (20.5" - 22-7/8" - 25.25")].
Sew together the inside of each leg up to the bound off sts and then sew together the opening between the legs from the center front to the center of the back on the trouser. Fold all edges double against the wrong side and sew. Pull an appropriate length of elastic through the seam.


HAT

Circumference: 40-40-46 (46-53-53) cm
[15.75" -15.75" -18-1/8" (18-1/8" -20-7/8" -20-7/8")]

DROPS 3 mm [US 2] double pointed needles, or size needed to obtain correct gauge.

Gauge: 24 sts and 32 rows in stockinette st = 10 x 10 cm [4" x 4"].

Pattern: See charts . (1 chart = 1 repeat). The pattern is seen from the right side and is knit entirely in stockinette st.

Hat: Cast on 96-96-112 (112-128-128) sts on double pointed needles with yellow/orange; join and place a marker at the join. Knit 26 rows stockinette st, purl 1 row, knit Pattern 1, then Pattern 4, then Pattern 3. Measure the work from here. Now knit the rest in reverse stockinette st. When the work measures 15-16-17 (18-19-20) cm [5-7/8" - 6.25" - 6.75" (7" - 7.5" - 7-7/8")] put 8 markers evenly distributed on the row. Decrease by knitting 2 sts together after each marker (= 8 decreases per row). Repeat decreasing until 16 sts remain. Pull a doubled strand of yarn through the remaining sts. Make a pompon of brown, yellow/orange and naturale / off white (approx. 5 cm [2"] in diameter) and attach it to the top.

Diagram

All measurements in charts are in cm.

symbols = brown
symbols = natural
symbols = yellow
diagram
diagram

Each of our patterns has specific tutorial videos to help you.

Do you have a question? See a list of frequently asked questions (FAQ)

Knitting tension is what determines the final measurements of your work, and is usually measured per 10 x 10 cm. It is provided like so: number of stitches in width x number of rows in height - eg: 19 stitches x 26 rows = 10 x 10 cm.

The knitting tension is very individual; some people knit/crochet loosely while others work tightly. You adjust the knitting tension with the needle size, which is why the suggested needle size only serve as a guide! You need to adjust this (up or down) to ensure that YOUR knitting tension matches the knitting tension provided in the pattern. If you work with a different knitting tension than provided you will have a different yarn consumption, and your work will have different measurements than what the pattern suggests.

The knitting tension also determines which yarns can replace each other. As long as you achieve the same knitting tension you can replace one yarn with another.

See DROPS lesson: How to measure your tension/gauge

See DROPS video: How to make a gauge tension swatch

The required amount of yarn is provided in grams, eg: 450 g. To calculate how many balls you’ll need you first need to know how many grams are in 1 ball (25g, 50g or 100g). This information is available if you click on the individual yarn quality on our pages. Divide the amount required with the amount of each ball. For example, if each ball is 50g (the most common amount), the calculation will be as follows: 450 / 50 = 9 balls.

The important thing when changing from one yarn to another is that the knitting/crochet tension remains the same. This is so that the measurements of the finished piece will be the same as on the sketch provided. It is easier to achieve the same knitting tension using yarns from the same yarn group. It is also possible to work with multiple strands of a thinner yarn to achieve the knitting tension of a thicker one. Please try our yarn converter. We recommend you to always work a test swatch.

Please NOTE: when changing yarn the garment might have a different look and feel to the garment in the photo, due to individual properties and qualities of each yarn.

See DROPS lesson: Can I use a different yarn than the one mentioned in the pattern?

All our yarns are categorised into yarn groups (from A to F) according to thickness and knitting tension – group A contains the thinnest yarns and group F the thickest. This makes it easier for you to find alternative yarns to our patterns, should you wish to switch yarn. All yarns within the same group have a similar knitting tension and can easily replace each other. However, different yarn qualities have different structures and properties which will give the finished work a unique look and feel.

Click here for an overview of the yarns in each yarn group

At the top of all our patterns you’ll find a link to our yarn converter, which is a helpful tool should you wish to use a different yarn than suggested. By filling in the yarn quality you wish to replace, the amount (in your size) and number of strands, the converter will present good alternative yarns with the same knitting tension. Additionally it will tell you how much you’ll require in the new qualities and whether you’ll need to work with multiple strands. Most skeins are 50g (some are 25g or 100g).

If the pattern is worked with multiple colours, every colour will have to be converted separately. Similarly, if the pattern is worked with several strands of different yarns (for example 1 strand Alpaca and 1 strand Kid-Silk) you will have to find alternatives for each, individually.

Click here to see our yarn converter

Since different yarns have different qualities and textures we have chosen to keep the original yarn in our patterns. However, you can easily find options among our available qualities by using our yarn converter, or simply pick a yarn from the same yarn group.

It is possible that some retailers still have discontinued yarns in stock, or that someone has a few skeins at home that they would like to find patterns for.

The yarn converter will provide both alternative yarn as well as required amount in the new quality.

If you think it's hard to decide what size to make, it can be a good idea to measure a garment you own already and like the size of. Then you can pick the size by comparing those measures with the ones available in the pattern's size chart.

You'll find the size chart at the bottom of the pattern.

See DROPS lesson: How to read size chart

The needle size provided in the pattern serves only as a guide, the important thing is to follow the knitting tension. And since knitting tension is very individual, you will have to adjust the needle size to ensure that YOUR tension is the same as in the pattern – maybe you’ll have to adjust 1, or even 2 needle sizes, up or down to achieve the correct tension. For this, we recommend that you work test swatches.

Should you work with a different knitting tension than the one provided, the measurements of the finished garment might deviate from the measurement sketch.

See DROPS lesson: How to measure your tension/gauge

See DROPS video: How to make a gauge tension swatch

Working a garment top-down provides more flexibility and room for personal adjustment. For example it is easier to try the garment on while working, as well as making adjustments to length of yoke and shoulder caps.

The instructions are carefully explaining every step, in the correct order. Diagrams are adjusted to the knitting direction and are worked as usual.

The diagram depicts all rows/rounds, and every stitch seen from the right side. It is read from bottom to top, from right to left. 1 square = 1 stitch.

When working back and forth, every other row is worked from the right side and every other row is worked from the wrong side. When working from the wrong side, the diagram will have to be worked reversed: from left to right, knit stitches are purled, purl stitches are knit etc.

When working in the round every round is worked from the right side and the diagram are worked from right to left on all rounds.

See DROPS lesson: How to read knitting diagrams

The diagram depicts all rows/rounds, and every stitch seen from the right side. It is worked from bottom to top, from right to left.

When working back and forth every other row is worked from the right side: from right to left and every other row is worked from the wrong side: from left to right.

When working in the round, every row in the diagram are worked from the right side, from right to left.

When working a circular diagram you start in the middle and work your way outwards, counter clockwise, row by row.

The rows usually start with a given number of chain stitches (equivalent to the height of the following stitch), this will either be depicted in the diagram or explained in the pattern.

See DROPS lesson: How to read crochet diagrams

Instructions for working several diagrams after each other on the same row/round, will often be written like so: “work A.1, A.2, A.3 a total of 0-0-2-3-4 times". This means you work A.1 once, then A.2 is worked once, and A.3 is repeated (in width) the number of times provided for your size – in this case like so: S = 0 times, M = 0 times, L=2 times, XL= 3 times and XXL = 4 times.

The diagrams are worked as usual: begin with the first row in A.1, then work the first row in A.2 etc.

See DROPS lesson: How to read knitting diagrams

See DROPS lesson: How to read crochet diagrams

The total width of the garment (from wrist-to-wrist) will be larger in the larger sizes, despite the actual sleeves being shorter. The larger sizes have longer sleeve caps and wider shoulders, so there will be a good fit in all sizes.

The measurement sketch/schematic drawing provides information regarding the full length of the garment. If it’s a jumper or a jacket the length is measured from the highest point on the shoulder (usually closest to the neckline), and straight down to the bottom of the garment. It is NOT measured from the tip of shoulder. Similarly, the length of yoke is measured from the highest point on the shoulder and down to where yoke is split into body and sleeves.

See DROPS lesson: How to read a schematic drawing

Diagrams are often repeated on the round or in height. 1 repeat is the diagram the way it appears in the pattern. If it says to work 5 repeats of A.1 in the round, then you work A.1 a total of 5 times after/next to each other in the round. If it says to work 2 repeats of A.1 vertically/in height you work the entire diagram once, then begin again at the start and work the entire diagram one more time.

Chain stitches are slightly narrower than other stitches and to avoid working the cast-on edge too tight, we simply chain more stitches to begin with. The stitch count will be adjusted on the following row to fit the pattern and measurement sketch.

The rib edge is more elastic and will contract slightly compared to, for example, stocking stitch. By increasing before the rib edge, you avoid a visible difference in width between the rib edge and the rest of the body.

It’s very easy to cast off too tightly, and by making yarn overs while casting off (and simultaneously casting these off) you avoid a too tight cast off edge.

See DROPS video: How to bind off with yarn overs (yo)

To achieve an even increase (or decrease) you can increase on, for example: every 3rd and 4th row alternately, like so: work 2 rows and increase on the 3rd row, work 3 rows and increase on the 4th. Repeat this until the increase is complete.

See DROPS lesson: Increase or decrease 1 st on every 3rd and 4th row alternately

Should you prefer to work in the round instead of back and forth, you may of course adjust the pattern. You’ll need to add steeks mid-front (usually 5 stitches), and follow the instructions. When you would normally turn and work from the wrong side, simply work across the steek and continue in the round. At the end you’ll cut the piece open, pick up stitches to work bands, and cover the cut edges.

See DROPS video: How to knit steeks and cut open

Should you prefer to work back and forth instead of in the round, you may of course adjust the pattern so you work the pieces separately and then assemble them at the end. Divide the stitches for the body in 2, add 1 edge stitch in each side (for sewing) and work the front and back pieces separately.

See DROPS lesson: Can I adapt a pattern for circular needles into straight needles?

Pattern repeats can vary slightly in the different sizes, in order to get the correct proportions. If you’re not working the exact same size as the garment in the photo, yours might deviate slightly. This has been carefully developed and adjusted so that the complete impression of the garment is the same in all sizes.

Make sure to follow instructions and diagrams for your size!

If you have found a pattern you like which is available in women’s size it’s not very difficult to convert it to men’s size. The biggest difference will be the length of sleeves and body. Start working on the women size that you think would fit across the chest. The additional length will be worked right before you cast off for the armhole/sleeve cap. If the pattern is worked top-down you can add the length right after the armhole or before the first decrease on sleeve.

Regarding additional yarn amount, this will depend on how much length you add, but it is better with a skein too many than too few.

All yarns will have excess fibres (from production) that might come off as lint or shedding. Brushed yarns (ie hairier yarns) have more of these loose, excess fibres, causing more shedding.

Shedding also depends on what is worn under or over the garment, and whether this pulls at the yarn fibres. It’s therefore not possible to guarantee that there will be no shedding

Below are some tips on how to get the best result when working with hairier yarns:

1. When the garment is finished (before you wash it) shake it vigorously so the looser hairs come off. NOTE: do NOT use a lint roller, brush or any method that pulls at the yarn.

2. Place the garment in a plastic bag and put it in your freezer - the temperature will cause the fibres to become less attached to each other, and excess fibres will come off easier.

3. Leave in the freezer for a few hours before taking it out and shaking it again.

4. Wash the garment according to the instructions on the yarn label.

Pilling is a natural process that happens to even the most exclusive of fibers. It's a natural sign of wear and tear that is hard to avoid, and that is most visible in high friction areas of your garment like a sweater's arms and cuffs.

You can make your garment look as new by removing the pilling, using a fabric comb or a pill/lint remover.

Still can't find the answer you need? Then scroll down and leave your question so one of our experts can try to help you. This will be done normally within 5 to 10 working days.
In the meantime, you can read the questions and answers that others have left to this pattern or join the DROPS Workshop on Facebook to get help from fellow knitters/crocheters!

You might also like...

Post a comment to pattern DROPS Baby 6-14

We would love to hear what you have to say about this pattern!

If you want to leave a question, please make sure you select the correct category in the form below, to speed up the answering process. Required fields are marked *.

Comments / Questions (41)

country flag Judy wrote:

Ready to start chart 1 and I have 136 stitches...when I leave 5 stitches in main colour for the steeks, I do not have an multiple of 8 stitches for the repeats

01.09.2021 - 14:35

DROPS Design answered:

Dear Judy, pattern is not supposed to be symetrical, repeat the 8 stitches all the row and finish with the first 3 sts in last repeat. When working M.2 pattern will be then symetrical (you will have the first 3 sts in M.2 on each side of the 5 steek stitches). Happy knitting!

02.09.2021 - 16:41

country flag Kathie wrote:

Hi. I am currently making the hat from this pattern. My concern is with the finishing of the hat. The pattern requires 26 rows of stockinette stitch followed by a purl row before commencing the charts for the band of the hat. The finished product clearly does not have 27 rows before the design section. Do those rows form a hem. I love the outfit and want to get it right. Can you help please.

18.06.2021 - 17:11

DROPS Design answered:

Dear Katie, this is a rather old pattern of ours. But yes, the first 27 row of stockinett is turned inwards and sewn in, amiking a double , extra warm edge for the hat. Happy Stitching!

19.06.2021 - 00:28

country flag Lucy Wright wrote:

What does reverse stockinette stitch mean in the hat pattern and how do you fold the first bit ? Thanks

27.12.2020 - 00:14

DROPS Design answered:

Hi Lucy, Reverse stockinette means that the purled side is on the right side when the hat is finished. Happy knitting!

28.12.2020 - 07:52

country flag Adela wrote:

Thank you for your reply. Of course, I had tried that before asking. I might not have expressed myself precisely enough, wanting to politely ask for uploading the pattern adult variation provided that it existed. Happy you had time to answer anyway. :-) I wish you all the best!

08.12.2020 - 10:25

country flag Adela wrote:

Hi, I'm a beginner who's just made her first sweater (with a Norwegian pattern). This one is lovely! Is there any variation of this one for an adult, moreover, not a cardigan? I'm not experienced enough to adjust it with the pattern itself. Thank you

07.12.2020 - 22:35

DROPS Design answered:

Hi Adela, You can search for adult jumpers with Nordic pattern in the search-box top right of the page. Happy knitting!

08.12.2020 - 07:06

country flag Daria wrote:

Forsto aldri hva en mener med å strikke vrangen på retten og når luen skal brettes? Står jo bare felling etter 19 cm og så ferdig... skuffende og unødvendig bruk av tid og garnet

23.11.2020 - 20:36

country flag Brigitte LEMOINE wrote:

Hello Que sont les "mailles STEEK" ?

04.11.2014 - 15:28

DROPS Design answered:

Bonjour Mme Lemoine, les mailles steek sont des mailles montées en plus et tricotées en jersey que l'on va ensuite découper pour les emmanchures et la bordure devant. On tricote ainsi toujours sur l'endroit, en rond. La vidéo ci-dessous montre comment faire. Bon tricot!

04.11.2014 - 17:11

country flag Riikka wrote:

Onko tässä villatakin mallissa myös muiden kuin minun mielestäni virhe? En voi ymmärtää, että luodaan 152 silmukkaa, josta 5 silmukkaa menee aukileikkaussilmukoihin, jolloin jää enää 147 silmukkaa, ja tämä pitäisi olla jaollinen 8:lla. Onko ehdotuksia, miten tästä selviää?

12.12.2012 - 18:13

DROPS Design answered:

Hei! Voit joko neuloa piirroksen M.1 mallineuletta, niin pitkälle kun silmukoita riittää. Halutessasi voit luoda 2 s vähemmin työn alkuun, jolloin työhön tulee vain kokonaisia mallikertoja. Lisää tällöin nämä 2 s ennen kuin aloitat piirroksen M.3 mallineuleen.

09.01.2013 - 15:07

Torhild wrote:

Ad luen. Etter mønsteret er ferdigstrikket står det noe om at det strikke videre på vrangen? Bildet viser glattstrikk. Er det feil beskrivelse? Ps. Det har sneket seg inn en del upassende kommentarer som kanskje bør fjernes!

21.11.2012 - 11:56

DROPS Design answered:

[13:29:56] Tine Jensen: Det er korrekt, du skal strikke glatstrik med vrangen ud. Naar du er faerdig skal kanten foldes om og du faar glatstrik paa ydersiden. Vi skal slette de kommentarer! Tak for det.

21.11.2012 - 13:56

Maria wrote:

Hvor er den overraskende flot, sikke god idé!

02.06.2006 - 21:34