
Popular categories
Looking for a yarn?


Comments / Questions (15)
![]() Petra wrote:
Petra wrote:
Na 3x M1 in de hoogte breien zijn er 18 steken bij gekomen bij de omslagdoek. Ga ik vanaf daar 2x M1 breien waardoor het golfje verspringt? Of wacht ik tot ik aan beide kanten van M1 voldoende steken heb om dan 3x M1 te breien en de golfjes onder elkaar te houden?
07.10.2021 - 22:10DROPS Design answered:
Dag Petra,
Je moet genoeg steken op de naald hebben om nog een herhaling van M.1 te kunnen breien , zodat de golfjes boven elkaar komen. Ze mogen niet verspringen.
12.10.2021 - 10:25
![]() Nicole Vandenreydt wrote:
Nicole Vandenreydt wrote:
Bonjour ! ce modèle m'intéresse beaucoup mais le diagramme ne s'affiche pas... j'ai raté quelque chose ??? merci
04.10.2021 - 18:06DROPS Design answered:
Bonjour Mme Vandenreydt, nous avons eu quelques soucis d'affichage des images mais tout est maintenant rentré dans l'ordre, merci pour votre patience. Bon tricot!
06.10.2021 - 07:03
![]() Guylaine Picard wrote:
Guylaine Picard wrote:
Bonjour, Autres questions. Je veux être certaine de bien comprendre. Lorsqu'on commence à faire le point de fantaisie M.1, est-ce que je dois tricoter les augmentations (des rangs précédents) comme elles se présentent jusqu'à ce qu'il y ait assez de mailles (17) pour un nouveau motif entier? Et, lorsqu'il y a 17 "nouvelles" mailles, je commence une 2e fois le point M.1? Merci bcp Guylaine
19.04.2018 - 13:43DROPS Design answered:
Bonjour Mme Picard, c'est exact, tricotez-les à l'endroit ou à l'envers comme le rang de M.1 que vous tricotez et quand vous avez 17 mailles augmentées, tricotez 1 nouveau motif sur ces 17 mailles. Bon tricot!
19.04.2018 - 15:52
![]() Picard wrote:
Picard wrote:
Bonjour, J'ai monté mes 13 mailles et dès le 2e rang, je me retrouve avec 21 mailles alors que dans vos explications on dit que je devrais en avoir 17. Qu'est-ce que je n'ai pas compris? Merci Guylaine Picard
18.04.2018 - 18:40DROPS Design answered:
Bonjour Mme Picard, au 1er rang on fait 4 double jetés mais au 2ème rang, on ne va tricoter qu'un seul des jetés et lâcher l'autre (cf AUGMENTATIONS) = on aura ainsi bien 17 m. Bon tricot!
19.04.2018 - 10:00
![]() Lourdes wrote:
Lourdes wrote:
Hola. Estoy tejiendo el chal pero no me queda claro si solo se teje en diagrama M1? Se teje solo este diagrama desde principio a fin ? Muchas gracias
15.11.2016 - 21:55DROPS Design answered:
Hola Lourdes. El chal se trabaja sólo con el diagrama M.1. Se trabajan varias repeticiones del Diagrama M.1 a lo largo de la fila.
19.11.2016 - 17:38
![]() Kathleen De Cokere wrote:
Kathleen De Cokere wrote:
Mooi
28.10.2014 - 18:53
![]() Marit Rasmussen wrote:
Marit Rasmussen wrote:
Flott fasong på sjalet, da det felt midt bak. Da er det lettere å få til å henge på skuldrene. Flott!
28.07.2009 - 22:32
![]() Sandra wrote:
Sandra wrote:
Dessa var fina, tycker ni ska behålla dessa!!
13.07.2009 - 19:06Svetilnik wrote:
Lovely! svetilnik-m.livejournal.com
07.07.2009 - 00:01
![]() Pia Nielsen wrote:
Pia Nielsen wrote:
Wieder ein schönes schal, freue mich auf die anleitung
01.07.2009 - 09:44
|
||||||||||||||||
Rose Valley#rosevalleyset |
||||||||||||||||
|
|
||||||||||||||||
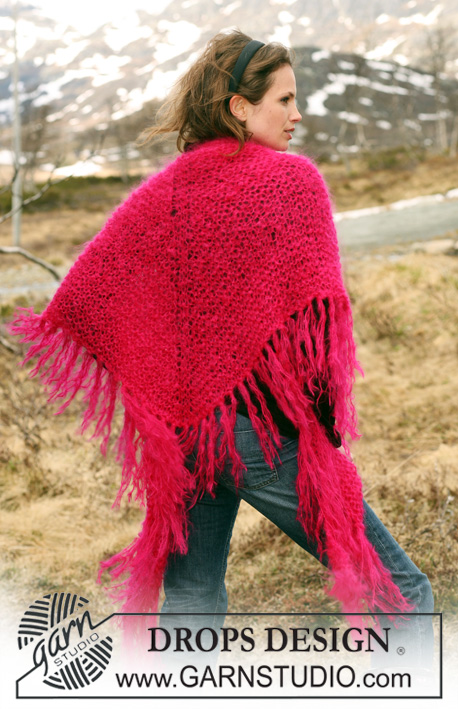
Set comprises: Knitted DROPS hat and shawl with wavy pattern in ”Kid-Silk” and ”Alpaca”.
DROPS 117-36 |
||||||||||||||||
|
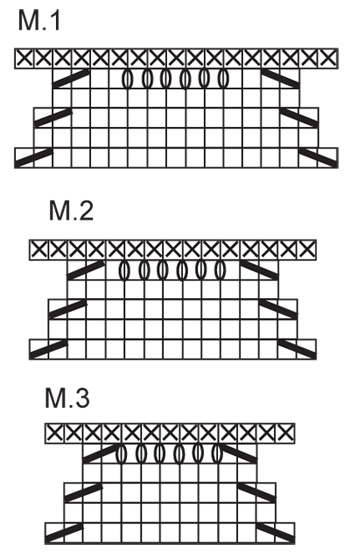
PATTERN: See diagrams M.1 to M.3. Diagrams show the pattern from RS. -------------------------------------------------------- HAT: Worked in the round on circular needle. Cast on 120-136 sts on circular needle size 4 mm / US 6 with 1 thread Alpaca and 2 threads Kid-Silk. Work rib K2/P2 for 4 cm / 1½". K 1 round, AT THE SAME TIME dec 1-0 st = 119-136 sts. Now remove the Alpaca thread and continue in M.1 on circular needle size 4.5 mm / US 7 with 2 threads Kid-Silk. Work 4 vertical repeats of M.1, but in the last repeat finish after row 2 in diagram = 105-120 sts on needle. Now work 4 vertical repeats of M.2, but in the last repeat finish after row 2 in diagram = 91-104 sts. Work 3 vertical repeats of M.3, but in the last repeat finish after row 4 in diagram = 63-72 sts. Now K2 tog all the way round = 32-36 sts. K2 tog all the way round again = 16-18 sts. Cut the thread, pull through remaining sts and fasten. Hat measures approx 30 cm / 11¾". SHAWL: -------------------------------------------------------- PATTERN: See diagram M.1. Diagram shows the pattern from RS. GARTER ST (back and forth on needle): K all rows. OPEN GARTER ST: Row 1 (= from RS): K Row 2: P Row 3: K Row 4: P Row 5: K Row 6: K INCREASING TIP: Make all inc from RS. Inc 4 sts on every other row throughout as follows: Inc 1 st as follows at beg of row: 3 garter sts, 1 dbl-YO. On next row K 1 YO and slip the other off needle. Inc 2 sts as follows in the middle of piece: 1 dbl-YO, K1 (= st with marker), 1 dbl-YO. On next row K 1 YO and slip the other off needle. Inc 1 st as follows at the end of row: 1 dbl-YO, 3 garter sts. On next row K 1 YO and slip the other off needle. -------------------------------------------------------- -------------------------------------------------------- SHAWL: Worked back and forth on circular needle in order to fit in all sts. Worked from neck mid back towards bottom edge. NOTE! Make sure to beg a new ball of yarn at the side and not mid piece. Cast on 13 sts on circular needle size 4.5 mm / US 7 with 2 threads Kid-Silk. Insert a marker in st 7 (to mark the middle). Work first row as follows (= RS): 3 garter sts – see above, 1 dbl-YO, K3, 1 dbl-YO, K1, 1 dbl-YO, K3, 1 dbl-YO, 3 garter sts = 17 sts. K return row. Now continue in OPEN GARTER ST with 3 garter sts each side – see above, AT THE SAME TIME inc 4 sts on every other row (= every row from RS) – see INCREASING TIP! Continue like this until there are 41 sts on needle. REMEMBER THE GAUGE! Now continue as follows – from RS: 3 garter sts, 1 dbl-YO, M.1 (= 17 sts), 1 dbl-YO, K1 (= middle st),1 dbl-YO, M.1, finish with 1 dbl-YO and 3 garter sts. Continue inc at the sides and mid back (K or P inc sts acc to M.1 until there are enough sts for a new repeat). Continue pattern and inc until shawl measures approx 75 cm / 29½", measured in the middle. Bind off. CROCHET BORDER: Crochet a border round the whole shawl with crochet hook size 5 mm / H/8 and 2 threads Kid-Silk + 1 thread Alpaca as follows: 1 sc in corner of shawl, * 3 ch, skip approx 1-1.5 cm / ⅜"-½", 1 sc *, repeat from *-* and finish with 1 sl st in sc from beg of round. |
||||||||||||||||
Diagram explanations |
||||||||||||||||
|
||||||||||||||||
 |
||||||||||||||||
Have you finished this pattern?Tag your pictures with #dropspattern #rosevalleyset or submit them to the #dropsfan gallery. Do you need help with this pattern?You'll find 15 tutorial videos, a Comments/Questions area and more by visiting the pattern on garnstudio.com. © 1982-2026 DROPS Design A/S. We reserve all rights. This document, including all its sub-sections, has copyrights. Read more about what you can do with our patterns at the bottom of each pattern on our site. |
||||||||||||||||


With over 40 years in knitting and crochet design, DROPS Design offers one of the most extensive collections of free patterns on the internet - translated to 17 languages. As of today we count 324 catalogs and 12284 patterns - 12274 of which are translated into English (US/in).
We work hard to bring you the best knitting and crochet have to offer, inspiration and advice as well as great quality yarns at incredible prices! Would you like to use our patterns for other than personal use? You can read what you are allowed to do in the Copyright text at the bottom of all our patterns. Happy crafting!
Post a comment to pattern DROPS 117-36
We would love to hear what you have to say about this pattern!
If you want to leave a question, please make sure you select the correct category in the form below, to speed up the answering process. Required fields are marked *.