
Popular categories
Looking for a yarn?


Comments / Questions (12)
![]() Brunet Cathy wrote:
Brunet Cathy wrote:
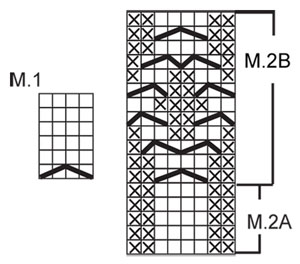
Bonjour pour ke bonnet le nombre de mailles du motif M2A est de 8 donc pas multiple de 68 donc comment faire
23.02.2023 - 18:05DROPS Design answered:
Bonjour Mme Brunet, pour le bonnet, on ne tricote pas M.2 tout le tour, mais M1 et M.2 avec des mailles envers entre les diagrammes ainsi: M1 (= 4 m), 4 m env, M2A (= 8 m), 4 m env, M1, 10 m env, M1, 4 m env, M2A, 4 m env, M1, 10 m env soit 4+4+8+4+4+10+4+4+8+4+4+10=68. Bon tricot!
24.02.2023 - 10:15
![]() Maria wrote:
Maria wrote:
Per fare scaldaspalle posso usare Ferri diritti?
01.12.2018 - 20:48DROPS Design answered:
Buonasera Maria. Lo scaldaspalle è lavorato avanti e indietro; può usare i ferri dritti e seguire le istruzioni così come vengono date. Il numero delle maglie è elevato: potrebbe risultarle più scomodo lavorare con i ferri dritti. Buon lavoro!
01.12.2018 - 22:38
![]() Georgine wrote:
Georgine wrote:
Super
05.01.2012 - 15:50
![]() DROPS Design wrote:
DROPS Design wrote:
Hulda, it's fixed now, thank you !
24.01.2011 - 19:03Hulda Mjöll wrote:
In the hat pattern Large size there is one error. Should be: When piece measures 4 cm continue as follows: M.1 (= 4 sts), P4-5, M.2A (= 8 sts), P4-5, M.1, P10, M.1, P4-5, M.2A, P4"-5", M.1, P10. -5 in the second to last purl section is missing.
23.01.2011 - 11:14
![]() DROPS Deutsch wrote:
DROPS Deutsch wrote:
Das ist jetzt korrigiert. danke für den Tipp.
18.11.2010 - 08:01
![]() Cat wrote:
Cat wrote:
Bei der Diagrammerklärung muss es bei der letzten Zeichenerklärung heissen 1 Masche auf eine Hilfsnadel hinter die Arbeit legen (nicht 2), 2 rechts, eine links von der Hilfsnadel.
17.11.2010 - 16:53
![]() Ineke wrote:
Ineke wrote:
Bestellen
06.09.2009 - 13:34Ana Pires wrote:
É um dos conjuntos mais lindos que já vi, mas como não entendi os pontos, creio que ficarei apenas a admirá-los.Um grande abraço.
01.08.2009 - 19:50
![]() Mercurydeb wrote:
Mercurydeb wrote:
I have just the right person for this one ! in American English!
05.07.2009 - 07:43
|
||||||||||||||||
Laluna#lalunaset |
||||||||||||||||
|
|
||||||||||||||||
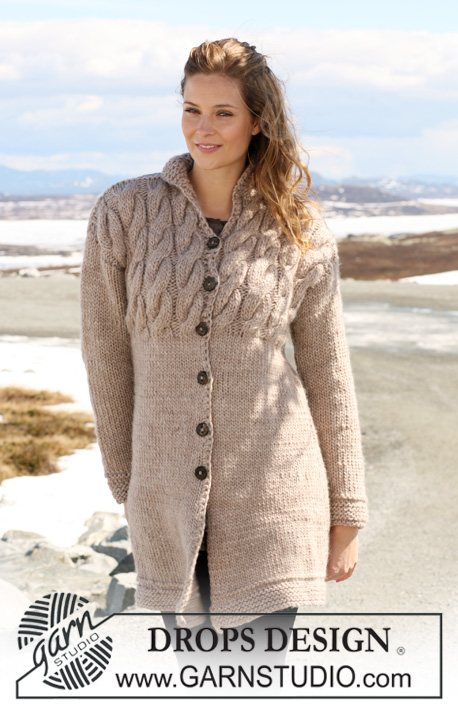
Set comprises: Knitted DROPS neck warmer, hat and mittens with cables in ”Snow”.
DROPS 117-15 |
||||||||||||||||
|
NECK WARMER: -------------------------------------------------------- PATTERN: See diagram M.1. Diagram shows the pattern from RS. BUTTONHOLES: Make buttonholes on right front band. 1 buttonhole = K tog 2nd and 3rd st from mid front. Cast on 1 new st, 2 sts from mid front, on return row. Make buttonholes when piece measures: All sizes: 7, 13, 19, 25, 31 and 37 cm / 2¾", 5⅛",7½",9¾",12¼" and 14½". -------------------------------------------------------- -------------------------------------------------------- NECK WARMER: Worked back and forth on circular needle. Cast on 158-176-194 sts on circular needle size 8 mm / US 11 with Snow. K 1 row from WS. Continue as follows - from RS: 5 garter sts, * K4/P4-5-6 *, repeat from *-* until 9 sts remain, and finish with K4 and 5 garter sts. When piece measures 5 cm / 2" work next row as follows - from RS: 5 garter sts, * M.1 (= 4 sts), P12-14-16 *, repeat from *-* until 9 sts remain, and finish with M.1 and 5 garter sts. Remember BUTTONHOLES – see above. Continue in pattern like this, AT THE SAME TIME when piece measures 10-11-12 cm / 4"-4⅜"-4¾" dec 1 st on the right side of all P-sections (= 9 dec) – dec by P2 tog. Repeat the dec on the right and on the left side alternately of all P-sections on every 2.5 cm / ⅞" a total of 8 times = 86-104-122 sts. When all dec are complete piece measures approx 28-29-30 cm / 11"-11⅜"-11¾". Continue as follows – from RS: 5 garter sts, * K4, P4-6-8 *, repeat from *-* until 9 sts remain, and finish with K4 and 5 garter sts. When rib measures 14 cm / 5½" bind off with K over K and P over P. Sew on buttons to fit buttonholes. -------------------------------------------------------- HAT: ---------------------------------------------------------- PATTERN: See diagram M.1 and M.2. Diagram shows the pattern from RS. -------------------------------------------------------- HAT: Worked in the round on double pointed needles. Cast on 68-72 sts on double pointed needles size 8 mm / US 11 with Snow. Work rib as follows: * K4, P2-3, K2, P2, K4, P2, K2, P2-3, K4, P2, K2, P2, K2, P2 *, repeat from *-* a total of 2 times. When piece measures 4 cm / 1½" continue as follows: M.1 (= 4 sts), P4-5, M.2A (= 8 sts), P4-5, M.1, P10, M.1, P4-5, M.2A, P4-5, M.1, P10. After 1 vertical repeat of M.2A continue with M.2 B. After 2 vertical repeats of M.2 B complete piece in M.2A. Continue in pattern like this, AT THE SAME TIME when piece measures 17 cm / 6¾" dec 1 st in each P10-section, and repeat the dec on every 2 cm / ¾" a total of 4 times (dec at the beg and the end of P-section alternately) = 60-64 sts. When piece measures 24 cm / 9½" K2 tog on all sts on M.1 = 52-58 sts. When piece measures 26 cm / 10¼" K2 tog all the way round = 26-29 sts. Cut the thread, pull through remaining sts and fasten. -------------------------------------------------------- MITTENS: -------------------------------------------------------- PATTERN: See diagram M.1. Diagram shows the pattern from RS. INCREASING TIP: Inc 1 st by making 1 YO, Work YO into back of loop on return row in order to avoid a hole. -------------------------------------------------------- RIGHT MITTEN: Worked back and forth on needle and sewn tog at the side afterwards. Cast on 24-27 sts on needle size 9 mm / US 13 with Snow. Continue as follows: K2-3, P2, K4, P2, * K2, P2 *, repeat from *-* on the next 12-16 sts, and finish with K2-0. Work rib like this for 3 cm / 1⅛". Work next row as follows - from RS: P2-3, M.2 B (= 8 sts), P14-16. Continue like this until piece measures 12 cm / 4¾". On next row from RS dec 4 sts evenly = 20-23 sts (do not dec on the first 10-11 sts on needle). Work 3-5 rows. Insert a marker in st no 11-13 from the right side of piece as seen from RS. Now inc 1 st for thumb on each side of marker on every other row a total of 3 times – see INCREASING TIP,(P inc sts as seen from RS) = 7 thumb sts (= 26-29 sts in total). When inc are complete slip the 7 thumb sts on a stitch holder. Cast on 1 new st over sts on stitch holder = 20-23 sts. Continue until piece measures 29-32 cm / 11⅜"-12½". Now K2 tog across the row = 10-12 sts. Cut the thread, pull through remaining sts and fasten. THUMB: Slip the 7 thumb sts back on needle, cast on 1 new st each side = 9 sts. Work reverse stockinette st back and forth on needle until piece measures 5-6 cm / 2"-2⅜". Now P2 tog across the row = 5 sts. Cut the thread, pull it thorough remaining sts twice and fasten. LEFT MITTEN: Like right mitten, but mirrored. I.e.: K2-0, * P2, K2 *, repeat from *-* on the next 12-16 sts, P2, K4, P2, K2-3. After the rib continue as follows: P14-16, M.2 B (= 8 sts), P2-3. Insert marker for thumb in st 10-11. ASSEMBLY: Sew side seam in outer loops of sts in order to avoid a chunky seam. Sew thumb tog in the same way and sew the new sts each side of thumb to mitten. |
||||||||||||||||
Diagram explanations |
||||||||||||||||
|
||||||||||||||||
 |
||||||||||||||||
Have you finished this pattern?Tag your pictures with #dropspattern #lalunaset or submit them to the #dropsfan gallery. Do you need help with this pattern?You'll find 20 tutorial videos, a Comments/Questions area and more by visiting the pattern on garnstudio.com. © 1982-2026 DROPS Design A/S. We reserve all rights. This document, including all its sub-sections, has copyrights. Read more about what you can do with our patterns at the bottom of each pattern on our site. |
||||||||||||||||


With over 40 years in knitting and crochet design, DROPS Design offers one of the most extensive collections of free patterns on the internet - translated to 17 languages. As of today we count 324 catalogs and 12290 patterns - 12280 of which are translated into English (US/in).
We work hard to bring you the best knitting and crochet have to offer, inspiration and advice as well as great quality yarns at incredible prices! Would you like to use our patterns for other than personal use? You can read what you are allowed to do in the Copyright text at the bottom of all our patterns. Happy crafting!
Post a comment to pattern DROPS 117-15
We would love to hear what you have to say about this pattern!
If you want to leave a question, please make sure you select the correct category in the form below, to speed up the answering process. Required fields are marked *.