
Popular categories
Looking for a yarn?


Comments / Questions (60)
![]() Vidal wrote:
Vidal wrote:
Bonjour, je suis en train de tricoter ce boléro et j\'ai du mal à comprendre la phrasé : \"EN MÊME TEMPS, au 2ème rang, monter 1 m côté milieu devant\". Cela veut-il dire qu\'il faut simplement faire 1 augmentation de 1 maille au milieu du devant ? Merci
25.07.2021 - 14:29DROPS Design answered:
Bonjour Mme Vidal, vous allez monter 1 maille côté milieu devant (= côté ouverture du devant si vous préférez) à la fin de chaque rang (sur l'envers pour le devant gauche, sur l'endroit pour le devant droit) - cette vidéo montre comment procéder pour monter plusieurs mailles en fin de rang. Bon tricot!
26.07.2021 - 08:58
![]() Jeanette Gaboardi wrote:
Jeanette Gaboardi wrote:
Regarding 3/4 sleeve bolero AC 013 pattern. My piece measures 24" instead of the 28 I told you in the previous inquiry. This is the width before binding off for the arm holes. Will these extra inches make the finished bolero larger all over? Do you think 24" will work for the size L? Thank you Jeanette Gaboardi
20.04.2016 - 17:16DROPS Design answered:
Dear Mrs Gaboardi, the best way to be sure about the size would be to compare a similar garment she has and like the shape to the finished measurements (taken flat from side to side, and remember in cm) - see here. Happy knitting!
20.04.2016 - 17:44
![]() Jeanette Gaboardi wrote:
Jeanette Gaboardi wrote:
Regarding the pattern for the Bolero w/3/4 sleeve pattern AC-013, I am now at the stage where you bind off for armholes. My work, before starting the bind off, is 28" wide. For size L should this piece measure 36 " as shown in diagram? Does the diagram mean the shoulder seams are 36" apart? When do you use the chart? Thank you. Jeanette Gaboardi
20.04.2016 - 14:13DROPS Design answered:
Dear Mrs Gaboardi, with a tension of 20 sts = 10 cm (see under tab "materials") you should get approx. 50 cm/20 inc with the 102 sts in size L before binding off for armholes - remember to check and keep correct gauge. Measurement in chart are in cm, convert here into inches. Happy knitting!
20.04.2016 - 16:11
![]() Jeanette Gaboardi wrote:
Jeanette Gaboardi wrote:
In regards to Bolero w/3/4 sleeve pattern AC-013. Back piece (binding off for armholes size L). Pattern reads bind off 3 sts O-2 times. Don't understand this. Does it mean bind off 3 sts at the beg of two rows or no sts for 2 rows for size L?
19.04.2016 - 14:46DROPS Design answered:
Dear Mrs Gaboardi, each number refers to a size, in size L, bind off for armholes as follows - at the beg of every row on each side: 4 sts 1 time, 2 sts 3 times and 1 st 3 times = 76 sts remain. Happy knitting!
19.04.2016 - 16:46
![]() Jessica wrote:
Jessica wrote:
Thank you for the response but i'm still strugglinig with how I end up with 38 sts. If I cast on 18 and do 6 increases (one every row RS and WS) and then 8 increases (every other row) and then 12 increases (inc 1 stitch each side 6 times) this equals 44 instead of the 38 I need. Can you help me understand where I have too many sts? Thank you!
21.01.2013 - 23:17DROPS Design answered:
Dear Jessica, you will inc 12 sts towards mid front and only 6 sts towards the side (back piece are each side but front piece is only 1 side = towards seam to back), so 18 sts + 14 sts (6 every row + 8 every 2nd row) + 6 sts towards back piece = 38 sts. Happy knitting!
22.01.2013 - 09:48
![]() Jessica wrote:
Jessica wrote:
I'm struggling with the front and am wondering if someone can help. It says on row 2 increase 1st towards frond mid every row. Is this only supposed to be on the front knit side of the garment or on both knit and purl sides? I am doing size M and struggling to understand how I end up with only 38 sts at end of increases. Right now I am casting on 18 +6 every row +8 inc every other + 12 (inc 1st each side 6 times) = 44. Can u help me understand where I have too many stitches?
19.01.2013 - 18:09DROPS Design answered:
Dear Jessica, there are 2 kinds of inc for front pieces : the first one every row (= from RS and from WS) towards mid front (to shape the round border) + the same inc as for back piece towards the side. Happy knitting !
21.01.2013 - 09:18
![]() Jessica wrote:
Jessica wrote:
I'm struggling with the front and am wondering if someone can help. It says on row 2 increase 1st towards frond mid every row. Is this only supposed to be on the front knit side of the garment or on both knit and purl sides? I am doing size M and struggling to understand how I end up with only 38 sts at end of increases. Right now I am casting on 18 +6 every row +8 inc every other + 12 (inc 1st each side 6 times) = 44. Can u help me understand where I have too many stitches?
19.01.2013 - 18:08
![]() Cobi Keus wrote:
Cobi Keus wrote:
Ik ben bezig met de rand langs de bolero, nu begrijp ik niet goed welke steken er tussen het patroon gebreid moet worden. Na de 12e nld moeten dan de steken afgekant worden? Heeft u een iets duidelijkere omschrijving?
14.12.2012 - 09:08DROPS Design answered:
U moet geen steken tussen het patroon breien, ALLEEN de st van de teltekening. Bijv maat S, heeft u 288 st op de nld. U herhaalt M.1 over alle st (16 st per herhaling = 18 herhalingen over de hele nld). Volgt u de teltekening en de beschrijving hiervoor, dan komen er eerst automatisch meerderingen (= omsl) en in nld 12 breit u st samen (zie beschrijving) Brei door volgens de teltekening.
15.12.2012 - 17:28
![]() Becky Brock wrote:
Becky Brock wrote:
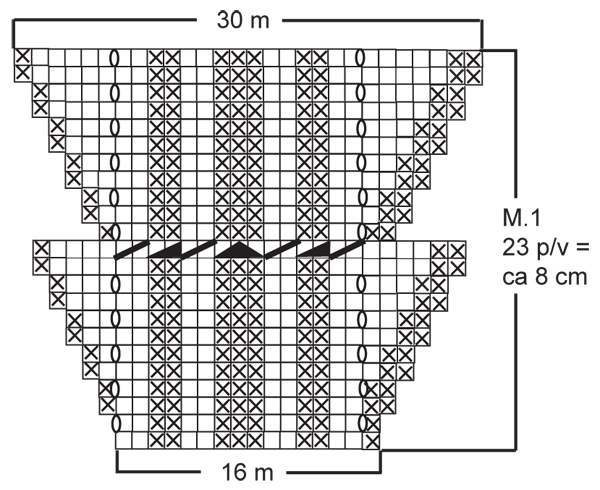
Thanks, the chart is upside down. It shows you starting with 30 sts.
20.11.2012 - 13:30
|
|||||||||||||||||||
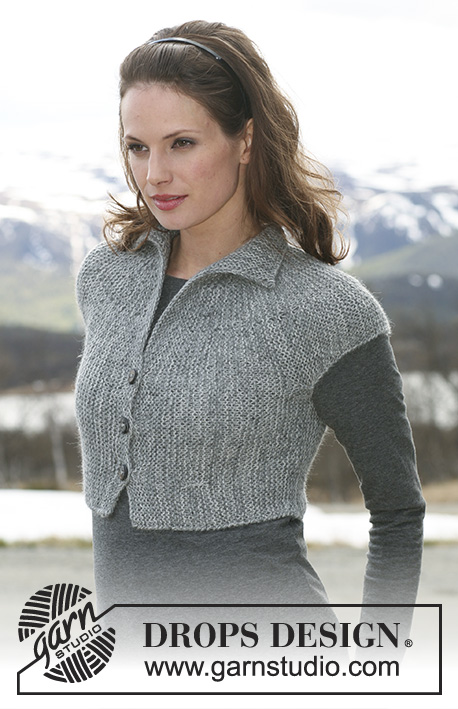
Elegant Dreams |
|||||||||||||||||||
|
|
|||||||||||||||||||
DROPS Bolero in ”Classic Alpaca” with ¾ sleeves. Size S – XXXL.
DROPS 115-16 |
|||||||||||||||||||
|
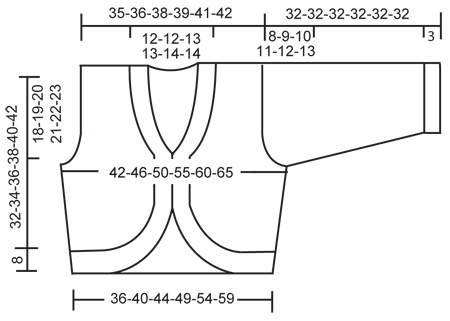
PATTERN: See diagram M.1 – diagram is seen from RS and shows 1 horizontal pattern repeat. DECREASING TIP (apply to neckline): Dec from RS inside 1 edge st. Dec as follows AFTER 1 st: slip 1 st as if to K, K1, psso. Dec as follows BEFORE 1 st: K2 tog. ---------------------------------------------------------- ---------------------------------------------------------- BACK PIECE: Worked back and forth on needle. Cast on 74-82-90-100-110-120 sts (includes 1 edge st each side) on needle size 4.5 mm / US 7 with Classic Alpaca. Work stockinette st. REMEMBER THE GAUGE! When piece measures 2-2-3-3-4-4 cm / ¾"-¾"-1⅛"-1⅛"-1½"-1½" inc 1 st each side, and repeat the inc on every 2 cm / ¾" a total of 6 times = 86-94-102-112-122-132 sts. When piece measures 14-15-16-17-18-19 cm / 5½"-6"-6¼"-6¾"-7"-7½" bind off for armhole each side at the beg of every row: 4 sts 1 time, 3 sts 0-0-0-1-2-2 times, 2 sts 1-2-3-3-3-5 times and 1 st 2-3-3-4-4-4 times = 70-72-76-78-82-84 sts. When piece measures 30-32-34-36-38-40 cm / 11¾"-12½"-13⅜"-14¼"-15"-15¾ slip the middle 22-22-24-24-26-26 sts on a stitch holder for neck and complete each shoulder separately. Bind off 1 st on neckline on next row = 23-24-25-26-27-28 sts left on each shoulder. Bind off when piece measures 32-34-36-38-40-42 cm / 12½"-13⅜"-14¼"-15"-15¾"-16½". RIGHT FRONT PIECE: Worked back and forth on needle. Cast on 14-18-21-27-31-36 sts on needle size 4.5 mm / US 7 with Classic Alpaca. Work stockinette st, AT THE SAME TIME on row 2 inc 1 st towards mid front, and repeat the inc on every row a total of 6 times and then on every other row a total of 8 times. AT THE SAME TIME when piece measures 2-2-3-3-4-4 cm / ¾"-¾"-1⅛"-1⅛"-1½"-1½" inc at the side as described for back piece. When all inc and dec are complete there are 34-38-41-47-51-56 sts on needle. When piece measures 14-15-16-17-18-19 cm / 5½"-6"-6¼"-6¾"-7"-7½" bind off for armhole at the side as described for back piece. AT THE SAME TIME when piece measures 16-17-18-19-20-21 cm / 6¼"-6¾"-7"-7½"-8"-8¼" dec 1 st towards mid front – SEE DECREASING TIP – and repeat the dec on every 4 cm / 1½" a total of 3-3-3-4-4-4 times = 23-24-25-26-27-28 sts left on shoulder. Bind off when piece measures 32-34-36-38-40-42 cm / 12½"-13⅜"-14¼"-15"-15¾"-16½". LEFT FRONT PIECE: Like right front piece, but mirrored. SLEEVE: Worked back and forth on needle. Cast on 54-58-62-66-70-74 sts on needle size 3.5 mm / US 4 with Classic Alpaca. Work rib, K2/P2, with 1 edge st each side. When piece measures 3 cm / 1⅛" change to needle size 4.5 mm / US 7 and continue in stockinette st, AT THE SAME TIME dec 8-8-8-10-10-10 sts evenly on first row = 46-50-54-56-60-64 sts. When piece measures 5 cm / 2" inc 1 st each side, and repeat the inc on every 5-4-4-3-3-3 row a total of 10-10-10-12-12-13 times = 66-70-74-80-84-90 sts. When piece measures 24-23-22-21-20-19 cm / 9½"-9"-8¾"-8¼"-8"-7½" (less for the larger sizes because of longer sleeve cap and wider shoulder) bind off for sleeve cap each side at the beg of every row: 4 sts 1 time and 3 sts 1 time, then 2 sts each side until piece measures 31 cm / 12¼", now bind off 3 sts each side 1 time and cast of remaining sts, piece measures approx 32 cm / 12½". ASSEMBLY: Sew shoulder seams and side seams (inside 1 edge st). Pick up 288-304-336-352-384-400 sts (includes sts on stith holder on back piece) round the whole opening of bolero on circular needle size 3.5 mm / US 4 with Classic Alpaca. NOTE: make sure to pick up enough sts along the shaped front pieces. Work M.1 (= 18-19-21-22-24-25 repeats). After M.1 there are 540-570-630-660-720-750 sts on needle, bind off with K over K and P over P. Sew sleeve seams inside 1 edge st and set in sleeves. |
|||||||||||||||||||
Diagram explanations |
|||||||||||||||||||
|
|||||||||||||||||||
 |
|||||||||||||||||||
 |
|||||||||||||||||||
Have you finished this pattern?Tag your pictures with #dropspattern or submit them to the #dropsfan gallery. Do you need help with this pattern?You'll find 22 tutorial videos, a Comments/Questions area and more by visiting the pattern on garnstudio.com. © 1982-2026 DROPS Design A/S. We reserve all rights. This document, including all its sub-sections, has copyrights. Read more about what you can do with our patterns at the bottom of each pattern on our site. |
|||||||||||||||||||


With over 40 years in knitting and crochet design, DROPS Design offers one of the most extensive collections of free patterns on the internet - translated to 17 languages. As of today we count 324 catalogs and 12272 patterns - 12262 of which are translated into English (US/in).
We work hard to bring you the best knitting and crochet have to offer, inspiration and advice as well as great quality yarns at incredible prices! Would you like to use our patterns for other than personal use? You can read what you are allowed to do in the Copyright text at the bottom of all our patterns. Happy crafting!
Post a comment to pattern DROPS 115-16
We would love to hear what you have to say about this pattern!
If you want to leave a question, please make sure you select the correct category in the form below, to speed up the answering process. Required fields are marked *.