The yarn cost is calculated from the pattern’s smallest size and the yarn’s cheapest product type. Looking for an even better price? You might find it on the DROPS Deals!
-------------------------------------------------------
Alternative Yarn – See how to change yarns here
Yarn Groups A to F – Use the same pattern and change the yarn here
Yarn usage using an alternative yarn – Use our yarn converter here
-------------------------------------------------------
The yarn cost is calculated from the pattern’s smallest size and the yarn’s cheapest product type. Looking for an even better price? You might find it on the DROPS Deals!
This pattern has been corrected. Click here to see the correction/s.
All measurements in charts are in cm.
= P from RS, K from WS | |
= K from RS, P from WS |
Each of our patterns has specific tutorial videos to help you.
These step-by-step tutorials might also help you:
Why is the knitting/crochet tension so important?
Knitting tension is what determines the final measurements of your work, and is usually measured per 10 x 10 cm. It is provided like so: number of stitches in width x number of rows in height - eg: 19 stitches x 26 rows = 10 x 10 cm.
The knitting tension is very individual; some people knit/crochet loosely while others work tightly. You adjust the knitting tension with the needle size, which is why the suggested needle size only serve as a guide! You need to adjust this (up or down) to ensure that YOUR knitting tension matches the knitting tension provided in the pattern. If you work with a different knitting tension than provided you will have a different yarn consumption, and your work will have different measurements than what the pattern suggests.
The knitting tension also determines which yarns can replace each other. As long as you achieve the same knitting tension you can replace one yarn with another.
See DROPS lesson: How to measure your tension/gauge
See DROPS video: How to make a gauge tension swatch
How do I know how many balls of yarn I need?
The required amount of yarn is provided in grams, eg: 450 g. To calculate how many balls you’ll need you first need to know how many grams are in 1 ball (25g, 50g or 100g). This information is available if you click on the individual yarn quality on our pages. Divide the amount required with the amount of each ball. For example, if each ball is 50g (the most common amount), the calculation will be as follows: 450 / 50 = 9 balls.
Can I use a different yarn than what the pattern suggests?
The important thing when changing from one yarn to another is that the knitting/crochet tension remains the same. This is so that the measurements of the finished piece will be the same as on the sketch provided. It is easier to achieve the same knitting tension using yarns from the same yarn group. It is also possible to work with multiple strands of a thinner yarn to achieve the knitting tension of a thicker one. Please try our yarn converter. We recommend you to always work a test swatch.
Please NOTE: when changing yarn the garment might have a different look and feel to the garment in the photo, due to individual properties and qualities of each yarn.
See DROPS lesson: Can I use a different yarn than the one mentioned in the pattern?
What are the yarn groups?
All our yarns are categorised into yarn groups (from A to F) according to thickness and knitting tension – group A contains the thinnest yarns and group F the thickest. This makes it easier for you to find alternative yarns to our patterns, should you wish to switch yarn. All yarns within the same group have a similar knitting tension and can easily replace each other. However, different yarn qualities have different structures and properties which will give the finished work a unique look and feel.
How do I use the yarn converter?
At the top of all our patterns you’ll find a link to our yarn converter, which is a helpful tool should you wish to use a different yarn than suggested. By filling in the yarn quality you wish to replace, the amount (in your size) and number of strands, the converter will present good alternative yarns with the same knitting tension. Additionally it will tell you how much you’ll require in the new qualities and whether you’ll need to work with multiple strands. Most skeins are 50g (some are 25g or 100g).
If the pattern is worked with multiple colours, every colour will have to be converted separately. Similarly, if the pattern is worked with several strands of different yarns (for example 1 strand Alpaca and 1 strand Kid-Silk) you will have to find alternatives for each, individually.
Why do you show discontinued yarns in the patterns?
Since different yarns have different qualities and textures we have chosen to keep the original yarn in our patterns. However, you can easily find options among our available qualities by using our yarn converter, or simply pick a yarn from the same yarn group.
It is possible that some retailers still have discontinued yarns in stock, or that someone has a few skeins at home that they would like to find patterns for.
The yarn converter will provide both alternative yarn as well as required amount in the new quality.
What size should I knit?
If you think it's hard to decide what size to make, it can be a good idea to measure a garment you own already and like the size of. Then you can pick the size by comparing those measures with the ones available in the pattern's size chart.
You'll find the size chart at the bottom of the pattern.
See DROPS lesson: How to read size chart
Why do I get the wrong knitting tension with the suggested needle size?
The needle size provided in the pattern serves only as a guide, the important thing is to follow the knitting tension. And since knitting tension is very individual, you will have to adjust the needle size to ensure that YOUR tension is the same as in the pattern – maybe you’ll have to adjust 1, or even 2 needle sizes, up or down to achieve the correct tension. For this, we recommend that you work test swatches.
Should you work with a different knitting tension than the one provided, the measurements of the finished garment might deviate from the measurement sketch.
See DROPS lesson: How to measure your tension/gauge
See DROPS video: How to make a gauge tension swatch
Why is the pattern worked top-down?
Working a garment top-down provides more flexibility and room for personal adjustment. For example it is easier to try the garment on while working, as well as making adjustments to length of yoke and shoulder caps.
The instructions are carefully explaining every step, in the correct order. Diagrams are adjusted to the knitting direction and are worked as usual.
How do I work according to a knitting diagram?
The diagram depicts all rows/rounds, and every stitch seen from the right side. It is read from bottom to top, from right to left. 1 square = 1 stitch.
When working back and forth, every other row is worked from the right side and every other row is worked from the wrong side. When working from the wrong side, the diagram will have to be worked reversed: from left to right, knit stitches are purled, purl stitches are knit etc.
When working in the round every round is worked from the right side and the diagram are worked from right to left on all rounds.
See DROPS lesson: How to read knitting diagrams
How do I work according to a crochet diagram?
The diagram depicts all rows/rounds, and every stitch seen from the right side. It is worked from bottom to top, from right to left.
When working back and forth every other row is worked from the right side: from right to left and every other row is worked from the wrong side: from left to right.
When working in the round, every row in the diagram are worked from the right side, from right to left.
When working a circular diagram you start in the middle and work your way outwards, counter clockwise, row by row.
The rows usually start with a given number of chain stitches (equivalent to the height of the following stitch), this will either be depicted in the diagram or explained in the pattern.
See DROPS lesson: How to read crochet diagrams
How do I work several diagrams simultaneously on the same row/round?
Instructions for working several diagrams after each other on the same row/round, will often be written like so: “work A.1, A.2, A.3 a total of 0-0-2-3-4 times". This means you work A.1 once, then A.2 is worked once, and A.3 is repeated (in width) the number of times provided for your size – in this case like so: S = 0 times, M = 0 times, L=2 times, XL= 3 times and XXL = 4 times.
The diagrams are worked as usual: begin with the first row in A.1, then work the first row in A.2 etc.
See DROPS lesson: How to read knitting diagrams
See DROPS lesson: How to read crochet diagrams
Why are the sleeves shorter in larger sizes?
The total width of the garment (from wrist-to-wrist) will be larger in the larger sizes, despite the actual sleeves being shorter. The larger sizes have longer sleeve caps and wider shoulders, so there will be a good fit in all sizes.
Where on the garment is the length measured?
The measurement sketch/schematic drawing provides information regarding the full length of the garment. If it’s a jumper or a jacket the length is measured from the highest point on the shoulder (usually closest to the neckline), and straight down to the bottom of the garment. It is NOT measured from the tip of shoulder. Similarly, the length of yoke is measured from the highest point on the shoulder and down to where yoke is split into body and sleeves.
See DROPS lesson: How to read a schematic drawing
What is a repeat?
Diagrams are often repeated on the round or in height. 1 repeat is the diagram the way it appears in the pattern. If it says to work 5 repeats of A.1 in the round, then you work A.1 a total of 5 times after/next to each other in the round. If it says to work 2 repeats of A.1 vertically/in height you work the entire diagram once, then begin again at the start and work the entire diagram one more time.
Why does the piece start with more chain stitches than it’s worked with?
Chain stitches are slightly narrower than other stitches and to avoid working the cast-on edge too tight, we simply chain more stitches to begin with. The stitch count will be adjusted on the following row to fit the pattern and measurement sketch.
Why increase before the rib edge when the piece is worked top-down?
The rib edge is more elastic and will contract slightly compared to, for example, stocking stitch. By increasing before the rib edge, you avoid a visible difference in width between the rib edge and the rest of the body.
Why increase in the cast-off edge?
It’s very easy to cast off too tightly, and by making yarn overs while casting off (and simultaneously casting these off) you avoid a too tight cast off edge.
See DROPS video: How to bind off with yarn overs (yo)
How do I increase/decrease on every 3rd and 4th row/round alternately?
To achieve an even increase (or decrease) you can increase on, for example: every 3rd and 4th row alternately, like so: work 2 rows and increase on the 3rd row, work 3 rows and increase on the 4th. Repeat this until the increase is complete.
See DROPS lesson: Increase or decrease 1 st on every 3rd and 4th row alternately
How can I work a jacket in the round instead of back and forth?
Should you prefer to work in the round instead of back and forth, you may of course adjust the pattern. You’ll need to add steeks mid-front (usually 5 stitches), and follow the instructions. When you would normally turn and work from the wrong side, simply work across the steek and continue in the round. At the end you’ll cut the piece open, pick up stitches to work bands, and cover the cut edges.
See DROPS video: How to knit steeks and cut open
Can I work a jumper back and forth instead of in the round?
Should you prefer to work back and forth instead of in the round, you may of course adjust the pattern so you work the pieces separately and then assemble them at the end. Divide the stitches for the body in 2, add 1 edge stitch in each side (for sewing) and work the front and back pieces separately.
See DROPS lesson: Can I adapt a pattern for circular needles into straight needles?
Why is the pattern slightly different than what I see in the photo?
Pattern repeats can vary slightly in the different sizes, in order to get the correct proportions. If you’re not working the exact same size as the garment in the photo, yours might deviate slightly. This has been carefully developed and adjusted so that the complete impression of the garment is the same in all sizes.
Make sure to follow instructions and diagrams for your size!
How do I make a women’s size garment into a men’s size one?
If you have found a pattern you like which is available in women’s size it’s not very difficult to convert it to men’s size. The biggest difference will be the length of sleeves and body. Start working on the women size that you think would fit across the chest. The additional length will be worked right before you cast off for the armhole/sleeve cap. If the pattern is worked top-down you can add the length right after the armhole or before the first decrease on sleeve.
Regarding additional yarn amount, this will depend on how much length you add, but it is better with a skein too many than too few.
How do I prevent a hairy garment from shedding?
All yarns will have excess fibres (from production) that might come off as lint or shedding. Brushed yarns (ie hairier yarns) have more of these loose, excess fibres, causing more shedding.
Shedding also depends on what is worn under or over the garment, and whether this pulls at the yarn fibres. It’s therefore not possible to guarantee that there will be no shedding
Below are some tips on how to get the best result when working with hairier yarns:
1. When the garment is finished (before you wash it) shake it vigorously so the looser hairs come off. NOTE: do NOT use a lint roller, brush or any method that pulls at the yarn.
2. Place the garment in a plastic bag and put it in your freezer - the temperature will cause the fibres to become less attached to each other, and excess fibres will come off easier.
3. Leave in the freezer for a few hours before taking it out and shaking it again.
4. Wash the garment according to the instructions on the yarn label.
Why does my garment pill?
Pilling is a natural process that happens to even the most exclusive of fibers. It's a natural sign of wear and tear that is hard to avoid, and that is most visible in high friction areas of your garment like a sweater's arms and cuffs.
You can make your garment look as new by removing the pilling, using a fabric comb or a pill/lint remover.
Regina |
|||||||
|
|||||||
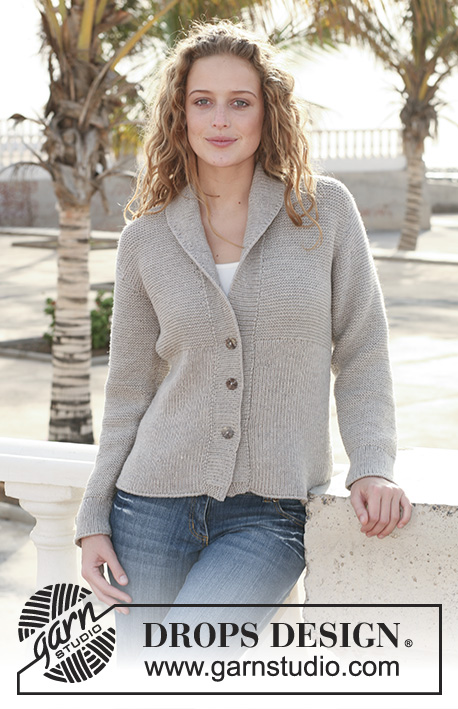
DROPS jacket with collar and wide front bands in 2 threads in ”Alpaca”. Size S - XXXL.
DROPS 112-35 |
|||||||
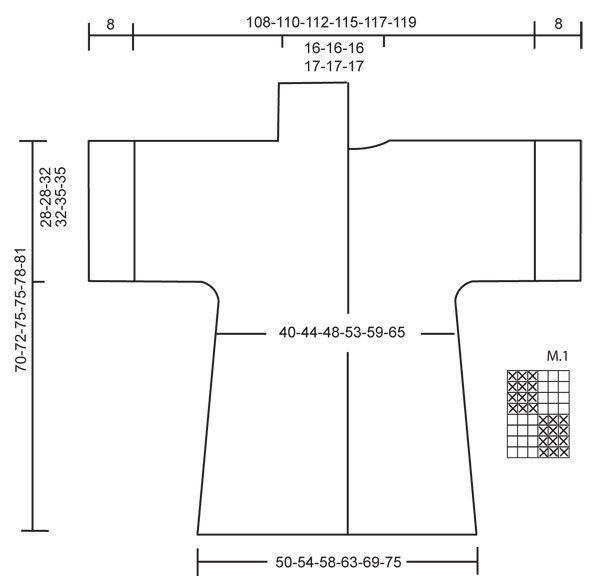
PATTERN: See diagram M.1. GARTER ST (back and forth on needle): K all rows. INCREASING TIP: Inc 1 st by making 1 YO. Work YO into back of loop on return row to avoid a hole. -------------------------------------------------------- JACKET: Worked from side to side, in 4 pieces, back and forth on circular needle. LEFT FRONT PIECE: Sleeve: Cast on 56-56-62-62-68-68 sts (includes 1 edge st each side) for sleeve on circular needle size 4 mm / US 6 with 2 threads Alpaca. Work 1 row stockinette st and continue in PATTERN – see above – with 1 garter st each side until piece measures 8 cm / 3⅛" (adjust to after row 4 or 8 in diagram). Change to needle size 5 mm / US 8 and continue in stockinette with 1 edge st each side, AT THE SAME TIME dec 3-3-4-4-5-5 sts evenly on first row = 53-53-58-58-63-63 sts. REMEMBER THE KNITTING GAUGE! When piece measures 34-33-32-31-29-27 cm / 13⅜"-13"-12½"-12¼"-11⅜"-10⅝" bind off 1 edge st on the left side of piece (as seen from RS) and slip the remaining 52-52-57-57-62-62 sts on a stitch holder. Put piece aside. NOW READ ALL OF THE FOLLOWING SECTION BEFORE CONTINUING! Body piece: Cast on 16 sts for all sizes on circular needle size 5 mm / US 8 with 2 threads (= bottom edge of jacket). P 1 row (=WS), then K 1 row (RS) with 2 garter sts at the end of row (= towards bottom edge of jacket, worked in garter st throughout). P 1 row (WS) and cast on 13-14-14-14-14-15 new sts at the end of row (opposite the 2 garter sts) = 29-30-30-30-30-31 sts. Now cast on 13-14-14-14-14-15 new sts on every other row at the same side a total of 3 times = 68-72-72-72-72-76 sts. Slip the sts from sleeve back on needle = 120-124-129-129-134-138 sts. (NOTE! Sleeve is now on the right side of body piece, as seen from RS). Insert a marker in piece. Continue in stockinette st until piece measures 14-15-16-17-19-20 cm / 5½"-6"-6¼"-6¾"-7½"-8" from marker - adjust so that next row is from WS. Work 1 row stockinette st, AT THE SAME TIME inc 15-14-12-15-16-15 sts evenly – see increasing tip = 135-138-141-144-150-153 sts. SIZE S-M-L: Change to circular needle size 4 mm / US 6. Work front band as follows: Pattern on the bottom 105-105-108 sts, and rib, P3/K3, on the remaining 30-33-33 sts (collar). Now cast on 21-21-21 new sts for neckline at the end of row = 156-159-162 sts. Incorporate the new sts in rib. Continue in pattern and rib like this for 3 cm / 1⅛". SIZE XL-XXL-XXXL: Change to circular needle size 4 mm / US 6. Work pattern on all 144-150-153 sts until piece measures 18-21-24 cm / 7"-8¼"-9½" from marker. Adjust so that next row is from RS. Cast on 24-24-24 new sts for neckline = 168-174-177 sts. Now work rib, K3/P3, on the top 57-57-60 sts (collar) and continue in pattern on the bottom 111-117-117 sts. Continue like this until collar measures 3 cm / 1⅛". ALL SIZES: When collar measures 3 cm / 1⅛" inc all P3 to P4(NOTE! Only inc in the P-sections on collar). When collar measures 6 cm / 2⅜" inc all K3 to K4. When collar measures 9 cm / 3½" inc all P4 to P5. When collar measures 12 cm / 4¾" inc all K4 to K5 = 190-195-198-206-212-217 sts. Continue with K5/P5 until collar measures 15-15-15-16-16-16 cm / 6"-6"-6"-6¼"-6¼"-6¼" (adjust to after row 4 or 8 in pattern). Bind off in rib. RIGHT FRONT PIECE: Sleeve: Like left sleeve, but mirrored. Body piece: Cast on 16 sts for all sizes on circular needle size 5 mm / US 8 with 2 threads Alpaca (= bottom edge of jacket). P 1 row with 2 garter sts at the end of row, then K 1 row. Cast on sts and continue as described for left front piece, but mirrored. LEFT BACK PIECE: Sleeve and the beg of body piece as described for right front piece. When sleeve and body piece are slipped on the same needle work stockinette st on all sts until piece measures 46-47-48-49-50-51 cm / 18"-18½"-19"-19¼"-19¾"-20"from cast on row for sleeve. On next row from WS bind off 4 sts for neckline (includes 1 edge st) = 116-120-125-125-130-134 sts. Continue in stockinette st until neckline measures 7-7-7-7.5 -7.5 -7.5 cm / 2¾"-2¾"-2¾"-2⅞"-2⅞"-2⅞". Now work 4 rows garter st on all sts and bind off. Piece measures approx 54-55-56-57.5-58.5-59.5 cm / 21¼"-21⅝"-22"-22⅝"-23"-23½". RIGHT BACK PIECE: Like left back piece, but mirrored. ASSEMBLY: Sew back pieces tog with the rows of garter st meeting mid back. Sew shoulder seams inside 1 edge st. Sew under arm and side seams inside 1 edge st. Sew collar tog mid back and sew to neckline. BUTTONHOLE LOOPS: Place the loops as follows, measured from the bottom edge of jacket: Size S-M: approx 33 and 43 cm / 13" and 17" SIZE L-XL: approx 34 and 44 cm / 13⅜" and 17 ¼" SIZE XXL-XXXL: approx 35 and 45 cm / 13¾" and 17¾" Crochet 2 buttonhole loops on right front band with crochet hook size 4 mm / G/6 and 2 threads Alpaca as follows: 1 sc (UK dc), 8 ch, 1 sl st in sc. Sew buttons on left front piece. TIE STRINGS: Crochet 2 tie strings on the inside of jacket as follows: Work 2 ch-strings measuring approx 20 cm / 8" each and attach them with a sl st. Place 1 string on the inside of left front band towards front edge and place 1 string on the inside of right front band towards the jacket, both in line with the top button. |
|||||||
Diagram explanations |
|||||||
|
|||||||
Have you made this or any other of our designs? Tag your pictures in social media with #dropsdesign so we can see them! Do you need help with this pattern?You'll find tutorial videos, a Comments/Questions area and more by visiting the pattern on garnstudio.com. © 1982-2024 DROPS Design A/S. We reserve all rights. This document, including all its sub-sections, has copyrights. Read more about what you can do with our patterns at the bottom of each pattern on our site. |
With over 40 years in knitting and crochet design, DROPS Design offers one of the most extensive collections of free patterns on the internet - translated to 17 languages. As of today we count 304 catalogs and 11422 patterns - 11417 of which are translated into English (US/in).
We work hard to bring you the best knitting and crochet have to offer, inspiration and advice as well as great quality yarns at incredible prices! Would you like to use our patterns for other than personal use? You can read what you are allowed to do in the Copyright text at the bottom of all our patterns. Happy crafting!
Comments / Questions (40)
Jabbar Huusain wrote:
ClassResult.in is best indian website to check latest educational result online soon after the announcement of class result and job result for official academic year 2023.
27.03.2023 - 11:10Marie Anne Joachim wrote:
Pour le devant Gauche: que veut dire 1m lis et je ne comprend pas la répartition 3-3-4-4-5-5 cette série signifie les rangés ou les mailles que l on diminue ou encore je regroupe mes mailles dans cette séquence. Pouvez vous m expliquer svp. Marie ( Québec au Canada)
30.07.2019 - 01:16DROPS Design answered:
Bonjour! 1 m lis de chaque cote de l'ouvrage est toujours tricotee a l'endroit (au point mousse). Tricoter en point fantaisie (M.1) jusqu'à 8 cm de hauteur totale. Continuer avec l'aiguille circulaire 5 en jersey et en meme temps répartir 3-3-4-4-5-5 diminutions (nombre de mailles a diminuer selon votre taille). Comment le faire vous trouverez ICI. Bon tricot!
30.07.2019 - 09:08Anne wrote:
Je suis en train de réaliser cette veste en taille M. J'ai donc acheté 700 g de laine, mais il m'en manque pour finir le modèle, alors même que j'ai bien respecté les mesures. J'ai du reprendre 2 pelotes supplémentaires pour pouvoir finir l'ouvrage (car travail en fil double). Je pense donc qu'il faudrait indiquer 750g de laine pour la taille M.
13.09.2017 - 18:26Coleen Gray wrote:
Re your sizing, I'm afraid your previous answer doesn't help me. The width measurement is the important one, but I don't know where on the body this measurement is taken and therefore cannot decide which size would fit me best. From the picture (DROPS 112-35) it looks as though it is below the bust, but how far below? I'm not sure how to go about this so any help that you can give would be very gratefully received!
18.11.2014 - 18:11DROPS Design answered:
Dear Mrs Gray, the measurements in width are taken directly under the sleeves. Remember you can always get individual assistance from your DROPS store. Happy knitting!
20.11.2014 - 08:56Coleen Gray wrote:
I am unsure of your sizing - what does S, M, L etc equate to in terms of size. UK or European would help. Thanks
12.09.2014 - 23:01DROPS Design answered:
Dear Mrs Gray, you will find at the end of the pattern a measurement chart with all measures for each size, they are in cm, flat, from side to side. Compare this to a similar garment you like the shape to find the matching size. Happy knitting!
13.09.2014 - 09:26Drops Design France wrote:
Bonjour Catherine, les explications du devant ont été modifiées. Bon tricot !
28.10.2011 - 09:32Catherine wrote:
Bonjour et merci pour la modification du texte. Cependant, au moment d'ajouter les mailles de la manche sur l'aiguille du devant (donc à la suite de l'augmentation des 15 dernières mailles), la manche se trouve à gauche de l'ouvrage vu sur l'endroit avec pour dernière maille la maille rabattue de la manche : est-ce normal ? Désolée de vous demander à nouveau de l'aide et merci encore pour vos explications
18.10.2011 - 08:26Drops Design France wrote:
Bonjour Catherine, les mailles se montent du côté opposé aux 2 m point mousse : vous tricotez 1 rang end, puis 1 rang env avec 2 m au point mousse à la fin de ce rang puis 1 rang end et vous montez les premières m à la fin de ce rang - texte modifié pour une meilleure compréhension.
17.10.2011 - 09:14Catherine wrote:
Bonjour, pour le devant gauche, faut-il tricoter un retour sur les 15 dernières mailles montées avant d'ajouter la manche ? Est-ce que la maille rabattue de la maille se trouve "sous la manche" ou sur l'épaule ? Pour moi, quand les mailles de la manche se trouve sur la même aiguille que les mailles du devant, la manche se situe à gauche de l'aiguille vu sur l'endroit... Merci pour vos précisions
15.10.2011 - 09:39Marthe wrote:
Hei igjen. Som jeg skrev sist, står det i oppskriften at du skal ha 224 m på p etter øking = 34 x 2... Dermed blir det 7r 7vr uansett hvordan jeg snur og vender på det.. Kragen ble iallefall veldig fin ;)
11.09.2011 - 21:19