
Popular categories
Looking for a yarn?


Comments / Questions (46)
![]() Annie wrote:
Annie wrote:
Bonjour. Par quel point peut-on remplacer le point mousse sur ce modèle. Merci
27.08.2025 - 14:13DROPS Design answered:
Bonjour Annie, vous pouvez probablement le remplacer par un autre de votre choix, pensez à bien vérifier les bonnes hauteurs pour que tout corresponde. Bon tricot!
28.08.2025 - 18:47
![]() Saurel Nadine wrote:
Saurel Nadine wrote:
Bonjour, Je tricoté ce modèle en 3 XL. Concernant le devant gauche, je ne comprends pas les diminution pour les emmanchures. IL est noté diminuer vomie pour le dos, mais il n'y a pas le lemf nombre de mailles pour le dos biensur. Et il y a 4 séries de diminution differentes. Merci de me donner l'es explications exactes pour les diminutions d'emmanchures des devant. Merci d'avance.
04.05.2025 - 12:36DROPS Design answered:
Bonjour Mme Saurel, pour le dos, vous avez rabattu de chaque côté tous les 2 rangs: 2 x 4 m puis 3 x 3 m puis 3 x 2 m et 6 x 1 m (soit 29 m de chaque côté); pour le devant gauche, vous allez rabattre en début de rang sur l'endroit: 2 x 4 m puis 3 x 3 m puis 3 x 2 m et 6 x 1 m soit 87 m -(8-9-6-6)= il reste 58 mailles. Bon tricot!
05.05.2025 - 08:06
![]() Martine wrote:
Martine wrote:
Het aantal steken voor de hals is in het achterpand en in de som van beide voorpanden min de 9 steken overlapping door het biesje, niet gelijk. Is dat de bedoeling of waar tel ik verkeerd?
11.04.2022 - 22:54DROPS Design answered:
Dag Martine,
Het voorpand is inderdaad 8 steken breder. Dit zie je wel vaker bij vesten, je kunt gewoon verder breien met het patroon.
14.04.2022 - 11:49
![]() Lise Leblanc wrote:
Lise Leblanc wrote:
Bonjour, je fais ce modèle pour ma belle-fille, mais elle veut une manche longue. Combien de centimètre dois-je tricoter avant de diminuer l'emmanchure pour la grandeur small. Est-ce que 42 cm c'est suffisant?
27.03.2021 - 22:00DROPS Design answered:
Bonjour Mme Leblanc, le plus simple sera de vous inspirer d'un modèle similaire avec manches longues et de même tension. Aidez-vous du schéma des mesures si besoin - cf cette leçon. Bon tricot!
06.04.2021 - 07:50
![]() Francesca wrote:
Francesca wrote:
Buonasera mi scusi se io dovessi lavorare con la baby merinos questo modello eseguo le stesse maglie da avviare come se usassi l alpaca usata in questo modello?
28.04.2020 - 22:21DROPS Design answered:
Buongiorno Francesca, Baby Merino appartiene allo stesso gruppo filati di Alpaca, gruppo filati A. Può lavorare seguendo le stesse indicazioni ma si ricordi di controllare che il suo campione corrisponda a quello indicato prima di iniziare a lavorare. Buon lavoro!!
29.04.2020 - 08:54
![]() Katie Ström wrote:
Katie Ström wrote:
Hej. Jag vill göra koftan men tål inte ull,kliar. vilken garn kan du rekomendera till mig då? MVH Katie
19.12.2019 - 09:41DROPS Design answered:
Hej Katie, Koftan kan med fördel stickas i DROPS Safran. Lycka till :)
15.01.2020 - 12:30
![]() Stefania wrote:
Stefania wrote:
Buongiorno! Ho dei dubbi sul vivagno. Nel davanti lato interno. il vivagno va aggiunto alle otto maglie legaccio del bordo? Praticamente avrò un bordo di nove maglie legaccio ma per l'asola partirò a contare dalla seconda maglia? Invece per il vivagno laterale (sia per il davanti che per il dietro) è meglio lavorarlo dritto su dritto e rovescio su rovescio quando faccio la maglia rasata o sempre dritto? Grazie.
02.08.2019 - 10:19DROPS Design answered:
Buongiorno Stefania, la maglia di vivagno è solo laterale, verso il centro davanti ha solo le 8 maglie del bordo. Può lavorare il vivagno a maglia legaccio, le servirà poi per la cucitura. Buon lavoro!
02.08.2019 - 15:50
![]() De Clercq Carine wrote:
De Clercq Carine wrote:
Beste, in dit patroon spreken jullie van een eerste mindering op 6 cm . Bedoelen jullie vanaf de boordsteek of vanaf de eerste naald boven de ribbelboord ?
03.07.2019 - 20:46DROPS Design answered:
Dag Carine,
Hiermee wordt vanaf het begin, dus vanaf de opzetnaald bedoeld.
08.07.2019 - 11:22
![]() Natalie wrote:
Natalie wrote:
Skal siste maske mot stolpe være glattstrikk, eller skal den strikkes vrangt på alle pinner
15.01.2019 - 16:47DROPS Design answered:
Hej Natalie, de 8 stolpemasker skal strikkes i riller, alle de andre strikkes i glatstrik ifølge opskriften. God fornøjelse!
17.01.2019 - 08:34
![]() Gunilla wrote:
Gunilla wrote:
Kan Modell Z-415 ändras till en jumper och hur gör jag
03.01.2019 - 08:34DROPS Design answered:
Hei Gunilla. Du kan gjerne gjøre denne om til en genser om du vil: strikk høyre og venstre forstykke sammen (isteden for å strikke dem hver for seg), og fjern stolpemaskene. Følg ellers oppskriften som anvist. God fornøyelse.
03.01.2019 - 09:19
|
|
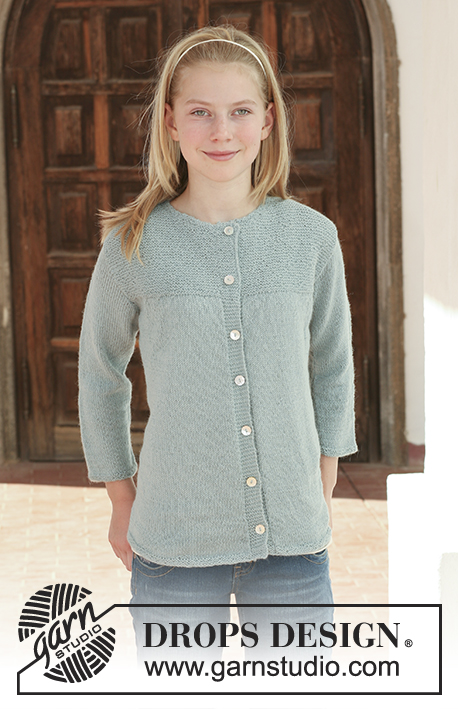
Quiet Lake#quietlakecardigan |
|
|
|
|
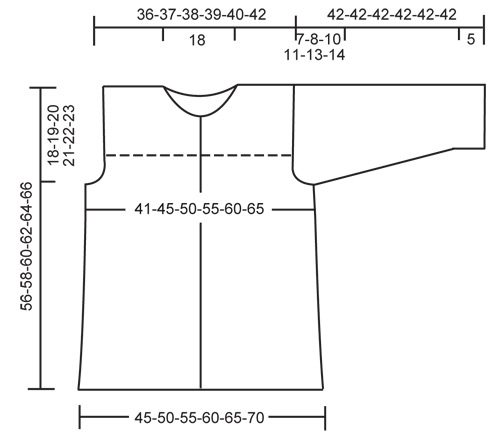
DROPS jacket with 3/4 sleeves in ”Alpaca”. Size S - XXXL.
DROPS 111-18 |
|
|
GARTER ST (back and forth on needle): K all rows. BUTTONHOLES: Make buttonholes on right front band. 1 buttonhole = bind off 4th and 5th st from mid front and cast on 2 new sts on return row. Make buttonholes when piece measures: SIZE S: 5, 13, 20, 28, 35 and 43 cm / 2",5⅛",8",11",13¾" and 17". SIZE M: 5, 13, 21, 29, 37 and 45 cm / 2",5⅛",8¼",11⅜",14½" and 17¾" SIZE L: 6, 14, 22, 30, 38 and 46 cm / 2⅜",5½",8¾",11¾",15" and 18". SIZE XL: 6, 15, 23, 32, 40 and 48 cm / 2⅜",6",9",12½",15 ¾" and 19". SIZE XXL: 6, 15, 24, 33, 41 and 49 cm / 2⅜",6",9½",13",16⅛" and 19¼", SIZE XXXL: 6, 15, 24, 33, 42 and 51 cm / 2⅜",6",9½",13",16½" and 20", NOTE: The last buttonhole is made on neckline. ---------------------------------------------------------- ---------------------------------------------------------- BACK PIECE: Worked back and forth on needle. Cast on 112-122-134-146-158-170 sts (includes 1 edge st each side) on needle size 3 mm / US 2or3 with Alpaca. Work 6 rows garter st – see above – and continue in stockinette st. REMEMBER THE KNITTING GAUGE! When piece measures 6 cm / 2⅜" dec 1 st on each side and repeat the dec on every 5 cm / 2" a total of 6 times = 100-110-122-134-146-158 sts. When piece measures 38-39-40-41-42-43 cm / 15-15¼"-15¾"-16⅛"-16½" bind off for armhole each side at the beg of every row: 4 sts 1-1-1-1-2-2 times, 3 sts 0-0-1-2-2-3 times, 2 sts 0-2-2-3-3-3 times and 1 st 3-3-4-4-5-6 times = 86-88-92-94-96-100 sts. When piece measures 42-44-46-48-50-52 cm / 16½"-17¼"-18"-19"-19¾"-20½" dec 4 sts evenly on row = 82-84-88-90-92-96 sts. Now complete piece in garter st. When piece measures 54-56-58-60-62-64 cm / 21¼"-22"-22¾"-23⅝"-24⅜"-25¼" bind off the middle 38 sts for neck and complete each shoulder separately. Bind off on every row from neckline: 1 st 2 times = 20-21-23-24-25-27 sts left on shoulder. Bind off when piece measures 56-58-60-62-64-66 cm / 22"-22¾"-23⅝"-24⅜"-25¼"-26". LEFT FRONT PIECE: Worked back and forth on needle. Cast on 64-69-75-81-87-93 sts (includes 1 edge st at the side and 8 front band sts towards mid front) on needle size 3 mm / US 2or3 with Alpaca. Work 6 rows garter st and continue in stockinette st with 8 front band sts towards mid front in garter st. When piece measures 6 cm / 2⅜" dec at the side as described for back piece = 58-63-69-75-81-87 sts. When piece measures 38-39-40-41-42-43 cm / 15-15¼"-15¾"-16⅛"-16½" bind off for armhole at the side as described for back piece = 51-52-54-55-56-58 sts. When piece measures 42-44-46-48-50-52 cm / 16½"-17¼"-18"-19"-19¾"-20½" dec 3 sts evenly on row (do not dec on front band) = 48-49-51-52-53-55 sts. Now complete piece in garter st on all sts, but to mark the front band P the 9th st from mid front on every row. When piece measures 50-52-54-55-57-59 cm / 19¾"-20½"-21¼"-21⅝"-22½"-23¼" slip 16 sts towards mid front on a stitch holder for neck and bind off to shape the neckline at the beg of every row from mid front: 2 sts 3 times and 1 st 6 times = 20-21-23-24-25-27 sts left on shoulder. Bind off when piece measures 56-58-60-62-64-66 cm / 22"-22¾"-23⅝"-24⅜"-25¼"-26". RIGHT FRONT PIECE: Like left front piece, but mirrored, and remember BUTTONHOLES – see above. SLEEVE: Worked back and forth on needle. Cast on 58-60-62-64-66-68 sts (includes 1 edge st each side) on needle size 3 mm / US 2or3 with Alpaca. Work 6 rows garter st and continue in stockinette st. When piece measures 5 cm / 2" inc 1 st each side, and repeat the inc on every 10-8-7-6-5-4 row a total of 10-12-13-15-16-18 times = 78-84-88-94-98-104 sts. When piece measures 35-34-32-31-29-28 cm / 13¾"-13⅜"-12½"-12¼"-11⅜"-11" – less for the larger sizes because of longer sleeve cap and wider shoulder - bind off for sleeve cap each side at the beg of every row: 4 sts 1 time, 2 sts 3 times, 1 st 5-6-10-12-15-17 times, then 2 sts each side until piece measures 41 cm / 16⅛", now bind off 3 sts each side 1 time and bind off remaining sts. Piece measures approx 42 cm / 16½". ASSEMBLY: Sew shoulder seams. NECKLINE: Pick up approx 110 to 120 sts round neckline (incl sts on stitch holders mid front) on needle size 3 mm / US 2or3 with Alpaca. K 5 rows, AT THE SAME TIME on row 2 make 1 buttonhole in line with the others on front band. Bind off loosely after 5 rows. FURTHER ASSEMBLY: Set in sleeves. Sew side and sleeve seams inside 1 edge st. Sew on buttons. |
|
 |
|
Have you finished this pattern?Tag your pictures with #dropspattern #quietlakecardigan or submit them to the #dropsfan gallery. Do you need help with this pattern?You'll find 18 tutorial videos, a Comments/Questions area and more by visiting the pattern on garnstudio.com. © 1982-2026 DROPS Design A/S. We reserve all rights. This document, including all its sub-sections, has copyrights. Read more about what you can do with our patterns at the bottom of each pattern on our site. |


With over 40 years in knitting and crochet design, DROPS Design offers one of the most extensive collections of free patterns on the internet - translated to 17 languages. As of today we count 325 catalogs and 12298 patterns - 12288 of which are translated into English (US/in).
We work hard to bring you the best knitting and crochet have to offer, inspiration and advice as well as great quality yarns at incredible prices! Would you like to use our patterns for other than personal use? You can read what you are allowed to do in the Copyright text at the bottom of all our patterns. Happy crafting!
Post a comment to pattern DROPS 111-18
We would love to hear what you have to say about this pattern!
If you want to leave a question, please make sure you select the correct category in the form below, to speed up the answering process. Required fields are marked *.