
Popular categories
Looking for a yarn?


Comments / Questions (38)
![]() Elisabeth wrote:
Elisabeth wrote:
Mönstret på bilden ser inte likadan ut som beskrivningen, på bilden är det slätst några cm innan mossstickning. I beskrivningen står det att man stickar moss-st direkt, finns det olika beskrivningar?
09.03.2026 - 09:32DROPS Design answered:
Hei Elisabeth. Strikk slik det står i beskrivningen (moss-st direkt), men om du ønsker 4 cm slätst før mossstickning gjør du det. Vi vil oppdatere bildet. mvh DROPS Design
09.03.2026 - 13:04
![]() Anna Israelsson wrote:
Anna Israelsson wrote:
Jag har stickat koftan i garnet Fabel med stickor nr. 3 som jag blev rekommenderad. När jag ska sy ihop armarna mot fram och bakstycket så är armarna alldeles för smala. Skiljer ca. 1.5 cm på varje sida. Stickade om en ärm i Flora garnet men det blev likadant igen. Maskantalet har stämt hela vägen. Vad är felet?
10.12.2025 - 22:51DROPS Design answered:
Hej Anna. Har du gjort en provlapp och sett att din stickfasthet stämmer med det som uppges i mönstret? Om du inte får stickfastheten att stämma så kan du behöva ändra till en annan sticka (nr) för att få det att bli rätt och få alla mått att stämma. Mvh DROPS Design
12.12.2025 - 11:56
![]() Francoise Grauleau wrote:
Francoise Grauleau wrote:
Bonjour. Ou trouver les diagrammes pour le jaquard ?
24.02.2025 - 13:34DROPS Design answered:
Bonjour Mme Grauleau, il n'y a pas de jacquard pour ce modèle, c'est l'imprimé de la laine DROPS Fabel qui donne cet effet. Bon tricot!
24.02.2025 - 15:51
![]() Kirsti wrote:
Kirsti wrote:
Hei! Savner mønsterdiagram på buksen og kantene på jakken. Ser av tidligere svar at det er garnet som lager mønster med det kan jeg ikke se at stemmer. Bildet viser at det er mønsterstrikk ??
15.02.2025 - 20:58
![]() Justine wrote:
Justine wrote:
Gilet 12/18 mois J'ai oublié de vous préciser que ma question concernée vos explications pour le devant droit. Vous dites après emmanchure, continuer en jersey et point de riz jusqu'à 28 cm. A 28 cm de hauteur totale, continuer en point jersey avec une maille lisière de chaque côté jusqu'à 32 cm puis tricoter au point mousse(donc 1 cm de mousse). Y a t'il pas une erreur? Faut 'il pas tricoter au point mousse à partir de 28 cm? Merci.
05.02.2025 - 10:49DROPS Design answered:
Bonjour Justine, parce que le point mousse ne se tricote qu'en haut des épaules et pas directement après les emmanchures, soit en commençant juste avant l'encolure dos + 1 cm d'épaules après avoir rabattu les mailles de l'encolure. Donc après voir rabattu les 3 m des emmanchures de chaque côté, continuez en jersey avec 6 m point de riz + 1 m lis de chaque côté puis, à 28 cm de hauteur totale, tricotez au point mousse jusqu'à la fin. Bon tricot!
05.02.2025 - 13:22
![]() Justine wrote:
Justine wrote:
Gilet taille 12:18 mois et autres tailles après diminutions pour emmanchures vous dites continuer en jersey et point de riz jusqu'à hauteur totale voulue puis continuer en jersey avec 1 maille lisière de chaque coté jusqu'à 32 cm de hauteur totale et continuer au point mousse sur toutes les mailles. Faut-il pas tricoter tout au point mousse pendant 4 cm et en jersey que les mailles lisières. je ne suis pas sûre. merci
04.02.2025 - 17:56DROPS Design answered:
Bonjour Justine, après avoir rabattu les mailles des emmanchure, en 12/18 mois, vous tricotez le dos en jersey endroit avec 6 mailles point de riz et 1 maille lisière de chaque côté jusqu'à ce que l'ouvrage mesure 28 cm de hauteur totale. Vous tricotez ensuite toutes les mailles au point mousse jusqu'à la fin, en même temps, à 32 cm de hauteur totale, vous rabattez les mailles centrales et terminez chaque épaule séparément (au point mousse). Bon tricot!
05.02.2025 - 08:05
![]() Monique wrote:
Monique wrote:
Wil heel graag het setje van Little Nugget (Gebreid vest, broek en sokken) gaan maken maar (misschien door mijn dyslexie) kan ik het Scandinavische patroon niet vinden voor de rand van het vestje en de broek. Kun je me misschien helpen? groet, Monique
06.06.2024 - 12:01
![]() Nadine Richard wrote:
Nadine Richard wrote:
Bonjour, Où puis je trouver le diagramme du point fantaisie du pantalon? Je tricote souvent vos modèles et les diagrammes sont joints au modèle ,alors que là,il ne semble pas joint. Merci pour votre aide. Bonne journée.
25.02.2023 - 09:45DROPS Design answered:
Bonjour Mme Richard, le pantalon se tricote simplement en jersey, le motif que vous voyez sur la photo correspond aux couleurs de la laine utilisée, DROPS Fabel qui crée son propre motif. Bon tricot!
27.02.2023 - 09:40
![]() Dorle wrote:
Dorle wrote:
Wo,ist das ein Strick Muster für die Hose und Jacke ? Ich sehe keins bitte helfen Danke Dorle
28.10.2021 - 21:48DROPS Design answered:
Liebe Dorle, das Muster der Hose ergibt sich einfach aus der Print-Färbung von Fabel Nr. 912 soft chocolate. Die Jacke hat ein Perlmuster, das ist in der Anleitung beschrieben. Viel Spaß beim Stricken!
28.10.2021 - 22:30
![]() Marie wrote:
Marie wrote:
Love this pattern
04.05.2021 - 23:54
|
|
Little Nugget#littlenuggetjacket |
|
 |
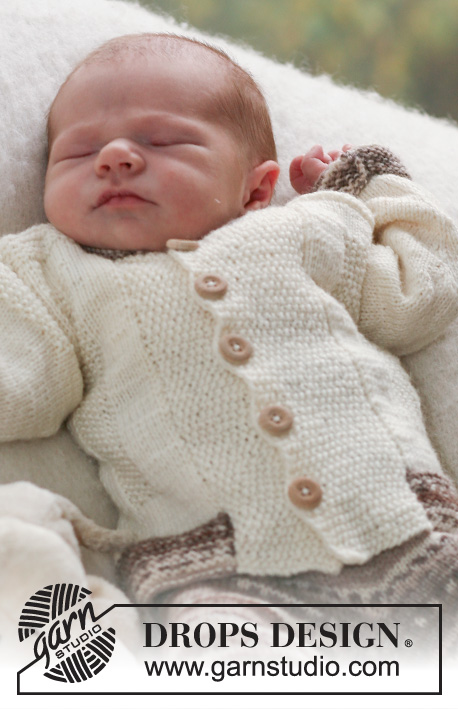 |
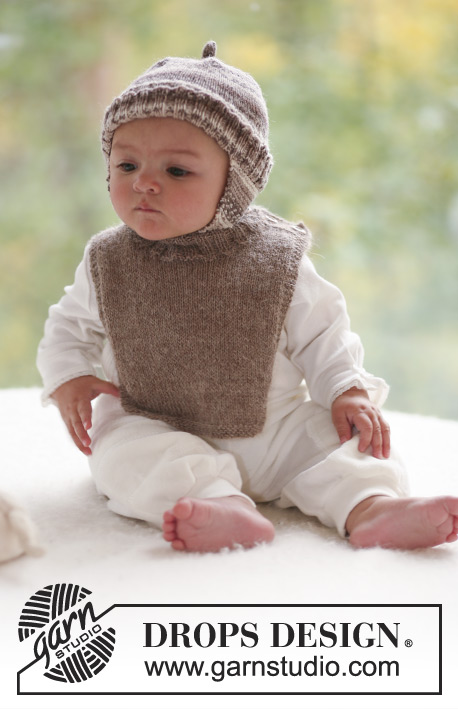
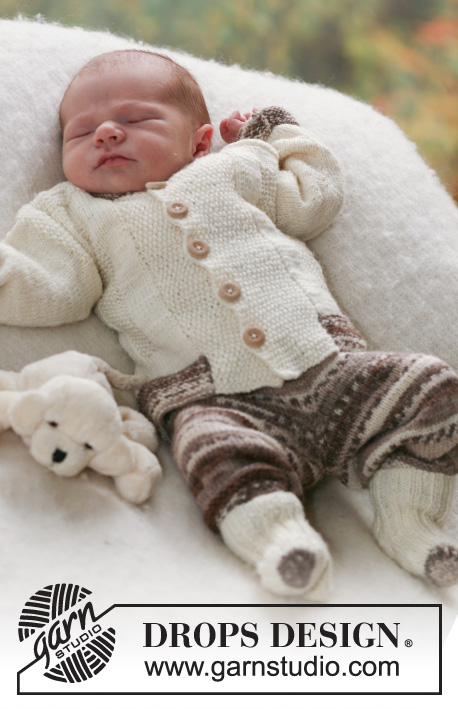
Set of knitted jacket, pants and socks for baby and children in DROPS Fabel or DROPS Flora
DROPS Baby 17-16 |
|
|
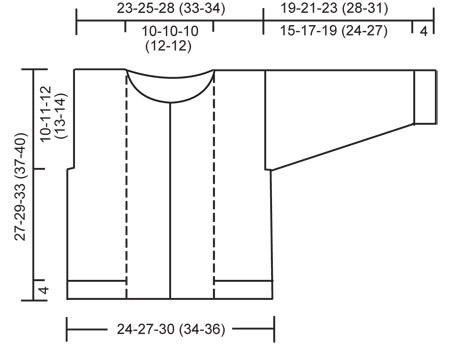
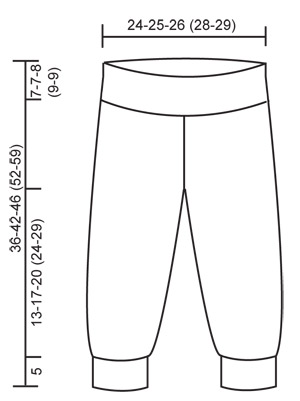
JACKET GARTER ST (back and forth on needle): K all rows. MOSS ST: Row 1: * K1, P1 *, repeat from *-*. Row 2: K over P and P over K. Repeat row 2. ---------------------------------------------------------- BACK PIECE: Worked back and forth on needle. Cast on 60-66-74 (84-88) sts (includes 1 edge st each side) on needle size 3 mm [US 2or3] with soft chocolate. Work 4 cm [1½"] garter st – SEE ABOVE. Change to off-white and continue as follows from RS: 1 edge st, 3 stockinette sts, 6 moss sts – SEE ABOVE – stockinette st until 10 sts remain, 6 moss sts, 3 stockinette sts and 1 edge st. Continue like this until piece measures 17-18-21 (24-26) cm [6¾"-7"-8¼" (9½"-10¼")]. REMEMBER THE KNITTING GAUGE! Now bind off 3 sts each side for armhole = 54-60-68 (78-82) sts. Continue in stockinette st with 6 moss sts and 1 edge st each side until piece measures 22-24-28 (32-35) cm [8¾"-9½"-11" (12½"-13¾")]. Now continue in stockinette st with 1 edge st each side until piece measures 25-27-31 (35-38) cm [9¾"-10⅝"-12¼" (13¾"-15")]. Now complete piece in garter st on all sts. AT THE SAME TIME when piece measures 26-28-32 (36-39) cm [10¼"-11"-12½" (14¼"-15¼")] bind off the middle 24-24-24 (28-28) sts for neck and complete each side separately. Continue in garter st for 1 cm [⅜"] on the remaining 15-18-22 (25-27) sts on shoulder and bind off. Piece measures approx 27-29-33 (37-40) cm [10⅝"-11⅜"-13" (14½"-15¾")]. RIGHT FRONT PIECE: Worked back and forth on needle. Cast on 18-21-25 (28-30) sts (includes 1 edge st each side) on needle size 3 mm [US 2or3] with soft chocolate. Work 4 cm [1½"] garter st. Change to off-white and continue as follows from mid front, first row = RS: 1 edge st, 7-10-14 (17-19) stockinette sts, 6 moss sts, 3 stockinette sts and 1 edge st. When piece measures 17-18-21 (24-26) cm [6¾"-7"-8¼" (9½"-10¼")] bind off 3 sts at the side for armhole = 15-18-22 (25-27) sts left on row. Continue in stockinette st and moss st as before until piece measures 22-24-28 (32-35) cm [8¾"-9½"-11" (12½"-13¾")]. Now continue in stockinette st with 1 edge st each side until piece measures 25-27-31 (35-38) cm [9¾"-10⅝"-12¼" (13¾"-15")]. Now complete piece in garter st on all sts. Bind off when piece measures 27-29-33 (37-40) cm [10⅝"-11⅜"-13" (14½"-15¾")]. FRONT BAND: Pick up 65-69-79 (89-96) sts inside 1 edge st along piece mid front on needle size 3 mm [US 2or3] with off-white. Work moss st, AT THE SAME TIME bind off to shape the neckline at the beg of every row from the neck: 4 sts 1 time, 2 sts 2 times and 1 st 2-2-2 (4-4) times = 55-59-69 (77-84) sts. When front band measures 6-6-6 (7-7) cm [2⅜"-2⅜"-2⅜" (2¾"-2¾")] bind off for 5-5-5 (6-6) buttonholes evenly on row – place top buttonhole 1 cm [⅜"] from neckline and the bottom one approx 3 cm [1⅛"] from bottom edge. 1 buttonhole = bind off 2 sts and cast on 2 new sts on return row. Continue until piece measures 8-8-8 (9-9) cm [3⅛"-3⅛"-3⅛" (1½"-1½")], bind off. LEFT FRONT PIECE: Like right front piece, but mirrored, i.e. after the 4 cm [1½"] garter st work first row as follows from the side (first row = RS): 1 edge st, 3 stockinette sts, 6 moss sts, 7-10-14 (17-19) stockinette sts and 1 edge st. Do not make buttonholes on front band. SLEEVE: Worked back and forth on needle. Cast on 33-35-39 (41-43) sts (includes 1 edge st each side) on needle size 3 mm [US 2or3] with soft chocolate. Work 4 cm [1½"] garter st, change to off-white and continue in stockinette st. AT THE SAME TIME when piece measures 6 cm [2⅜"] inc 1 st each side on every 5th row a total of 8-9-10 (12-13) times = 49-53-59 (65-69) sts. AT THE SAME TIME when piece measures 17-19-21 (26-29) cm [6¾"-7½"-8¼" (10¼"-11⅜")] work moss st on the middle 29-31-35 (39-41) sts, work remaining sts as before. Bind off when piece measures 19-21-23 (28-31) cm [7½"-8¼"-9" (11"-12¼")]. ASSEMBLY: Sew shoulder seams, edge to edge to avoid a chunky seam. NECKLINE: Pick up approx 70 to 84 sts round neckline on needle size 3 mm [US 2or3] with soft chocolate. K 3 rows back and forth on needle, bind off. Set in sleeves, sew sleeve and side seams inside 1 edge st. Sew on buttons to fit buttonholes. ---------------------------------------------------------- PANTS: DECREASING TIP: Dec as follows 3 sts before marker: K2 tog, K1. Dec as follows after marker: K1, slip 1 st as if to K, K1, psso. ---------------------------------------------------------- LEG: Worked in the round on double pointed needles. Cast on 64-68-72 (76-80) sts on double pointed needles size 2.5 mm [US 1] with soft chocolate. Insert a marker at beg of round = inside of leg. Work 5 cm [2"] rib, K1/P1, and then continue in stockinette st. AT THE SAME TIME on first row dec 8-8-10 (12-12) sts evenly = 56-60-62 (64-68) sts. When piece measures 9-8-9 (7-10) cm = 3½"-3⅛"-3½" (2¾"-4") inc 1 st on each side of marker by K 2 sts in 1 st on every 3-4-6 (8-10) round a total of 8 times = 72-76-78 (80-84) sts. When leg measures 16-20-23 (25-32) cm [6¼"-8"-9" (9¾"-12½")] divide the piece by marker and continue back and forth on needle (to make it easier to slip both legs on the same circular needle afterwards), AT THE SAME TIME cast on 1 new st each side for seam = 74-78-80 (82-86) sts. When piece measures 18-22-25 (29-34) cm [7"-8¾"-9¾" (11⅜"-13⅜")] bind off 3 sts each side = 68-72-74 (76-80) sts. Put piece aside and knit the other leg in the same way. PANTS: Slip both legs on the same circular needle size 2.5 mm [US 1] = 136-144-148 (152-160) sts. Insert a marker mid front. Now dec 1 st on each side of marker mid front – SEE DECREASING TIP. Repeat the dec on every other round a total of 6 times = 124-132-136 (140-148) sts. When piece measures 29-35-38 (43-50) cm [11⅜"-13¾"-15" (17"-19¾")] inc 24-24-24 (28-28) sts evenly = 148-156-160 (168-176) sts. Now continue in rib, K2/P2, for 7-7-8 (9-9) cm [2¾"-2¾"-3⅛" (3½"-3½")]. Bind off loosely in rib. Pants measures approx 36-42-46 (52-59) cm [14¼"-16½"-18" (20½"-23¼")]. ASSEMBLY: Sew split on the inside of leg inside 1 edge st. Sew opening between legs from mid front to mid back on pants. ---------------------------------------------------------- SOCKS: HEEL DECREASES: Row 1 (= RS): Work row until 6-7-7 (7-8) sts remain, slip next st as if to K, K1, psso, turn piece, Row 2 (= WS): Work row until 6-7-7 (7-8) sts remain, slip next st as if to P, P1, psso, turn piece, Row 3 ( = RS): Work row until 5-6-6 (6-7) sts remain, slip next st as if to K, K1, psso, turn piece, Row 4 (= WS): Work row until 5-6-6 (6-7) sts remain, slip next st as if to P, P1, psso, turn piece. Continue dec like this with 1 less st between each dec until there are 8-10-10 (10-12) sts on row. DECREASING TIP-1: Dec as follows before rib: K2 tog. Dec as follows after rib: slip 1 st as if to K, K1, psso. DECREASING TIP-2: Dec as follows before marker: K2 tog. Dec as follows after marker: slip 1 st as if to K, K1, psso. ---------------------------------------------------------- SOCK: Worked in the round on double pointed needles. Cast on 44-48-48 (52-56) sts on double pointed needles size 2.5 mm [US 1] with off-white. Work 7-8-9 (10-11) cm [2¾"-3⅛"-3½" (4"-4⅜")] rib, K2/P2. Now keep the first 18-22-22 (22-26) sts on needle for heel and slip the remaining 26-26-26 (30-30) sts on a stitch holder = upper foot. Work 3-3½-4 (4-4½) cm [1⅛"-1¼"-1½" (1½"-1¾")] stockinette st on heel sts. Insert a marker in piece and now dec for heel – SEE ABOVE. After heel dec pick up 8-9-10 (11-12) sts on either side of heel and slip sts from stitch holder back on needles = 50-54-56 (62-66) sts. Continue in rib on the 26-26-26 (30-30) sts on upper foot and stockinette st on remaining sts. AT THE SAME TIME dec 1 st on either side of rib – SEE DECREASING TIP-1. Repeat the dec on every other round a total of 5-7-6 (7-9) times = 40-40-44 (48-48) sts. Continue with K over K and P over P until piece measures 7-8-9 (10-12) cm [2¾"-3⅛"-3½" (4"-4¾"] from marker on heel (approx 3-3-3 (4-4) cm [1⅛"-1⅛"-1⅛" (1½"-1½")] remain). Now insert a marker each side with 20-20-22 (24-24) sts on upper foot and 20-20-22 (24-24) sts under foot. Change to soft chocolate and continue in stockinette st on all sts, AT THE SAME TIME dec 1 st on each side of both markers – SEE DECREASING TIP-2 - on every other round 3 times and then on every round 5-5-6 (7-7) times = 8 sts left. Cut the thread, pull through remaining sts and fasten. Sock measures approx 10-11-12 (14-16) cm [4"-4⅜"-4¾" (5½"-6¼")]. |
|
 |
|
 |
|
Have you finished this pattern?Tag your pictures with #dropspattern #littlenuggetjacket or submit them to the #dropsfan gallery. Do you need help with this pattern?You'll find 15 tutorial videos, a Comments/Questions area and more by visiting the pattern on garnstudio.com. © 1982-2026 DROPS Design A/S. We reserve all rights. This document, including all its sub-sections, has copyrights. Read more about what you can do with our patterns at the bottom of each pattern on our site. |
|


With over 40 years in knitting and crochet design, DROPS Design offers one of the most extensive collections of free patterns on the internet - translated to 17 languages. As of today we count 325 catalogs and 12298 patterns - 12288 of which are translated into English (US/in).
We work hard to bring you the best knitting and crochet have to offer, inspiration and advice as well as great quality yarns at incredible prices! Would you like to use our patterns for other than personal use? You can read what you are allowed to do in the Copyright text at the bottom of all our patterns. Happy crafting!
Post a comment to pattern DROPS Baby 17-16
We would love to hear what you have to say about this pattern!
If you want to leave a question, please make sure you select the correct category in the form below, to speed up the answering process. Required fields are marked *.