
Popular categories
Looking for a yarn?


Comments / Questions (32)
![]() Augusta wrote:
Augusta wrote:
Jeg er i gang med størrelse L. 51 masker minus kantmasker er 49 masker skal dele med 4 = 12,25 (ret, ret, ret, vrang kan ikke deles med 49. :-( Mvh. Augusta
18.04.2026 - 11:30
![]() Sharon wrote:
Sharon wrote:
On left side inc7 every row. Is that every row RS or truly every row and if so, do we make the increase on the second row before we handle the increase on the front row or after?
15.09.2025 - 15:15DROPS Design answered:
Hi Sharon, on left front, towards mid front, you increase inside the 5 garter sts 1 st on every row a total of 7 times (on the right and wrong side of your work) and then on every other row (only on right side) 4 times. Happy knitting!
22.10.2025 - 15:41
![]() Marzia wrote:
Marzia wrote:
Eine Frage: Wenn in der Anleitung so etwas wie „ Nach 8-8-9-9-10-10 cm auf der Seite 1 M. aufnehmen“ steht, heisst es insgesamt bspw. nach insgesamt 8 cm oder zusätzliche 8 cm. zu dem, was man bis dahin schon gearbeitet hat? Vielen Dank für die Hilfe!
17.04.2023 - 23:10DROPS Design answered:
Liebe Marzia, messen Sie diese 8 cm ab der Anschlagskante. Viel Spaß beim stricken!
18.04.2023 - 10:23
![]() Andrea wrote:
Andrea wrote:
Jeg skjønner ikke beskrivelsen av hvordan man øker på venstre forstykke. Det står man skal øke på hver p. 7 ganger, og på annen hver 4 ganger. Skal man da først på øke hver pinne 7 ganger og så på annen hver p 4 ganger? For jeg synes det ser feil ut?
31.03.2020 - 17:32DROPS Design answered:
Hei Andrea, Ja du øker hver pinne x 7 og deretter hver 2. pinne x 4. God fornøyelse!
02.04.2020 - 08:52
![]() Andrea wrote:
Andrea wrote:
Hei, under VENSTRE FORSTYKKE står det at man skal øke med 7 m på hver p og 4 m på hver 2.p. Betyr det at man øker med 7 og 11 m på annen hver p?
29.03.2020 - 22:28DROPS Design answered:
Hei Andrea, Det betyr at du først øker 7 masker på hver pinner 7 ganger og deretter hver 2. pinne 4 ganger (ikke samtidig). God fornøyelse!
30.03.2020 - 07:39
![]() Mariek wrote:
Mariek wrote:
Ik heb eenzelfde soort vraag over het telpatroon. Volgens de omschrijving is het hokje met de zwarte stip "averecht op de goede kant, recht op de verkeerde kant". Maar als je het telpatroon precies volgt (waarbij elke rij hokjes één naald is), komen de hokjes met de zwarte stip alléén voor als een averechte steek aan de goede kant (en dus niet als een rechte steek aan de verkeerde kant). Hoe zit dit nu precies?
05.09.2017 - 23:05DROPS Design answered:
Hallo Mariek, Het klopt precies zoals je het beschrijft. In de uitleg van de symbolen bij de telpatronen van DROPS wordt altijd voor de duidelijkheid aangegeven welke steek je op de voor- dan wel achterkant breit, zodat er geen verwarring ontstaat. Ook zijn alle naalden aangegeven; zowel de heen- als de teruggaande naalden. In dit geval brei je inderdaad altijd de averechte steek als je op de heengaande naald bent.
08.09.2017 - 11:35
![]() Mandy wrote:
Mandy wrote:
Ik heb een vraag over breien volgens patroon m1. Ik snode uitleg maar is elk hokje dan een naald die je breid? En lees je hem danvan links naar rechts? Ik ben nog maar eenbeginnend breister en zou graag eens iets voor mezelf proberen te maken. Groetjesmandy
08.02.2013 - 21:47DROPS Design answered:
Je leest de teltekening als volgt: 1e rij = goede kant, lees van rechts naar links, 2e rij = verkeerde kant, lees van links naar rechts. Elk hokje is 1 gebreide steek.
12.02.2013 - 11:45
![]() Drops Design wrote:
Drops Design wrote:
Bonjour Julie, effectivement, les augmentations du devant ont été corrigées, merci pour votre aide.
06.04.2010 - 11:47
![]() Julie wrote:
Julie wrote:
Il y a un probleme dans la traduction française au niveau de l'explication du demi devant le nombre de mailles ne tombe pas juste après toutes les augmentations.
05.04.2010 - 20:12
![]() Drops Design wrote:
Drops Design wrote:
Hi The repeat is 2 rows on all sts, 2 rows on the outermost 5 sts, 2 rows on all sts, 2 rows on the outermost 5 sts,2 rows on all sts, 2 rows on the outermost 5 sts ... and so on.
03.11.2009 - 02:29
|
|||||||
Crisp Autumn Vest |
|||||||
|
|
|||||||
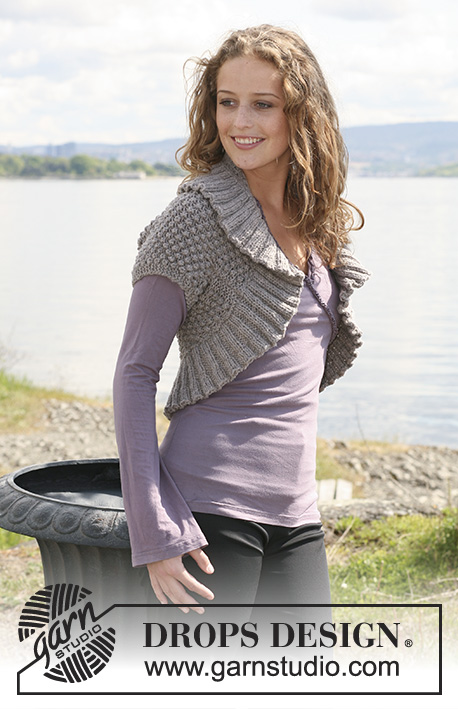
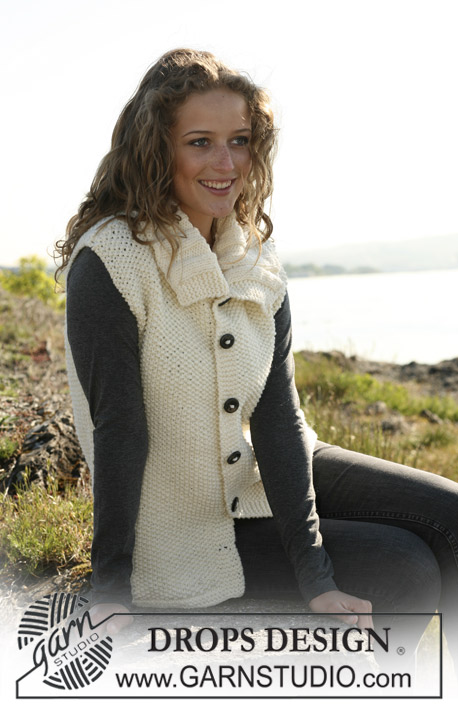
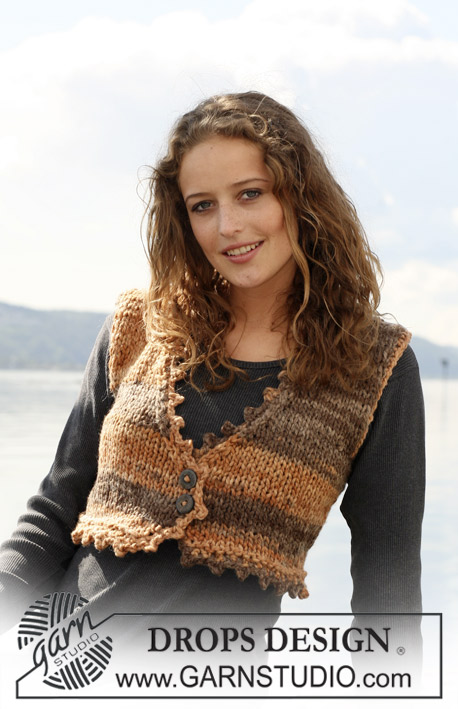
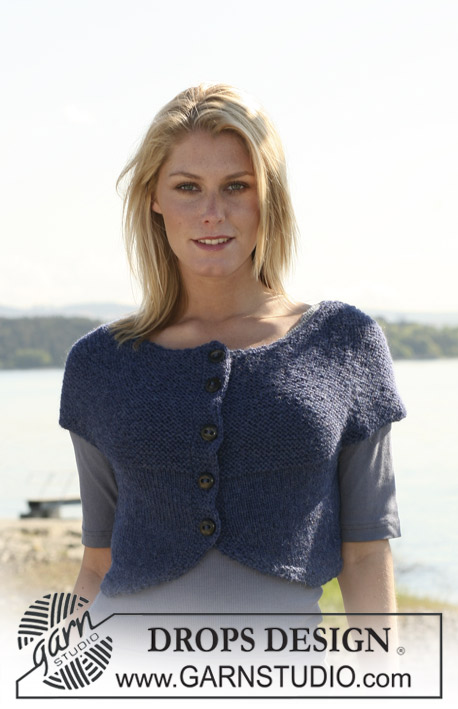
DROPS waistcoat in ”Snow”. Size S – XXXL.
DROPS 110-25 |
|||||||
|
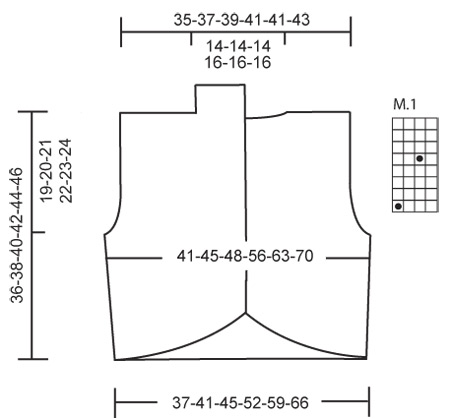
Garter st, back and forth on needle: K all rows. Pattern: See diagram M.1 – diagram shows the pattern from RS. Decreasing tip (applies to armhole): Make all dec from RS inside 4 garter sts. Dec as follows after 4 sts: Slip 1 st as if to K, K1, psso. Dec as follows before 4 sts: K2 tog. Increasing tip (applies to front piece): Inc inside 5 garter st. Inc by making 1 YO and work YO into back of loop to avoid a hole. Incorporate inc sts in M.1 as you go along. BACK PIECE Cast on 43-47-51-59-67-75 sts (includes 1 edge st each side) on needle size 8 mm [US 11] with Snow. Work 2 rows garter st and continue in M.1 with 1 edge st each side. Remember the knitting gauge! When piece measures 8-8-9-9-10-10 cm [3⅛"-3⅛"-3½"-3½"-4"-4"] inc 1 st each side, and repeat the inc when piece measures 13-13-14-14-15-15 cm [5⅛"-5⅛"-5½"-5½"-6"-6"] = 47-51-55-63-71-79 sts – incorporate the inc sts in M.1 as you go along. When piece measures 16-17-18-19-20-21 cm [6¼"-6¾"-7"-7½"-8"-8¼"] work 2 rows garter st on 6-6-7-9-10-11 sts each side. On next row from RS bind off 2-2-3-5-6-7 sts each side for armhole and now dec to shape the armhole each side at the beg of every row - see Decreasing tip: 1 st 2-3-3-4-7-9 times = 39-41-43-45-45-47 sts. Continue in M.1 with 4 garter sts each side. When piece measures 34-36-38-40-42-44 cm [13⅜"-14¼"-15"-15¾"-16½"-17 ¼"] bind off the middle 15-15-15-17-17-17 sts for neck = 12-13-14-14-14-15 sts left on each shoulder. Complete each shoulder separately and bind off when piece measures 36-38-40-42-44-46 cm [14¼"-15"-15¾"-16½"-17¼"-18"] . LEFT FRONT PIECE Cast on 14-16-18-22-26-30 sts (includes 1 edge st at side and 5 front band sts towards mid front) on needle size 8 mm [US 11] with Snow. Work 2 rows garter st and continue as follows from RS: 1 edge st, M.1 on the next 8-10-12-16-20-24 sts and 5 front band sts in garter st – at the same time inc towards mid front inside the 5 garter sts – see Increasing tip – on every row a total of 7 times and then on every other row 4 times. At the same time when piece measures 8-8-9-9-10-10 cm [3⅛"-3⅛"-3½"-3½"-4"-4"] inc 1 st at side and repeat the inc when piece measures 13-13-14-14-15-15 cm [5⅛"-5⅛"-5½"-5½"-6"-6"]. After all inc are complete there are 27-29-31-35-39-43 sts on row. When piece measures 16-17-18-19-20-21 cm [6¼"-6¾"-7"-7½"-8"-8¼"] work 2 rows garter st on 6-6-7-9-10-11 sts at side, work remaining sts as before. On next row from the side bind off 2-2-3-5-6-7 sts for armhole = 25-27-28-30-33-36 sts. Dec to shape the armhole as described for back piece = 23-24-25-26-26-27 sts on row. Continue until piece measures approx 36-38-40-42-44-46 cm [14¼"-15"-15¾"-16½"-17¼"-18"]. On next row from the side bind off the first 12-13-14-14-14-15 sts for shoulder and work remaining sts on row = 11-11-11-12-12-12 sts left for collar. Continue on these sts as follows: * 2 rows on all sts (continue as before with 5 garter sts and M.1), 2 rows on the 5 garter sts towards mid front only *. Repeat from *-* until collar measures 7-7-7-8-8-8 cm [2¾"-2¾"-2¾"-3⅛"-3⅛"-3⅛"] where shortest, measured from shoulder. Bind off. RIGHT FRONT PIECE Like left front piece, but mirrored. Also, make 1 buttonhole on front band when piece measures 15 cm [6"] as follows: bind off 3rd and 4th st from mid front and cast on 2 new sts on return row. ASSEMBLY Sew shoulder seams. Sew collar tog mid back, edge to edge to avoid a chunky seam, and sew to back piece. Sew side seams inside 1 edge st and sew on button. |
|||||||
Diagram explanations |
|||||||
|
|||||||
 |
|||||||
Have you finished this pattern?Tag your pictures with #dropspattern or submit them to the #dropsfan gallery. Do you need help with this pattern?You'll find 18 tutorial videos, a Comments/Questions area and more by visiting the pattern on garnstudio.com. © 1982-2026 DROPS Design A/S. We reserve all rights. This document, including all its sub-sections, has copyrights. Read more about what you can do with our patterns at the bottom of each pattern on our site. |
|||||||


With over 40 years in knitting and crochet design, DROPS Design offers one of the most extensive collections of free patterns on the internet - translated to 17 languages. As of today we count 325 catalogs and 12298 patterns - 12288 of which are translated into English (US/in).
We work hard to bring you the best knitting and crochet have to offer, inspiration and advice as well as great quality yarns at incredible prices! Would you like to use our patterns for other than personal use? You can read what you are allowed to do in the Copyright text at the bottom of all our patterns. Happy crafting!
Post a comment to pattern DROPS 110-25
We would love to hear what you have to say about this pattern!
If you want to leave a question, please make sure you select the correct category in the form below, to speed up the answering process. Required fields are marked *.