DROPS Alpaca
DROPS Alpaca
100% Alpaca
from 4.85 $ /50g
Get the yarn to make this pattern from 77.60$.

The yarn cost is calculated from the pattern’s smallest size and the yarn’s cheapest product type. Looking for an even better price? You might find it on the DROPS Deals!

DROPS Super Sale

Valeria

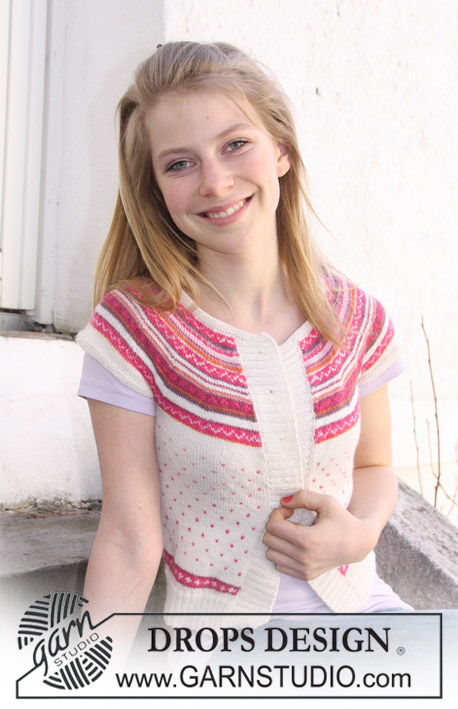
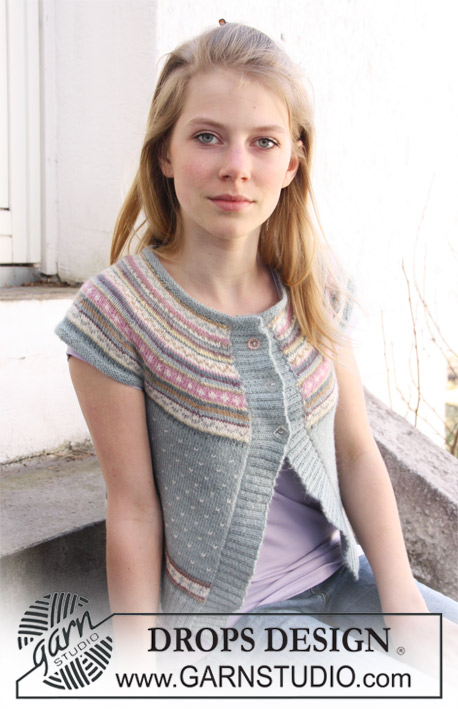
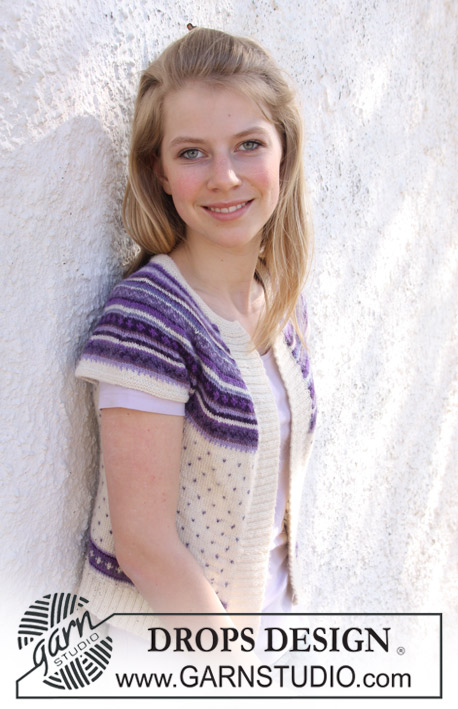
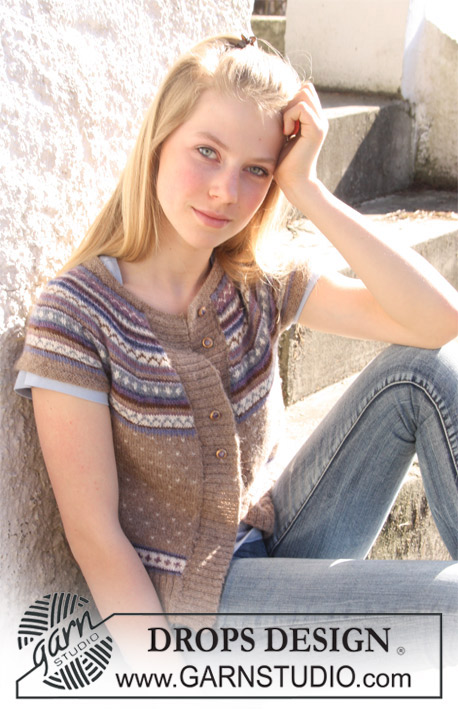
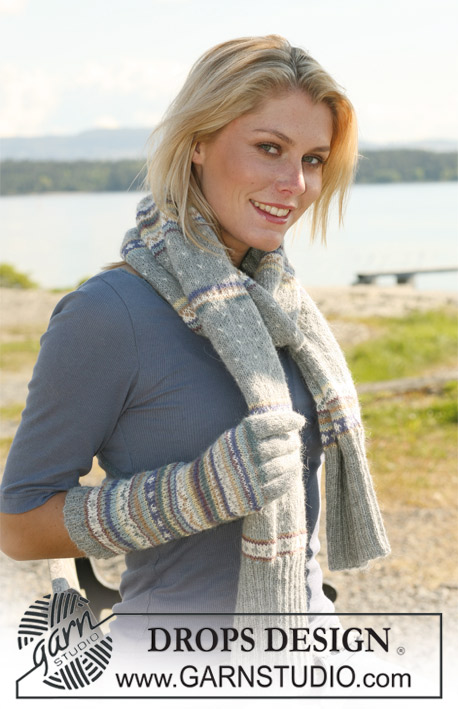
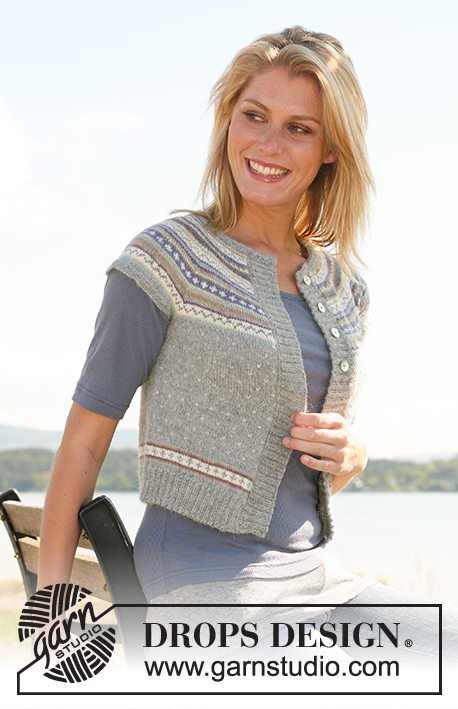
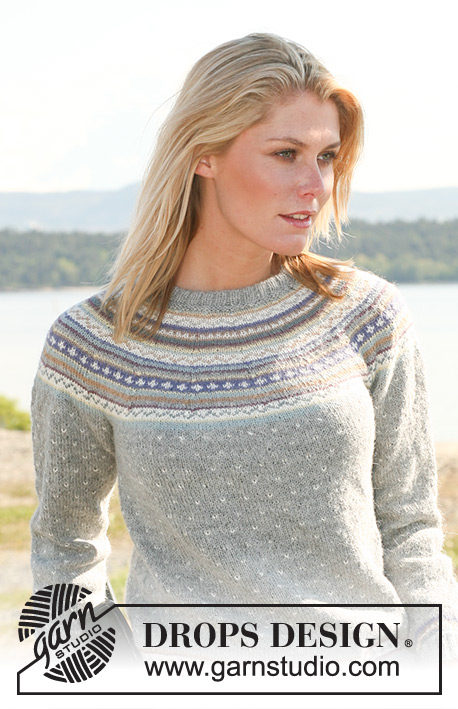
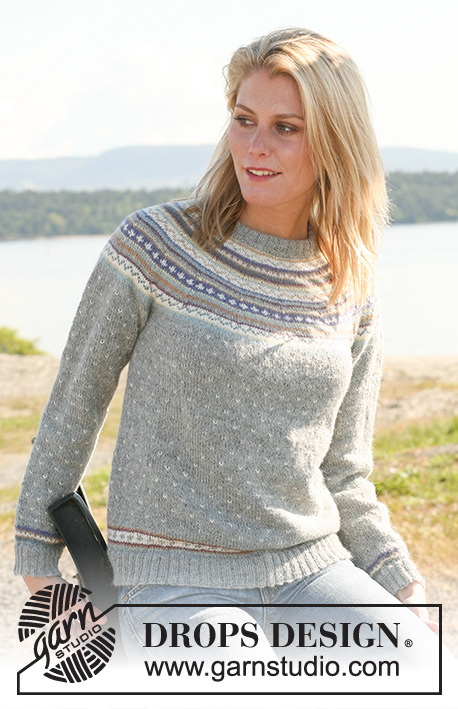
DROPS jumper in ”Alpaca” with round yoke and multi coloured pattern. Long or short sleeves. Size XS - XXL.

DROPS 108-10
Size: XS - S - M - L - XL - XXL

Finished measurements:
Bust: 76-86-90-100-110-120 cm [30’’-33 7/8’’-35½’’-39 3/8’’-43 3/8’’-47¼’’]
Full length: 56-58-60-62-64-66 cm [22’’-22¾’’-23 5/8’’-24 3/8’’-25¼’’-26’’]

Materials: DROPS Alpaca from Garnstudio
50 g for all sizes color no 100, off-white
50 g for all sizes color no 7120, light slate gray
50 g for all sizes color no 2110, wheat
50 g for all sizes color no 7139, slate gray
50 g for all sizes color no 3800, blue violet
50 g for all sizes color no 0302, camel
50 g for all sizes color no 6347, dark steel blue
50 g for all sizes color no 618, light beige
Long sleeve:
200-250-250-300-300-350 g color no 501, light gray
Short sleeve:
150-150-150-200-200-200 g color no 501, light gray.

DROPS double pointed needles and circular needle (40 and 80 cm [16” and 32”]) size 3 mm [US 2or3] – or size needed to get 24 sts x 32 rows in stockinette st = 10 x 10 cm [4’’ x 4’’].

DROPS double pointed needles and circular needle (40 and 80 cm [16” and 32”]) size 2.5 mm [US 1] – for garter st and rib.

-------------------------------------------------------

Alternative Yarn – See how to change yarns here
Yarn Groups A to F – Use the same pattern and change the yarn here
Yarn usage using an alternative yarn – Use our yarn converter here

-------------------------------------------------------

DROPS Alpaca
DROPS Alpaca
100% Alpaca
from 4.85 $ /50g
Get the yarn to make this pattern from 77.60$.

The yarn cost is calculated from the pattern’s smallest size and the yarn’s cheapest product type. Looking for an even better price? You might find it on the DROPS Deals!

DROPS Super Sale

SAVE 30% on 6 cotton favorites!
Valid until 04.12.2024

Pattern instructions

NOTE: This pattern is written in American English. All measurements in charts are in cm. For conversion from inches to cm - click here. There are different terms for crocheting in American and British English. If this pattern includes crochet, click for "crochet terms" here. For this pattern in British English, please click here.
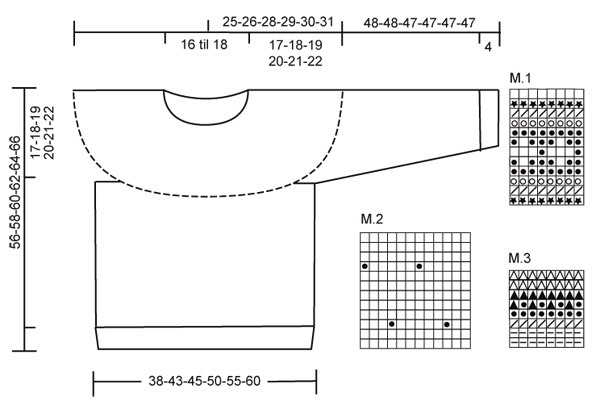
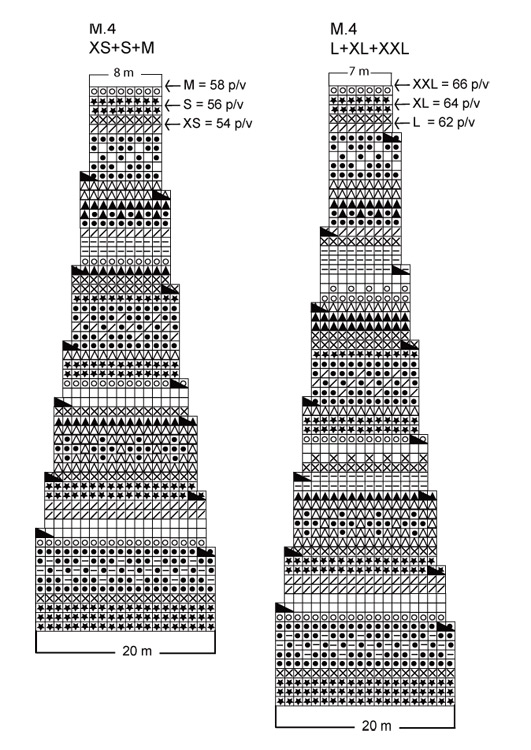
Garter st, in the round: K 1 round, P 1 round.
Pattern: See diagram M.1 to M.4. The diagrams show the pattern from the RS and the entire pattern is worked in stockinette st.

JUMPER
Worked in the round on circular needle. Long or short sleeves. Cast on 236-260-284-312-344-384 sts on large circular needle size 2.5 mm [US 1] with light gray Alpaca. K 1 round and continue in rib, K2/P2. When rib measures 5-5-5-5-6-6 cm [2”-2”-2”-2”-2 3/8”-2 3/8”] change to circular needle size 3 mm [US 2or3] and K 1 round, at the same time dec 56-56-68-72-80-96 sts evenly on round = 180-204-216-240-264-288 sts. K 1 round and now continue in M.1. Remember the knitting gauge! After 1 vertical repeat of M.1 K 1 round with light gray. Insert 1 Marking Thread (MT) each side (back piece = 90-102-108-120-132-144 sts, front piece = 90-102-108-120-132-144 sts).
K 1 round with light gray and now continue in M.2 until piece measures 39-40-41-42-43-44 cm [15¼”-15¾”-161/8”-16½”-17”-17¼”]. K 1 round with light gray, at the same time bind off 12 sts each side (i.e. 6 sts on each side of both MT) = 156-180-192-216-240-264 sts. Put piece aside.

Long sleeve:
Worked in the round on double pointed needles. Cast on 76-76-80-84-88-92 sts on double pointed needles size 2.5 mm [US 1] with light gray Alpaca. K 1 round and continue in rib, K1/P1. When rib measures 4 cm [1½’’] change to double pointed needles size 3 mm [US 2or3]. K 1 round, at the same time dec 20-20-22-24-26-26 sts evenly on round = 56-56-58-60-62-66 sts. K 1 round and now continue in M.3. After 1 vertical repeat of M.3 K 1 round with light gray, at the same time inc 4-4-2-0-4-0 sts evenly = 60-60-60-60-66-66 sts. Insert a MT at beg of round = mid under arm. K 1 round and now continue in M.2. At the same time when piece measures 9-9-9-12-12-12 cm [3½”-3½”-3½”-4¾”-4¾”-4¾”] inc 1 st on both sides of MT on every 4-3.5-3-2-2-2 cm [1½”-1¼”-1 1/8”-3/4”-3/4”-3/4”] a total of 10-11-13-16-16-17 times = 80-82-86-92-98-100 sts. Incorporate inc sts in pattern as you go along.
When piece measures 48-48-47-47-47-47 cm [19”-19”-18½”-18½”-18½”-18½”] (Note! Less on the larger sizes because of wider shoulders) K 1 round with light gray, at the same time bind off 12 sts mid under sleeve (i.e. 6 sts on each side of MT) = 68-70-74-80-86-88 sts. Put piece aside and knit the other sleeve.

Short sleeve:
Cast on 80-82-86-92-98-100 sts on double pointed needles size 2.5 mm [US 1] with light gray Alpaca. Insert a MT at beg of round (= mid under arm). Work 6 rows garter st – see above. Change to double pointed needles size 3 mm [US 2or3].
K 1 round, at the same time bind off 12 sts mid under sleeve (i.e. 6 sts on each side of MT) = 68-70-74-80-86-88 sts. Put piece aside and knit the other sleeve.

Yoke:
Slip sleeves in on the same circular needle as body piece where bind off for armholes = 292-320-340-376-412-440 sts.
K 1 round with light gray, at the same time dec 12-20-20-16-12-20 sts evenly = 280-300-320-360-400-420 sts. K 1 round with light gray. Now continue in pattern and decreases as per M.4 (see diagram for your size). After M.4 (see arrow for your size) there are 112-120-128-126-140-147 sts on round. K 1 round with light gray, at the same time dec 9-15-21-15-27-28 sts evenly = 103-105-107-111-113-119 sts. Cut the thread.

Neckline:
Insert a MT in the middle st on front piece. Now K the 25 first sts after st with MT with light gray on circular needle size 2.5 mm [US 1] (this is now the beg of round).
K 52-54-56-60-62-68 sts, turn piece and
K 57-59-61-65-67-73 sts. Turn piece again and K 62-64-66-70-72-78 sts, turn piece and
K 67-69-71-75-77-83 sts. Turn piece again,
K 72-74-76-80-82-88 sts, (this is now the beg of round), and now work 2 rounds garter st – see above - on all sts in the round. K 1 round, at the same time inc 13-15-17-17-19-17 sts evenly = 116-120-124-128-132-136 sts. Continue in rib as follows: * K2, P2 *, repeat from *-*. When rib measures approx 4-4-5-5-6-6 cm [1½”-1½”-2”-2”-2 3/8”-2 3/8”] bind off loosely in rib.

Assembly:
Sew openings under arms. Fold rib at neckline double towards WS and fasten.

Diagram

All measurements in charts are in cm.

symbols = light gray
symbols = off-white
symbols = light slate gray green
symbols = wheat
symbols = slate gray
symbols = blue violet
symbols = camel
symbols = dark steel blue
symbols = light beige
symbols = K 2 tog
diagram
diagram
Do you have a question? See a list of frequently asked questions (FAQ)

Knitting tension is what determines the final measurements of your work, and is usually measured per 10 x 10 cm. It is provided like so: number of stitches in width x number of rows in height - eg: 19 stitches x 26 rows = 10 x 10 cm.

The knitting tension is very individual; some people knit/crochet loosely while others work tightly. You adjust the knitting tension with the needle size, which is why the suggested needle size only serve as a guide! You need to adjust this (up or down) to ensure that YOUR knitting tension matches the knitting tension provided in the pattern. If you work with a different knitting tension than provided you will have a different yarn consumption, and your work will have different measurements than what the pattern suggests.

The knitting tension also determines which yarns can replace each other. As long as you achieve the same knitting tension you can replace one yarn with another.

See DROPS lesson: How to measure your tension/gauge

See DROPS video: How to make a gauge tension swatch

The required amount of yarn is provided in grams, eg: 450 g. To calculate how many balls you’ll need you first need to know how many grams are in 1 ball (25g, 50g or 100g). This information is available if you click on the individual yarn quality on our pages. Divide the amount required with the amount of each ball. For example, if each ball is 50g (the most common amount), the calculation will be as follows: 450 / 50 = 9 balls.

The important thing when changing from one yarn to another is that the knitting/crochet tension remains the same. This is so that the measurements of the finished piece will be the same as on the sketch provided. It is easier to achieve the same knitting tension using yarns from the same yarn group. It is also possible to work with multiple strands of a thinner yarn to achieve the knitting tension of a thicker one. Please try our yarn converter. We recommend you to always work a test swatch.

Please NOTE: when changing yarn the garment might have a different look and feel to the garment in the photo, due to individual properties and qualities of each yarn.

See DROPS lesson: Can I use a different yarn than the one mentioned in the pattern?

All our yarns are categorised into yarn groups (from A to F) according to thickness and knitting tension – group A contains the thinnest yarns and group F the thickest. This makes it easier for you to find alternative yarns to our patterns, should you wish to switch yarn. All yarns within the same group have a similar knitting tension and can easily replace each other. However, different yarn qualities have different structures and properties which will give the finished work a unique look and feel.

Click here for an overview of the yarns in each yarn group

At the top of all our patterns you’ll find a link to our yarn converter, which is a helpful tool should you wish to use a different yarn than suggested. By filling in the yarn quality you wish to replace, the amount (in your size) and number of strands, the converter will present good alternative yarns with the same knitting tension. Additionally it will tell you how much you’ll require in the new qualities and whether you’ll need to work with multiple strands. Most skeins are 50g (some are 25g or 100g).

If the pattern is worked with multiple colours, every colour will have to be converted separately. Similarly, if the pattern is worked with several strands of different yarns (for example 1 strand Alpaca and 1 strand Kid-Silk) you will have to find alternatives for each, individually.

Click here to see our yarn converter

Since different yarns have different qualities and textures we have chosen to keep the original yarn in our patterns. However, you can easily find options among our available qualities by using our yarn converter, or simply pick a yarn from the same yarn group.

It is possible that some retailers still have discontinued yarns in stock, or that someone has a few skeins at home that they would like to find patterns for.

The yarn converter will provide both alternative yarn as well as required amount in the new quality.

If you think it's hard to decide what size to make, it can be a good idea to measure a garment you own already and like the size of. Then you can pick the size by comparing those measures with the ones available in the pattern's size chart.

You'll find the size chart at the bottom of the pattern.

See DROPS lesson: How to read size chart

The needle size provided in the pattern serves only as a guide, the important thing is to follow the knitting tension. And since knitting tension is very individual, you will have to adjust the needle size to ensure that YOUR tension is the same as in the pattern – maybe you’ll have to adjust 1, or even 2 needle sizes, up or down to achieve the correct tension. For this, we recommend that you work test swatches.

Should you work with a different knitting tension than the one provided, the measurements of the finished garment might deviate from the measurement sketch.

See DROPS lesson: How to measure your tension/gauge

See DROPS video: How to make a gauge tension swatch

Working a garment top-down provides more flexibility and room for personal adjustment. For example it is easier to try the garment on while working, as well as making adjustments to length of yoke and shoulder caps.

The instructions are carefully explaining every step, in the correct order. Diagrams are adjusted to the knitting direction and are worked as usual.

The diagram depicts all rows/rounds, and every stitch seen from the right side. It is read from bottom to top, from right to left. 1 square = 1 stitch.

When working back and forth, every other row is worked from the right side and every other row is worked from the wrong side. When working from the wrong side, the diagram will have to be worked reversed: from left to right, knit stitches are purled, purl stitches are knit etc.

When working in the round every round is worked from the right side and the diagram are worked from right to left on all rounds.

See DROPS lesson: How to read knitting diagrams

The diagram depicts all rows/rounds, and every stitch seen from the right side. It is worked from bottom to top, from right to left.

When working back and forth every other row is worked from the right side: from right to left and every other row is worked from the wrong side: from left to right.

When working in the round, every row in the diagram are worked from the right side, from right to left.

When working a circular diagram you start in the middle and work your way outwards, counter clockwise, row by row.

The rows usually start with a given number of chain stitches (equivalent to the height of the following stitch), this will either be depicted in the diagram or explained in the pattern.

See DROPS lesson: How to read crochet diagrams

Instructions for working several diagrams after each other on the same row/round, will often be written like so: “work A.1, A.2, A.3 a total of 0-0-2-3-4 times". This means you work A.1 once, then A.2 is worked once, and A.3 is repeated (in width) the number of times provided for your size – in this case like so: S = 0 times, M = 0 times, L=2 times, XL= 3 times and XXL = 4 times.

The diagrams are worked as usual: begin with the first row in A.1, then work the first row in A.2 etc.

See DROPS lesson: How to read knitting diagrams

See DROPS lesson: How to read crochet diagrams

The total width of the garment (from wrist-to-wrist) will be larger in the larger sizes, despite the actual sleeves being shorter. The larger sizes have longer sleeve caps and wider shoulders, so there will be a good fit in all sizes.

The measurement sketch/schematic drawing provides information regarding the full length of the garment. If it’s a jumper or a jacket the length is measured from the highest point on the shoulder (usually closest to the neckline), and straight down to the bottom of the garment. It is NOT measured from the tip of shoulder. Similarly, the length of yoke is measured from the highest point on the shoulder and down to where yoke is split into body and sleeves.

See DROPS lesson: How to read a schematic drawing

Diagrams are often repeated on the round or in height. 1 repeat is the diagram the way it appears in the pattern. If it says to work 5 repeats of A.1 in the round, then you work A.1 a total of 5 times after/next to each other in the round. If it says to work 2 repeats of A.1 vertically/in height you work the entire diagram once, then begin again at the start and work the entire diagram one more time.

Chain stitches are slightly narrower than other stitches and to avoid working the cast-on edge too tight, we simply chain more stitches to begin with. The stitch count will be adjusted on the following row to fit the pattern and measurement sketch.

The rib edge is more elastic and will contract slightly compared to, for example, stocking stitch. By increasing before the rib edge, you avoid a visible difference in width between the rib edge and the rest of the body.

It’s very easy to cast off too tightly, and by making yarn overs while casting off (and simultaneously casting these off) you avoid a too tight cast off edge.

See DROPS video: How to bind off with yarn overs (yo)

To achieve an even increase (or decrease) you can increase on, for example: every 3rd and 4th row alternately, like so: work 2 rows and increase on the 3rd row, work 3 rows and increase on the 4th. Repeat this until the increase is complete.

See DROPS lesson: Increase or decrease 1 st on every 3rd and 4th row alternately

Should you prefer to work in the round instead of back and forth, you may of course adjust the pattern. You’ll need to add steeks mid-front (usually 5 stitches), and follow the instructions. When you would normally turn and work from the wrong side, simply work across the steek and continue in the round. At the end you’ll cut the piece open, pick up stitches to work bands, and cover the cut edges.

See DROPS video: How to knit steeks and cut open

Should you prefer to work back and forth instead of in the round, you may of course adjust the pattern so you work the pieces separately and then assemble them at the end. Divide the stitches for the body in 2, add 1 edge stitch in each side (for sewing) and work the front and back pieces separately.

See DROPS lesson: Can I adapt a pattern for circular needles into straight needles?

Pattern repeats can vary slightly in the different sizes, in order to get the correct proportions. If you’re not working the exact same size as the garment in the photo, yours might deviate slightly. This has been carefully developed and adjusted so that the complete impression of the garment is the same in all sizes.

Make sure to follow instructions and diagrams for your size!

If you have found a pattern you like which is available in women’s size it’s not very difficult to convert it to men’s size. The biggest difference will be the length of sleeves and body. Start working on the women size that you think would fit across the chest. The additional length will be worked right before you cast off for the armhole/sleeve cap. If the pattern is worked top-down you can add the length right after the armhole or before the first decrease on sleeve.

Regarding additional yarn amount, this will depend on how much length you add, but it is better with a skein too many than too few.

All yarns will have excess fibres (from production) that might come off as lint or shedding. Brushed yarns (ie hairier yarns) have more of these loose, excess fibres, causing more shedding.

Shedding also depends on what is worn under or over the garment, and whether this pulls at the yarn fibres. It’s therefore not possible to guarantee that there will be no shedding

Below are some tips on how to get the best result when working with hairier yarns:

1. When the garment is finished (before you wash it) shake it vigorously so the looser hairs come off. NOTE: do NOT use a lint roller, brush or any method that pulls at the yarn.

2. Place the garment in a plastic bag and put it in your freezer - the temperature will cause the fibres to become less attached to each other, and excess fibres will come off easier.

3. Leave in the freezer for a few hours before taking it out and shaking it again.

4. Wash the garment according to the instructions on the yarn label.

Pilling is a natural process that happens to even the most exclusive of fibers. It's a natural sign of wear and tear that is hard to avoid, and that is most visible in high friction areas of your garment like a sweater's arms and cuffs.

You can make your garment look as new by removing the pilling, using a fabric comb or a pill/lint remover.

Still can't find the answer you need? Then scroll down and leave your question so one of our experts can try to help you. This will be done normally within 5 to 10 working days.
In the meantime, you can read the questions and answers that others have left to this pattern or join the DROPS Workshop on Facebook to get help from fellow knitters/crocheters!

You might also like...

Post a comment to pattern DROPS 108-10

We would love to hear what you have to say about this pattern!

If you want to leave a question, please make sure you select the correct category in the form below, to speed up the answering process. Required fields are marked *.

Comments / Questions (48)

country flag Undine wrote:

Wie lässt sich dieses Muster von oben nach unten stricken?

08.09.2022 - 16:54

DROPS Design answered:

Liebe Undine, leider können wir nicht jede Anleitung nach jeder Anfrage anpassen, aber vielleicht können Sie mal den Pullover "verkehrs" lesen, dh die Maschen anschlagen anstatt abketten, für die Passe zunehmen anstatt abnehmen usw. Diese Modellen (von oben nach unten + mit Garngruppe A gestrickt) können vielleicht Ihnen helfen bzw inspirieren. Viel Spaß beim stricken!

09.09.2022 - 08:47

country flag Lolo Sörelius wrote:

Vart tog min tidigare fråga vägen? Borta och inget svar??

20.02.2021 - 14:22

DROPS Design answered:

Hej Lolo. Din fråga och svar finns här under. Mvh DROPS Design

22.02.2021 - 11:24

country flag Lolo Sörelius wrote:

Jag undrar om det verkligen stämmer med att lägga upp 80 maskor för M på ärmarna. Jag gjorde det och de blev alldeles för stora och vida i resåren. Är dessutom skeptisk till att det ska räcka med 250 g i grundfärgen f M, eller har jag fel? Jag har samma stickfasthet som det står och stickar i Alpacka Drops.

08.02.2021 - 13:28

DROPS Design answered:

Hei Lolo. Ja, det stemmer med 80 masker. Når du er ferdig med vrangborden skal det felles til 58 masker. Om du syns 80 masker blir for stort, kan du legge opp et mindre antall masker, bare husk å ha riktig maskeantall når du skal begynne å strikke mønster. Det skal være riktig garnmengde som er opplyst, men man kan alltids kjøp et ekstra nøste om man ønsker. mvh DROPS design

12.02.2021 - 15:01

country flag Kirsten wrote:

Hallo und guten Tag. Ich habe eine Frage zum Muster M2: Wird der Faden in natur immer mitgeführt und eingewebt? Auch in den "leeren" Reihen, in denen er gar nicht gebraucht wird? Oder lässt man ihn dann hängen und führt ihn seitlich hoch, wenn natur wieder benutzt wird? Das ist mir leider nicht ganz klar. Und wenn er seitlich hochgeführt wird, wird er dann gekreuzt? Vielen Dank für eure Hilfe und liebe Grüße.

10.12.2020 - 13:09

DROPS Design answered:

Liebe Kirsten, der Faden Natur wird nur mitgeführt bei den Reihen wo er gestrickt wird, zwischen diesen Reihen, lassen Sie den Faden unbenutzt von der Rückseite so können Sie bei der nächsten Reihe mit 2 Farben hochziehen. Vor jeder Runde verdrehen Sie den Arbeitsfaden mit dem Faden oder den Fäden, die gerade nicht benutzt werden, erst dann stricken Sie die Runde. Viel Spaß beim stricken!

10.12.2020 - 14:00

country flag Sölvi Andersson wrote:

Når der står 4 omg Retstrik, betyder det så at man skal strikke 12 pinde i alt

19.11.2019 - 10:49

DROPS Design answered:

Hej Sölvi, nej du skal bare strikke 4 omgange retstrik = 1 omg vrang, 1 omg ret, 1 omg vrang, 1 omg ret. God fornøjelse!

19.11.2019 - 13:09

country flag Mariana wrote:

Hei, har problemer med å skjønne hvordan det kan gå fra 320 m (minus de 12 inntagningar jeg gjort ifølge M4) til å ende opp med 128 m. Strikker i strl M og er nettopp ferdig med M4.

24.08.2019 - 23:01

DROPS Design answered:

Hej. Du stickar M.4 16 gånger på bredden och det är totalt 12 intagningar per M.4. 16 x 12= 192 m. 320-192=128 m. Lycka till!

26.08.2019 - 08:00

country flag Elin wrote:

Skal forhøyninga på halsen være framme ? Da der står at du skal starte på forstykket med halskant

22.11.2018 - 22:03

DROPS Design answered:

Hei Elin. Forhøyningen går over nakken/skuldrene. Du setter et merke midt foran, men så begynner omgangen 25 masker etter dette merket. Når du da begynner å strikke vil dette blir over nakken og skuldrene. God fornøyelse

23.11.2018 - 08:27

country flag Ingvild Gabrielsen wrote:

Har dere noen alternative garn denne genseren kan strikkes med? Eks blanding alpakka og ull.

26.09.2018 - 15:37

DROPS Design answered:

Hej Ingvild, Ja du kan blandt andet strikke den i DROPS Flora 65% Ull 35% Alpaca som også tilhører garngruppe A. Prøv at bruge vores garnkalkulator som ligger inde på selve opskriften, her får du flere andre alternativer :)

28.09.2018 - 14:44

country flag Eve Beeley wrote:

I cannot find the chart instructions or diagram on this patter. There is a box saying no image by the diagram explanations. Please can you supply a diagram?

23.03.2018 - 09:05

DROPS Design answered:

Dear Eve! Look at the end of the pattern, maybe in other language versions. If it doesn't work please change your browser. Happy knitting!

23.03.2018 - 15:12

country flag Catharine Clausen wrote:

Mønster M.4, hva betyr på slutten "XS=54 p/v" ?

05.12.2016 - 17:15

DROPS Design answered:

Hej Catharine. Dvs, der er 54 pinne i str XS (v = varv = svensk)

06.12.2016 - 15:22