
Popular categories
Looking for a yarn?


Comments / Questions (51)
![]() Ruth Norman wrote:
Ruth Norman wrote:
Thank you for your previous reply re fabel yarn however I do not like to wear garments made of thick or chunky yarn could I knit a larger size with smaller needles and get a successful outcome?
13.01.2023 - 14:03DROPS Design answered:
Dear Mrs Norman, you might then have to check our patterns designed for smaller needles, see for example all jackets worked with a tension of 25-23 stitches here - feel free to edit or add more filters. Happy knitting!
13.01.2023 - 15:22
![]() Ruth Norman wrote:
Ruth Norman wrote:
Can drops fabel yarn be used for this pattern
12.01.2023 - 19:53DROPS Design answered:
Hi Ruth, Drops Fabel is a yarn from group A. The 2 yarns suggested for this pattern are from yarn group C. Our yarns are spun to standard thickness and 2 strands of a yarn from group A is equivalent to 1 strand from group C. So yes, you can work this pattern with Drops Fabel, using 2 strands throughout the garment. Happy knitting!
13.01.2023 - 07:53
![]() Klara wrote:
Klara wrote:
I'm using needle nr 6, and it is going to be at least 48 cm when it's time to change to needles 5,5 (probably 5). It's mathematically impossible to get to this point with 42 cm. I'm doing the L size. Not funny when the pattern doesn't work. Gladly I know how to repair it. It's beautiful if it fits well.
09.08.2019 - 20:06
![]() Wil wrote:
Wil wrote:
Wie weet met hoeveel steken de onderste streep heeft.ik wil die als begin gebruiken,omdat ik veel korter ben. zie ook die mevrouw van 155cm.wie heeft deze al gemaakt? wilt u mij het stekenaantal geven van de eerste streep.voorpand en achterpand.dank u.
08.08.2017 - 22:46DROPS Design answered:
Hoi Wil, Hoeveel steken er in de eerste streep zitten, kan ik zo niet zeggen. Dit hangt namelijk ook af van je de maat die je breit en de stekenverhouding die je hebt. Om uit te rekenen met hoeveel steken je moet beginnen om op een kortere lengte uit te komen, moet je uitrekenen hoeveel meerderingen en minderingen er gemaakt zijn op het stuk dat je zeg maar over wilt slaan en deze meerderingen/minderingen moet je verrekenen.
15.08.2017 - 17:42
![]() Patricia wrote:
Patricia wrote:
Mooi model moet het zo los gebreid worden
26.05.2012 - 21:30DROPS Design answered:
Ja, dat klopt. De stekenverhouding voor dit model is 14st x 17 nld voor de onderkant van het vest en 17st x 22nld voor de bovenkant van het vest.
29.05.2012 - 14:55
![]() DROPS Deutsch wrote:
DROPS Deutsch wrote:
Ja, richtig.
05.12.2011 - 10:28
![]() Ute wrote:
Ute wrote:
Frage zur Anleitung 107-6 ich komme mit der Anleitung nicht klar. verstehe ich das richtig 1. reihe bei 1. und 3. Markierungsfaden jeweils davor und danach 1 Mache abnehmen- 1. Reihe linkes 3. Reihe am Angang 1 M aufnehemen, bei dem 2. Markierungsfaden vor und danach 1 zunehmen und am Ende der Reihe eine zunehmen ?
05.12.2011 - 09:12
![]() DROPS Design wrote:
DROPS Design wrote:
You are right. It is corrected now. Thank you.
17.04.2009 - 21:27
![]() Anne wrote:
Anne wrote:
When the change to 5.5mm needles takes place on the fronts the pattern says to knit 12 rows in garter stitch. This does not correspond to the back where only 6 rows garter stitch are required. I assume this is an error.
17.04.2009 - 21:18
![]() DROPS Design wrote:
DROPS Design wrote:
Yes, the stripes are in 2 strands, and this is added to the pattern. The length is measured at the shortest, and because of the inc and dec, the garment will get long at some points where you'll see the full length of the 79 rows.
16.04.2009 - 17:38
|
|
Gerda#gerda |
|
|
|
|
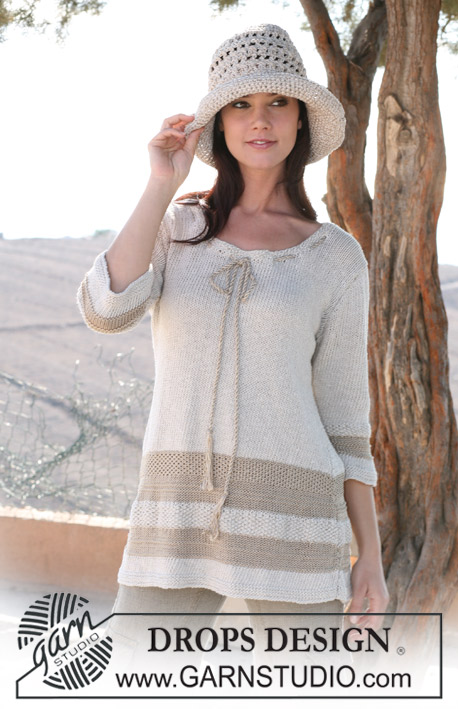
DROPS long jacket in “Bomull-Lin” and “Cotton Viscose”. Size S – XXXL
DROPS 107-6 |
|
|
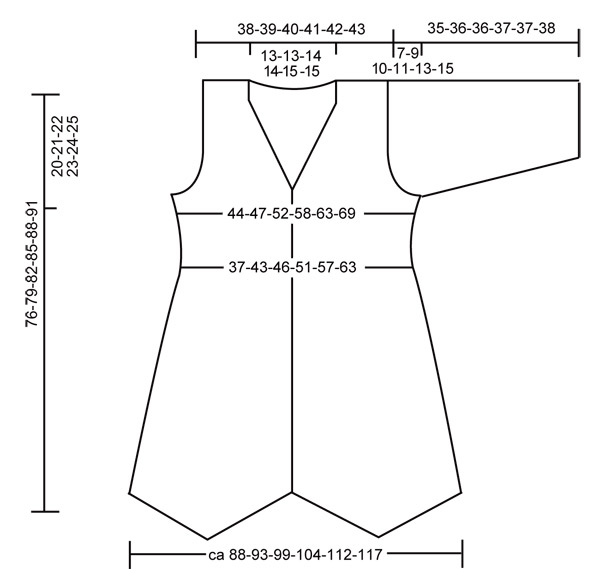
Measuring tip: Because of the weight of the yarn, all measurements should be made whilst the garment is hanging, otherwise it will be too long when worn. Garter st, back and forth on needle: K all rows. Stripes: Front and back piece: When piece measures 12, 25, 28 and 32 cm [4¾"-9¾"-11"and 12½"] work 2 rows in 2 strands Cotton Viscose. Sleeves: When piece measures 13 and 17 cm [5⅛" and 6¾"] work 2 rows in 2 strands Cotton Viscose. Decreasing tip-1: Make all dec from RS! Dec as follows before marker: K2 tog. Dec as follows after marker: slip 1 st as if to knit, K1, psso Decreasing tip-2 (applies to neckline): Make all dec from RS! Dec as follows after 8 sts: slip 1 st as if to knit, K1, psso Dec as follows before 8 sts: K2 tog. Buttonholes: Make buttonholes on right front band. 1 buttonhole = bind off 4th st from mid front and cast on 1 new st on return row. Make buttonholes when piece measures: Size S: 33, 39, 46 and 54 cm [13"-15¼"-18" and 21¼"]. Size M: 33, 40, 48 and 57 cm [13"-15¾"-19" and 22½"]. Size L: 33, 41, 50 and 60 cm [13"-16⅛"-19¾" and 23⅝"]. Size XL: 33, 42, 52 and 62 cm [13"-16½"-20½" and 24⅜"]. Size XXL: 34, 42, 50, 57 and 65 cm [13⅜"- 16½"-19¾"-22½" and 25½"]. Size XXXL: 34, 44, 52, 60 and 68 cm [13⅜"-17¼"-20½", 23 5/8 and 26¾"]. Back piece: Loosely cast on 134-142-150-158-170-178 sts (includes 1 edge st each side) on needle size 7 mm [US 10 ½] with 1 thread Bomull-Lin. Work 2 rows garter st – see above. Insert 3 markers (M) in piece as follows: M-1 after 34-36-38-40-43-45 sts, M-2 after 67-71-75-79-85-89 sts and M-3 after 100-106-112-118-127-133 sts. Continue in stockinette st, at the same time dec 1 st on each side of M-1 and M-3 on every other row a total of 39-39-41-41-43-43 times – see Decreasing tip-1. At the same time inc 1 st on each side of piece and each side of M-2 on every 4th row a total of 19-19-20-20-21-21 times = 54-62-66-74-82-90 sts. Remember the knitting gauge! Remember stripes – see above. Continue until piece measures 40-41-42-43-44-45 cm [15¾"-16⅛"-16½"-17"-17¼"-17¾"] – measured where shortest, see Measuring tip! Dec and inc are now complete. Change to needle size 5.5 mm [US 9]. Work 12 rows garter st, at the same time inc 12-10-14-16-17-19 sts evenly on first row = 66-72-80-90-99-109 sts. Continue in stockinette st, at the same time inc 1 st each side on every 2.5-2.5-2.5-3-3-3 cm [⅞"-⅞"-⅞"-1⅛"-1⅛"-1⅛"] a total of 5 times = 76-82-90-100-109-119 sts. When piece measures 56-58-60-62-64-66 cm [22"-22¾"-23⅝"-24⅜"-25¼"-26"] bind off 3 sts each side for armhole and dec to shape the armhole on every other: 2 sts 1-1-2-3-5-7 times and 1 st 1-3-4-6-6-6 times = 64-66-68-70-71-73 sts. When piece measures 72-75-78-81-84-87 cm [28⅜"-29½"-30¾"-32"-33"-34¼"] work garter st on the middle 38-38-40-40-41-41 sts – work remaining sts as before. When piece measures 74-77-80-83-86-89 cm [29⅛"-30⅜"-31½"-32¾"-33⅞"-35"] bind off the middle 20-20-22-22-23-23 sts for neck and dec 1 st on neckline on next row = 21-22-22-23-23-24 sts left on each shoulder. Continue with 8 garter sts towards neckline and bind off loosely when piece measures 76-79-82-85-88-91 cm [30"-31"-32¼"-33½"-34⅝"-35¾"]. Left front piece: Loosely cast on 75-79-83-87-93-97 sts (includes 1 edge st at side and 7 front band sts towards mid front) on needle size 7 mm [US 10 ½] with 1 thread Bomull-Lin. Insert 1 marker after 41-43-45-47-50-52 sts from mid front. Work 2 rows garter st and continue in stockinette st with 7 front band sts in garter st until finished measurements. At the same time dec 1 st on each side of marker on every other row a total of 39-39-41-41-43-43 times –see Decreasing tip-1. At the same time inc 1 st each side of piece (towards mid front inc inside 7 front band sts) on every 4th row a total of 19-19-20-20-21-21 times = 35-39-41-45-49-53 sts. Remember stripes! Continue until piece measures 40-41-42-43-44-45 cm [15¾"-16⅛"-16½"-17"-17¼"-17¾"] – measured where shortest. Dec and inc are now complete. Change to needle size 5.5 mm [US 9] and work 12 rows garter st, at the same time inc 5-5-6-7-8-9 sts evenly on first row = 40-44-47-52-57-62 sts. Continue in stockinette st with 8 sts towards mid front in garter st. At the same time inc at side as described for back piece = 45-49-52-57-62-67 sts. When piece measures 56-58-60-62-64-66 cm [22"-22¾"-23⅝"-24⅜"-25¼"-26"] dec for armhole at side as described for back piece. At the same time when piece measures 56-59-62-64-67-70 cm [22"-23¼"-24⅜"-25¼"-26⅜"-27½"] work 2 rows garter st on the 8 front band sts only. Continue on all sts and now dec to shape the neckline on every other row – see Decreasing tip-2: 1 st a total of 18-19-19-19-20-20 times. After all dec are complete there are 21-22-22-23-23-24 sts left on shoulder. Bind off loosely when piece measures 76-79-82-85-88-91 cm [30"-31"-32¼"-33½"-34⅝"-35¾"]. Right front piece: Cast on and work like left front piece, but mirrored. Remember buttonholes! Sleeve: Cast on 36-38-40-42-44-46 sts on needle size 7 mm [US 10 ½] with 1 thread Bomull-Lin. Work 10 rows garter st and continue in stockinette st, at the same time inc 16 sts evenly on first row = 52-54-56-58-60-62 sts. When piece measures 10 cm [4"] inc 1 st each side on every 3.5-2.5-2-1.5-1-1 cm [1¼"-⅞"-¾"-½"-⅜"-⅜"] a total of 5-6-7-9-10-11 times = 62-66-70-76-80-84 sts. At the same time work stripes – see above. When piece measures 28-27-26-26-24-23 cm [11"-10⅝"-10¼"-10¼"-9½"-9"] (less on the larger sizes because of longer sleeve cap and wider shoulder) dec to shape the sleeve cap each side on every other row: 2 sts 3 times, 1 st 0-2-3-4-5-7 times, then 2 sts each side until piece measures 34-35-35-36-36-37 cm [13⅜"-13¾"-13¾"-14¼"-14¼"-14½"]. Now bind off 3 sts each side 1 time and bind off remaining sts on next row. Sleeve measures approx 35-36-36-37-37-38 cm [13¾"-14¼"-14¼"-14½"-14½"-15"]. Assembly: Sew shoulder seams. Set in sleeves. Sew sleeve and side seams inside 1 edge st. Sew on buttons. |
|
 |
|
Have you finished this pattern?Tag your pictures with #dropspattern #gerda or submit them to the #dropsfan gallery. Do you need help with this pattern?You'll find 18 tutorial videos, a Comments/Questions area and more by visiting the pattern on garnstudio.com. © 1982-2026 DROPS Design A/S. We reserve all rights. This document, including all its sub-sections, has copyrights. Read more about what you can do with our patterns at the bottom of each pattern on our site. |


With over 40 years in knitting and crochet design, DROPS Design offers one of the most extensive collections of free patterns on the internet - translated to 17 languages. As of today we count 325 catalogs and 12298 patterns - 12288 of which are translated into English (US/in).
We work hard to bring you the best knitting and crochet have to offer, inspiration and advice as well as great quality yarns at incredible prices! Would you like to use our patterns for other than personal use? You can read what you are allowed to do in the Copyright text at the bottom of all our patterns. Happy crafting!
Post a comment to pattern DROPS 107-6
We would love to hear what you have to say about this pattern!
If you want to leave a question, please make sure you select the correct category in the form below, to speed up the answering process. Required fields are marked *.