
Popular categories
Looking for a yarn?


Comments / Questions (55)
![]() Anne-Letizia Rebeaud wrote:
Anne-Letizia Rebeaud wrote:
Bonjour, merci pour votre réponse, il y a encore un point obscur pour moi : " 1 m au début des 4-8-10-12-18-20 rangs suivants (4-5-6-8-9-10 x 1 m de chaque côté). Si je prends la taille M, je rabats 1 maille au début des 8 rangs suivants, de chaque côté? du coup 16 mailles en tout? Or il est dit qu'on a 5 mailles de chaque côté, donc 10? Merci bcp, bonnes fêtes
22.12.2025 - 10:59DROPS Design answered:
Bonjour Mme Rebeaut, vous rabattez en taille M pour les manches: 3 m au début des 2 rangs suivants (1 x 3 m de chaque côté) + 2 m au début des 6 rangs suivants (3x 2 m de chaque côté), puis 1 m au début des 8 rangs suivants (4x 1 m de chaque côté) = vous aurez alors rabattu3+6+4=13 m de chaque côté (26 m au total), puis 2 m au début de chaque rang de chaque côté jusqu'à 40 cm de hauteur totale (veillez juste à bien rabattre le même nombre de fois de chaque côté) et 1 x 3 m de chaque côté. Bon tricot!
23.12.2025 - 17:29
![]() Anne-Letizia Rebeaud wrote:
Anne-Letizia Rebeaud wrote:
Bonjour, Mes manches sont ratées, il manque environ 5 cm par rapport à l'emmenchure. J'avoue que je n'ai pas compris cette instruction : "rabattre de chaque côté tous les 2 rangs : 1 fois 3 m, 3 fois 2 m, 2-4-5-6-9-10 fois 1 m puis 2 m jusqu'à ce que la manche mesure 40 cm de hauteur totale, puis 1 fois 3 m. rabattre les mailles restantes. La manche mesure environ 41 cm de hauteur totale." et c'est peut-être ce qui m'a induite en erreur. Pouvez-vous m'aider? Merc, ALR
06.12.2025 - 12:18DROPS Design answered:
Bonjour Mme Rebeaud, pour former la tête de manche, procédez ainsi: rabattez 3 m au début des 2 rangs suivants (1 x 3 m de chaque côté), puis 2 m au début des 6 rangs suivants (3x2 m de chaque côté), puis 1 m au début des 4-8-10-12-18-20 rangs suivants (4-5-6-8-9-10 x 1 m de chaque côté), puis vous rabattez 2 mailles au début de chaque rang de chaque côté jusqu'à ce que la manche mesure 40 cm de hauteur totale (attention à bien rabattre autant de fois 2 m de chaque côté), puis vous rabattez 3 m au début des 2 rangs suivants, la tête de manche doit mesurer entre 8 et 14 cm selon la taille (cf schéma); rabattez les mailles restantes. Bon tricot!
08.12.2025 - 08:31
![]() AL Rebeaud wrote:
AL Rebeaud wrote:
Bonjour, je ne comprends pas comment finir le dos. En taille M, il est dit : à 59 cm, faire 8 rangs en mousse etc. Puis continuer jusqu'à 62 cm pour les épaules. Oui mais moi, après 8 rangs, je suis déjà à 62 cm!
13.11.2025 - 16:25DROPS Design answered:
Bonjour Mme Rebeaud, c'est donc juste ainsi: vous rabattez maintenant les 20 mailles centrales pour l'encolure et vous terminez chaque épaule séparément; vous avez ainsi une bordure point mousse au niveau de l'encolure dos, et vous continuez les épaules avec une bordure de 8 m point mousse côté encolure. Bon tricot!
14.11.2025 - 08:02
![]() Loretta wrote:
Loretta wrote:
Thank you for all the lovely patterns written for Drops Lin yarn. I have used your yarn converter, but I want to double check calculations to be sure I have enough Drops Belle on hand. I cannot find how many metres of Drops Lin were in 50g or 100g because Drops Lin is NOT listed in your Discontinued Yarns chart. Could you please tell me how many metres of Drops Lin were supplied per the weight of the original ball? Thank you.
18.09.2025 - 06:46DROPS Design answered:
Hi Loretta, DROPS Lin is similar to DROPS Belle, has 120 m in 50 g. It is a good alternative. Happy knitting!
18.09.2025 - 22:14
![]() Elodie wrote:
Elodie wrote:
Merci! Autant pour moi, désolée de vous avoir sollicités, je n’y voyais plus clair . Merci encore
26.02.2025 - 10:43
![]() Elodie wrote:
Elodie wrote:
Bonjour, je suis en train de réaliser le devant gauche, mais, soit je comprends mal, soit il y a une erreur dans le nombre de mailles restant. Il est écrit qu’il doit en rester 28, et avec le nombre de diminutions à réaliser, il m’en reste 26. Pourriez vous m’éclairer, ce serait vraiment gentil. Merci d’avance.
25.02.2025 - 17:01DROPS Design answered:
Bonjour Elodie, en taille M-L vous commencez par 59-63 m, puis vous diminuez 8 m sur le côté (8 x 1 m), puis vous diminuez pour l'encolure 14-15 m (soit 5+5+4 en M - 6+5+4 en L) et vous rabattez pour l'emmanchure 9-12 m (soit 4+(1x2 m) + (3x1m) en M - 4+(2x2m) + (4x1m) en L), il vous reste, en M: 59-8-14-9= 28 m en M et 63-8-15-12=28 m en L. Bon tricot!
26.02.2025 - 08:02
![]() Angelika Stömer wrote:
Angelika Stömer wrote:
Ich habe diese Jacke in Größe XXXL in Arbeit und bin nun beim ersten Ärmel. Statt 3/4 Länge würde ich gern normal lange Ärmel stricken. Wie viel länger muss ich stricken und wie teile ich die Maschenzunahme auf? Ich freue mich auf eure Antwort. Schöne Grüße, Angelika
30.11.2024 - 18:57DROPS Design answered:
Liebe Frau Störmer, am besten lassen Sie sich von einer ähnlichen Jacke inspirieren, die die richtigen Ärmellänge sowie dieselbe Maschen bietet. Viel Spaß beim Stricken!
02.12.2024 - 09:17
![]() Sabrina wrote:
Sabrina wrote:
Bonjour, Pour les diminutions, il est précisé "diminutions (encolure)" et de les faire à 8 mailles des bords. Pour les dimunutions en bas du dos et des devants, faut-il aussi les faire à 8 mailles des bords ? Merci pour vos modèles et vos explications
29.06.2024 - 19:05DROPS Design answered:
Bonjour Sabrina, les diminutions des côtés peuvent être faites à 1 maille des bords (après la maille lisière en début de rang et avant la maille lisière en fin de rang). Bon tricot!
01.07.2024 - 08:41
![]() Judy Caudill wrote:
Judy Caudill wrote:
Thanks, I never thought of grafting.
24.10.2021 - 20:28
![]() Judy Caudill wrote:
Judy Caudill wrote:
I guess I didn't give the right terminology in my question of Oct. 22, 2021 regarding the colleta sweater. I completely knit one front and realized the bottom trim had some mistakes so I ripped the trim out and knit it again, but from the top of the trim down the 8 rows of garter stitches. It didn't look right so I wondered if there is a better or correct way to do this. This is the trim that goes around the hips not the front bands that have the buttons and button holes. Thanks
24.10.2021 - 06:14DROPS Design answered:
Dear Judy, when you work something separately, you need to knit it without picking up the stitches, apart from the rest, while also having open the stitches in the front, for example in an auxiliary needle. Then, you'd need to join both parts with grafting. You can check this in the following video: https://www.bing.com/videos/search?q=grafting+knitting&view=detail&mid=BA4091A006DE7C9167D8BA4091A006DE7C9167D8&FORM=VIRE
24.10.2021 - 12:13
|
|
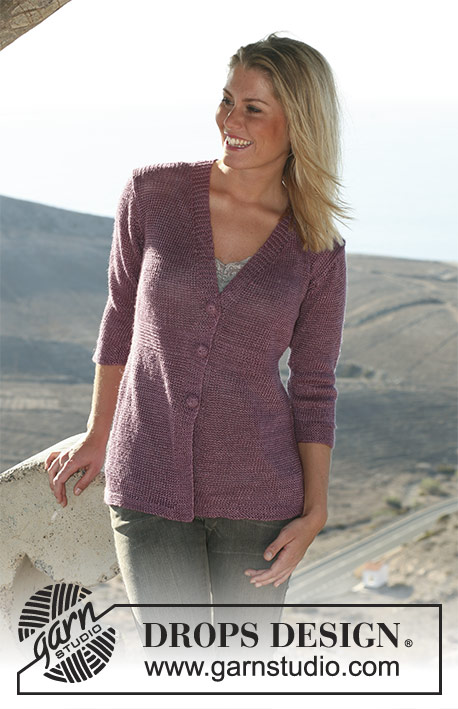
Coletta |
|
 |
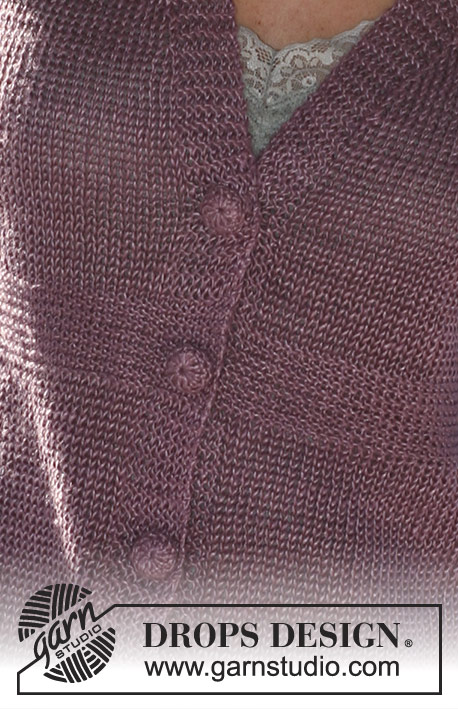 |
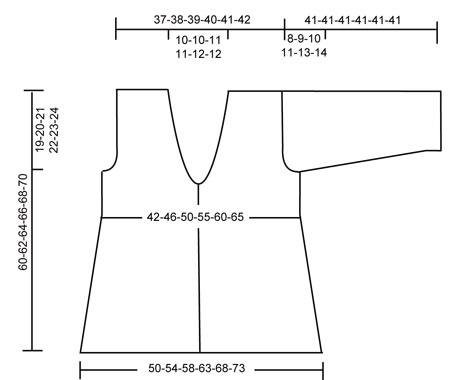
DROPS jacket with ¾ sleeves and crochet button covers in “Lin”. Size S – XXXL
DROPS 105-39 |
|
|
Garter st, back and forth on needle: K all rows Decreasing tip (applies to neckline): Dec inside 8 garter sts. Make all dec from RS! Dec as follows after 8 garter sts: slip 1 st as if to knit, K1, psso Dec as follows before 8 garter sts: K2 tog. Buttonholes: Make buttonholes on right front piece. 1 buttonhole = bind off fourth and fifth st from mid front, cast on 2 new sts on return row. Make buttonholes when piece measures: Size S: 6.75", 9.75" and 13". Size M: 7", 10.2" and 13.4". Size L: 7½", 10.6" and 13.75". Size XL: 8", 11" and 14.2". Size XXL: 8.2", 11.4" and 14½". Size XXXL: 8.75", 11.75" and 15". Back piece: Loosely cast on 102-110-118-128-138-148 sts (includes 1 edge st each side) on needle size 4 mm [US 6]. Work 8 rows garter st and continue in stocking st. Remember the knitting gauge! When piece measures 1½"-1½"-2"-2"-2.4"-2.4" dec 1 st each side on every 1" a total of 8 times = 86-94-102-112-122-132 sts. When piece measures 10.2"-10.2"-10.6"-11"-11.4"-11.7", work 1½" in garter st and then continue in stockinette st. When piece measures 16.1"-16½"-17"-17.2"-17.7"-18" bind off for armhole each side on every other row: 4 sts 1-1-1-2-2-2 times, 2 sts 0-1-2-2-4-6 times and 1 st 2-3-4-4-4-4 times = 74-76-78-80-82-84 sts. When piece measures 22½"-23.2"-24"-24.7"-25½"-26.4" work 8 rows garter st on the middle 36-36-38-38-40-40 sts with remaining sts in stockinette st. Now bind off the middle 20-20-22-22-24-24 sts for neck = 27-28-28-29-29-30 sts left on each shoulder. Continue in stocking st with 8 garter sts towards neckline until piece measures 23.6"-24.4"-25.2"-26"-26.7"-27½". Bind off loosely. Left front piece: Cast on 55-59-63-68-73-78 sts (includes 1 edge st at side and 8 front band sts towards mid front) on needle size 4 mm [US 6]. Work 8 rows garter st and continue in stocking st with 8 front band sts in garter st. Dec at side as described for back piece. When piece measures 10.2"-10.2"-10.6"-11"-11.4"-11.7", work 1½" in garter st on all sts and then continue in stocking st with front band sts in garter st as before. When piece measures 13.7"-14.2"-14½"-15"-15.2"-15.7" dec to shape the neckline – see Decreasing tip – as follows: 1 st on every other row 5-5-6-6-7-7 times, 1 st on every 4th row 5 times and 1 st on every 6th row 4 times. At the same time when piece measures 16.1"-16½"-17"-17.2"-17.7"-18" bind off for armhole as described for back piece. After all dec for neckline and armhole are complete there are 27-28-28-29-29-30 sts left on shoulder. Bind off loosely when piece measures 23.6"-24.4"-25.2"-26"-26.7"-27½". Right front piece: Cast on and work like left front piece, but mirrored. Remember buttonholes! Sleeve: Loosely cast on 50-52-54-56-60-62 sts (includes 1 edge st each side) on needle size 4 mm [US 6]. Work 8 rows garter st and continue in stockinette st. At the same time when piece measures 1½"-2"-2.4"-2.4"-2"-1½" cm inc 1 st each side on every 1"-0.9"-0.7"-0.6"-0.6"-0.6" a total of 10-11-12-14-14-15 times = 70-74-78-84-88-92 sts. When piece measures 13"-12½"-12.2"-11.7"-11"-10.6" (less on the larger sizes because of larger sleeve cap) dec to shape the sleeve cap each side on every other row: 3 sts 1 time, 2 sts 3 times, 1 st 2-4-5-6-9-10 times, then 2 sts each side until piece measures 15.7", dec 3 sts each side 1 time and bind off remaining sts. Sleeve measures approx 16". Assembly: Sew shoulder seams. Set in sleeves and sew side and sleeve seams inside 1 edge st. Button covers: Crochet 3 covers with crochet hook size 3 mm [US C] as follows: 2 ch, then 12 dc in the first ch, finish with 1 sl st at the top of first dc (= round 1) Round 2: 1 sc in each dc and finish with 1 sl st in first sc from beg of round. Round 3: 1 dc (replace first dc with 3 ch) in every other sc and finish with 1 sl st in first dc from beg of round. Put buttons inside cover, sew round the edge of cover and tighten thread. Sew on buttons to fit buttonholes. |
|
 |
|
Have you finished this pattern?Tag your pictures with #dropspattern or submit them to the #dropsfan gallery. Do you need help with this pattern?You'll find 20 tutorial videos, a Comments/Questions area and more by visiting the pattern on garnstudio.com. © 1982-2026 DROPS Design A/S. We reserve all rights. This document, including all its sub-sections, has copyrights. Read more about what you can do with our patterns at the bottom of each pattern on our site. |
|


With over 40 years in knitting and crochet design, DROPS Design offers one of the most extensive collections of free patterns on the internet - translated to 17 languages. As of today we count 324 catalogs and 12290 patterns - 12280 of which are translated into English (US/in).
We work hard to bring you the best knitting and crochet have to offer, inspiration and advice as well as great quality yarns at incredible prices! Would you like to use our patterns for other than personal use? You can read what you are allowed to do in the Copyright text at the bottom of all our patterns. Happy crafting!
Post a comment to pattern DROPS 105-39
We would love to hear what you have to say about this pattern!
If you want to leave a question, please make sure you select the correct category in the form below, to speed up the answering process. Required fields are marked *.