Mare del Nord

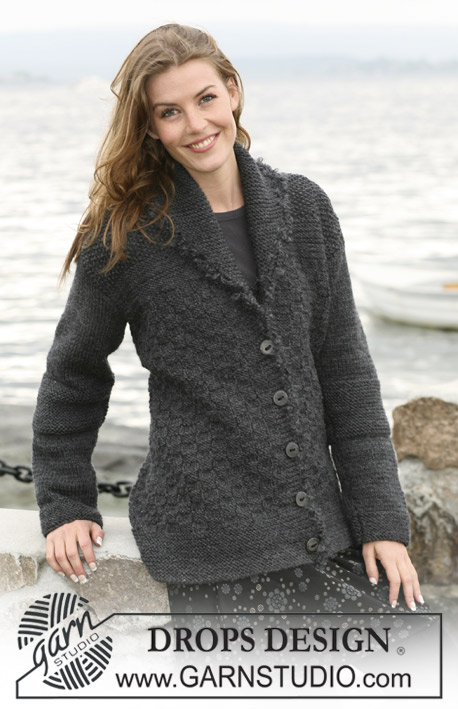
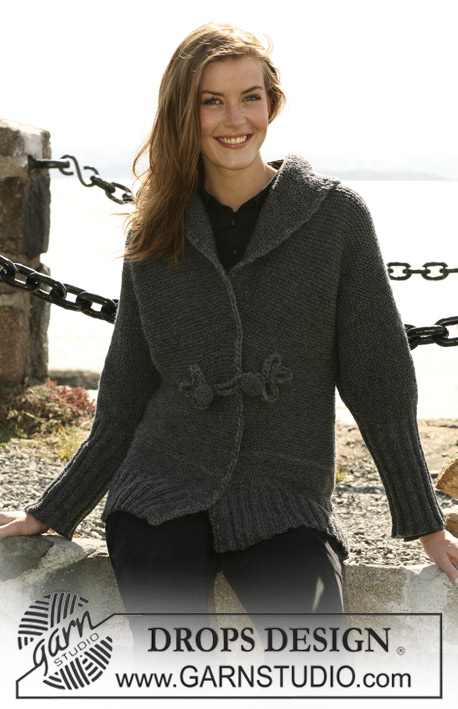
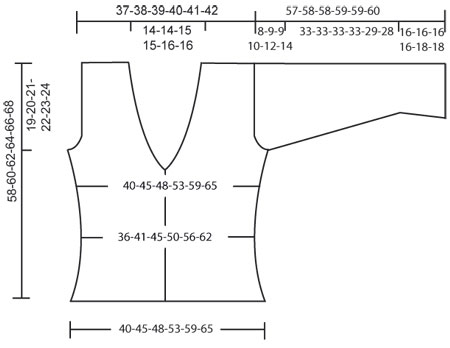
DROPS jacket in Silke-Alpaca or Nepal with shawl collar and ornamental buttons. Size: S to XXXL.

DROPS 104-36
Size: S - M - L - XL - XXL - XXXL
Finished measurements at chest: 31½”-35½”-37 ¾”-41 ¾”-46½”-51”
Full length: 22 ¾”-23 5/8”-24 3/8”-25 ¼”-26”-26 3/4”

Materials:DROPS Silke-Alpaca from Garnstudio
650-700-800-850-950-1050 g color no 8903, black

Or use: DROPS Nepal from Garnstudio
550-600-650-700-800-850 g colour no 8903, black

DROPS needles size 4.5 mm [US 7] – or the needle size needed to obtain correct knitting gauge.

DROPS Button Variety: 9 pcs
5 buttons with a diameter of 20 mm [3/4”], these are used for buttoning the jacket.
4 buttons in various sizes, these buttons are for decoration

-------------------------------------------------------

Alternative Yarn – See how to change yarns here
Yarn Groups A to F – Use the same pattern and change the yarn here
Yarn usage using an alternative yarn – Use our yarn converter here

-------------------------------------------------------

DROPS Super Sale

SAVE 30% on 6 cotton favorites!
Valid until 04.12.2024

Pattern instructions

NOTE: This pattern is written in American English. All measurements in charts are in cm. For conversion from inches to cm - click here. There are different terms for crocheting in American and British English. If this pattern includes crochet, click for "crochet terms" here. For this pattern in British English, please click here.
Knitting gauge: 17 sts x 22 rows stockinette sts = 10 x 10 cm [4’’ x 4’’]

Garter st: Knit all rows.

Decreasing tip: Dec for neck within front edge and 6 sts (3 K/ 3 P).
Dec as follows before front edge + 6 sts: K2 tog
Dec as follows after front edge + 6 sts: Slip 1 sts as if to knit, K1, psso.

Buttonholes: Bind off for buttonhole on right front band. 1 buttonhole = bind off 4th-4th-4th-5th-5th-5th front band sts from edge and cast on 1 new sts over the bound off sts on next row.
Bind off for buttonhole when piece measures:
Size S: 4, 11, 18, 25 and 32 cm [1½”-4 3/8”-7”-9 ¾” and 12½”].
Size M: 5, 12, 19, 26 and 33 cm [2”-4 ¾”-7½”-10 ¼” and 13”].
Size L: 6, 13, 20, 27 and 34 cm [2 3/8”-5 1/8”-8”-10 5/8” and 13 3/8”].
Size XL+XXL+XXXL: 7, 14, 21, 28 and 35 cm [2 ¾”-5½”-8 ¼”-11” and 13 ¾”].
NOTE: bind off for last buttonhole after inc for collar / dec for neck.


Back piece: Cast on 77-89-95-101-113-125 sts (includes 1 edge sts on each side) on needles size 4.5 mm [US 7] with Silke-Alpaca. P1 row from WS. Continue in Rib as follows (= from RS): 1 edge st, * K3, P3 * repeat from *-* and finish off with 3 K and 1 edge st. When piece measures approx 3-3-3-4-4-4 cm [1 1/8”-1 1/8”-1 1/8”-1½”-1½”-1½”] continue in stockinette sts until complete measurement. Remember knitting gauge! At the same time on 1st row stockinette sts dec 7-11-11-9-11-13 sts evenly = 70-78-84-92-102-112 sts. When piece measures 6-6-6-8-8-8 cm [2 3/8”-2 3/8”-2 3/8”-3 1/8”-3 1/8”-3 1/8”] bind off 1 st on each side every 4 cm [1½’’] 3-3-3-2-2-2 times in total = 64-72-78-88-98-108 sts. Continue until piece measures 20 cm [8’’]. Now inc 1 sts on each side on every 5 -6 -7 -12 -13 -14 cm [2”-2 3/8”-2 ¾”-4 ¾”-5 1/8”-5½”] 3-3-3-2-2-2 times in total = 70-78-84-92-102-112 sts. When piece measures 39-40-41-42-43-44 cm [15 ¼”-15 ¾”-16 1/8”-16½”-17”-17 ¼”] bind off 3 sts on each side for armhole. Then bind off to shape armhole on every other row as follows: 3 sts 0-0-0-0-1-1 times, 2 sts 0-1-2-4-4-6 times and 1 sts 1-2-2-1-2-2 times = 62-64-66-68-70-72 sts. When piece measures 56-58-60-62-64-66 cm [22”-22 ¾”-23 5/8”-24 3/8”-25 ¼”-26”] bind off middle 22-22-24-24-26-26 sts for neckline. Continuing bind off 1 sts off on each side at neckline= 19-20-20-21-21-22 sts on each shoulder. Knit until piece measures 58-60-62-64-66-68 cm [22 ¾”-23 5/8”-24 3/8”-25 ¼”-26”-26 3/4”]. Bind off loosely.

Left front piece: Cast on 49-55-55-63-69-75 sts (includes 1 edge st on side and 6-6-6-8-8-8 edge sts mid front) on needle size 4.5 mm [US 7] with Silke-Alpaca. P1 row from WS. Continue in Rib as follows (= from RS): 1 edge sts, * P3, K3 *, repeat from *-* and finish with 6-6-6-8-8-8 front edge sts in garter sts – see explanation above – until completed measurement. When piece measures approx 3-3-3-4-4-4 cm [1 1/8”-1 1/8”-1 1/8”-1½”-1½”-1½”] continue in stockinette sts until complete measurement. But front edge and 6 sts before front edge (= 3 K and 3 P) continues as earlier to complete measurement. At the same time dec 5-7-5-7-7-9 sts on first row evenly = 44-48-50-56-62-66 sts (not in the 12-12-12-14-14-14 sts towards mid front). When piece measures 6-6-6-8-8-8 cm [2 3/8”-2 3/8”-2 3/8”-3 1/8”-3 1/8”-3 1/8”] bind off on side like back piece = 41-45-47-54-60-64 sts.
Read entire section before knitting commences!
When piece measures 20 cm [8’’] inc in side like back piece. At the same time when piece measures 27-28-29-30-30-30 cm [10 5/8”-11”-11 3/8”-11 ¾”-11 ¾”-11 ¾”] inc 1 st within 6-6-6-8-8-8 front edge sts for collar on every other row 24-24-26-26-28-28 times in total. Continuing, knit new sts in garter st like front band. At the same time when piece measures 29-30-31-32-32-32 cm [11 3/8”-11 ¾”-12 ¼”-12½”-12½”-12½”] dec 1 st for neck – read Decreasing tip – within front edge and 6 sts (3 K and 3 P) towards mid front: On every other row 17-15-14-15-17-14 times and on every 4th row 4-6-7-8-8-10 times. At the same time when piece measures 39-40-41-42-43-44 cm [15 ¼”-15 ¾”-16 1/8”-16½”-17”-17 ¼”] bind off for armhole like back piece. When decreases/increases are completed there are 43-44-46-47-49-50 sts on row. Continue until piece measures 58-60-62-64-66-68 cm [22 ¾”-23 5/8”-24 3/8”-25 ¼”-26”-26 3/4”]. Now bind off outermost 19-20-20-21-21-22 sts for shoulder = 24-24-26-26-28-28 sts left on needle for collar. Insert 1 marking thread or stitch marker. Continue knitting garter sts on collar as follows: * 2 rows garter sts over all sts, 2 rows garter sts over outermost 14 sts towards mid front *, repeat from *-* for collar measures approx 7-7-7.5-7.5-8-8 cm [2 ¾”-2 ¾”-2 7/8”-2 7/8”-3 1/8”-3 1/8”] from marking thread or stitch marker on shortest side. Bind off loosely.

Right front piece: Knit like left but reversed. Additionally, bind off for buttonholes – see explanation above.

Sleeve: Cast on 51-51-58-58-58-58 sts (includes 1 edge st on each side) on needles size 4.5 mm [US 7] with Silke-Alpaca. Knit 1 row garter st from WS. Now knit Rib 3 K/ 4 P with 1 edge st on each side. Knit 2 rows Rib then dec 1 st in each P part = 44-44-50-50-50-50 sts. And continue knitting Rib K3/ P3 with P 1 edge sts on each side. When piece measures 13-13-13-13-15-15 cm [5 1/8-5 1/8-5 1/8-5 1/8-6”-6”] knit 3 cm [1 1/8”] garter sts – see explanation above. Continue with stockinette sts until piece is completed. At the same time when piece measures 19-19-19-19-21-21 cm [7½”-7½”-7½”-7½”-8 ¼”-8 ¼”] inc 1 st on each side on every 4.5 -3 -3.5 - 3 -2 -1.5 cm [1 ¾”-1 1/8”-1 ¼”-1 1/8”-3/4”-½”] 7-10-8-10-12-14 times in total = -58-64-66-70-74-78 sts. When piece measures 49-49-49-49-47-46 cm [19 ¼”-19 ¼”-19 ¼”-19 ¼”-18½”-18”] bind off 3 sts on each side to shape sleeve cap. Continuing bind off on every other row as follows: 2 sts 3-4-4-5-4-3 times and 1 sts 1-1-0-0-3-6 times. Continuing, bind off 2 sts on each side until piece measures 56-57-57-58-58-59 cm [22”-22½”-22½”-22 ¾”-22 ¾”-23 ¼”]. Now bind off 3 sts on each side. Piece measures approx 57-58-58-59-59-60 cm [22½”-22 ¾”-22 ¾”-23 ¼” -23 ¼”-23 5/8’’]. Bind off remaining sts.

Assembly: Sew shoulder seams. Because front edge on front piece continues all the way up to shoulder, front and back pieces will not be the same in structure when sewing tog shoulder seams. Sew in sleeves. Sew sleeve and side seams in one within 1 edge st. Sew collar tog neck back and sew back and front piece.
Sew in buttons. Sew 20 mm diameter buttons on left front band so they fit buttonholes. Sew in decorative buttons in between buttonholes on right front band.

Diagram

All measurements in charts are in cm.

diagram measurements
Do you have a question? See a list of frequently asked questions (FAQ)

Knitting tension is what determines the final measurements of your work, and is usually measured per 10 x 10 cm. It is provided like so: number of stitches in width x number of rows in height - eg: 19 stitches x 26 rows = 10 x 10 cm.

The knitting tension is very individual; some people knit/crochet loosely while others work tightly. You adjust the knitting tension with the needle size, which is why the suggested needle size only serve as a guide! You need to adjust this (up or down) to ensure that YOUR knitting tension matches the knitting tension provided in the pattern. If you work with a different knitting tension than provided you will have a different yarn consumption, and your work will have different measurements than what the pattern suggests.

The knitting tension also determines which yarns can replace each other. As long as you achieve the same knitting tension you can replace one yarn with another.

See DROPS lesson: How to measure your tension/gauge

See DROPS video: How to make a gauge tension swatch

The required amount of yarn is provided in grams, eg: 450 g. To calculate how many balls you’ll need you first need to know how many grams are in 1 ball (25g, 50g or 100g). This information is available if you click on the individual yarn quality on our pages. Divide the amount required with the amount of each ball. For example, if each ball is 50g (the most common amount), the calculation will be as follows: 450 / 50 = 9 balls.

The important thing when changing from one yarn to another is that the knitting/crochet tension remains the same. This is so that the measurements of the finished piece will be the same as on the sketch provided. It is easier to achieve the same knitting tension using yarns from the same yarn group. It is also possible to work with multiple strands of a thinner yarn to achieve the knitting tension of a thicker one. Please try our yarn converter. We recommend you to always work a test swatch.

Please NOTE: when changing yarn the garment might have a different look and feel to the garment in the photo, due to individual properties and qualities of each yarn.

See DROPS lesson: Can I use a different yarn than the one mentioned in the pattern?

All our yarns are categorised into yarn groups (from A to F) according to thickness and knitting tension – group A contains the thinnest yarns and group F the thickest. This makes it easier for you to find alternative yarns to our patterns, should you wish to switch yarn. All yarns within the same group have a similar knitting tension and can easily replace each other. However, different yarn qualities have different structures and properties which will give the finished work a unique look and feel.

Click here for an overview of the yarns in each yarn group

At the top of all our patterns you’ll find a link to our yarn converter, which is a helpful tool should you wish to use a different yarn than suggested. By filling in the yarn quality you wish to replace, the amount (in your size) and number of strands, the converter will present good alternative yarns with the same knitting tension. Additionally it will tell you how much you’ll require in the new qualities and whether you’ll need to work with multiple strands. Most skeins are 50g (some are 25g or 100g).

If the pattern is worked with multiple colours, every colour will have to be converted separately. Similarly, if the pattern is worked with several strands of different yarns (for example 1 strand Alpaca and 1 strand Kid-Silk) you will have to find alternatives for each, individually.

Click here to see our yarn converter

Since different yarns have different qualities and textures we have chosen to keep the original yarn in our patterns. However, you can easily find options among our available qualities by using our yarn converter, or simply pick a yarn from the same yarn group.

It is possible that some retailers still have discontinued yarns in stock, or that someone has a few skeins at home that they would like to find patterns for.

The yarn converter will provide both alternative yarn as well as required amount in the new quality.

If you think it's hard to decide what size to make, it can be a good idea to measure a garment you own already and like the size of. Then you can pick the size by comparing those measures with the ones available in the pattern's size chart.

You'll find the size chart at the bottom of the pattern.

See DROPS lesson: How to read size chart

The needle size provided in the pattern serves only as a guide, the important thing is to follow the knitting tension. And since knitting tension is very individual, you will have to adjust the needle size to ensure that YOUR tension is the same as in the pattern – maybe you’ll have to adjust 1, or even 2 needle sizes, up or down to achieve the correct tension. For this, we recommend that you work test swatches.

Should you work with a different knitting tension than the one provided, the measurements of the finished garment might deviate from the measurement sketch.

See DROPS lesson: How to measure your tension/gauge

See DROPS video: How to make a gauge tension swatch

Working a garment top-down provides more flexibility and room for personal adjustment. For example it is easier to try the garment on while working, as well as making adjustments to length of yoke and shoulder caps.

The instructions are carefully explaining every step, in the correct order. Diagrams are adjusted to the knitting direction and are worked as usual.

The diagram depicts all rows/rounds, and every stitch seen from the right side. It is read from bottom to top, from right to left. 1 square = 1 stitch.

When working back and forth, every other row is worked from the right side and every other row is worked from the wrong side. When working from the wrong side, the diagram will have to be worked reversed: from left to right, knit stitches are purled, purl stitches are knit etc.

When working in the round every round is worked from the right side and the diagram are worked from right to left on all rounds.

See DROPS lesson: How to read knitting diagrams

The diagram depicts all rows/rounds, and every stitch seen from the right side. It is worked from bottom to top, from right to left.

When working back and forth every other row is worked from the right side: from right to left and every other row is worked from the wrong side: from left to right.

When working in the round, every row in the diagram are worked from the right side, from right to left.

When working a circular diagram you start in the middle and work your way outwards, counter clockwise, row by row.

The rows usually start with a given number of chain stitches (equivalent to the height of the following stitch), this will either be depicted in the diagram or explained in the pattern.

See DROPS lesson: How to read crochet diagrams

Instructions for working several diagrams after each other on the same row/round, will often be written like so: “work A.1, A.2, A.3 a total of 0-0-2-3-4 times". This means you work A.1 once, then A.2 is worked once, and A.3 is repeated (in width) the number of times provided for your size – in this case like so: S = 0 times, M = 0 times, L=2 times, XL= 3 times and XXL = 4 times.

The diagrams are worked as usual: begin with the first row in A.1, then work the first row in A.2 etc.

See DROPS lesson: How to read knitting diagrams

See DROPS lesson: How to read crochet diagrams

The total width of the garment (from wrist-to-wrist) will be larger in the larger sizes, despite the actual sleeves being shorter. The larger sizes have longer sleeve caps and wider shoulders, so there will be a good fit in all sizes.

The measurement sketch/schematic drawing provides information regarding the full length of the garment. If it’s a jumper or a jacket the length is measured from the highest point on the shoulder (usually closest to the neckline), and straight down to the bottom of the garment. It is NOT measured from the tip of shoulder. Similarly, the length of yoke is measured from the highest point on the shoulder and down to where yoke is split into body and sleeves.

See DROPS lesson: How to read a schematic drawing

Diagrams are often repeated on the round or in height. 1 repeat is the diagram the way it appears in the pattern. If it says to work 5 repeats of A.1 in the round, then you work A.1 a total of 5 times after/next to each other in the round. If it says to work 2 repeats of A.1 vertically/in height you work the entire diagram once, then begin again at the start and work the entire diagram one more time.

Chain stitches are slightly narrower than other stitches and to avoid working the cast-on edge too tight, we simply chain more stitches to begin with. The stitch count will be adjusted on the following row to fit the pattern and measurement sketch.

The rib edge is more elastic and will contract slightly compared to, for example, stocking stitch. By increasing before the rib edge, you avoid a visible difference in width between the rib edge and the rest of the body.

It’s very easy to cast off too tightly, and by making yarn overs while casting off (and simultaneously casting these off) you avoid a too tight cast off edge.

See DROPS video: How to bind off with yarn overs (yo)

To achieve an even increase (or decrease) you can increase on, for example: every 3rd and 4th row alternately, like so: work 2 rows and increase on the 3rd row, work 3 rows and increase on the 4th. Repeat this until the increase is complete.

See DROPS lesson: Increase or decrease 1 st on every 3rd and 4th row alternately

Should you prefer to work in the round instead of back and forth, you may of course adjust the pattern. You’ll need to add steeks mid-front (usually 5 stitches), and follow the instructions. When you would normally turn and work from the wrong side, simply work across the steek and continue in the round. At the end you’ll cut the piece open, pick up stitches to work bands, and cover the cut edges.

See DROPS video: How to knit steeks and cut open

Should you prefer to work back and forth instead of in the round, you may of course adjust the pattern so you work the pieces separately and then assemble them at the end. Divide the stitches for the body in 2, add 1 edge stitch in each side (for sewing) and work the front and back pieces separately.

See DROPS lesson: Can I adapt a pattern for circular needles into straight needles?

Pattern repeats can vary slightly in the different sizes, in order to get the correct proportions. If you’re not working the exact same size as the garment in the photo, yours might deviate slightly. This has been carefully developed and adjusted so that the complete impression of the garment is the same in all sizes.

Make sure to follow instructions and diagrams for your size!

If you have found a pattern you like which is available in women’s size it’s not very difficult to convert it to men’s size. The biggest difference will be the length of sleeves and body. Start working on the women size that you think would fit across the chest. The additional length will be worked right before you cast off for the armhole/sleeve cap. If the pattern is worked top-down you can add the length right after the armhole or before the first decrease on sleeve.

Regarding additional yarn amount, this will depend on how much length you add, but it is better with a skein too many than too few.

All yarns will have excess fibres (from production) that might come off as lint or shedding. Brushed yarns (ie hairier yarns) have more of these loose, excess fibres, causing more shedding.

Shedding also depends on what is worn under or over the garment, and whether this pulls at the yarn fibres. It’s therefore not possible to guarantee that there will be no shedding

Below are some tips on how to get the best result when working with hairier yarns:

1. When the garment is finished (before you wash it) shake it vigorously so the looser hairs come off. NOTE: do NOT use a lint roller, brush or any method that pulls at the yarn.

2. Place the garment in a plastic bag and put it in your freezer - the temperature will cause the fibres to become less attached to each other, and excess fibres will come off easier.

3. Leave in the freezer for a few hours before taking it out and shaking it again.

4. Wash the garment according to the instructions on the yarn label.

Pilling is a natural process that happens to even the most exclusive of fibers. It's a natural sign of wear and tear that is hard to avoid, and that is most visible in high friction areas of your garment like a sweater's arms and cuffs.

You can make your garment look as new by removing the pilling, using a fabric comb or a pill/lint remover.

Still can't find the answer you need? Then scroll down and leave your question so one of our experts can try to help you. This will be done normally within 5 to 10 working days.
In the meantime, you can read the questions and answers that others have left to this pattern or join the DROPS Workshop on Facebook to get help from fellow knitters/crocheters!

You might also like...

Post a comment to pattern DROPS 104-36

We would love to hear what you have to say about this pattern!

If you want to leave a question, please make sure you select the correct category in the form below, to speed up the answering process. Required fields are marked *.

Comments / Questions (34)

country flag Annette wrote:

Liebes Drops-Team, ich habe Schwierigkeiten mit den Ärmeln : 58 Machen für das Bündchen sind doch viel zu weit????

15.03.2019 - 17:00

DROPS Design answered:

Liebe Annette, nach 2 Reihen Bündchen werden Sie zu 50 M abnehmen, und Bünchen machen immer die Arbeit etwas enger in der Breite, so ist es richtig. Viel Spaß beim stricken!

18.03.2019 - 08:29

country flag Monica wrote:

Scusatemi, ho trovato il mio errore, non calcolavo le prime tre maglie di calo dello scalfo!!

28.12.2016 - 17:44

country flag Monica wrote:

Buongiorno, sto lavorando questo modello nella taglia M. Alla fine della lavorazione di metà davanti mi ritrovo 47 maglie e non 44 come indicato. Ho rifatto i conti fra diminuzioni e aumenti e non trovo l'errore. Mi potete aiutare? Grazie.

28.12.2016 - 17:27

country flag Katia Abdeladim wrote:

Bon, j'ai trouvé la réponse toute seule : il y a une erreur dans le texte en français pour le dos. Il faut diminuer pour l'emmanchure et non pour l'encolure !

24.06.2013 - 02:21

Katia Abdeladim wrote:

Bonjour, je ne comprends pas les explications pour les diminutions de l'encolure dos, surtout qu'il n'y a pas de photo. Est-ce que c'est un V ? Dans ce cas, on diminue à partir du milieu et on tricote chaque côté séparément ? Est-ce qu'on doit faire la bordure 3m end / 3 m. env.? Ce n'est pas clair. Merci.

24.06.2013 - 01:58

DROPS Design answered:

Bonjour Mme Abdeladim, comme vous l'avez remarqué à juste titre, il y avait une erreur, la correction a été faite, on diminue bien côté emmanchure après les 3 m de chaque côté, merci. Bon tricot!

24.06.2013 - 09:37

country flag Alicia García wrote:

I do not fully understand the explanation concerning the inc for the collar and the dec for the neck in front pieces. If you have some diagram, it would be excellent. Thank you very much. Best regards from Uruguay. Alicia García

09.01.2008 - 14:09

country flag Alicia Garcia wrote:

I do not fully understand the explanation concerning the inc for the collar and the dec for the neck in front pieces. If you have some diagram, it would be excellent. Thank you very much. Best regards from Uruguay. Alicia García

09.01.2008 - 14:08

country flag Stick O'holic wrote:

Jättesnygg tröja! Stilren men fortfanarnde speciell med knapparna! Den vill jag sticka, blir bara bättre av att silkesalpackan är så härlig.

19.11.2007 - 09:56

Eneida Favre wrote:

Adorei este casaco. Já fiz outros modelos postados por vocês e todos ficam muito lindos. Este também vai ficar. Obrigada.

11.11.2007 - 01:24

country flag DROPS Design wrote:

När du stickar 2 räta v över de yttersta 14 m så stickar du de 14 m, vänder och stickar dem tillbaka, vänd igen o sticka över alla m, vänd o sticka över alla m tillbaka igen...

09.10.2007 - 04:22