DROPS Alaska
DROPS Alaska
100% Wool
from 2.60 $ /50g
Get the yarn to make this pattern from 23.40$.

The yarn cost is calculated from the pattern’s smallest size and the yarn’s cheapest product type. Looking for an even better price? You might find it on the DROPS Deals!

DROPS SS24

Daphne

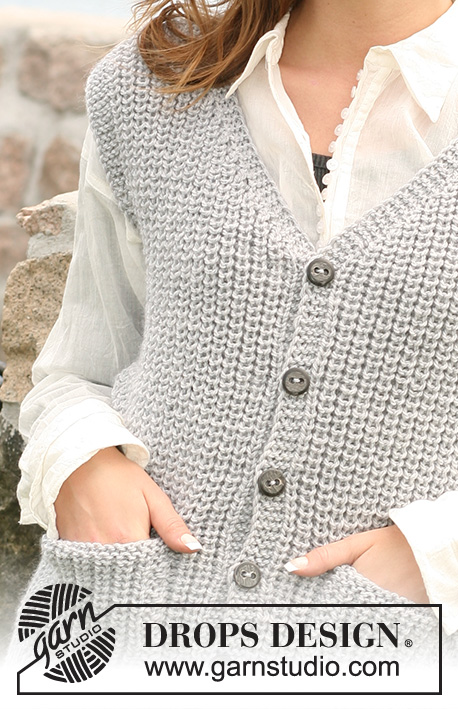
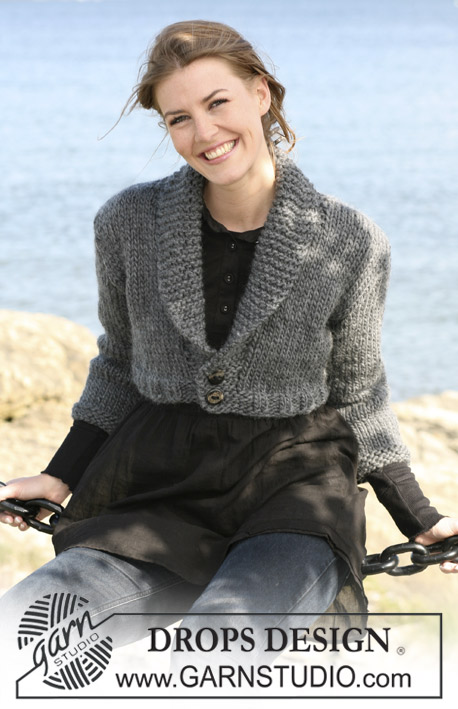
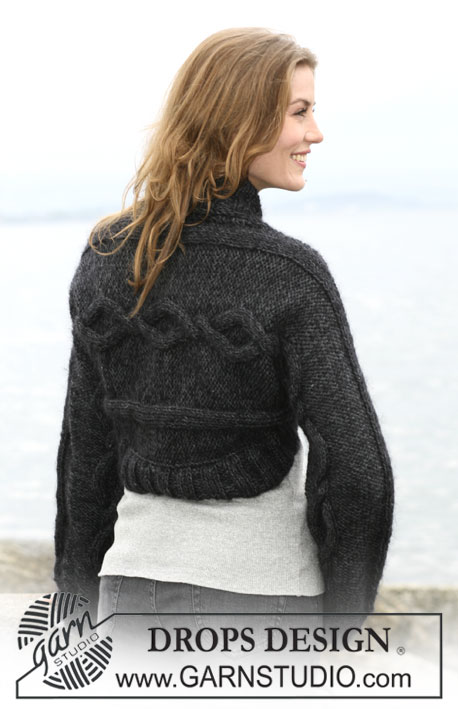
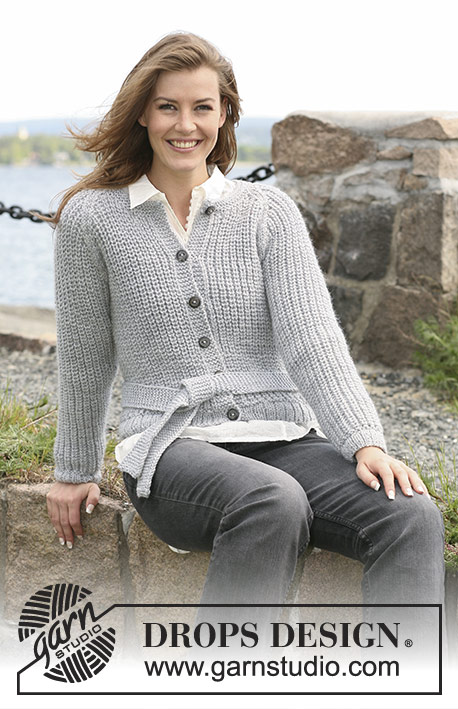
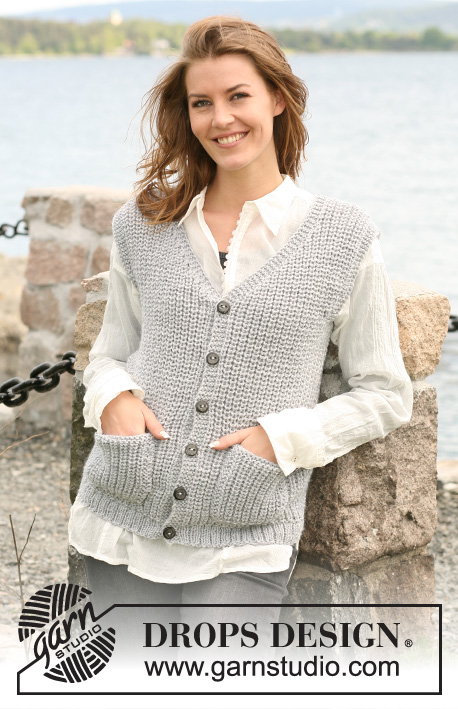
English rib DROPS waistcoat in ”Alaska” with wide shoulders and pockets. Size: S to XXXL

DROPS 104-34
Size: S - M - L - XL - XXL - XXXL
Finished measurements at chest: 33"-36 ¼"-40"-44"-48 ¾"-53½"
Full length: 22"-22 ¾"23⅝"-24⅜"-25 ¼"-26"]

Materials:DROPS Alaska from Garnstudio
450-450-500-550-600-700 g color no 03, light gray

DROPS needle size 5 mm [US 8] – or the needle size needed to obtain correct knitting gauge

DROPS buffalo horn button, no 535: 6-6-6-6-7-7 pcs

-------------------------------------------------------

Alternative Yarn – See how to change yarns here
Yarn Groups A to F – Use the same pattern and change the yarn here
Yarn usage using an alternative yarn – Use our yarn converter here

-------------------------------------------------------

DROPS Alaska
DROPS Alaska
100% Wool
from 2.60 $ /50g
Get the yarn to make this pattern from 23.40$.

The yarn cost is calculated from the pattern’s smallest size and the yarn’s cheapest product type. Looking for an even better price? You might find it on the DROPS Deals!

Pattern instructions

NOTE: This pattern is written in American English. All measurements in charts are in cm. For conversion from inches to cm - click here. There are different terms for crocheting in American and British English. If this pattern includes crochet, click for "crochet terms" here. For this pattern in British English, please click here.
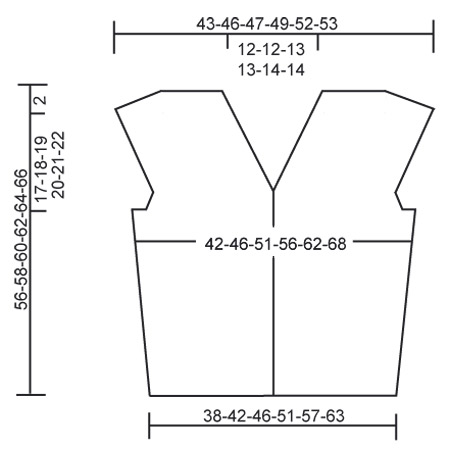
Knitting gauge: 16 sts x 27 rows English rib = 10 x 10 cm [4" x 4"]

English rib: Knit English rib as follows:
1st row (RS): * K1, P1 *, repeat from *-*.
2nd row back piece: *P1, yo, slip 1 st as if to K*, repeat from*-*.
2nd row front piece: *yo, slip 1 st as if to K, P1* repeat from*-*.
3rd row: *K1, P tog yo and loose st from last row*, repeat from *-*.
Continuing, repeat 2nd and 3rd rows.

Decreasing tip: Dec within 4 sts garter sts. All decreases are done from RS!
Dec as follows before and after 4 garter sts:
P2 sts tog. NOTE: Due to English rib it will sometimes be yo and lose sts from previous row that is bind off. Yo and lose sts are then countes as one.

Increasing tip 1: Inc 2 sts by casting on 2 new sts on end of row.
Increasing tip 2: Inc within 4 garter sts. All increases are done from RS! Yo 1 sts on needle for inc . On next row knit into back of yo to avoid hole (i.e.e knit into back of sts in stead of front part).
Buttonhole: Bind off for buttonhole on right front band. 1 buttonehole = bind off 3rd sts on front band. On next row cast on 1 new sts over bound off sts.
Bind off for buttonhole when piece measures:
Size S: 2, 9, 16, 23, 30 and 37 cm [3/4", 3½", 6 ¼", 9", 11 ¾" and 14½"].
Size M: 2, 10, 17, 24, 31 and 38 cm [3/4", 4", 6 ¾", 9½", 12 ¼" and 15"].
Size L: 2, 9, 17, 25, 33 and 40 cm [3/4", 3½", 6 ¾", 9 ¾", 13" and 15¾"].
Size XL: 2, 10, 18, 26, 34 and 41 cm [3/4", 4", 7", 10 ¼", 13 3/8 and 16⅛"].
Size XXL: 2, 8, 15, 22, 29, 36 and 43 cm [3/4", 3⅛", 6", 8 ¾", 11⅜", 14 ¼" and 17"].
Size XXXL: 2, 9, 16, 23, 30, 37 and 44 cm [3/4", 3½", 6 ¼", 9", 11 ¾", 14½" and 17 ¼"].

Back piece: Knit piece back and forth.
Cast on 78-84-93-102-114-126 sts (incl 1 edge sts on each side) on needles size 5 mm [US 8] with Alaska. Then knit as follows (1st row = RS): 1 edge st, * P1, K2 * repeat from *-* and finish off with 1 P and 1 edge st. Continue with K over K and P over P until piece measures 4-4-4-6-6-6 cm [1½"-1½"-1½"-2⅜"-2⅜"-2⅜"]. K2 rows at the same time dec on 1st row 15-15-18-19-21-23 sts evenly = 63-69-75-83-93-103 sts. Continue with English rib – see explanation above – with 1 edge sts on each side until complete measurement. Remember knitting gauge! When piece measures 8-9-10-11-12-13 cm [3⅛"-3½"-4"-4⅜"-4 ¾"-5⅛"] inc 2 sts – read Increasing tip 1 – on each side, repeat inc when piece measures 24-25-26-27-28-29 cm [9½"-9 ¾"-10 ¼"-10⅝"-11"-11⅜"] = 71-77-83-91-101-111 sts (incorporate new sts into English rib as you go). When piece measures 36-37-38-39-40-41 cm [14 ¼"-14½"-15"-15 ¼"-15 ¾"-16⅛"] knit 7-8-9-9-10-11 sts continuing on each side in garter sts.
Read entire section before knitting commences!
When piece measures 37-38-39-40-41-42 cm [14½"-15"-15 ¼"-15 ¾"-16⅛"-16½"] bind off 3-4-5-5-6-7 sts on each side for armhole. Continuing knit 4 sts garter sts on each side until completed measurement. Continuing dec 1 sts – read Decreasing tip: on every other row 3-4-5-8-10-13 times in total = 59-61-63-65-69-71 sts. Then inc 1 sts for wide shoulder – read Increasing tips 2: on every 4th row 5-6-6-7-7-7 times in total = 69-73-75-79-83-85 sts. Knit new sts into English rib as you go.. At the same time when piece measures 52-54-56-58-60-62 cm [20½"-21 ¼"-22"-22 ¾"23⅝"-24⅜"] knit garter sts on 27-27-29-29-31-31 sts mid back (knit other sts like before). When piece measures 54-56-58-60-62-64 cm [21 ¼"-22"-22 ¾"23⅝"-24⅜"-25 ¼"] start bind off for shoulder on each side on every other row as follows: bind off 4-6-6-7-8-8 sts 1 time and 3 sts 1 time. At the same time on 1st row also bind off middle 17-17-19-19-21-21 sts for neck, continuing bind off 1 sts on next row towards neck (continue with 4 sts garter sts on each side at neckline). When all bind offs are completed 18-18-18-19-19-20 sts are left on each shoulder. Piece measures approx 56-58-60-62-64-66 cm [22"-22 ¾"23⅝"-24⅜"-25 ¼"-26"]. Bind off loosely.

Left front piece: Cast on 43-46-49-55-61-67 sts (incl 4 front band sts and 1 edge sts) on needles size 5 mm [US 8] with Alaska. Then knit as follows (1st row = RS): 1 front edge sts * K2, P1 *, repeat from *-* and finish with 2 K and 4 front edge sts (knit front edge in garter sts on each row until completed measurement). Continue with K over K and P over P until piece measures 4-4-4-6-6-6 cm [1½"-1½"-1½"-2⅜"-2⅜"-2⅜"]. K2 rows at the same time dec on 1st row 8-7-8-10-10-12 sts evenly = 35-39-41-45-51-55 sts. Continue with English rib – see explanation above – with 1 edge sts on each side and 4 front edge sts mid front until complete measurement. When piece measures 16-17-18-19-20-21 cm [6 ¼"-6 ¾"-7"-7½"-8"-8 ¼"] inc 2 sts on side – read Inc. tip 1. Repeat inc when piece measures 32-33-34-35-36-37 cm [12½"-13"-13⅜"-13 ¾"-14 ¼"-14½"] = 39-43-45-49-55-59 sts. When piece measures 36-37-38-39-40-41 cm [14 ¼"-14½"-15"-15 ¼"-15 ¾"16⅛"] knit 7-8-9-9-10-11 sts continuously in garter sts. Bind off for armhole and inc for wide shoulder on side like back piece. At the same time when piece measures 38-39-41-42-44-45 cm [15"-15 ¼"-16⅛"-16½"-17 ¼"-17 ¾"] knit 2 rows back and forth but only on front band, continue over all sts at the same time as dec 1 st for neckline – read Dec. tips – on every other row 13-14-14-14-16-15 times in total. At the same time when piece measures 54-56-58-60-62-64 cm [21 ¼"-22"-22 ¾"23⅝"-24⅜"-25 ¼"] bind off for armhole on side as back piece. When all bind offs are completed 18-18-18-19-19-20 sts are left on each shoulder. Piece measures approx 56-58-60-62-64-66 cm [22"-22 ¾"23⅝"-24⅜"-25 ¼"-26"]]. Bind off loosely.

Right front piece: Knit like left piece but reversed. Remember to close off for button hole – see explanation above.

Assembly: Sew shoulder seams. Sew tog side seams within 1 edge st.

Pocket: Cast on 19-19-21-21-23-23 sts on needle size 5 mm [US 8] with Alaska. Knit 2 rows garter sts. Continue with English rib (knit 2nd row English rib like on back piece) with 2 sts garter sts on each side. Continue as follows until pocket measures approx 12-12-13-13-14-14 cm [4 ¾"-4 ¾"-5⅛"-5⅛"-5½"-5½"] (ensure finishing off with 1 row from RS). Knit 3 rows garter sts. Bind off loosely. Knit another pocket. Sew 1 pocket on each front piece. Sew on pocket approx 6 cm [2⅜"] from cast on edge and approx 6 cm [2⅜"] from mid front.

This pattern has been corrected.

Updated online: 14.03.2022
Back piece:... Then knit as follows (1st row = RS): 1 edge st, * P1, K2 * repeat from *-* and finish off with 1 P and 1 edge st.

Diagram

All measurements in charts are in cm.

diagram measurements
Do you have a question? See a list of frequently asked questions (FAQ)

Knitting tension is what determines the final measurements of your work, and is usually measured per 10 x 10 cm. It is provided like so: number of stitches in width x number of rows in height - eg: 19 stitches x 26 rows = 10 x 10 cm.

The knitting tension is very individual; some people knit/crochet loosely while others work tightly. You adjust the knitting tension with the needle size, which is why the suggested needle size only serve as a guide! You need to adjust this (up or down) to ensure that YOUR knitting tension matches the knitting tension provided in the pattern. If you work with a different knitting tension than provided you will have a different yarn consumption, and your work will have different measurements than what the pattern suggests.

The knitting tension also determines which yarns can replace each other. As long as you achieve the same knitting tension you can replace one yarn with another.

See DROPS lesson: How to measure your tension/gauge

See DROPS video: How to make a gauge tension swatch

The required amount of yarn is provided in grams, eg: 450 g. To calculate how many balls you’ll need you first need to know how many grams are in 1 ball (25g, 50g or 100g). This information is available if you click on the individual yarn quality on our pages. Divide the amount required with the amount of each ball. For example, if each ball is 50g (the most common amount), the calculation will be as follows: 450 / 50 = 9 balls.

The important thing when changing from one yarn to another is that the knitting/crochet tension remains the same. This is so that the measurements of the finished piece will be the same as on the sketch provided. It is easier to achieve the same knitting tension using yarns from the same yarn group. It is also possible to work with multiple strands of a thinner yarn to achieve the knitting tension of a thicker one. Please try our yarn converter. We recommend you to always work a test swatch.

Please NOTE: when changing yarn the garment might have a different look and feel to the garment in the photo, due to individual properties and qualities of each yarn.

See DROPS lesson: Can I use a different yarn than the one mentioned in the pattern?

All our yarns are categorised into yarn groups (from A to F) according to thickness and knitting tension – group A contains the thinnest yarns and group F the thickest. This makes it easier for you to find alternative yarns to our patterns, should you wish to switch yarn. All yarns within the same group have a similar knitting tension and can easily replace each other. However, different yarn qualities have different structures and properties which will give the finished work a unique look and feel.

Click here for an overview of the yarns in each yarn group

At the top of all our patterns you’ll find a link to our yarn converter, which is a helpful tool should you wish to use a different yarn than suggested. By filling in the yarn quality you wish to replace, the amount (in your size) and number of strands, the converter will present good alternative yarns with the same knitting tension. Additionally it will tell you how much you’ll require in the new qualities and whether you’ll need to work with multiple strands. Most skeins are 50g (some are 25g or 100g).

If the pattern is worked with multiple colours, every colour will have to be converted separately. Similarly, if the pattern is worked with several strands of different yarns (for example 1 strand Alpaca and 1 strand Kid-Silk) you will have to find alternatives for each, individually.

Click here to see our yarn converter

Since different yarns have different qualities and textures we have chosen to keep the original yarn in our patterns. However, you can easily find options among our available qualities by using our yarn converter, or simply pick a yarn from the same yarn group.

It is possible that some retailers still have discontinued yarns in stock, or that someone has a few skeins at home that they would like to find patterns for.

The yarn converter will provide both alternative yarn as well as required amount in the new quality.

If you think it's hard to decide what size to make, it can be a good idea to measure a garment you own already and like the size of. Then you can pick the size by comparing those measures with the ones available in the pattern's size chart.

You'll find the size chart at the bottom of the pattern.

See DROPS lesson: How to read size chart

The needle size provided in the pattern serves only as a guide, the important thing is to follow the knitting tension. And since knitting tension is very individual, you will have to adjust the needle size to ensure that YOUR tension is the same as in the pattern – maybe you’ll have to adjust 1, or even 2 needle sizes, up or down to achieve the correct tension. For this, we recommend that you work test swatches.

Should you work with a different knitting tension than the one provided, the measurements of the finished garment might deviate from the measurement sketch.

See DROPS lesson: How to measure your tension/gauge

See DROPS video: How to make a gauge tension swatch

Working a garment top-down provides more flexibility and room for personal adjustment. For example it is easier to try the garment on while working, as well as making adjustments to length of yoke and shoulder caps.

The instructions are carefully explaining every step, in the correct order. Diagrams are adjusted to the knitting direction and are worked as usual.

The diagram depicts all rows/rounds, and every stitch seen from the right side. It is read from bottom to top, from right to left. 1 square = 1 stitch.

When working back and forth, every other row is worked from the right side and every other row is worked from the wrong side. When working from the wrong side, the diagram will have to be worked reversed: from left to right, knit stitches are purled, purl stitches are knit etc.

When working in the round every round is worked from the right side and the diagram are worked from right to left on all rounds.

See DROPS lesson: How to read knitting diagrams

The diagram depicts all rows/rounds, and every stitch seen from the right side. It is worked from bottom to top, from right to left.

When working back and forth every other row is worked from the right side: from right to left and every other row is worked from the wrong side: from left to right.

When working in the round, every row in the diagram are worked from the right side, from right to left.

When working a circular diagram you start in the middle and work your way outwards, counter clockwise, row by row.

The rows usually start with a given number of chain stitches (equivalent to the height of the following stitch), this will either be depicted in the diagram or explained in the pattern.

See DROPS lesson: How to read crochet diagrams

Instructions for working several diagrams after each other on the same row/round, will often be written like so: “work A.1, A.2, A.3 a total of 0-0-2-3-4 times". This means you work A.1 once, then A.2 is worked once, and A.3 is repeated (in width) the number of times provided for your size – in this case like so: S = 0 times, M = 0 times, L=2 times, XL= 3 times and XXL = 4 times.

The diagrams are worked as usual: begin with the first row in A.1, then work the first row in A.2 etc.

See DROPS lesson: How to read knitting diagrams

See DROPS lesson: How to read crochet diagrams

The total width of the garment (from wrist-to-wrist) will be larger in the larger sizes, despite the actual sleeves being shorter. The larger sizes have longer sleeve caps and wider shoulders, so there will be a good fit in all sizes.

The measurement sketch/schematic drawing provides information regarding the full length of the garment. If it’s a jumper or a jacket the length is measured from the highest point on the shoulder (usually closest to the neckline), and straight down to the bottom of the garment. It is NOT measured from the tip of shoulder. Similarly, the length of yoke is measured from the highest point on the shoulder and down to where yoke is split into body and sleeves.

See DROPS lesson: How to read a schematic drawing

Diagrams are often repeated on the round or in height. 1 repeat is the diagram the way it appears in the pattern. If it says to work 5 repeats of A.1 in the round, then you work A.1 a total of 5 times after/next to each other in the round. If it says to work 2 repeats of A.1 vertically/in height you work the entire diagram once, then begin again at the start and work the entire diagram one more time.

Chain stitches are slightly narrower than other stitches and to avoid working the cast-on edge too tight, we simply chain more stitches to begin with. The stitch count will be adjusted on the following row to fit the pattern and measurement sketch.

The rib edge is more elastic and will contract slightly compared to, for example, stocking stitch. By increasing before the rib edge, you avoid a visible difference in width between the rib edge and the rest of the body.

It’s very easy to cast off too tightly, and by making yarn overs while casting off (and simultaneously casting these off) you avoid a too tight cast off edge.

See DROPS video: How to bind off with yarn overs (yo)

To achieve an even increase (or decrease) you can increase on, for example: every 3rd and 4th row alternately, like so: work 2 rows and increase on the 3rd row, work 3 rows and increase on the 4th. Repeat this until the increase is complete.

See DROPS lesson: Increase or decrease 1 st on every 3rd and 4th row alternately

Should you prefer to work in the round instead of back and forth, you may of course adjust the pattern. You’ll need to add steeks mid-front (usually 5 stitches), and follow the instructions. When you would normally turn and work from the wrong side, simply work across the steek and continue in the round. At the end you’ll cut the piece open, pick up stitches to work bands, and cover the cut edges.

See DROPS video: How to knit steeks and cut open

Should you prefer to work back and forth instead of in the round, you may of course adjust the pattern so you work the pieces separately and then assemble them at the end. Divide the stitches for the body in 2, add 1 edge stitch in each side (for sewing) and work the front and back pieces separately.

See DROPS lesson: Can I adapt a pattern for circular needles into straight needles?

Pattern repeats can vary slightly in the different sizes, in order to get the correct proportions. If you’re not working the exact same size as the garment in the photo, yours might deviate slightly. This has been carefully developed and adjusted so that the complete impression of the garment is the same in all sizes.

Make sure to follow instructions and diagrams for your size!

If you have found a pattern you like which is available in women’s size it’s not very difficult to convert it to men’s size. The biggest difference will be the length of sleeves and body. Start working on the women size that you think would fit across the chest. The additional length will be worked right before you cast off for the armhole/sleeve cap. If the pattern is worked top-down you can add the length right after the armhole or before the first decrease on sleeve.

Regarding additional yarn amount, this will depend on how much length you add, but it is better with a skein too many than too few.

All yarns will have excess fibres (from production) that might come off as lint or shedding. Brushed yarns (ie hairier yarns) have more of these loose, excess fibres, causing more shedding.

Shedding also depends on what is worn under or over the garment, and whether this pulls at the yarn fibres. It’s therefore not possible to guarantee that there will be no shedding

Below are some tips on how to get the best result when working with hairier yarns:

1. When the garment is finished (before you wash it) shake it vigorously so the looser hairs come off. NOTE: do NOT use a lint roller, brush or any method that pulls at the yarn.

2. Place the garment in a plastic bag and put it in your freezer - the temperature will cause the fibres to become less attached to each other, and excess fibres will come off easier.

3. Leave in the freezer for a few hours before taking it out and shaking it again.

4. Wash the garment according to the instructions on the yarn label.

Pilling is a natural process that happens to even the most exclusive of fibers. It's a natural sign of wear and tear that is hard to avoid, and that is most visible in high friction areas of your garment like a sweater's arms and cuffs.

You can make your garment look as new by removing the pilling, using a fabric comb or a pill/lint remover.

Still can't find the answer you need? Then scroll down and leave your question so one of our experts can try to help you. This will be done normally within 5 to 10 working days.
In the meantime, you can read the questions and answers that others have left to this pattern or join the DROPS Workshop on Facebook to get help from fellow knitters/crocheters!

You might also like...

Post a comment to pattern DROPS 104-34

We would love to hear what you have to say about this pattern!

If you want to leave a question, please make sure you select the correct category in the form below, to speed up the answering process. Required fields are marked *.

Comments / Questions (21)

country flag Inge wrote:

Jeg vil gerne strikke vesten, men jeg kan se på spørgsmål, at det ser ud til at der er fejl i opskriften?

02.02.2024 - 16:12

DROPS Design answered:

Hei Inge. Hvilket spørsmål refererer du til? Ser at Raisa Feygin fra 06.02.2021 hadde en Kommentar at vrangborden var feil på den amerikanske oppskriften. Den er rettet og en rettelse link (rød) er lagt til oppskriften (+ på de språk det var feil på), men det var ikke feil på den danske oppskriften, så her er det ingen rettelse link i rødt. Eller er det en annen Kommentar/Spørsmål du tenker på? mvh DROPS Design

12.02.2024 - 11:22

country flag Carolien Baars wrote:

Hoe voorkom ik dat de voorbies krom trekt!! Hij trekt zo het voorpand een beetje bol zeg maar. Heb al geprobeerd om de eerste steek wel en niet mee te breien. Ik hoor graag van u.

04.04.2023 - 08:19

DROPS Design answered:

Dag Carolien,

Vlak voordat de minderingen voor de hals beginnen brei je 2 naalden alleen over de 4 voorbiessteken. Dus je breit de 4 steken dan keer je het werk en je breit terug. Hierdoor ontstaat er meer ruimte in de bocht. Verder kun je, nadat je het werk klaar hebt, de biezen voorzichtig oppersen, door er een natte doek overheen te leggen en heel voorzichtig te deppen met het strijkijzer.

05.04.2023 - 07:43

country flag Manuela wrote:

Die norwegische Anleitung zum Muster habe ich jetzt so verstanden: 1.R: *rm lm* 2.R (Rückenteil): *linke Masche Umschlag nächste Masche wie zum Rechtsstricken abheben* 2.R(Seitenteil): *Umschlag nächste Masche wie zum rechtsstricken abheben linke Masche* 3. R: * rechte Masche die nächsten beiden Maschen (umschlag und abgehobene Masche) links zusammenstricken* 2. und 3. Runde wiederholen Ich hoffe, es stimmt so.

04.01.2023 - 11:15

country flag Manuela wrote:

Das Oatentmuster im Video ist Vollpatent. In der Abbildung der Weste siehtves aber so aus, als sei diese im Halbpatent gestrickt und die linke Seite des Halbpatentes für die Vorderseite genommen worden. Die Angaben für das Strickmustercsind total verwirrend, weder Halb-noch Vollpatent. Ich würde die Weste gerne stricken. Was soll ich machen?

04.01.2023 - 00:59

DROPS Design answered:

Liebe Manuela, das Patentmuster wurde hier korrigiert, danke für den Hinweis. Viel Spaß beim stricken!

04.01.2023 - 10:00

country flag ELLEN wrote:

Hi, I was struggling with this pattern, then I read the comments and found the back should be a K2, P1 rib rather than a K1, P2 rib. Also the English rib says to P1, yo, slip 1st as if to K, but the video on how to work English rib calls for P1, yo, slip 1st as if to P. Can you confirm which is the correct instruction? It seems to me that with the patterns way, on the RS when you P tog yo and loose st from last row, you end up with the loose st twisted unless you p that st through the back loop.

13.03.2022 - 19:53

DROPS Design answered:

Dear Ellen, English pattern has been edited, ribbing edge at the bottom of back piece should be worked with ribb *P1, K2*; the English rib will be worked as explained in the pattern, not in the video, please note that the 2nd row will be worked a different way on back piece and on front pieces. Happy knitting!

14.03.2022 - 12:26

country flag Tiziana wrote:

Does this vest could be knitted also for a man using bigger sizing and changing button rib?

24.04.2021 - 14:54

DROPS Design answered:

Dear Tiziana, please understand that we cannot modify our patterns to each individual request, however, if you are willing to do the appropriate recalculation of the stitchnumbers and length, why not? Pay attention to make the buttonholes on the approproate side! Happy Knitting!

24.04.2021 - 15:14

country flag Raisa Feygin wrote:

I started knitting the vest and found out that the instructions for the back do not match the front. For the back we start with the RS and the rib is K1,P2. For the left front we start with RS and the rib is K2,P1. Also increases for the back and for the front are at different heights. Are all these inconsistencies intentional or are they errors in instructions. Please help.

06.02.2021 - 19:25

DROPS Design answered:

Dear Raisa, you're right, there is a mistake in the pattern. The rib is k2,p1, we will correct it as soon as possible. Also, the decreases are worked in different heights due to the English rib pattern.

07.02.2021 - 19:59

country flag Anya Velickovic wrote:

Första varvet efter uppläggningsvarvet ska Aldrig räknas som rätsida. Där har ni FEL!

10.05.2020 - 15:33

country flag DE MAEYER Danielle wrote:

Je trouve ce modèle très joli, ma question est: je voudrais le tricoter avec une laine qui se travaille avec des aiguilles n°3 et pas n° 5, comment puis-je faire pour adapter le nombre des mailles. Merci pour votre réponse

06.01.2019 - 23:45

DROPS Design answered:

Bonjour Mme De Maeyer, nous ne sommes malheureusement pas en mesure de pouvoir adapter chacun de nos modèles à chaque demande. Vous pouvez recalculer vous même d'après votre échantillon et les explications du modèle (d'après l''échantillon indiqué). N'hésitez pas à demander de l'aide à votre magasin et/ou à un forum tricot si besoin. Bon tricot!

07.01.2019 - 12:03

country flag Anne wrote:

Bonjour, pour ce modele, les explications pour les cotes anglaises ne sont pas les meme que la video. Aussi, pour les cotes gauche et droit pour la taille S, ca dit d'augmenter a 16cm de 2 mailles de chaque cotes et a nouveau a 32cm. Mais ca dit un total de 39 mailles. Si on ajoute 8 mailles au 35 mailles de depart, ca donnerait 43 mailles. Un grand merci

26.09.2018 - 22:42