
Popular categories
Looking for a yarn?


Comments / Questions (36)
![]() Nancy Delahunt wrote:
Nancy Delahunt wrote:
I have never crocheted an edge before. The patterns says crochet edge using Vienna. Then says crochet 1 row of lobster stitch. So, Do I do 2 rounds of crochet? one with Vienna stitch and one with Lobster stitch? thanks, Nancy Delahunt (Halifax, Nova Scotia, Canada)
27.04.2021 - 16:26DROPS Design answered:
Dear nancy, no, the crochet edge is not two rows, you need to crochet one row/round with the Vienna yarn and the crab stitch. Happy Crafting!
27.04.2021 - 21:42
![]() Margret Kurze wrote:
Margret Kurze wrote:
Ich stricke gerade diese Jacke und verstehe nicht, wie ich den Halsausschnitt abketten muss. Was heißt denn:"Blendm abn."? Was heißt bei Armloch: Weiter, bei jeder 2.R. gegen den Hals abk.-siehe Tipp:..
14.02.2013 - 20:48DROPS Design answered:
Liebe Frau Kurze, es wird neben den Blendenmaschen abgenommen. Wie die Blendenmaschen gestrickt werden, sehen Sie oben in der Anleitung. Gegen den Hals abketten heißt zum Halsausschnitt hin abketten.
15.02.2013 - 13:45
![]() Gracia wrote:
Gracia wrote:
Heb dit vest net gebreid en hij ligt nu te drogen. Eenvoudig patroon, maar met een heel mooi effect.
04.09.2012 - 00:24
![]() DROPS Design wrote:
DROPS Design wrote:
It's there - right after the Back and Front pieces.
16.02.2010 - 02:48
![]() Daphne wrote:
Daphne wrote:
I have just knitted the back of this lovely design and am working on the front and noticed that there is no pattern for the sleeves HELP Can you please supply the missing pattern. I really want to finish this cardigan!!!! Kind Regards Daphne
16.02.2010 - 00:13
![]() Drops Design France wrote:
Drops Design France wrote:
Nany, il faut tricoter en côtes sur les 35-35-37-37-37 m centrales, le modèle a été corrigé, merci. bon tricot !
03.04.2009 - 09:24
![]() Nany wrote:
Nany wrote:
J'ai un souci pour le dos a partir de des 47 CM JE NE COMPREND PAS CE QUe je dois faire merci de m'eclaicir
02.04.2009 - 17:50
![]() Cri Cri wrote:
Cri Cri wrote:
J'ai exécuté ce modèle sans difficulté Merci
09.12.2008 - 21:35
![]() DROPS Design NL wrote:
DROPS Design NL wrote:
Beste gebruikers. Er is een fout ontdekt onder het rechter voorpand van dit patroon: Minderen langs de hals. Het patroon is inmiddels gewijzigd. Gr. Tine.
01.01.2008 - 20:05Hélenda wrote:
J'aime la couleur et son originalité. Tout simple mais très beau.
17.10.2007 - 01:30
|
|
DROPS 103-19 |
|
|
|
|
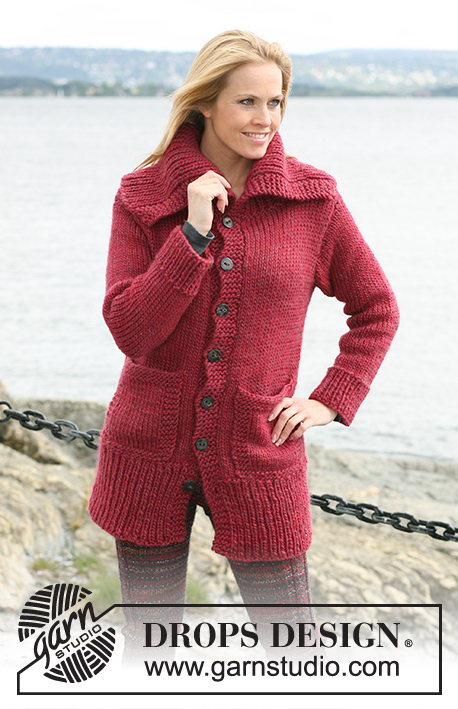
Short wide DROPS jacket in ”Angora-Tweed”. Size S to XXXL
DROPS 103-19 |
|
|
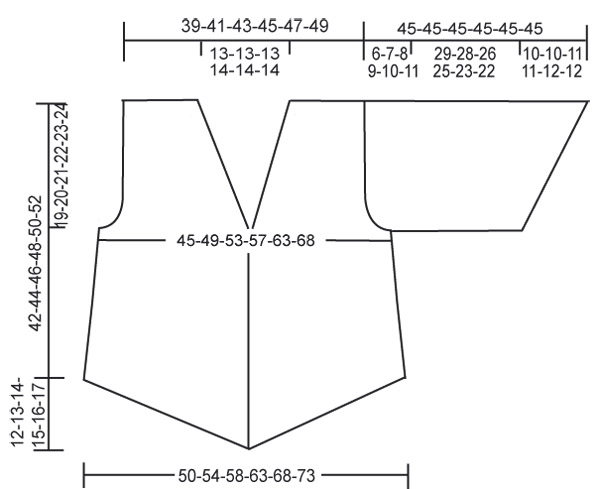
Knitting gauge: 19 sts x 25 rows in stockinette sts = 10 x 10 cm [4" x 4"]. Garter sts: Knit back and forth on all rows. Rib: *K1, P1*, repeat from *-*. Decreasing tip (apply for the neck shaping): Dec inside the 7 front band sts. All dec. are done from the RS! Dec as follows after 7 front band sts: Slip a st as if to K, K1, psso. Dec as follows before 7 front band sts: K2 tog. "Lobster stitches": Crochet sc’s in the opposite direction of normal, i.e. from the left towards the right side. The edge looks best if crochet is done from the WS. _________________________________________________________________ Back piece: Knit back and forth on row! Cast on 97-105-113-121-131-141 sts (incl. 1 edge st each side) on needles size 4.5 mm [US 7]. Knit 3 rows of Rib – see explanation above. Continue in stockinette sts. When the piece measures 4-4-5-5-6-7 cm [1½"-1½"-2"-2"-2⅜"-2¾"-] bind off 1 st each side on every 4 cm [1½"] a total of 5 times = 87-95-103-111-121-131 sts. When the piece measures 23-24-25-26-27-28 cm [9"-9½"-9¾"-10¼"-10⅝"-11"] bind off for armholes each side on every other row as follows: 3 sts 1-1-1-1-2-2 times, 2 sts 0-1-2-3-3-4 times and 1 st 3-4-4-4-4-5 times = 75-77-81-85-89-93 sts. Continue until the piece measures approx 39-41-43-45-47-49 cm [15 ¼"-16⅛"-17"-17¾"-18½"-19¼"] – make sure the next row will be knitted from the RS! Now knit 2 rows of Rib over the mid 35-35-35-37-37-37 sts (begina and end with P1 seen from the RS), knit the other sts in stockinette sts. On the next row bind off the mid 21-21-21-23-23-23 sts for the neck, bind off with K over K and P over P. Now dec. 1 st towards the neck on every other row – see decreasing tips 2 times = 25-26-28-29-31-33 sts left for each shoulder. Knit 1 row over all sts and bind off with K over K and P over P. Right front piece: Cast on 10 sts. Knit as follows from the mid front ( 1st row = RS): 1 garter st, * K1, P1 *, repeat from *-* a total of 3 times (i.e. there will then be 7 front band sts knitted this way until finish). Knit the remaining 3 sts on row in stockinette sts. At the end of the row cast on 3 new sts towards the side, turn and slip 1 st and knit back – knit in new sts in stockinette sts. Continue as follows i.e cast on 3 new sts at the end of each row towards the side until 55-58-64-67-73-76 sts in total on row (a total inc 15-16-18-19-21-22 times). The work now measures approx. 12-13-14-15-16-17 cm [4¾"-5⅛"-5½"-6"-6¼"-6¾"] at the longest. Insert a MT (marking thread) in the piece – continue to measure from this point onwards. Continue in stockinette sts and front band sts as before. When the piece measures 4-4-5-5-6-7 cm [1½"-1½"-2"-2"-2⅜"-2¾"] bind off 1 st at the side on every 4 cm [1½"] a total of 5 times = 50-53-59-62-68-71 sts. Please read all of the following section before continue! Neck shaping: When the piece measures 21-22-23-24-25-26 cm [8¼"-8¾"-9"-9½"-9¾"-10¼"] (from the MT) dec 1 st for the neck line at the mid front –see Decreasing tip on every other row a total of 14-12-14-14-14-12 times and then on every 4th row a total of 5-6-6-6-7-7 times. Armhole: At the same time when the piece measures 23-24-25-26-27-28 cm [9"-9½"-9¾"-10¼"-10⅝"-11"] bind off for armhole as done for the back. After all dec = 25-26-28-29-31-33 sts left for the shoulder. Continue to knit until the piece measures 42-44-46-48-50-52 cm [16½"-17¼"-18"-19"-19¾"-20½"] from the MT, bind off. Left front piece: Cast on as done for the Right front piece. Knit 1st row as follows: 3 stockinette sts, *P1, K1*, repeat from *-* a total of 3 times, 1 garter st. Turn and knit until finish and then cast on 3 new sts, turn and slip 1 st. Finish as the right front piece but do all inc. and dec. at opposite sides. Sleeve: Knit the bottom part of the sleeve in 2 parts because of the slit. 1st part: Cast on 4 sts. Knit as follows (1st row = RS): 1 garter sts, K1, P1 and 1 stockinette st. Cast on 3 new sts at the end of row, turn and slip 1 st, and knit back until finish. Continue this way – i.e. cast on 3 new sts at the end of each row towards the side a total of 9-10-10-11-12-12 times, then cast on 4-3-5-4-3-5 sts 1 time = 35-37-39-41-43-45 sts in total – knit new sts in stockinette sts. Continue to knit until the piece measures 10-10-11-11-12-12 cm [4"-4"-4⅜"-4⅜"-4¾"-4¾"] at the longest part. Put piece aside. 2nd part: Knit as first part but reverse, i.e. knit the first row as follows: 1 stockinette st, P1, K1 and 1 garter sts. Turn, finish row and cast on 3 new sts. Turn and slip 1 st, finish row. When the 2nd parts measures the same as the first part, put the 2 parts tog. on the same needle with the "points" towards each other = 70-74-78-82-86-90 sts. Continue in stockinette sts over all sts until the piece measures 39-38-37-36-35-34 cm [15¼"-15"-14½"-14¼"-13¾"-13⅜"] from the "point"(shorter measures for bigger sizes because of the longer sleeve cap). Then bind off for the sleeve cap each side on every other row as follows: 3 sts 1 time, 2 sts 3 times and 1 st 0-1-2-3-4-6 times, then bind off 2 sts each side until the piece measures 44 cm [17 ¼"], continue to bind off 3 sts each side 1 time. Bind off remaining sts, the piece measures approx. 45 cm [17 ¾"] from the "point". Assembly: Sew the shoulder seams with grafting sts inside the binding off edge. Sew in the sleeves and sew tog. the side and the sleeve seams inside the 1 edge st. Crochet edge: Crochet with Vienna on hook size 5 mm [H/8] around the back and front pieces + the neck line + at the bottom of the sleeves. Crochet 1 row of lobster sts from the WS – see explanation above. Continue to crochet 2 button hole loops at the right front piece with Vienna. Begin the top loop 1 cm [⅜"] below the neckline. Crochet as follows: 1 sc, 5 ch, skip approx. 2 cm [¾"] and finish with 1 sc, turn and crochet 4 sc around the ch-loop and finish with 1 sl st. Put the second button hole loop approx. 7 cm [2¾"] below the first. Sew in 2 buttons at the left front edge and 1 button at the top of the each slit at sleeves. |
|
 |
|
Have you finished this pattern?Tag your pictures with #dropspattern or submit them to the #dropsfan gallery. Do you need help with this pattern?You'll find 23 tutorial videos, a Comments/Questions area and more by visiting the pattern on garnstudio.com. © 1982-2026 DROPS Design A/S. We reserve all rights. This document, including all its sub-sections, has copyrights. Read more about what you can do with our patterns at the bottom of each pattern on our site. |


With over 40 years in knitting and crochet design, DROPS Design offers one of the most extensive collections of free patterns on the internet - translated to 17 languages. As of today we count 325 catalogs and 12298 patterns - 12288 of which are translated into English (US/in).
We work hard to bring you the best knitting and crochet have to offer, inspiration and advice as well as great quality yarns at incredible prices! Would you like to use our patterns for other than personal use? You can read what you are allowed to do in the Copyright text at the bottom of all our patterns. Happy crafting!
Post a comment to pattern DROPS 103-19
We would love to hear what you have to say about this pattern!
If you want to leave a question, please make sure you select the correct category in the form below, to speed up the answering process. Required fields are marked *.