
Popular categories
Looking for a yarn?


Comments / Questions (42)
![]() Saus wrote:
Saus wrote:
Bonjour j'aimerais savoir ce que veux dire (tricoter avec un fil de chaque qualité) est-ce tricoter avec les deux fils en même temps ou je change de fil a chaque rang merci
07.11.2024 - 15:02DROPS Design answered:
Bonjour Mme Saus, cela signifie que vous devez tricoter avec les 2 laines en même temps, soit ici 1 fil Fabel + 1 fil Vivaldi (ou l'équivalent). Bon tricot!
07.11.2024 - 16:42
![]() Eve wrote:
Eve wrote:
Tere! Kui sooviksin kudumit veidi muuta ning kududa kampsuni ainult drops fabel lõngast ning varrastega nr 2,5, siis kas peaksin topeltarvu silmuseid arvestama? Tänud
30.01.2019 - 07:54DROPS Design answered:
Tere Eve! Vaadake mustreid lõngagrupile A, sealt saate valida sobiva juhendi vastavalt oma koetihedusele: https://www.garnstudio.com/search.php?action=search&w=dzemper&c=1&mt=1&t=0&k=0&yg=1&y=0&col=0&df=0&lang=ee Head kudumist!
10.02.2019 - 01:42
![]() DROPS Design wrote:
DROPS Design wrote:
Hej Helena, det innebär att du skall sticka de yttersta 2 maskor i rätsickning på varje sida uppöver så det blir en kant :-) Lycka till
07.02.2011 - 08:39
![]() Helena wrote:
Helena wrote:
Hej! Vad menas med yttersta 2 m varje stida rätstickas uppöver?
06.02.2011 - 21:45
![]() DROPS Design wrote:
DROPS Design wrote:
Hej Linnea, det stämmer - du skall sticka en axel i taget :-)
16.03.2010 - 10:36
![]() Linnea wrote:
Linnea wrote:
JAg förstår inte hur man gör på framstycket när man ska maska av för halsen. Jag har satt 12 mittenmaskor på tråd men då kan jag ju inte bara sticka varvet rakt över. Ska man sticka en axel i taget eller hur gör man?
16.03.2010 - 08:50
![]() Drops Design wrote:
Drops Design wrote:
Bonjour Cremer, cliquez sur 'Imprimer' ci-dessus (votre navigateur doit accepter les "pop'ups") puis dans la nouvelle fenêtre qui va s'ouvrir, cliquez en bas sur "imprimer". bon tricot !
10.11.2009 - 10:40
![]() Cremer wrote:
Cremer wrote:
Je n'arrive pas à imprimer le modèle
10.11.2009 - 10:03
![]() Drops Design wrote:
Drops Design wrote:
Du feller de første 5 m etter 14 cm og de neste 5 m etter 18 m (86 m – 5 m – 5 m = 76 m).
12.02.2008 - 09:49
![]() Lilletrille wrote:
Lilletrille wrote:
I lueoppskriften står det "Når arb måler 14 og 18 cm felles det 5 m jevnt fordelt = 76 m." Er dette en feil? skal det være mellom 14 og 18 cm? og hvordan kan man felle 5 masker jevnt fordelt og plutselig ha 20 masker mindre på pinnen? skal fellingen gjentas over 2 pinner?
12.02.2008 - 09:34
|
|
DROPS 103-17 |
|
|
|
|
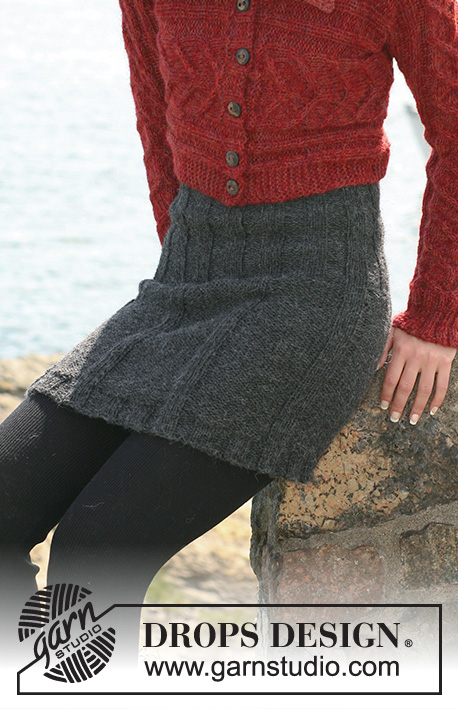
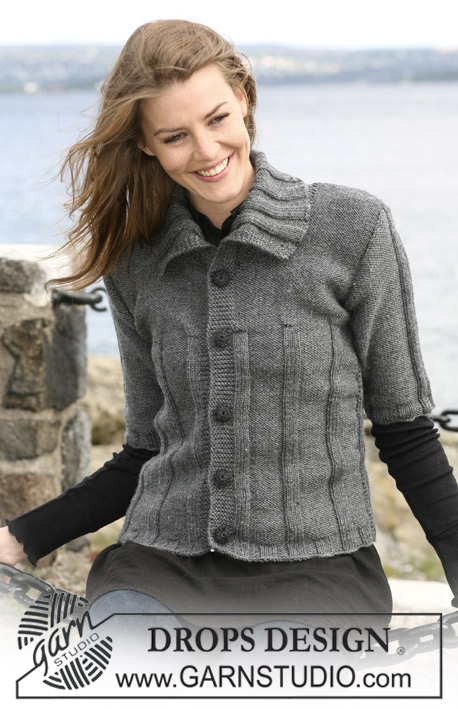
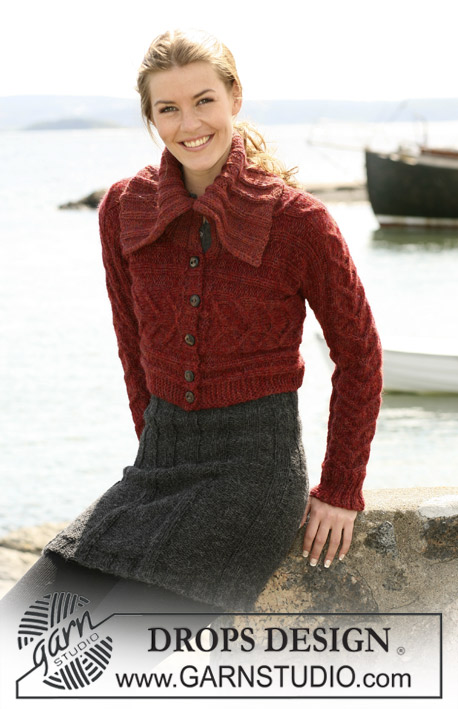
DROPS long jumper in ”Fabel” and ”Vivaldi” and Hat in 2 threads of ”Alpaca”. Size S to XXL.
DROPS 103-17 |
|
|
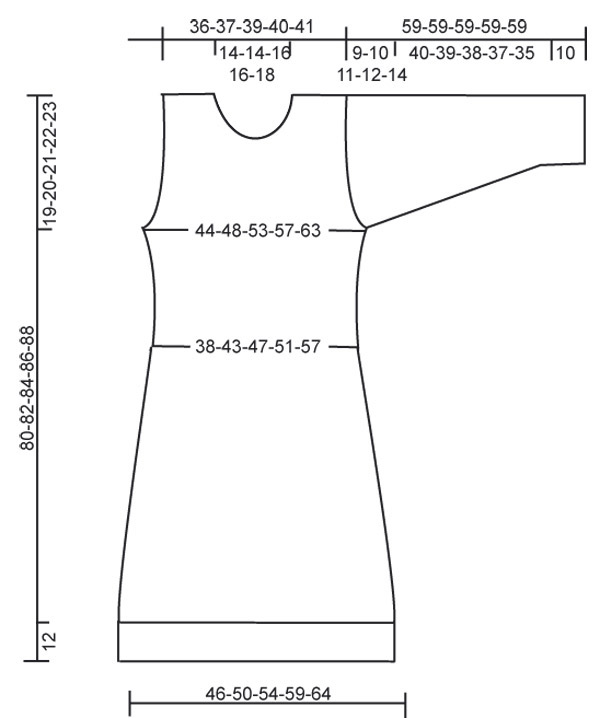
JUMPER Knitting gauge: 14 sts x 18 rows with 1 thread of each quality in stockinette sts = 10 x 10 cm [4" x 4"] Garter sts: Knit back and forth on all rows. Decreasing tips: All dec. are done from the RS. Dec. inside 2 garter sts each side. Dec as follows after 2 garter sts: K2 twisted tog. (twist sts as follows: knit into the back part of st instead of front part) Dec as follows before 2 garter sts: K2 tog. Increasing tips: Inc inside 2 garter sts each side. All inc. are done from the RS as follows: Make a yo, on the returning P the yo in the back loop to avoid a hole. Front piece: Cast on 64-70-76-82-90 sts loosely on needle size 7 mm [US 10 ½] with 1 thread of each quality. Knit in garter sts for 12 cm [4¾"]. Continue in stockinette sts, but knit the outer most 2 sts each side in garter sts throughout. When the piece measures 18-19-20-21-22 cm [7"-7½"-8"-8¼"-8¾"] dec. 1 st each side on every 5 cm [2"] a total of 5 time– see decreasing tips = 54-60-66-72-80 sts. When the piece measures 45-46-47-48-49 cm [17¾"-18"-18½"-19"-19¼"] inc. 1 st each side on every 4 cm [1½"] a total of 4 times - see increasing tips = 62-68-74-80-88 sts. When the piece measures 61-62-63-64-65 cm [24"-24⅜"-24¾"-25¼"-25½"] bind off for the armholes each side on every other row as follows: 3 sts 1 time, 2 sts 0-1-2-3-4 times and 1 sts 3-3-3-3-4 times = 50-52-54-56-58 sts. Continue in stockinette sts over all sts until the piece measures 72-74-76-78-80 cm [28⅜"-29⅛"-30"-30⅜"-31½"]. Now put the mid 12-12-14-14-16 sts on a thread or a stitch holder for the neck. Continue to bind off at neck side on every other row: 2 sts1 time and 1 st 2 times = 15-16-16-17-17 sts left for each shoulder. Bind off when the piece measures 80-82-84-86-88 cm [31½"-32¼"-33"-33⅞"-34⅝"]. Back piece: Cast on and knit as front piece bind off for armholes as done for the front piece and continue until the piece measures 77-79-81-83-85 cm [30⅜"-31"-32"-32¾"-33½"]. Now bind off the mid 18-18-20-20-22 sts for the neck. Then bind off 1 st towards the neck = 15-16-16-17-17 sts left for each shoulder. Bind off when the piece measures 80-82-84-86-88 cm [31½"-32¼"-33"-33⅞"-34⅝"]. Sleeve: Cast on 32-34-36-38-40 sts on needle size 7 mm [US 10 ½] with 1 thread of each quality. Knit in garter sts for 10 cm [4"] and continue in stockinette sts with 2 garter sts each side. When the piece measures 13 cm [5⅛"] inc. 1 st each side on every 4.5-4.5-4-3.5-3 cm [1¾"-1¾"-1½"-1¼"-1⅛"] a total of 8-8-9-10-11 times – see Increasing tips = 48-50-54-58-62 sts. When the piece measures 50-49-48-47-45 cm [19¾"-19¼"-19"-18½"-17¾"] (Shorter measures for bigger sizes due to the longer sleeve cap) bind off for the sleeve cap each side on every other row: 3 sts 1 time, 2 sts 2 times, 1 st 2-3-4-5-7 times, continue to bind off 2 sts each side until the piece measures 58 cm [22¾"], then bind off 3 sts each side 1 time. The piece measures approx. 59 cm [23¼"]. Bind off remaining sts. Assembly: Sew the right shoulderseam. Neck: Pick up approx 50 to 60 sts around the neck (incl. the sts on the thread or stitch holder) on needle size 7 mm [US 10 ½] with 1 thread of each quality. Knit in garter sts back and forth from the shoulder not yet sewn tog. When the neck measures 5 cm [2"] inc evenly distributed to 70-74-78-82-86 sts. Continue in garter sts until the neck measures 20 cm [8"], bind off loosely. More assembly: Sew the left shoulder seam and continue the seam up along the neck - Sew in the outer part of the most outer sts to get an "invisible" seam. Sew the sleeves and the side seams. Sew in the most outer part of the most outer sts so there will be 4 garter sts next to each other each side and underneath the sleeves. HAT Materials: DROPS Alpaca from Garnstudio 100 g col. no. 7238, green And use: DROPS Fabel from Garnstudio A remainder of col. no. 542, green mix DROPS needles size 5 mm [US 8] – or the size needed to obtain the correc knitting gauge . Knitting gauge: 17 sts x 33 rows in garter sts = 10 x 10 cm [4" x 4"]. Garter sts: Knit back and forth on all rows. Moss sts: 1st row: * K1, P1 *, repeat from *-*. 2nd row: K over P and P over K. Repeat the 2nd row. Hat: Knit back and forth! Cast on 86 sts on needle size 5 mm [US 8] with 2 threads of Alpaca. P one row from the WS and K 1 row from the RS. Continue in garter sts - see explanation above. When the piece measures 14 and 18 cm [5½" and 7"] dec 5 sts evenly = 76 sts. When the piece measures 20 cm [8"] dec 10 sts evenly distributed on every other cm [¾"] a total of 4 times = 36 sts. When the piece measures 27 cm [10⅝"] knit all sts tog. 2 by 2 = 18 m. On the next row K all sts tog. 2 by 2 = 9 sts left on row. Pull the thread through the remaining sts and sew tight. Sew the hat tog at the mid back in the outer edge of the most outer st. Bow: Cast on 12 sts with 1 thread of Alpaca and 1 thread of Fabel on needle size 5 mm [US 8]. Knit in moss sts – see explanation above - for 8 cm [3⅛"]. Bind off in moss sts. Sew a few sts in the middle of the bow. Pull the thread tight to make a bow. Sew the bow to the hat. |
|
 |
|
Have you finished this pattern?Tag your pictures with #dropspattern or submit them to the #dropsfan gallery. Do you need help with this pattern?You'll find 19 tutorial videos, a Comments/Questions area and more by visiting the pattern on garnstudio.com. © 1982-2026 DROPS Design A/S. We reserve all rights. This document, including all its sub-sections, has copyrights. Read more about what you can do with our patterns at the bottom of each pattern on our site. |


With over 40 years in knitting and crochet design, DROPS Design offers one of the most extensive collections of free patterns on the internet - translated to 17 languages. As of today we count 325 catalogs and 12298 patterns - 12288 of which are translated into English (US/in).
We work hard to bring you the best knitting and crochet have to offer, inspiration and advice as well as great quality yarns at incredible prices! Would you like to use our patterns for other than personal use? You can read what you are allowed to do in the Copyright text at the bottom of all our patterns. Happy crafting!
Post a comment to pattern DROPS 103-17
We would love to hear what you have to say about this pattern!
If you want to leave a question, please make sure you select the correct category in the form below, to speed up the answering process. Required fields are marked *.