Comments / Questions (42)
![]() Kelly Wright wrote:
Kelly Wright wrote:
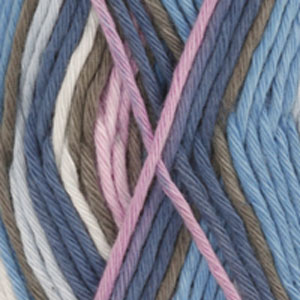
This pattern calls for Drops Muskat Soft but it's discontinued. What yarn group was Drops Muskat Soft so I can choose an alternative. Thank you.
24.01.2025 - 14:51DROPS Design answered:
Dear Kelly, DROPS Muskat Soft was a group B yarn; you can find more information about our discontinued yarns here, as well as some suggested substitutions: https://www.garnstudio.com/yarn-groups.php?d=1&cid=19. Happy knitting!
25.01.2025 - 19:27
![]() Heidrun Mühlberg-Krüger wrote:
Heidrun Mühlberg-Krüger wrote:
Ich möchte gern von Ihnen wissen ,wo ich die Drops Muskat soft Wolle multicolor kaufen kann. Da die Farbe Nr. 06 (blaulilamix) nicht mehr im Sortiment ist ,würde ich auch eine andere Farbe nehmen. Vielleicht können Sie mir weiter helfen. Danke und freundliche Grüße H. Mühlberg-Krüger
02.09.2020 - 17:03DROPS Design answered:
Liebe Frau Mühlberg-Krüger, DROPS Muskat Soft is jetzt ausgelaufen, benutzen Sie unseren Garnumrechner um eine Alternative zu finden, gerne wird Ihnen auch Ihr DROPS Laden weiterhelfen, den richtigen Garn zu finden. Viel Spaß beim stricken!
03.09.2020 - 08:47
![]() Anne Berdal wrote:
Anne Berdal wrote:
Jag hittar inte garntypen. Bara Drops Muskat i en färg - inte som här i blålillamix.
24.02.2019 - 13:05DROPS Design answered:
Hej Anne, Den färgen har tyvärr utgått, DROPS Muskat finns bara enfärgad. Lycka till :)
28.02.2019 - 14:04
![]() Monique wrote:
Monique wrote:
Geachte, er staat, neem voor de hals 52 steken op (kleinste maat) rondom de hals. Is dat ook langs de split of vanaf en tot en met de 5 op een draad gezette steken? Als dat met de split erbiij is heb ik veel meer dan 52 steken nodig. Met dank
17.03.2018 - 16:19DROPS Design answered:
Hallo Monique, Deze 52 steken moet je inderdaad alleen opnemen langs de hals en over de bovenkant van de gehaakte steken van het split (dus niet langs de zijkanten van het split)
19.03.2018 - 07:52
![]() Monique wrote:
Monique wrote:
Beste, op een moment staat bij de mouw, kant daarna 2 steken af aan weerskanten tot een hoogte van 34 cm. Is dat elke naald of om de naald? Met dank.
12.03.2018 - 11:56DROPS Design answered:
Hallo Monique, Dat is inderdaad op elke naald, steeds aan het begin van de naald 2 steken.
13.03.2018 - 16:21
![]() Diane Mueller wrote:
Diane Mueller wrote:
Thank you very much for the info and for answering so quickly! Am making this pullover for my 8 yr. old granddaughter who LOVES rainbow colors!
22.01.2016 - 18:13
![]() Diane Mueller wrote:
Diane Mueller wrote:
Love the pattern. My question has to do with the front neckline instructions: When the piece measures 15 3/4" put the 6 sts towards the mid front on a stitch holder. Then bind off 1 st for the neck on every row starting from neck a total of 2 times = 17 sts left for shoulder. Having trouble visualizing the stitch holder part. Shouldn't I just decrease 2 stitches at the neck edge and work till desired length and then bind off? Thank you
22.01.2016 - 17:27DROPS Design answered:
Dear Mrs Mueller, work next row from neckline as follows: work the first 6 sts and slip them onto a st holder or a thread, work remaining sts on row, work return row. Dec 1 st at beg of next row from neckline and continue as stated. Afterwards you will slip sts from st holder /thread back onto needle and work the neckedge (see under assembly). Happy knitting!
22.01.2016 - 17:44
![]() Renate Hansen wrote:
Renate Hansen wrote:
Jeg ønsker en oppskrift på enkel glattstrikket genser med rageland og rund hals str 12 år jente. Jeg har forsøkt lenge å finne på nettsiden, men finner ikke :(( Mvh Renate
10.01.2016 - 20:41Kerry-Anne Tweddle wrote:
Good Day, I don't think you understood my previous question, what I was asking about the neck line has to do with the 4 rows of garter stitch that is mentioned after sewing the shoulders, I was asking if those garter rows must go all the way to the down the gap on the neckline or till the stitches that you have left on hooks, sorry I should have been more specific on the previous question.
08.07.2015 - 11:42DROPS Design answered:
Dear Mrs Tweeddle, sorry for misunderstanding, the 4 rows in garter st are worked over the sts on the st holders each side on front pieces + along neckline on back piece, not along the vent mid front. You should hae approx. 52-70 sts including the sts from thread/st holder. Happy knitting!
08.07.2015 - 17:40Kerry-Anne Tweddle wrote:
Good Day, I am rather new to knitting and I just have a question about the neck line. It is the first time I am doing a neck line like this and I was wandering when you are assembling the jersey, do you only sew one side of the shoulders and then do the neck line or sew both shoulders. And you go all the way to the bottom of the opening or just until the stitches you have on the hooks?
07.07.2015 - 12:05DROPS Design answered:
Dear Mrs Tweedle, in this pattern, you first sew both shoulders, then crochet the border beg at the bottom of vent on front piece then crochet up along the vent, then along neckline on back piece and down to the bottom of vent on the other side on front piece. Happy crocheting!
07.07.2015 - 16:38
Addi's Sweater#addissweater |
|||||||||||||||||||
|
|
|||||||||||||||||||
Knitted sweater in DROPS Muskat Soft with crochet edge. Size children 5 to 14 years.
DROPS Children 15-2 |
|||||||||||||||||||
|
Garter sts back and forth: Knit on all rows. Back piece: Cast on 86-90-94-98-102 sts (includes 1 edge st each side) on needles size 4 mm / US 6 with Muskat Soft. Knit 2 rows of garter sts and continue with stockinette sts. When the piece measures 4 cm / 1½" bind off 1 st each side, repeat on every 4-4.5-5-5.5-8 cm / 1½"-1¾"-2"-2¼"-3⅛" a total of 5-5-5-5-4 times= 76-80-84-88-94 sts. When the piece measures 24-26-28-30-32 cm / 9½"-10¼"-11"-11¾"-12½" bind off for arm holes in beg of every row, each side like this: 3 sts 1 time, 2 sts 1-1-1-2-3 times and 1 st 3-3-4-3-3 times = 60-64-66-68-70 sts. When the piece measures 38-41-44-47-50 cm / 15"-16⅛"-17¼"-18½"-19¾" bind off the mid 28-30-30-32-34 sts for the neck and work each side separately. Continue and bind off 1 st towards the neck on the following row = 15-16-17-17-17 sts left for shoulder. Bind off when piece measures 40-43-46-49-52 cm / 15¾"-17"-18"-19¼"-20½". Front piece: Cast on and work as back piece. When the piece measures 24-26-28-30-32 cm / 9½"-10¼"-11"-11¾"-12½" bind off for arm holes as done for the back piece, and at the same time when the piece measures 27-29-31-33-35 cm / 10⅝"-11⅜"-12¼"-13"-13¾" bind off the mid 16-16-16-18-18 sts for the slit at the neck. Continue work each side separately. When the piece measures 35-38-40-43-45 cm / 13¾"-15"-15¾"-17"-17¾" put the 5-6-6-6-7 sts towards the mid front on a stitch holder. Then bind off 1 st for the neck on every row starting from neck a total of 2 times = 15-16-17-17-17 sts left for shoulder. Bind off when the piece measures 40-43-46-49-52 cm / 15¾"-17"-18"-19¼"-20½". Sleeve: Cast on 47-52-52-57-57 sts (includes 1 edge st each side) on needles size 4 mm / US 6 with Muskat Soft. Knit 2 rows of garter sts and then continue in stockinette sts, at the same time when the piece measures 4 cm / 1½" inc. 1 st each side, repeat inc on every 3-3.5-3-4-3.5 cm / 1⅛"-1¼"-1⅛"-1½"-1¼" a total of 9-8-10-9-10 times = 65-68-72-75-77 sts. When the piece measures 30-33-36-39-41 cm / 11¾"-13"-14¼"-15¼"-16⅛" bind off for the sleeve cap in beg of every row, each side as follows: 3 sts 1 time, 2 sts 3 times, 1 st 0-1-2-3-5 times. Then bind off 2 sts each side until the piece measures 34-38-42-46-49 cm / 13⅜"-15"-16½"-18"-19¼" and then bind off 3 sts 1 times each side. Bind off remaining sts when the piece measures approx. 35-39-43-47-50 cm / 13¾"-15¼"-17"-18½"-19¾". Assembly: Sew the shoulder seams. Pick up approx. 52-70 sts (including the sts on stitch holder) with needle size 4 mm / US 6 around the neck line and knit 4 rows of garter sts. Bind off. Sew in the sleeves. Sew the sleeve and the side seams inside 1 edge sts. Crochet border: Neck slit at the front: Beg. at the bottom of 1 corner of the slit at the front piece using hook size 3.5 mm/E. Crochet *1 sc, 1 ch* repeat from *-* so there will be a total of 13-13-13-17-17 sc (divisible with 4 +1) up along one side. Turn. Now crochet diagram M.1 over the first 5 sts and continue to crochet diagram M.2 until 4 sc remains and crochet diagram M.3 over the last 4 sc. Turn and continue according to diagram from the 3rd row onwards. Measure after 6th row = 4 cm / 1½". Repeat for the other side. Sew the crochet edge with small sts to the bottom edge of the slit. Crochet border: Crochet a border around the bottom edge of the tunic and around the bottom edge of the sleeves as follows: 1st round: 1 sc in the first st *5 ch, skip 3 sts, 1 sc in the next st*, repeat from *-* and finish with a sl st in the first sc on round. 2nd round: Crochet 3 sl sts in the top of the first ch space from the beg. of previous round, *5 ch, 1 sc in the next ch space from previous round* repeat from *-* and finish with a sl st in the top of the first ch from previous round. 3rd round: ch 3, *3 dc in the first ch space from previous round, 2 ch*, repeat from *-* and finish with 1 sl st in the 3rd ch at the beg. of round. 4th round: *5 ch, 1 sc in the 2 ch from previous round*, repeat from *-* and finish with 1 sl st in the first ch from beg. of round. 5th. round: Crochet 3 sl st at the top of the first ch space from previous round, *5 ch, 1 sc in the next ch space from previous round* repeat from *-* and finish with 1 sl st in the top of the ch space from previous round. Fasten off. Now crochet a border edge over the crochet borders in the slit and around the neck as follows: 1st round: 1 sc at the in the top of the cornet of the crochet border mid front *5 ch, skip approx. 1.5 cm / ½", 1 sc in the next st* repeat from *-* around the neck and over the crochet border at the other side (make sure to finish with a dc at the top corner). Turn. 2nd round: Crochet 3 sl sts to the top of the first ch space at the beg. of previous round, *5 ch, 1 sc in the next ch space from previous round* repeat from *-* and finish with 1 sl st at the top of the first ch space from previous row. Fasten off. |
|||||||||||||||||||
Diagram explanations |
|||||||||||||||||||
|
|||||||||||||||||||
 |
|||||||||||||||||||
Have you finished this pattern?Tag your pictures with #dropspattern #addissweater or submit them to the #dropsfan gallery. Do you need help with this pattern?You'll find 17 tutorial videos, a Comments/Questions area and more by visiting the pattern on garnstudio.com. © 1982-2025 DROPS Design A/S. We reserve all rights. This document, including all its sub-sections, has copyrights. Read more about what you can do with our patterns at the bottom of each pattern on our site. |
|||||||||||||||||||




Post a comment to pattern DROPS Children 15-2
We would love to hear what you have to say about this pattern!
If you want to leave a question, please make sure you select the correct category in the form below, to speed up the answering process. Required fields are marked *.