
Popular categories
Looking for a yarn?


Comments / Questions (26)
![]() Sandy wrote:
Sandy wrote:
Is the first row the outside (right side of cardigan) so I know where to place the button hole?
02.10.2019 - 18:21DROPS Design answered:
Hi Sandy, The first row is the wrong side. Happy knitting!
03.10.2019 - 07:40
![]() Renee wrote:
Renee wrote:
Is row one considered the wrong side or right side of the cardigan? Thank you
02.10.2019 - 14:03DROPS Design answered:
Dear Renee, the very first row worked on body is worked from WS: Knit first row as follows (from WS): 5 front band sts in garter sts, *P3, K3*, repeat from *-* and finish with P3 and 5 front band sts. Happy knitting!
02.10.2019 - 14:41
![]() Margit wrote:
Margit wrote:
Hallo, ich habe diese Jacke genau nach Anleitung gestrickt. Auch die Maschenprobe hat gestimmt. Leider ist die Jacke nun doch viiiiiel zu groß geworden. Beim Waschen bei 40 Grad hat sich an der Größe nichts geändert. Meine Frage: Kann ich die Jacke bei einer höheren Temperatur 60 Grad oder höher waschen. Besteht da die Chance, dass sie entsprechend eingeht? Vielen Dank im Voraus mit freundlichen Grüßen aus Norwegen Margit Lämmlein
02.08.2019 - 17:00DROPS Design answered:
Liebe Margit, haben Sie auch beim stricken dieselbe Maschenprobe behalten? Nehmen Sie bitte Kontakt mit Ihrem DROPS laden auf, sicher können Sie Ihnen weiterhelfen - auch telefonisch oder per E-mail. Viel Spaß beim stricken!
06.08.2019 - 16:32
![]() Monika Franaschitz wrote:
Monika Franaschitz wrote:
Sinorel
07.04.2019 - 10:05
![]() Marleen Spijkerman wrote:
Marleen Spijkerman wrote:
Ik ben met dit patroon bezig in maat M en kom tot de ontdekking dat ik na de 13 cm tricotsteek moet minderen naar 197 steken. zover zo goed dan moet ik 4 naalden ribbelsteek en dan beginnen met patroon M1.. dit patroon beslaat 8 steken en moet herhaald worden. Echter is dit onmogelijk want ik kan 197 - 10 steken voorbies = 187 steken niet delen door 8 zodat ik het gaatjes patroon niet boven elkaar krijg.
14.01.2017 - 20:08DROPS Design answered:
Hoi Marleen. Je breit als volgt: 5 voorbiessteken, herhaal M.1 23 keer = 184 st breien, je hebt dan nog 3 st, brei de eerste 3 st weer van M.1 (dan is je patroon ook gelijk aan beide voorpanden) en eindig met 5 voorbiessteken.
19.01.2017 - 14:27
![]() Sabine Jungmann wrote:
Sabine Jungmann wrote:
Leider komm ich mit der angabe für den kragen auch nicht klar. die 15M die nach 62cm übrigbleiben beim vorderteil sind schulter? und vorne hab ich dann einen geraden ausschnitt und beim rückenteil bleibt mir viel mehr "schulter" übrig da nur die mittleren 21M abgekettet werden??? bitte um hilfe...
09.07.2016 - 23:29DROPS Design answered:
Liebe Sabine, die (je nach Grösse) 13-14-15-15-15 M sind die Kragenmaschen, die weiter gestrickt werden, wenn bereits für die Schulter abgekettet wurde.
11.07.2016 - 16:47
![]() Nancy Goldberg wrote:
Nancy Goldberg wrote:
Using cotton/acrylic. Does this pattern have any ease in it. I am between 2 sizes. Also, can I do 1yo instead of I don't want the holes so wide at the chest v section? Thank you
18.06.2016 - 05:35DROPS Design answered:
Dear Mrs Goldberg, you will find a measurement chart at the bottom of the pattern, with all measurements for each size in cm, taken flat from side to side. Compare these to find out the matching size - read more here. Measurements for each size have been made in pattern as charted, make sure your swatch will match before altering the pattern - for any further personnal assistance you can also request help from the store where you bought your yarn. Happy knitting!
20.06.2016 - 08:42
![]() Nancy Goldberg wrote:
Nancy Goldberg wrote:
Is there a video tutorial for this pattern ?
23.01.2016 - 05:16DROPS Design answered:
Dear Mrs Goldberg, there are no specific videos to the diagrams yet, you will find videos showing how to work most of the techniques used here under tab "videos". Happy knitting!
25.01.2016 - 10:53
![]() Nancy Goldberg wrote:
Nancy Goldberg wrote:
I bought my yarn on line from Nordicmart. Where do I go for questions. Would love to videos that match this pattern for charts M.1 M.2 and M.3. Want to start pattern but want to make sure that chart is read from right side so row 1 reads right to left and row 2 would read left to right?
23.01.2016 - 05:06DROPS Design answered:
Dear Mrs Goldberg, that's correct - read more about diagrams here. Happy knitting!
25.01.2016 - 10:50
![]() Ulla wrote:
Ulla wrote:
Ich verstehe das mit dem Kragen nicht! :-(
03.09.2015 - 18:10DROPS Design answered:
Liebe Ulla, bitte präzisieren Sie, was genau Sie beim Kragen nicht verstehen, damit wir Ihnen weiterhelfen können.
08.09.2015 - 11:03
|
|||||||||||||
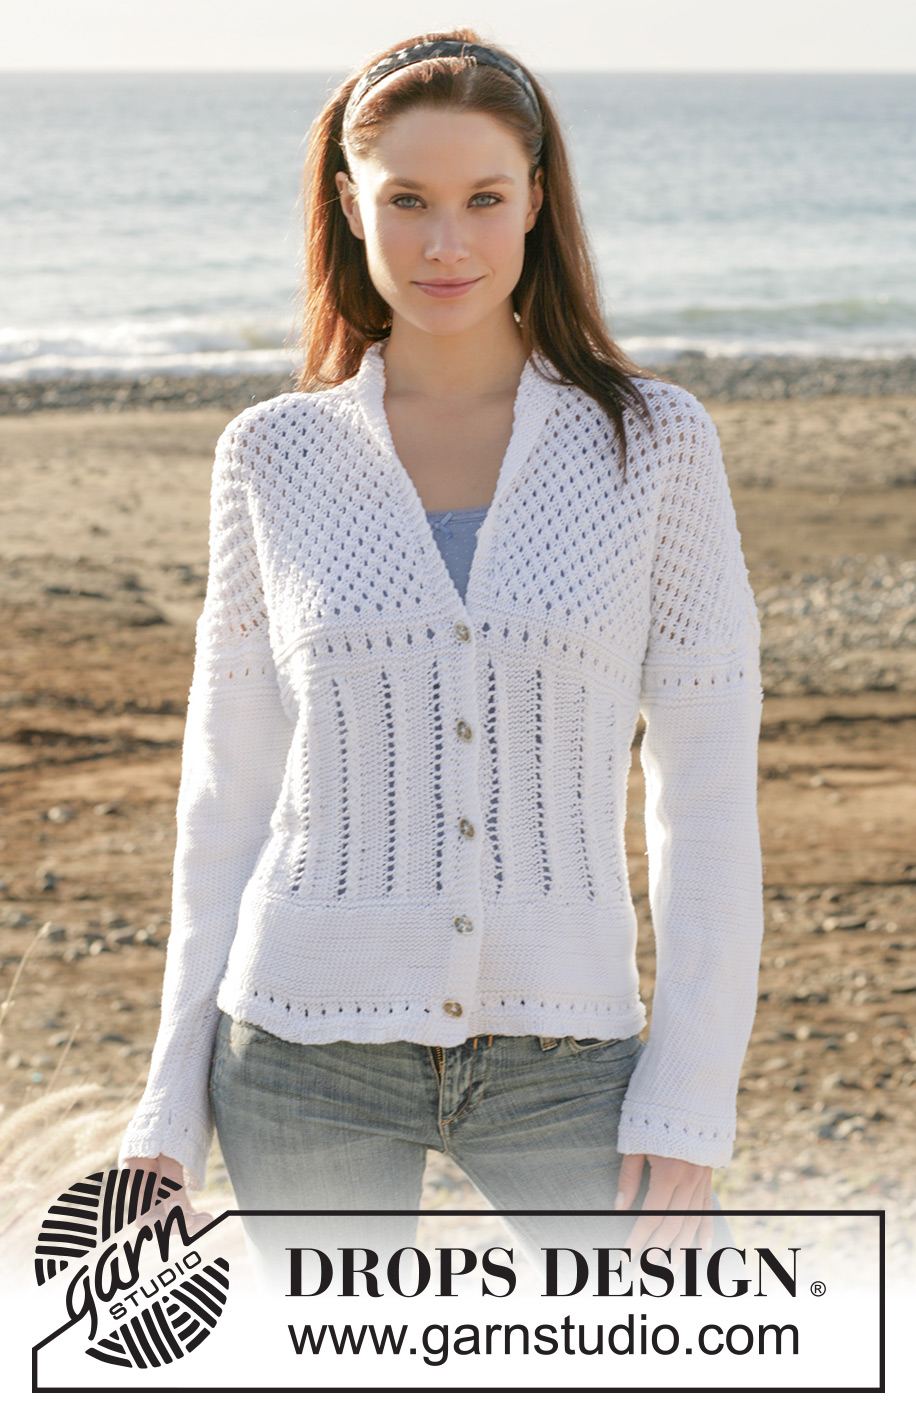
Lily White#lilywhitecardigan |
|||||||||||||
|
|
|||||||||||||
DROPS jacket with collar and lace pattern in “Muskat”
DROPS 101-22 |
|||||||||||||
|
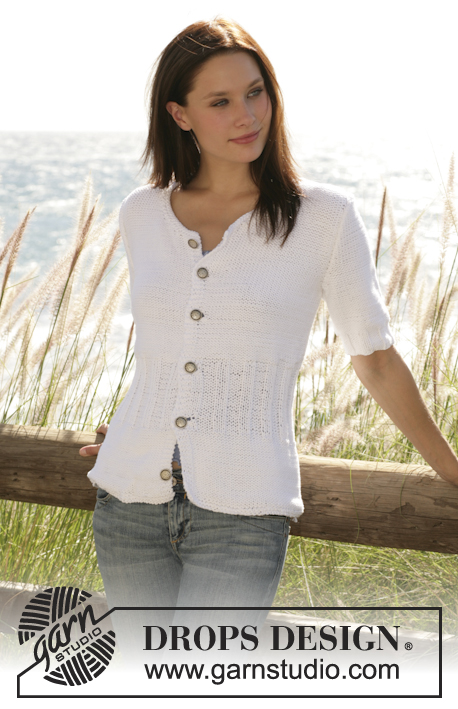
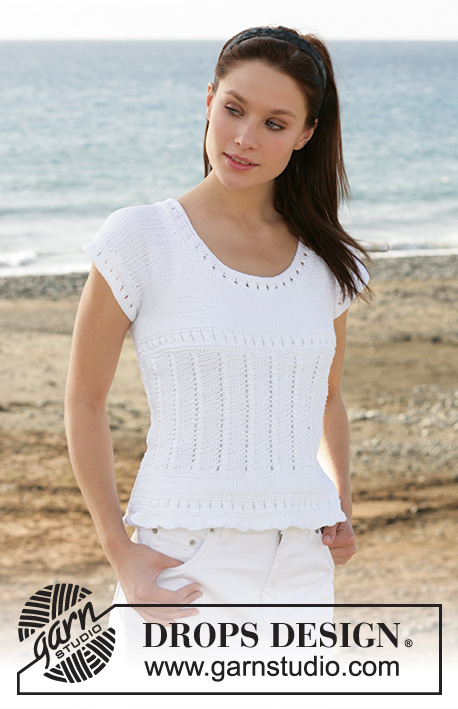
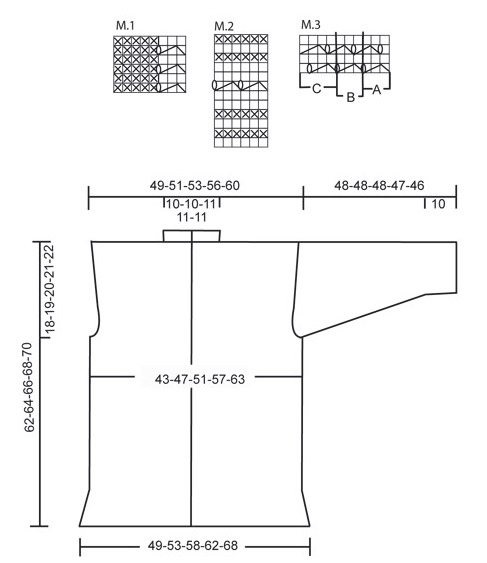
Knitting gauge: 20 sts x 26 rows on needle size 4.5 mm / US 7 in stockinette sts = 10 x 10 cm / 4" x 4" Garter st, back and forth on needle: Knit all rows Pattern: See diagram M.1-M.3. The diagram is showing every row in pattern seen from the right side. Buttonholes: Make buttonholes on right front band. 1 buttonhole: K tog 3rd and 4th st from edge and make a yo. Make buttonholes when piece measures: Size S: 2, 9, 16, 23 and 30 cm / ¾",3½",6¼",9" and 11¾" Size M: 3, 10, 17, 24 and 31 cm / 1⅛",4",6¾",9½" and 12¼" Size L: 4, 11, 18, 25 and 32 cm / 1½",4⅜",7",9¾" and 12½" Size XL: 5, 12, 19, 26 and 33 cm / 2",4¾",7½",10¼" and 13" Size XXL: 6, 13, 20, 27 and 34 cm / 2⅜",5⅛",8",10⅝" and 13⅜" ___________________________________________________________ Back and front piece: Worked back and forth on circular needle from mid front. Cast on 205-223-241-259-283 sts (includes 5 front band sts each side towards mid front, knitted in garter sts throughout) on circular needle size 4.5 mm / US 7. Work first row as follows (from WS): 5 front band sts in garter sts, *P3, K3*, repeat from *-* and finish with P3 and 5 front band sts in garter. Work 2 more rows like this and then continue with 1 vertical repeat of diagram M.2 - remember buttonholes on right front band - see explanation above. After M.2 continue in reverse stockinette sts until piece measures 13 cm / 5⅛", at the same time on the last row dec evenly to 181-197-213-237-261 sts (do not dec over front band sts). K4 rows garter sts and continue in diagram M.1 with front band sts in garter sts. When piece measures 33 cm / 13" work M.2, at the same time adjust no of sts to 181-199-214-238-262 on the first row. On the last row of M.2 inc 1 st mid back = 182-200-215-239-263 sts. After M.2 finish piece in M.3 as follows: 5 front band sts, M.3 A (= 3 sts), M.3 B until 9 sts left on row, M.3 C (= 4 sts) and 5 front band sts. When piece measures 44-45-46-47-48 cm / 17¼"-17¾"-18"-18½"-19" work next row as follows: 46-50-53-58-63 sts (= front piece), bind off 2-4-6-8-10 sts for armhole, 86-92-97-107-117 sts (= back piece), bind off 2-4-6-8-10 sts for armhole, 46-50-53-58-63 sts (= front piece). Now complete each piece separately. Back piece: = 86-92-97-107-117 sts. Continue in M.3 with 1 garter st each side - make sure to continue the pattern, work sts not fitting into pattern at the sides in stockinette sts. When piece measures 3-4-5-6-7 cm / 1⅛"-1½"-2"-2⅜"-2¾" from the split for the armhole inc 1 st inside 1 garter st each side for wide shoulder. Inc 1 st in the 4 smaller sizes (no inc in size XXL) on every 2-3-4-5 cm / ¾"-1⅛"-1½"-2" a further 5-4-3-1 times = 98-102-105-111-119 sts (work inc sts in stockinette st until they fit into pattern). When piece measures 60-62-64-66-68 cm / 23⅝"-24⅜"-25¼"-26"-26¾" bind off the middle 20-20-21-21-21 sts for neck = 39-41-42-45-49 sts left on each shoulder. Finish each side separately and continue in pattern – stockinette st sts not fitting into pattern at neckline. Bind off remaining sts when piece measures 62-64-66-68-70 cm / 24⅜"-25¼"-26"-26¾"-27½". Right front piece: = 46-50-53-58-63 sts. Inc for wide shoulder as described for back piece = 52-55-57-60-64 sts. Note! No dec for neck. When piece measures 62-64-66-68-70 cm / 24⅜"-25¼"-26"-26¾"-27½" bind off the outermost 39-41-42-45-49 sts on shoulder = 13-14-15-15-15 sts left. Work 5-5-6-6-6 cm / 2"-2"-2½"-2½"-2½" as before over these sts (= neckline to be sewn to back piece afterwards, to be stretched slightly so do not work further then indicated). Put sts on a holder. Left front piece: Like right front piece, but mirrored. Sleeve: Worked back and forth on needle. Cast on 50-50-50-56-56 sts (includes 1 edge st each side) on needle size 4.5 mm / US 7. Work first row as follows from WS: 1 edge st, *K3, P3*, repeat from *-* and finish with 1 edge st. Work 2 more rows like this and then continue with 1 vertical repeat of M.2, at the same time on the first row dec evenly to 47-50-50-53-53 sts. Now K 1 row from RS and then continue in reverse stockinette sts. At the same time when sleeve measures 10 cm / 4" inc 1 st each side, repeat on every 2.5-2.5-2-2-2 cm / ⅞"-⅞"-¾"-¾"-¾" a total of 13-14-17-16-16 times = 73-78-84-85-85 sts. When piece measures 43-43-43-42-41 cm / 17"-17"-17"-16½"-16" work 1 vertical repeat of M.2, at the same time on the first row adjust no of sts to 74-77-83-86-89. Bind off after M.2, sleeve measures approx 48-48-48-47-46 cm / 19"-19"-19"-18½"-18". Assembly: Sew shoulder seams. Sew collar tog mid back (sts from holders) with grafting sts and sew collar to back piece. Sew sleeve seams and sew sleeves to front and back piece. Sew on buttons. |
|||||||||||||
Diagram explanations |
|||||||||||||
|
|||||||||||||
 |
|||||||||||||
Have you finished this pattern?Tag your pictures with #dropspattern #lilywhitecardigan or submit them to the #dropsfan gallery. Do you need help with this pattern?You'll find 21 tutorial videos, a Comments/Questions area and more by visiting the pattern on garnstudio.com. © 1982-2026 DROPS Design A/S. We reserve all rights. This document, including all its sub-sections, has copyrights. Read more about what you can do with our patterns at the bottom of each pattern on our site. |
|||||||||||||


With over 40 years in knitting and crochet design, DROPS Design offers one of the most extensive collections of free patterns on the internet - translated to 17 languages. As of today we count 324 catalogs and 12290 patterns - 12280 of which are translated into English (US/in).
We work hard to bring you the best knitting and crochet have to offer, inspiration and advice as well as great quality yarns at incredible prices! Would you like to use our patterns for other than personal use? You can read what you are allowed to do in the Copyright text at the bottom of all our patterns. Happy crafting!
Post a comment to pattern DROPS 101-22
We would love to hear what you have to say about this pattern!
If you want to leave a question, please make sure you select the correct category in the form below, to speed up the answering process. Required fields are marked *.