
Popular categories
Looking for a yarn?


Comments / Questions (55)
![]() Barbara wrote:
Barbara wrote:
Love this pattern
16.04.2026 - 21:54
![]() Laura wrote:
Laura wrote:
Tengo problemas al final de la parte delantera para formar el hombro y el cuello. Después de los aumentos (9 para el talle L) debo comenzar a disminuir. Tengo 22 puntos y ya disminuí 6 puntos de los 20 que debo disminuir para la sisa. Me quedan 14 puntos para disminuir del lado de la sisa y 8 puntos que no se bien como disminuir. No sé tampoco como hacer con los 3 puntos derechos del borde del cuello
19.12.2025 - 17:56DROPS Design answered:
Hola Laura, cuando la labor mide 42 cm tienes 38 pts. Ahora aumentas en el 2º lado, 13 aumentos en total. Después de 6cm, cuando la labor mida 48cm, empiezas a cerrar y disminuir en el 1º lado (= 7 pts disminuidos, comenzando y disminuyendo primero los 3 pts orillo), a la vez que continúas con los aumentos en el 2º lado. Trabajas de esta forma hasta que la labor mida 55cm. A partir de ahí cierras para la sisa 13 + 20 pts en el 1º lado y, cuando la labor mida 58 cm, empiezas a cerrar también en el 2º lado, hasta disminuir todos los pts.
04.01.2026 - 23:03
![]() Martine TOMASI wrote:
Martine TOMASI wrote:
Bonjour, je souhaite réaliser ce modèle. Les deux laines sont épuisées, et je n'arrive pas à trouver des fils de composition à peu près équivalente ... Merci par avance pour votre aide. (J'ai bien utilisé les tableaux d'équivalence, je ne m'en sors pas !)
11.02.2025 - 13:54DROPS Design answered:
Bonjour Mme Tomasi, utilisez les alternatives proposées par le convertisseur, car, effectivement, aucun de ces 2 fils n'ont une équivalence 100% correspondante; on propose souvent de remplacer Silke Tweed par Alpaca, vous pouvez aussi remplacer Cotton Viscose par Safran, l'effet sera naturellement différent car les fils ont des compositions différents. Votre magasin pourra également vous aider, même par mail ou téléphone, dans le choix d'une alternative (pensez aussi à 1 fil du groupe C éventuellement). Bon tricot!
11.02.2025 - 16:09
![]() Maria Soledad Adiani wrote:
Maria Soledad Adiani wrote:
Podrías ser más sencillo la explicación del tejido cruzado en las delanteras , no quiero combinar colores , solo en un solo color me gustaría realizarlo y con palabras sencillas . ojalá tenga noticias pronta con tu ayuda.muchas gracias
29.05.2024 - 22:43DROPS Design answered:
Hola Maria Soledad, la labor se trabaja con dos hilos juntos; no haces rayas ni mezclas de colores, es como si usarás un solo hilo. Se usan dos para obtener el grosor deseado y el efecto de hilo deseado. No hacemos patrones personalizados, pero si tienes dudas en una sección concreta puedes escribirnos aquí. Si el patrón resulta demasiado complicado, puedes probar otro similar; puedes consultar otras chaquetas cruzadas haciendo click en "chaquetas cruzadas" en la sección "Más así" de los Materiales.
03.06.2024 - 00:34
![]() Adiani Maria Soledad wrote:
Adiani Maria Soledad wrote:
Podrías hacer más sencillas la explicación del tejido??
29.05.2024 - 22:36DROPS Design answered:
Hola Maria Soledad, la labor se trabaja con dos hilos juntos; no haces rayas ni mezclas de colores, es como si usarás un solo hilo. Se usan dos para obtener el grosor deseado y el efecto de hilo deseado. No hacemos patrones personalizados, pero si tienes dudas en una sección concreta puedes escribirnos aquí. Si el patrón resulta demasiado complicado, puedes probar otro similar; puedes consultar otras chaquetas cruzadas haciendo click en "chaquetas cruzadas" en la sección "Más así" de los Materiales.
03.06.2024 - 00:34
![]() Veronika Rademacher wrote:
Veronika Rademacher wrote:
Hallo, wie nehme ich beim Vorderteil nach den 3 re. krausmaschen 2, 3 und 4 Maschen zu? Bei 1 M zunehmen mache ich einen Umschlag , aber wie mache ich es bei mehr Maschen? Danke Veronika
06.01.2024 - 15:59DROPS Design answered:
Liebe Veronika, in diesem Video zeigen wir, wie man neuen Maschen an der Seiten zunimmt bzw anschlägt, beim rechten Vorderteil werden diese Maschen am Ende einer Rück-Reihe angeschlagen, und bei der nächsten Reihe glatt rechts gestrickt, die 3 Randmaschen bei dieser Seite werden erst ab 12-13-14-15-16 cm krausrechts gestrickt. Viel Spaß beim stricken!
08.01.2024 - 10:13
![]() Corry Veerman wrote:
Corry Veerman wrote:
Ik wil patroon 'sea crossing' breien met Drops Alpaca Mix 7815. Het oorspronkelijke garen is er niet meer. Hoeveel bollen heb ik nodig voor een damesmaat 40?
29.11.2023 - 14:33DROPS Design answered:
Dag Corry,
Met behulp van de garenvervanger (zie link onderaan de materialenlijst bij het patroon) kun je berekenen hoeveel je nodig hebt als je een vervangend garen wilt gebruiken. Als je de benodigde hoeveelheid van het oorspronkelijke garen invult komt er een lijst met alternatieven tevoorschijn met de hoeveelheden erbij.
29.11.2023 - 19:18
![]() Guadalupe Julieta Garcia Parra wrote:
Guadalupe Julieta Garcia Parra wrote:
Me disculpo porque hice una pregunta sin leer todo y ver la imagen. Ya comprendí la duda que tenía de los aumentos en la parte delantera. gracias
21.09.2023 - 17:11
![]() Guadalupe Julieta Garcia Parra wrote:
Guadalupe Julieta Garcia Parra wrote:
Mi pregunta es sobre los aumentos del frente derecho. El patrón dice; (Aumentar en la orilla lateral cada 2 hileras; 1 pt 5-6-7-8-9 veces, 2 pts 4 veces, 3 pts 2 veces y 4 pts 1 vez . cuando es un punto no veo problema porque es una lazada de los 3 de musgo, pero cuando son 2 ,3 y 4 aumentos como o dondo los hago ?
21.09.2023 - 17:03DROPS Design answered:
Hola Guadalupe, aquí no aumentas, aquí estás montando puntos. Aumentas: 1 pt 5-6-7-8-9 veces. El resto de puntos los montas:2 pts 4 veces, 3 pts 2 veces y 4 pts 1 vez, lo más cerca posible hacia el lateral.
25.09.2023 - 01:03
![]() Lynn Strauss wrote:
Lynn Strauss wrote:
In sea crossing pattern… Back says to cast on 63 stiTches and then after garter edge decrease 1 stitch each side which would make 61 …yet the pattern says 57?.?HELP Thank you
10.03.2023 - 11:50DROPS Design answered:
Dear Mrs Strauss, you should decrease 1 stitch on each side when piece measures 5, 7 and 9 cm (= 3 times in total x 2 sts = 6 sts decreased), so that there are 63-6=57 sts left. Happy knitting!
10.03.2023 - 13:37
|
|
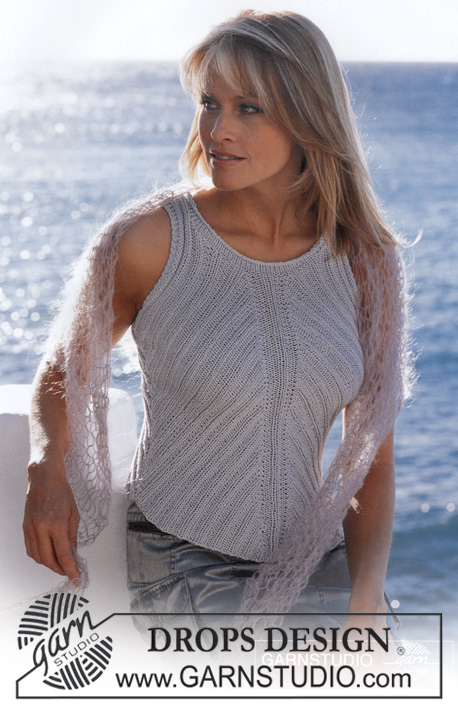
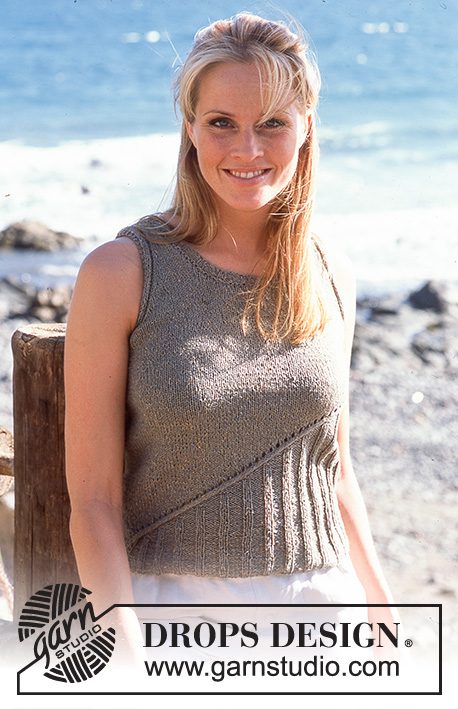
Sea Crossing |
|
|
|
|
Jumper in Silke-tweed and Cotton Viscose with wrap-round at front
DROPS 81-28 |
|
|
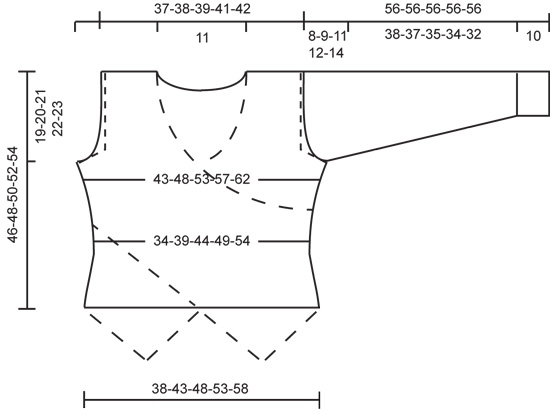
Gauge: 16 sts x 20 rows with 1 strand of each yarn (2 strands) in stockinette st = 10 x 10 cm. Note: The row gauge must be accurate in order for the pattern to work out. Increasing tips (for fronts): All increases are made on right side rows. Inc 1 st inside 3 edge sts knit in garter st by making a yo, on the next row twist and P the yo so that there will not be a hole. Decreasing tips (for fronts): All decs are made on right side rows. Dec 1 st inside of 3 edge sts knit in garter st as follows: After 3 edge sts: Slip 1 st as if to knit, K 1, psso. Before 3 edge sts: K 2 tog. Measuring-tips: Make all measurements when piece is lying flat. Back: Cast on 63-71-79-87-95 sts with 1 strand of each yarn (2 strands). Knit 4 rows garter st, then change to stockinette st. When the piece measures 5, 7 and 9 cm dec 1 st at each side = 57-65-73-81-89 sts. When the piece measures 12 cm inc 1 st at each side every 2-2-2-2.5-2.5 cm a total of 7-7-7-6-6 times = 71-79-87-93-101 sts. When the piece measures 27-28-29-30-31 cm bind off for armhole at each side every other row: 3 sts 1 time, 2 sts 1-2-3-4-5 times and 1 st 1-2-3-3-4 times = 59-61-63-65-67 sts. When the piece measures 43-45-47-49-51 cm knit 4 rows garter st over the center 23 sts (the remaining sts in stockinette st as before). Then bind off the center 17 sts for the neck = 21-22-23-24-25 sts remain on each shoulder. Continue with stockinette st and 3 sts in garter st at neck edges to finished measurements. Bind off when the piece measures 46-48-50-52-54 cm. Right front: Read the entire instructions and the tips above before knitting. All instructions relating to right edge and left edge of the piece are as seen from the right side of the work. Cast on 22-24-26-28-30 sts with 1 strand of each yarn (2 strands). Knit 4 rows garter st, then knit stockinette st, keeping 3 sts in garter st at the left edge of the piece (side-1) = this is the center front/lower edge. After the 2nd row of garter st, begin cast on for the side edge of the sweater at the right edge of the piece (side-2) every other row: 1 st 5-6-7-8-9 times, 2 sts 4 times, 3 sts 2 times and then 4 sts 1 time = 45-48-51-54-57 sts. The piece measures approx. 12-13-14-15-16 cm. Continue in stockinette st, keeping 3 sts in garter st at each edge – and dec 1 st at side-2 (see Decreasing tips): every 4th row 6-7-11-12-13 times and then every 6th row 4-4-2-2-2 times = 35-37-38-40-42 sts. The piece measures approx. 36-39-42-45-48 cm. Now inc 1 st at side-2 (see Increasing tips): every 4th row 6-5-4-3-1 times and then every other row 4-6-9-11-15 times. At the same time, when front piece measures 40-44-48-52-56 cm (from cast on edge), bind off on side-1 on every other row: 1 st 7 times (decrease at the edge, after the 3 garter sts have been bind off, knit stockinette stitch over all sts). The piece measures approx. 47-51-55-59-63 cm. On the next row bind off 8-10-13-16-18 sts at side-1 for armhole. Then dec 1 st at armhole 20-20-20-20-21 times as follows: dec every row for 3 rows and then knit 1 row without dec. After last inc on side-2 the piece measures approx. 51-54-58-61-65 cm from cast-on edge. Now dec 1 st from edge of side-2 every other row until all sts are bound off. The piece measures approx. 60-64-68-72-76 cm from cast-on edge to shoulder. Left front: Cast on and knit the same as the right, reversing all shaping. Sleeve: Cast on 36-38-40-42-42 sts with 1 strand of each yarn (2 strands). Knit 4 rows garter st, then continue as follows (first row = right side): K 1 row, * P 3 rows, K 3 rows *, repeat from * - * until the piece measures 10 cm, then knit stockinette st to finished measurements. When the piece measures 13 cm inc 1 st at each side every 3.5-3-3-2.5-2 cm a total of 10-11-11-12-14 times = 56-60-62-66-70 sts. When sleeve measures 48-47-45-44-42 cm bind off for sleeve cap at each side every other row: 3 sts 1 time, 2 sts 3 times, 1 st 0-1-3-4-6 times and then 2 sts at each side until the piece measures 55 cm, then bind off 3 sts 1 time at each side. Bind off the remaining sts, the piece measures approx. 56 cm. Assembly: Sew shoulder seams. Sew in sleeves. Lay right front over left and sew side seams (see dotted lines on diagram). |
|
 |
|
Have you finished this pattern?Tag your pictures with #dropspattern or submit them to the #dropsfan gallery. Do you need help with this pattern?You'll find 16 tutorial videos, a Comments/Questions area and more by visiting the pattern on garnstudio.com. © 1982-2026 DROPS Design A/S. We reserve all rights. This document, including all its sub-sections, has copyrights. Read more about what you can do with our patterns at the bottom of each pattern on our site. |


With over 40 years in knitting and crochet design, DROPS Design offers one of the most extensive collections of free patterns on the internet - translated to 17 languages. As of today we count 324 catalogs and 12290 patterns - 12280 of which are translated into English (US/in).
We work hard to bring you the best knitting and crochet have to offer, inspiration and advice as well as great quality yarns at incredible prices! Would you like to use our patterns for other than personal use? You can read what you are allowed to do in the Copyright text at the bottom of all our patterns. Happy crafting!
Post a comment to pattern DROPS 81-28
We would love to hear what you have to say about this pattern!
If you want to leave a question, please make sure you select the correct category in the form below, to speed up the answering process. Required fields are marked *.