
Popular categories
Looking for a yarn?


Comments / Questions (7)
![]() Vera wrote:
Vera wrote:
Guten Tag! Ich verstehe diese Angaben beim Ärmel nicht. Nach 49-48-46-45-44 cm, bei jeder 2. R. gegen die Schulter abk.: 3 M. 1 Mal, 2 M. 2-2-1-1-1 Mal und 1 M. 1-2-5-6-7 Mal, weiter, Dh nicht auf beiden Seiten? Welche Seite ist die gegen die Schulter? weiter, 2 M. auf beiden Seiten ab Dh danach immer 2M beidseits? Oder nur 1x? Danke für die Antwort! Lg Vera
11.04.2023 - 14:22DROPS Design answered:
Liebe Vera, also hier wird eine Korrektur erfolgen... danke für den Hinweis, für den Armkugel muss man am Anfang jeder Reihe (beide Hin- und Rückreihe = beidseitig) so abketten: 3 Maschen x 1 Mal, 2 Maschen x 2-2-1-1-1 Mal, 1 Masche x 1-2-5-6-7 Mal, dann ketten Sie 2 Maschen am Anfang jeder Reihe (Hin- sowie Rückreihe) ab bis die Ärmel 56 cm misst, dann ketten Sie 3 Maschen am Anfang der 2 nächsten Reihe dann die restlichen Maschen ab. Viel Spaß beim stricken!
11.04.2023 - 16:52
![]() Rinat Prilik wrote:
Rinat Prilik wrote:
Hello, I'm a little confused. I started with the body part of the sweater, working pattern 1; 2 YO and only 1 psso I have additional sts each row, comparing to instruction. What am I missing?
22.03.2022 - 06:21DROPS Design answered:
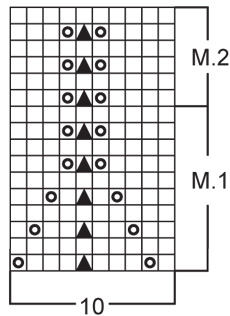
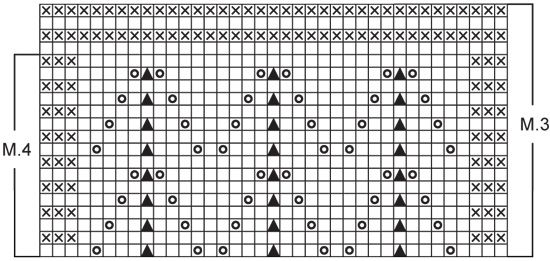
Hi Rinat, The dark triangles in M.1 are 'Slip 1 stitch, knit 2 together and pass the slipped stitch over', which decreases 2 stitches. These are replaced by the YOs and the stitch number should stay the same. Happy knitting!
22.03.2022 - 06:55
![]() Debbie wrote:
Debbie wrote:
Hello. In the Lisse pattern, am I supposed to knit the front and back (bind off for armhole) at the same time? Asking because they are written as two separate instructions Thank you
15.03.2022 - 04:01DROPS Design answered:
Hi Debbie, Yes you continue to work as before, while binding off for the armholes. Happy knitting!
15.03.2022 - 06:46
![]() Debbie wrote:
Debbie wrote:
Do your sizings run small? I am 158cm tall, weigh 51 kg, with a bust measurement of 90cm. Do I need to knit a size large??
25.02.2022 - 00:25DROPS Design answered:
Dear Debbie, measure a similar garment you have and like the size and compare these measurements to those in the chart, this will then help you to choose the right size - ajdusting if you like it more tight or more loose. Read more about chart here. Happy knitting!
25.02.2022 - 09:23
![]() Alejandra Sanchez wrote:
Alejandra Sanchez wrote:
Muy lindos
10.04.2021 - 14:42
![]() Els wrote:
Els wrote:
Beste, De wol vivali is niet meer beschikbaar. Kan ik deze vervangen door Kid silk? Ik heb hiervan reeds 4 bollen gekocht, maar begin te twijfelen of ik genoeg ga hebben voor maat S. vriendelijke groeten ,Els
25.10.2020 - 08:32DROPS Design answered:
Dag Els,
KidSilk heeft een andere stekenverhouding dan Vivaldi, maar je zou in dit geval 2 draden kidSilk kunnen gebruiken. Onderaan de lijst met materialen zie je een link met de garenvervanger, waarmee je uit kunt rekenen hoeveel gram je nodig hebt voor een vervangend garen. Voor KidSilk heb je dan ongeveer 140 gram nodig (dus 6 bollen, want 1 bol kidsilk = 25 gram) om 100 gram Vivaldi te vervangen.
25.10.2020 - 18:57
![]() Joy wrote:
Joy wrote:
Hello, I am a bit confused. The pattern says to cast on with 2 strands, then it says to take one away, but I cant see when you are to add the second strand back in. When do you add the second strand back in? Or do you leave it out for the remaining pattern?
21.08.2018 - 15:58DROPS Design answered:
Dear Joy, you use 2 strands just to cast on sts for the body and sleeves and also to work the neckband. Happy crafting!
21.08.2018 - 17:19
|
|||||||||||||
Lisse |
|||||||||||||
 |
 |
||||||||||||
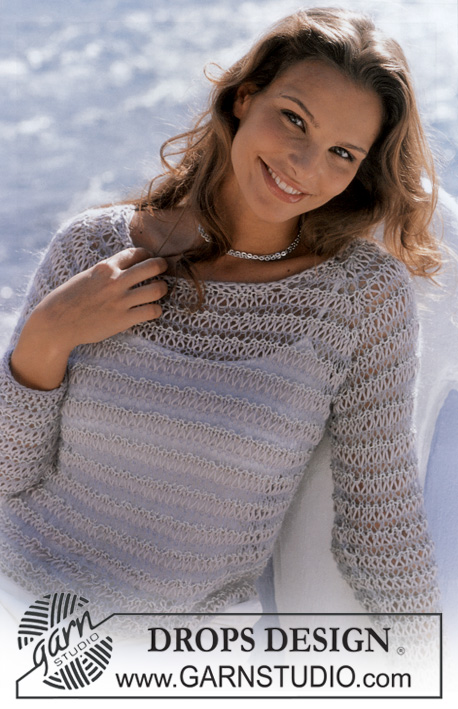
DROPS Pullover in Vivaldi and Scarf in Muskat
DROPS 81-4 |
|||||||||||||
|
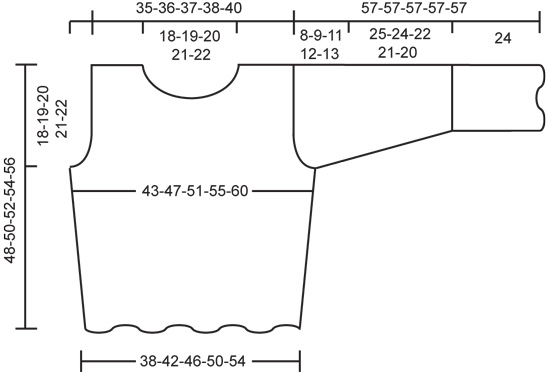
PULLOVER: Gauge: 13 sts x 18 rows in stockinette st = 10 x 10 cm. Pattern: See the chart for Patterns 1 and 2. The pattern is seen from right side. Body: Loosely cast on 100-110-120-130-140 sts with 2 strands Vivaldi. Join and place a marker at the join, take away 1 strand and knit Pattern 1, then continue in stockinette st. Place a marker at each side (= 50-55-60-65-70 sts between markers). When the piece measures 10 cm inc 1 st each side of each marker every 5 cm a total of 3-3-3-3-4 times = 112-122-132-142-156 sts. When the piece measures 30-31-32-33-34 cm bind off 4-4-6-6-6 sts at each side for armhole (= 2-2-3-3-3 sts at each side of each marker). Front: = 52-57-60-65-72 sts. Bind off for armhole every other row: 2 sts 1-1-2-2-3 times and 1 st 1-3-2-4-4 times = 46-47-48-49-52 sts. When the piece measures 40-41-43-44-46 cm put the center 12-13-14-15-16 sts on a st holder for the neck. Then bind off at each neck edge every other row: 2 sts 2 times and 1 st 2 times = 11-11-11-11-12 sts remain on each shoulder. Bind off when the piece measures 48-50-52-54-56 cm. Back: = 52-57-60-65-72 sts. Bind off for armhole as on front. When the piece measures 46-48-50-52-54 cm bind off the center 22-23-24-25-26 sts for the neck. On the next row dec 1 st at each neck edge = 11-11-11-11-12 sts remain on each shoulder. Bind off when the piece measures 48-50-52-54-56 cm. Sleeve: Loosely cast on 32-42-42-42-42 sts with 2 strands Vivaldi. Take away 1 strand and knit Pattern 1 keeping 1 edge st at each side in garter st, then knit Pattern 2 until the piece measures 24 cm. Then knit stockinette st to finished measurements. After Pattern 2 inc 1 st at each side every 4-10-6-4.5-3 cm a total of 6-3-4-5-7 times = 44-48-50-52-56 sts. When sleeve measures 49-48-46-45-44 cm bind off for sleeve cap at each side every other row: 3 sts 1 time, 2 sts 2-2-1-1-1 time and 1 st 1-2-5-6-7 times, then bind off 2 sts at each side until the piece measures 56 cm, then bind off 3 sts 1 time at each side. Bind off the remaining sts, the piece measures approx. 57 cm. Assembly: Sew right shoulder. Neckband: Pick up approx. 60-70 sts (incl. sts on st holders) around the neck with 2 strands Vivaldi. Knit 5 rows stockinette st back and forth, bind off. Sew left shoulder and up along neckband. Sew the sleeve using edge sts as seam allowance and sew sleeves into Body. SCARF: Measurements: approx. 17 x 120 cm [6.75" x 47.25"] Materials: Garnstudio MUSKAT 100% mercerized Egyptian cotton, 50 g./100 m./109 yards 150 gr nr 18, white DROPS 4 mm [US 6] needles, or size needed to obtain correct gauge. Gauge: 21 sts x 28 rows in stockinette st = 10 x 10 cm Pattern: See chart for Patterns 3 and 4(the lower chart). The pattern is seen from the right side. = knit from right side, purl from wrong side = knit from wrong side = slip 1 as if to knit, K 2 tog, psso. = yo Scarf: So that the scarf will be alike at both ends, you need to knit 2 sides and join them in the middle. Cast on 43 sts and knit 4 rows garter st. Knit the next row as follows (right side row): K 3 (edge sts in garter st), K 5, sl 1, K 2 tog, psso, * K 9, sl 1, K 2 tog, psso *, repeat from * - * 1 time more, K 5, K 3 (edge sts in garter st). You have now decreased 6 sts = 37 sts. P back, keeping 3 sts in garter st at each side. Then knit Pattern 3 twice, and then knit Pattern 4 until the piece measures 60 cm – adjust to end after 1 entire repeat. K 1 row from right side and K 1 row from wrong side, put sts on a st holder. Knit another side in the same manner. Assembly: Weave the two sides together at center. |
|||||||||||||
Diagram explanations |
|||||||||||||
|
|||||||||||||
 |
|||||||||||||
 |
|||||||||||||
 |
|||||||||||||
Have you finished this pattern?Tag your pictures with #dropspattern or submit them to the #dropsfan gallery. Do you need help with this pattern?You'll find 25 tutorial videos, a Comments/Questions area and more by visiting the pattern on garnstudio.com. © 1982-2026 DROPS Design A/S. We reserve all rights. This document, including all its sub-sections, has copyrights. Read more about what you can do with our patterns at the bottom of each pattern on our site. |
|||||||||||||


With over 40 years in knitting and crochet design, DROPS Design offers one of the most extensive collections of free patterns on the internet - translated to 17 languages. As of today we count 325 catalogs and 12298 patterns - 12288 of which are translated into English (US/in).
We work hard to bring you the best knitting and crochet have to offer, inspiration and advice as well as great quality yarns at incredible prices! Would you like to use our patterns for other than personal use? You can read what you are allowed to do in the Copyright text at the bottom of all our patterns. Happy crafting!
Post a comment to pattern DROPS 81-4
We would love to hear what you have to say about this pattern!
If you want to leave a question, please make sure you select the correct category in the form below, to speed up the answering process. Required fields are marked *.