DROPS Alpaca
DROPS Alpaca
100% Alpaca
from 4.85 $ /50g
Get the yarn to make this pattern from 19.40$.

The yarn cost is calculated from the pattern’s smallest size and the yarn’s cheapest product type. Looking for an even better price? You might find it on the DROPS Deals!

DROPS SS24

Sweet Ella

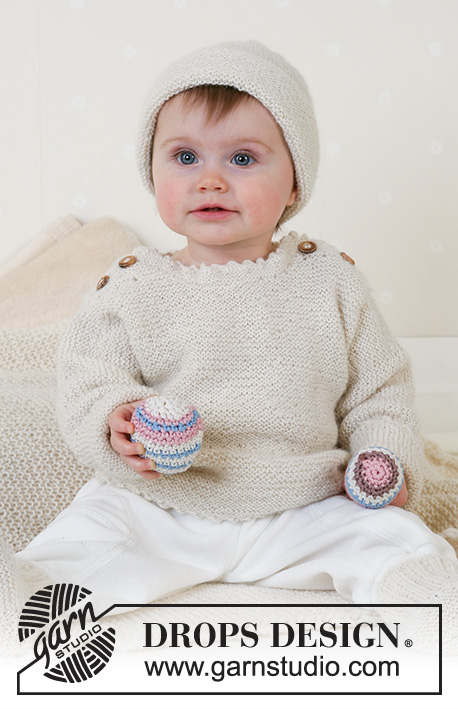
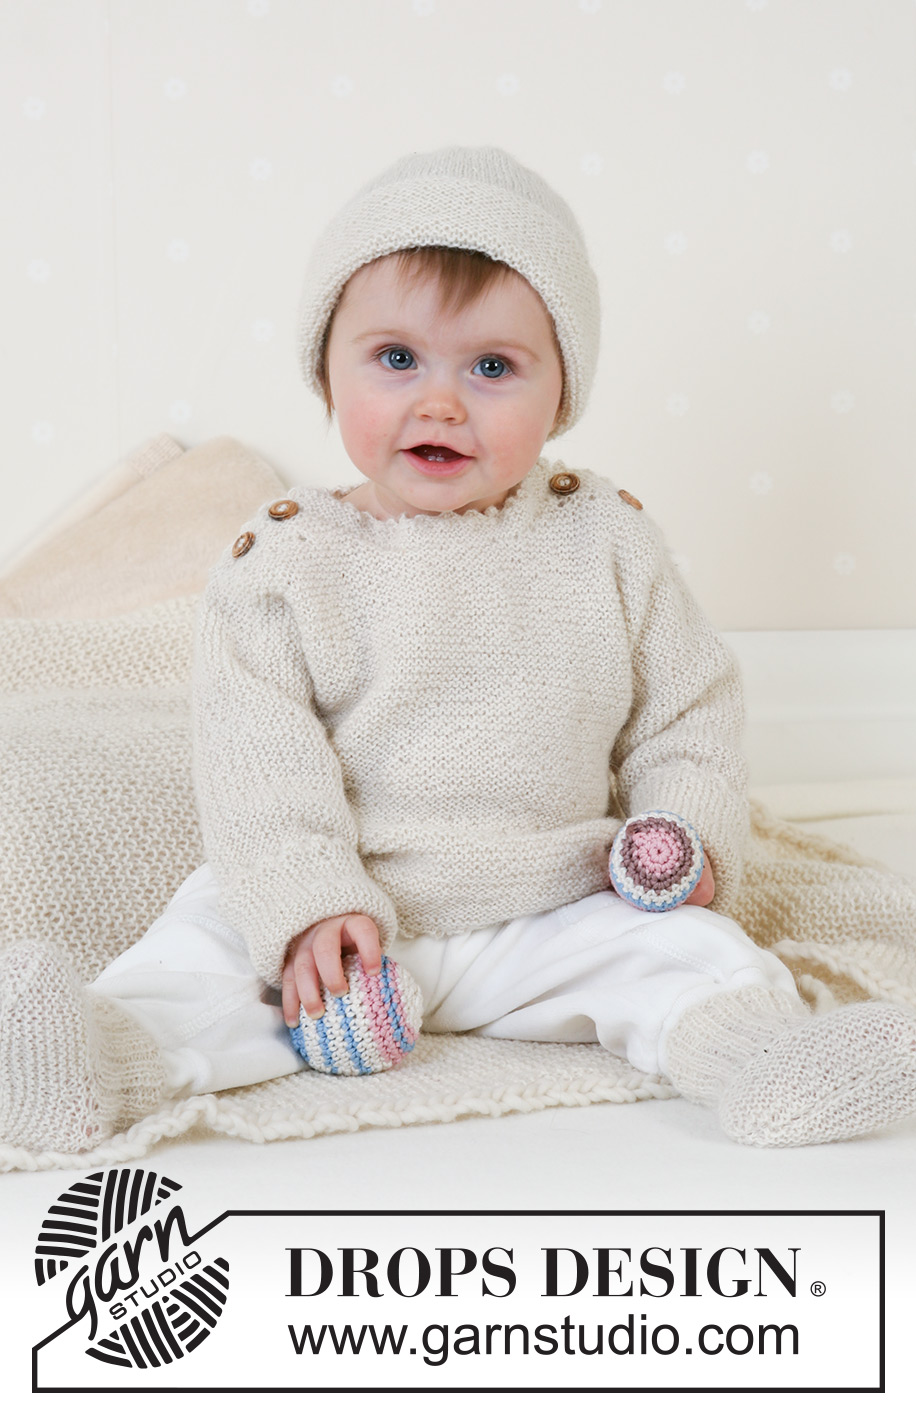
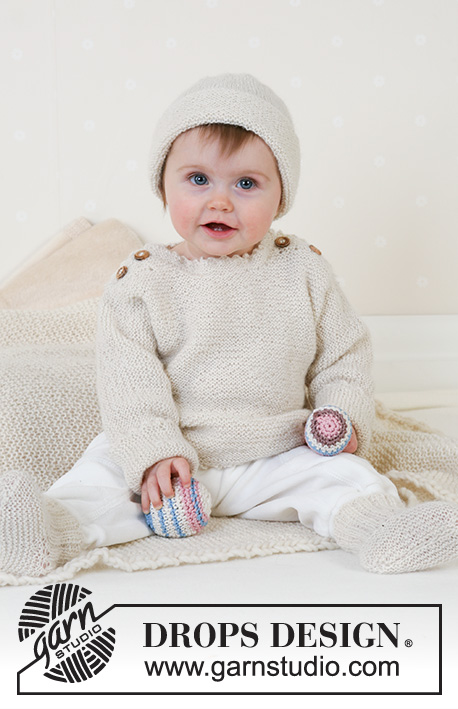
Knitted sweater with buttons and socks in DROPS Alpaca. Sizes baby and children from 1 month to 4 years.

DROPS Baby 14-13
Size: 1/3 – 6/9 – 12/18 months (2 –3/4 years)
All measurements in charts are in cm.

Materials: DROPS Alpaca from Garnstudio
Jumper: 150-200-200 (250-300) g color no 0100, off-white

DROPS CIRCULAR NEEDLE size 3 mm / US 2or3
DROPS CROCHET HOOK size 3 mm / C or D (for borders)
DROPS wooden button, no 513, 4 pcs

Socks:
50 g for all sizes color no 0100, off-white
DROPS STRAIGHT NEEDLES size 2.5 mm / US 1or2

-------------------------------------------------------

Alternative Yarn – See how to change yarns here
Yarn Groups A to F – Use the same pattern and change the yarn here
Yarn usage using an alternative yarn – Use our yarn converter here

-------------------------------------------------------

DROPS Alpaca
DROPS Alpaca
100% Alpaca
from 4.85 $ /50g
Get the yarn to make this pattern from 19.40$.

The yarn cost is calculated from the pattern’s smallest size and the yarn’s cheapest product type. Looking for an even better price? You might find it on the DROPS Deals!

Pattern instructions

NOTE: This pattern is written in American English. All measurements in charts are in cm. For conversion from inches to cm - click here. There are different terms for crocheting in American and British English. If this pattern includes crochet, click for "crochet terms" here. For this pattern in British English, please click here.
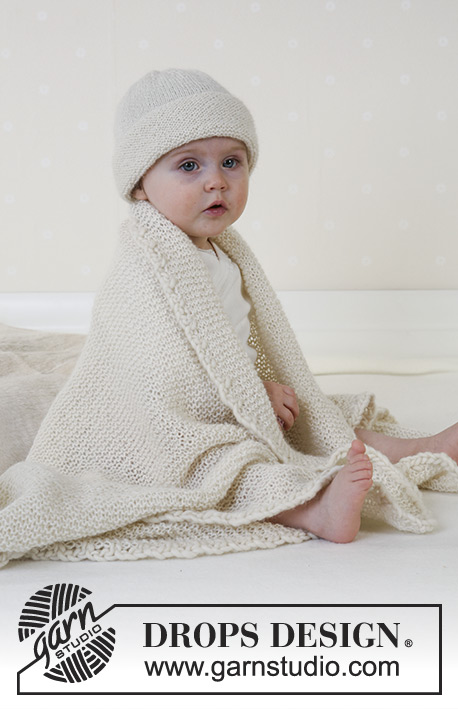
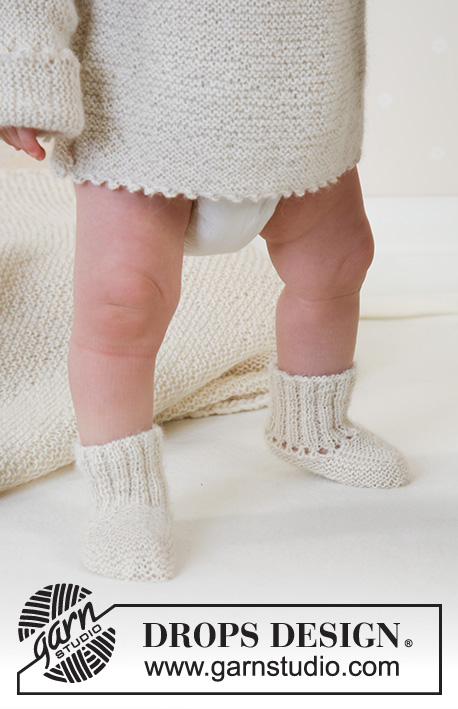
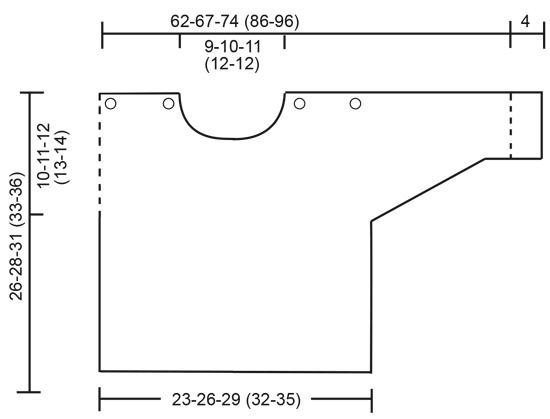
JUMPER:
Gauge: 24 sts x 48 in garter sts with Alpaca in garter sts on needle size 3 mm / US 2or3 = 10 x 10 cm / 4" x 4"

Because of the number of sts, work back and forth on circular needle.
Front piece: Cast on 58-64-71 (78-86) sts (includes 1 edge st each side) with Alpaca on circular needle size 3 mm / US 2or3 and knit garter sts.
When piece measures 16-17-19 (20-22) cm / 6¼"-6¾"-7½" (8"-8¾") cast on new sts each side for sleeves at the end of every row, each side: 3 sts 3-3-3 (3-2) times, 4 sts 4-4-3 (5-8) times, 10 sts 2-2-3 (3-3) times and then 10-13-12 (15-14) sts 1 time = 168-180-197 (226-250) sts (includes 4 cm / 1½" fold-up on each sleeve).
When piece measures 21-23-26 (27-30) cm / 8¼"-9"-10¼" (10⅝"-11¾"), bind off the middle 8-10-13 (14-14) sts for neck. Put sts on one side on a holder.

1st side: = 80-85-92 (106-118) sts. Now bind off for neck towards mid front on every 4th row as follows: 2 sts 2 times and 1 st 3 times = 73-78-85 (99-111) sts left on shoulder/sleeve.
When piece measures 25-27-30 (32-35) cm / 9¾"-10⅝"-11¾" (12½"-13¾") bind off for 2 buttonholes on shoulder as follows from mid front: K2, K2 tog, yo, K7-8-9 (10-11) sts, K2 tog, yo, knit garter sts over remaining sts. Continue in garter sts until piece measures 26-28-31 (33-36) cm / 10¼"-11"-12¼" (13"-14¼").
Now put the outermost 57-61-67 (80-91) sts from sleeve edge and in towards the shoulder on a holder. Bind off the remaining 16-17-18 (19-20) sts.

2nd side: Put sts from first holder back on needle and work as 1st piece, but mirrored.

Back piece: Cast on and work as front piece.
Cast on new sts for sleeve as described for front piece and continue until piece measures 24-26-29 (31-34) cm / 9½"-10¼"-11⅜" (12¼"-13⅜") (do not make buttonholes on back piece). Now bind off the middle 18-20-23 (24-24) sts for neck and work each side separately. Then dec to shape the neckline on every other row: 1 st 2 times = 73-78-85 (99-111) sts left on shoulder/sleeve.
When piece measures 26-28-31 (33-36) cm / 10¼"-11"-12¼" (13"-14¼") put the outermost 57-61-67 (80-91) sts from sleeve edge in towards the shoulder on a holder = 16-17-18 (19-20) sts left on shoulder. Continue in garter sts and bind off when piece measures 28-30-33 (35-38) cm / 11"-11¾"-13" (13¾"-15") (= button band).
Repeat the other side of neck.

Assembly: Sew upper sleeve seams (sts from holders) with neat sts.
Sew side and under arm seams within 1 edge st.

Neck: Pick up approx 30-40 sts from the right side along neckline on front piece with Alpaca and needle size 3 mm / US 2or3. Knit 6 rows garter sts and bind off from the wrong side. Repeat on back piece (also pick up sts along button edge). Sew on buttons.

Crochet border: Using crochet hook size 3 mm / C or D, crochet a border round neck on front and back pieces, along bottom edge on front and back pieces and round sleeve edges as follows: 1 sc in 1st st, *3 ch, 1 hdc in the 1st of the 3 ch just crochet, 1 sc in each of the next 3 sts*, repeat from *-*.


SOCKS:
Size: 1/3 – 6/9 – 12/18 months (2 years)
To fit foot length: 10-11-12 (14) cm / 4"-4½"-4¾" (5½")

Rib: *K2, P2*, repeat from *-*

The sock is worked back and forth from mid back.
Cast on 48-52-56 (56) sts with 2 strands of Alpaca and needles size 2.5 mm / US 1or2. Remove 1 strand and work 5-6-6 (7) cm / 2"-2½"-2½" (2¾") in Rib – stop after a row from RS. K 1 row from the wrong side, at the same time dec 14-14-18 (14) sts evenly on row = 34-38-38 (42) sts.
With row of eyelet holes: Work next row from the right side as follows: K1, *K2 tog, yo*, repeat from *-* and finish with K1. K1 row from wrong side.
Without row of eyelet holes: K1 row from right side and K1 row from wrong side.
Now put the outermost 12-13-13 (15) sts each side on a holder.
Work 4-4.5-5.5 (6.5) cm / 1½"-1¾"-2¼" (2½") in garter sts over the middle 10-12-12 (12) sts.
Put sts from holder back on needle and pick up 10-11-13 (16) sts on each side of middle piece = 54-60-64 (74) sts.
Work 3-4-5 (5) cm / 1"-1½"-2" (2") in garter sts over all sts, at the same time after 1.5-2-2.5 (3) cm/½"-¾"-⅞" (1") start dec on every other row until finished measurements as follows: Dec 1 st at the beginning and at the end of row and K2 tog on each side of the 2 middle sts.
Bind off when foot measures 10-11-12 (14) cm / 4"-4½"-4¾" (5½") and sew seam under foot and mid back.
Pull a silk ribbon or similar through eyelet holes.

HAT AND BLANKET: see pattern 14-12
BALL AND RATTLE: see pattern 13-32

Diagram

All measurements in charts are in cm.

diagram measurements
Do you have a question? See a list of frequently asked questions (FAQ)

Knitting tension is what determines the final measurements of your work, and is usually measured per 10 x 10 cm. It is provided like so: number of stitches in width x number of rows in height - eg: 19 stitches x 26 rows = 10 x 10 cm.

The knitting tension is very individual; some people knit/crochet loosely while others work tightly. You adjust the knitting tension with the needle size, which is why the suggested needle size only serve as a guide! You need to adjust this (up or down) to ensure that YOUR knitting tension matches the knitting tension provided in the pattern. If you work with a different knitting tension than provided you will have a different yarn consumption, and your work will have different measurements than what the pattern suggests.

The knitting tension also determines which yarns can replace each other. As long as you achieve the same knitting tension you can replace one yarn with another.

See DROPS lesson: How to measure your tension/gauge

See DROPS video: How to make a gauge tension swatch

The required amount of yarn is provided in grams, eg: 450 g. To calculate how many balls you’ll need you first need to know how many grams are in 1 ball (25g, 50g or 100g). This information is available if you click on the individual yarn quality on our pages. Divide the amount required with the amount of each ball. For example, if each ball is 50g (the most common amount), the calculation will be as follows: 450 / 50 = 9 balls.

The important thing when changing from one yarn to another is that the knitting/crochet tension remains the same. This is so that the measurements of the finished piece will be the same as on the sketch provided. It is easier to achieve the same knitting tension using yarns from the same yarn group. It is also possible to work with multiple strands of a thinner yarn to achieve the knitting tension of a thicker one. Please try our yarn converter. We recommend you to always work a test swatch.

Please NOTE: when changing yarn the garment might have a different look and feel to the garment in the photo, due to individual properties and qualities of each yarn.

See DROPS lesson: Can I use a different yarn than the one mentioned in the pattern?

All our yarns are categorised into yarn groups (from A to F) according to thickness and knitting tension – group A contains the thinnest yarns and group F the thickest. This makes it easier for you to find alternative yarns to our patterns, should you wish to switch yarn. All yarns within the same group have a similar knitting tension and can easily replace each other. However, different yarn qualities have different structures and properties which will give the finished work a unique look and feel.

Click here for an overview of the yarns in each yarn group

At the top of all our patterns you’ll find a link to our yarn converter, which is a helpful tool should you wish to use a different yarn than suggested. By filling in the yarn quality you wish to replace, the amount (in your size) and number of strands, the converter will present good alternative yarns with the same knitting tension. Additionally it will tell you how much you’ll require in the new qualities and whether you’ll need to work with multiple strands. Most skeins are 50g (some are 25g or 100g).

If the pattern is worked with multiple colours, every colour will have to be converted separately. Similarly, if the pattern is worked with several strands of different yarns (for example 1 strand Alpaca and 1 strand Kid-Silk) you will have to find alternatives for each, individually.

Click here to see our yarn converter

Since different yarns have different qualities and textures we have chosen to keep the original yarn in our patterns. However, you can easily find options among our available qualities by using our yarn converter, or simply pick a yarn from the same yarn group.

It is possible that some retailers still have discontinued yarns in stock, or that someone has a few skeins at home that they would like to find patterns for.

The yarn converter will provide both alternative yarn as well as required amount in the new quality.

If you think it's hard to decide what size to make, it can be a good idea to measure a garment you own already and like the size of. Then you can pick the size by comparing those measures with the ones available in the pattern's size chart.

You'll find the size chart at the bottom of the pattern.

See DROPS lesson: How to read size chart

The needle size provided in the pattern serves only as a guide, the important thing is to follow the knitting tension. And since knitting tension is very individual, you will have to adjust the needle size to ensure that YOUR tension is the same as in the pattern – maybe you’ll have to adjust 1, or even 2 needle sizes, up or down to achieve the correct tension. For this, we recommend that you work test swatches.

Should you work with a different knitting tension than the one provided, the measurements of the finished garment might deviate from the measurement sketch.

See DROPS lesson: How to measure your tension/gauge

See DROPS video: How to make a gauge tension swatch

Working a garment top-down provides more flexibility and room for personal adjustment. For example it is easier to try the garment on while working, as well as making adjustments to length of yoke and shoulder caps.

The instructions are carefully explaining every step, in the correct order. Diagrams are adjusted to the knitting direction and are worked as usual.

The diagram depicts all rows/rounds, and every stitch seen from the right side. It is read from bottom to top, from right to left. 1 square = 1 stitch.

When working back and forth, every other row is worked from the right side and every other row is worked from the wrong side. When working from the wrong side, the diagram will have to be worked reversed: from left to right, knit stitches are purled, purl stitches are knit etc.

When working in the round every round is worked from the right side and the diagram are worked from right to left on all rounds.

See DROPS lesson: How to read knitting diagrams

The diagram depicts all rows/rounds, and every stitch seen from the right side. It is worked from bottom to top, from right to left.

When working back and forth every other row is worked from the right side: from right to left and every other row is worked from the wrong side: from left to right.

When working in the round, every row in the diagram are worked from the right side, from right to left.

When working a circular diagram you start in the middle and work your way outwards, counter clockwise, row by row.

The rows usually start with a given number of chain stitches (equivalent to the height of the following stitch), this will either be depicted in the diagram or explained in the pattern.

See DROPS lesson: How to read crochet diagrams

Instructions for working several diagrams after each other on the same row/round, will often be written like so: “work A.1, A.2, A.3 a total of 0-0-2-3-4 times". This means you work A.1 once, then A.2 is worked once, and A.3 is repeated (in width) the number of times provided for your size – in this case like so: S = 0 times, M = 0 times, L=2 times, XL= 3 times and XXL = 4 times.

The diagrams are worked as usual: begin with the first row in A.1, then work the first row in A.2 etc.

See DROPS lesson: How to read knitting diagrams

See DROPS lesson: How to read crochet diagrams

The total width of the garment (from wrist-to-wrist) will be larger in the larger sizes, despite the actual sleeves being shorter. The larger sizes have longer sleeve caps and wider shoulders, so there will be a good fit in all sizes.

The measurement sketch/schematic drawing provides information regarding the full length of the garment. If it’s a jumper or a jacket the length is measured from the highest point on the shoulder (usually closest to the neckline), and straight down to the bottom of the garment. It is NOT measured from the tip of shoulder. Similarly, the length of yoke is measured from the highest point on the shoulder and down to where yoke is split into body and sleeves.

See DROPS lesson: How to read a schematic drawing

Diagrams are often repeated on the round or in height. 1 repeat is the diagram the way it appears in the pattern. If it says to work 5 repeats of A.1 in the round, then you work A.1 a total of 5 times after/next to each other in the round. If it says to work 2 repeats of A.1 vertically/in height you work the entire diagram once, then begin again at the start and work the entire diagram one more time.

Chain stitches are slightly narrower than other stitches and to avoid working the cast-on edge too tight, we simply chain more stitches to begin with. The stitch count will be adjusted on the following row to fit the pattern and measurement sketch.

The rib edge is more elastic and will contract slightly compared to, for example, stocking stitch. By increasing before the rib edge, you avoid a visible difference in width between the rib edge and the rest of the body.

It’s very easy to cast off too tightly, and by making yarn overs while casting off (and simultaneously casting these off) you avoid a too tight cast off edge.

See DROPS video: How to bind off with yarn overs (yo)

To achieve an even increase (or decrease) you can increase on, for example: every 3rd and 4th row alternately, like so: work 2 rows and increase on the 3rd row, work 3 rows and increase on the 4th. Repeat this until the increase is complete.

See DROPS lesson: Increase or decrease 1 st on every 3rd and 4th row alternately

Should you prefer to work in the round instead of back and forth, you may of course adjust the pattern. You’ll need to add steeks mid-front (usually 5 stitches), and follow the instructions. When you would normally turn and work from the wrong side, simply work across the steek and continue in the round. At the end you’ll cut the piece open, pick up stitches to work bands, and cover the cut edges.

See DROPS video: How to knit steeks and cut open

Should you prefer to work back and forth instead of in the round, you may of course adjust the pattern so you work the pieces separately and then assemble them at the end. Divide the stitches for the body in 2, add 1 edge stitch in each side (for sewing) and work the front and back pieces separately.

See DROPS lesson: Can I adapt a pattern for circular needles into straight needles?

Pattern repeats can vary slightly in the different sizes, in order to get the correct proportions. If you’re not working the exact same size as the garment in the photo, yours might deviate slightly. This has been carefully developed and adjusted so that the complete impression of the garment is the same in all sizes.

Make sure to follow instructions and diagrams for your size!

If you have found a pattern you like which is available in women’s size it’s not very difficult to convert it to men’s size. The biggest difference will be the length of sleeves and body. Start working on the women size that you think would fit across the chest. The additional length will be worked right before you cast off for the armhole/sleeve cap. If the pattern is worked top-down you can add the length right after the armhole or before the first decrease on sleeve.

Regarding additional yarn amount, this will depend on how much length you add, but it is better with a skein too many than too few.

All yarns will have excess fibres (from production) that might come off as lint or shedding. Brushed yarns (ie hairier yarns) have more of these loose, excess fibres, causing more shedding.

Shedding also depends on what is worn under or over the garment, and whether this pulls at the yarn fibres. It’s therefore not possible to guarantee that there will be no shedding

Below are some tips on how to get the best result when working with hairier yarns:

1. When the garment is finished (before you wash it) shake it vigorously so the looser hairs come off. NOTE: do NOT use a lint roller, brush or any method that pulls at the yarn.

2. Place the garment in a plastic bag and put it in your freezer - the temperature will cause the fibres to become less attached to each other, and excess fibres will come off easier.

3. Leave in the freezer for a few hours before taking it out and shaking it again.

4. Wash the garment according to the instructions on the yarn label.

Pilling is a natural process that happens to even the most exclusive of fibers. It's a natural sign of wear and tear that is hard to avoid, and that is most visible in high friction areas of your garment like a sweater's arms and cuffs.

You can make your garment look as new by removing the pilling, using a fabric comb or a pill/lint remover.

Still can't find the answer you need? Then scroll down and leave your question so one of our experts can try to help you. This will be done normally within 5 to 10 working days.
In the meantime, you can read the questions and answers that others have left to this pattern or join the DROPS Workshop on Facebook to get help from fellow knitters/crocheters!

You might also like...

Post a comment to pattern DROPS Baby 14-13

We would love to hear what you have to say about this pattern!

If you want to leave a question, please make sure you select the correct category in the form below, to speed up the answering process. Required fields are marked *.

Comments / Questions (38)

country flag Louice wrote:

1. Har följt mönstret men upplever att ärmarna blir väldigt smala. Vad kan var fel? 2. Stickad söm med maskor - sömmen blir väldigt hård. Vad kan vara fel?

20.11.2022 - 15:25

DROPS Design answered:

Hei Louice. 1) Genseren er rillestrikket = meget tøyelig. Men ta en titt på strikkefastheten som er oppgitt i oppskriften og se om du har den samme som er oppgitt. Se også på målskissen om du har de målene i den størrelsen du strikker. 2) Om maskestingene er strammet for hardt sammen kan de muligens bli litt harde. Det samme gjelder når man syr sammen innenfor 1 kantmaske ettersom det er flere lag som er blitt sydd sammen. mvh DROPS Design

21.11.2022 - 12:47

country flag Ruth wrote:

Größe 1/3 Monate Beim Rückenteil steht in der Anleitung: ... nach 26 cm die äußersten 57 M. vom Ärmel gegen die Schulter abk. Sollten diese 57 M nicht wie beim Vorderteil auf eine Hilfsnadel gelegt werden und ich abgekettet? Am Schluss sollen doch die jeweils 57 M Vorderteil und Rückenteil der beiden Ärmel mit Maschenstich zusammengenäht werden. Hat sich da ein Fehler in der Anleitung eingeschlichen oder habe ich einen Denkfehler? Danke für ihre Antwort! Liebe Grüße

09.07.2022 - 21:28

DROPS Design answered:

Liebe Ruth, ja stimmt, diese Maschen sollen Sie stilllegen, um die beiden Schulter separat zu stricken. Eine Korrektur erfolgt, danke für den Hinweis. Viel Spaß beim stricken!

11.07.2022 - 08:27

country flag Gina Deschenes wrote:

Comment faire pour coudre le dessus des manches. ( Mailles laissées en attentees.)

08.01.2022 - 16:58

DROPS Design answered:

Bonjour Mme Deschenes, assemblez-les en grafting, comme dans cette vidéo. Bonne continuation!

10.01.2022 - 08:09

country flag Ann wrote:

Hej, Funderar på följande... Nu sätts de yttersta 57-61-67 (80-91) m från nederst på ärmen och inåt mot axeln på 1 tråd. Maska av de resterande 16-17-18 (19-20) m. Vad ska man göra med dessa 57-61-67 (80-91) m sedan??

14.09.2021 - 10:02

DROPS Design answered:

Hej Ann. De stickar du sedan ihop med maskorna från det andra stycket för att få en osynlig söm, i videon Osynlig söm - stickad ser du hur du ska göra. Mvh DROPS Design

17.09.2021 - 11:58

country flag Petra wrote:

Hallo ,ich habe eine Frage zu dem Sweet Ella Babypulli .Ich habe das Vorderteil soweit fertig gestrickt und am Ende steht die äußeren 57 Maschen vom Ärmel gegen die Schulter auf eine Hilfsnadel legen.Die restlichen 16 Maschen abketten.Jetzt weiss ich nicht was ich mit den 57 Maschen auf der Hilsnadel machen soll,auch abketten? Ich bitte um Hilfe.Danke!

15.07.2020 - 08:06

DROPS Design answered:

Liebe Petra, die stillgelegten Maschen von den Ärmeln nähen Sie dann zusammen - siehe Technik im Video. Viel Spaß beim stricken!

15.07.2020 - 10:49

country flag Nora wrote:

Jag stickar för 6/9 månader. När arbetet mäter 27 cm är ärmen ca 3 cm bred längst ut. Vad missar jag?

13.05.2020 - 23:07

DROPS Design answered:

Hej Nora, du starter udtagningerne når arb måler 17 cm, udtagningerne strikkes over 20 varv = ca 4,5 cm, det vil sige at du strikker over alle masker (også de yderste) fra 21,5 til 28 cm. God fornøjelse!

22.05.2020 - 09:12

country flag Ella wrote:

Hallo, Ich habe mit diversen Medien versucht das Diagramm zu öffnen, leider ist es für mich nicht sichtbar.. Könnten sie vielleicht prüfen, ob das Bild vielleicht nicht richtig hochgeladen ist? Das wäre toll, vielen Dank! Lg Ella

11.07.2019 - 17:07

DROPS Design answered:

Liebe Ella, es gibt zu diesem Muster kein Diagram, aber Maßskizze wurde hochgeladen. Viel Spaß beim stricken!

06.08.2019 - 08:44

country flag Hilde Johansen wrote:

Jeg kan ikke finne ut hva jeg skal gjøre med de maskene som er satt på tråd?

10.05.2019 - 12:38

DROPS Design answered:

Hei Hilde. Du feller av de midterste maskene til hals, og setter maskene på den ene siden av avfellingen på en tråd. Så fortsteter du å strikke frem og tikbake over ermet og skulderen på den andre siden. Når du er ferdig, og har felt av setter du maskene på tråden tilbake på pinnen og strikker på samme måte. Altså du gjentar avsnittet fra "1.side: = 80-85-92 (106-118) m. Videre felles det til hals mot midt foran på hver 4.p slik: 2 m 2 ganger...." Maskene oppå ermet, som settes på en tråd når det felles av på skulderen skal monteres med maskesting. God fornøyelse

13.05.2019 - 15:20

country flag Bibi wrote:

Hej! Jag har inte stickat så mycket och sitter nu med den tröja till mitt barnbarn. jag fattar inte hur det kan bli +190 m på arbetet efter man ökat för ärmarna, jag har följt mönstret men får då +130 m efter jag ökat för ärmarna? Stickar alltså storleken som är nr 3. Om det nu blir konstigt kan jag sticka ärmarna längre i efterhand?

03.04.2017 - 15:48

DROPS Design answered:

Hei Bibi. Har du husket å øke til ermene på begge sidene? Du legger opp 71 masker til forstykket og når arbeidet måler 19 cm legger du opp nye masker i HVER side til ermene på hver 2.p (dvs på slutten av hver p): 3 masker 3 ganger = 9 masker i den ene siden + 9 masker i den annen siden (= 71+9+9= 89 masker). Deretter 4 masker 3 ganger (= 89+12+12= 113), så 10 masker 3 ganger (= 113+30+30= 173 masker). Og tilslutt 12 masker 1 gang (= 173+12-12=197). God fornøyelse!

04.04.2017 - 08:15

country flag Betty wrote:

Guten Tag Ich habe nun die beiden Teile fertig gestrickt und nun beginnen die Ärmeloberkante mit 'Maschenstichen zusammennähen'. Dafür sollten beide kannten abgekettet sein, oder? Denn ich habe das Problem, dass die Oberkanten des vorderen Teils immer noch auf je 1 Hilfsfaden liegen. Nur die jeweilige. Ärmel -Oberkanten des Rückenteils habe ich schon abgekettet. Da stimmt doch was nicht.. ? Vielen Dank!

22.02.2016 - 12:32