
Popular categories
Looking for a yarn?


Comments / Questions (80)
![]() Véronique VRIJDAG wrote:
Véronique VRIJDAG wrote:
Bonjour, je souhaite tricoter ce gilet pour ma fille qui taille un 50 français. Pensez-vous que la taille XXL sera suffisante ? Et aussi ce modèle est-il fort ajusté ? D'avance merci pour votre réponse, Véronique
11.02.2026 - 14:11
![]() Robyne Seagreen wrote:
Robyne Seagreen wrote:
Hello, I’m struggling to understand the first instructions after the cast on and knitting in garter stitch. “ When the piece measures 8 and 14 cm dec 1 st at each side “ please clarify
03.12.2025 - 08:06DROPS Design answered:
Dear Mrs Seagreen, when piece measures 8 cm decrease 1 stitch on each side (= at the beg + at the end of row = 2 sts decreased), then when piece measures 14 cm, repeat decreases = 2 more sts decreased. Happy knitting!
03.12.2025 - 16:20
![]() Marisa wrote:
Marisa wrote:
Istruzioni molto chiare. Realizzato con un vecchio filato misto alpaca e un filo mohair la taglia Xs. Grazie!!! Apprezzo molto i vostri progetti
07.11.2025 - 11:48
![]() BRIGITTE wrote:
BRIGITTE wrote:
Bonsoir, la drops Vivaldi étant en rupture, je ne trouve pas par quel autre référence je peux remplacer cette laine qui doit se tricoter en fil double pour ce modèle. Je ne souhaite pas de laine poilue.
19.09.2025 - 20:24DROPS Design answered:
Bonjour Brigitte, utilisez notre convertisseur pour voir les alternatives possibles à Vivaldi ainsi que les quantités correspondantes. Si vous hésitez entre 2 laines, votre magasin saura vous conseiller, même par mail ou téléphone. Bon tricot!
24.09.2025 - 07:16
![]() Joan Bigg wrote:
Joan Bigg wrote:
Love this pattern but have 8ply 80% Acrylic and 20%Wool using 4.5mm knitting needles. 100g 230m Cast on stitches don't seem to be right size for sleeves and back Any suggestions for extra stitches for M/L size
10.12.2024 - 07:42DROPS Design answered:
Dear Joan, before starting the piece try working a gauge as specified: 14 sts x 28 rows in garter st with 2 strands = 10 x 10 cm. If the gauge doesn't match, you can adjust it by changing needle size. If the gauge is too different you may need to use a different yarn. You can check the following lesson for more information to adjust the piece according to the gauge obtained: https://www.garnstudio.com/lesson.php?id=25&cid=19. Happy knitting!
15.12.2024 - 14:01
![]() Katrina wrote:
Katrina wrote:
Спасибо! Когда я повторяю эти 5 рядов, получается, что два подряд ряда должны идти лицевыми петлями (1 и 5), правильно? Мне немного непонятен именно этот момент. Вяжу Непалом. Спасибо большое за ответы! Очень люблю вашу пряжу и кардиганы!
05.12.2024 - 11:00DROPS Design answered:
Dear Katrina, correct, just try on a swatch over a few number of stitches you will see the pattern working. Happy knitting!
06.12.2024 - 07:29
![]() Katrina wrote:
Katrina wrote:
Здравствуйте! Уточните, пожалуйста, по шаблону каждый пятый ряд лицевыми петлями? Лицевые петли всегда должны вязаться на лицевой стороне изделия, правильно? Спасибо!
04.12.2024 - 20:53DROPS Design answered:
Dear Katrina, this is here not a usual garter stitch, just work as explained either with K or P from RS/WS and repeat these 5 rows. Happy knitting!
05.12.2024 - 08:17
![]() Sarap wrote:
Sarap wrote:
Hi, I’m having trouble with the instructions on how to attach the hood. I’m not sure where the stitch holders come in. I’m still a beginner at garment knitting, so if you could explain this in more detail, I’d appreciate it.
02.12.2024 - 06:47
![]() Blanche Herrera wrote:
Blanche Herrera wrote:
How many skeins of yarn are required? I need to replace the Vivaldi yarn (no longer available). Please help.
08.08.2022 - 19:08DROPS Design answered:
Hi Blanche, You can replace the Vivaldi with any yarn from the same yarn group. Then you use the same number of skeins as recommended in the pattern. We always suggest working a swatch to test your knitting/crochet tension before starting your project. Happy crafting!
09.08.2022 - 07:14
![]() Barbara wrote:
Barbara wrote:
Grazie, ho risolto e capito come proseguire.
19.11.2021 - 17:40
|
|
Elinor's Mistery |
|
|
|
|
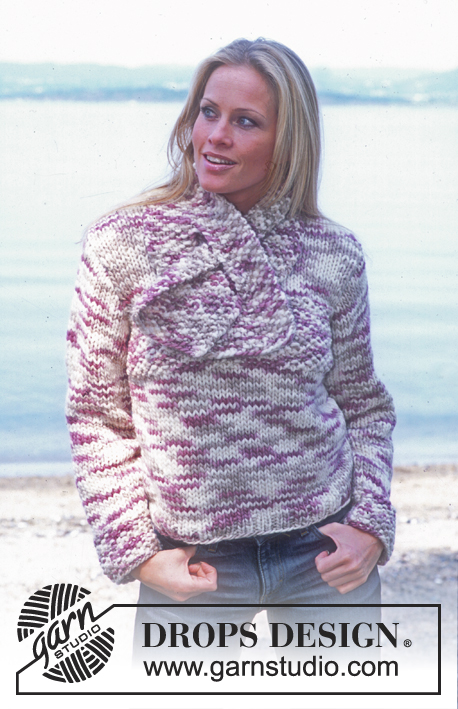
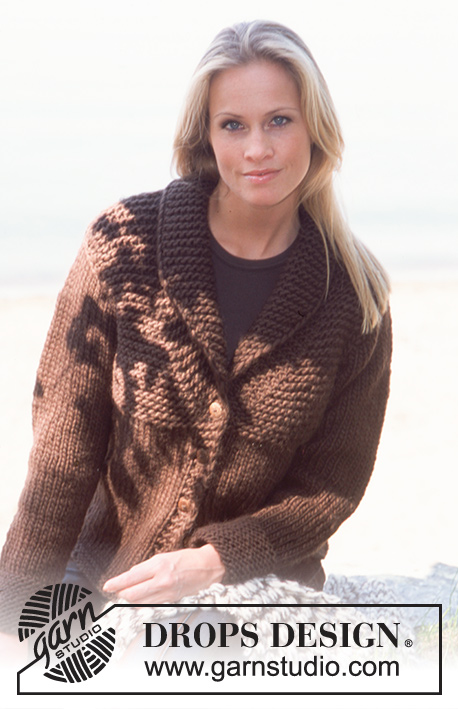
DROPS Cardigan in Vivaldi with Hood
DROPS 80-18 |
|
|
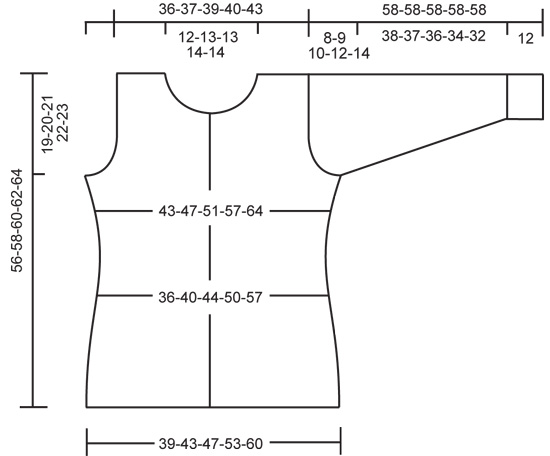
Gauge: 14 sts x 28 rows in garter st with 2 strands = 10 x 10 cm. Pattern: Row 1 (right side): knit Row 2 (wrong side): purl Row 3: purl Row 4: purl Row 5: knit Back: Cast on loosely 56-62-68-76-86 sts with 2 strands brown + 1 strand light blue. Take away 1 strand brown and knit garter st to finished measurements. When the piece measures 8 and 14 cm dec 1 st at each side = 52-58-64-72-82 sts. When the piece measures 20-21-22-23-24 cm inc 1 st at each side every 3 cm a total of 5 times = 62-68-74-82-92 sts. When the piece measures 37-38-39-40-41 cm bind off for armhole at each side every other row: 3 sts 1 time, 2 sts 0-1-2-3-4 times and 1 st 3-3-3-4-5 times = 50-52-54-56-60 sts. When the piece measures 54-56-58-60-62 cm bind off the center 14-16-16-18-18 sts for the neck. On the next row dec 1 st at each neck edge = 17-17-18-18-20 sts remain on each shoulder. Bind off when the piece measures 56-58-60-62-64 cm. Left front: Cast on 33-36-39-43-48 sts with 2 strands brown + 1 strand light blue. Take away 1 strand brown and knit garter st to finished measurements – but purl the 6th st from center front edge on all rows to mark the buttonband. When the piece measures 8 and 14 cm dec 1 st at the side = 31-34-37-41-46 sts. When the piece measures 20-21-22-23-24 cm inc 1 st at the side every 3 cm a total of 5 times = 36-39-42-46-51 sts. When the piece measures 37-38-39-40-41 cm bind off for armhole at the side as on back = 30-31-32-33-35 sts. When the piece measures 49-51-53-55-57 cm put the 8-9-9-10-10 sts at the center front edge on a st holder for the neck. Then bind off for neck every other row: 2 sts 1 time and 1 st 3 times = 17-17-18-18-20 sts remain on shoulder. Bind off when the piece measures 56-58-60-62-64 cm. Right front: Cast on and knit the same as the left, reversing all shaping. Make buttonholes along button bands (1 buttonhole = K tog the 3rd and 4th sts from center front edge and then yo. On the next row, twist the yo when knitting so the buttonhole will not stretch too large.) Make buttonholes when the piece measures: Size S: 8, 16, 24, 32, 40 and 48 cm. Size M: 8, 16, 25, 33, 42 and 50 cm. Size L: 8, 17, 26, 34, 43 and 52 cm. Size XL: 9, 18, 27, 36, 45 and 54 cm. Size XXL: 9, 18, 28, 37, 47 and 56 cm. Sleeve: Cast on 33-34-35-36-37 sts with 2 strands brown + 1 strand light blue. Take away 1 strand brown and knit garter st for 10 cm. Then knit Pattern - see instructions above - 1 time. Continue in garter st to finished measurements. At the same time when the piece measures 13 cm inc 1 st at each side every 5-4-3.5-3-2.5 cm a total of 8-9-10-11-12 times = 49-52-55-58-61 sts. When sleeve measures 50-49-48-46-44 cm bind off for sleeve cap at each side every other row: 3 sts 1 time and 2 sts 1 time, continue dec 1 st at each side until the piece measures 56 cm, then bind off 2 sts at each side until the piece measures 58 cm. Bind off the remaining sts. Assembly: Sew shoulder seams. Hood: Cast on 5 sts with 1 strand of each color, then put sts from st holder on left front on needle, pick up approx. 30-40 sts around neck, put sts from st holder on right front on needles and cast on 5 new sts at the other side = approx. 56-70 sts. Knit garter st over all sts – at the same time after 4 rows garter st inc evenly distributed (do not inc over the 5 outermost sts at each side) to 82-84-86-88-90 sts. Knit garter st until hood measures approx. 31-32-33-34-35 cm, divide sts onto 2 needles and Kitchener st the top together. Fold the 5 outermost sts along edge double to the right side and stitch in place. Sew in sleeves. Sew sleeve and side seams in one using edge sts as seam allowance. Sew on buttons. |
|
 |
|
Have you finished this pattern?Tag your pictures with #dropspattern or submit them to the #dropsfan gallery. Do you need help with this pattern?You'll find 15 tutorial videos, a Comments/Questions area and more by visiting the pattern on garnstudio.com. © 1982-2026 DROPS Design A/S. We reserve all rights. This document, including all its sub-sections, has copyrights. Read more about what you can do with our patterns at the bottom of each pattern on our site. |


With over 40 years in knitting and crochet design, DROPS Design offers one of the most extensive collections of free patterns on the internet - translated to 17 languages. As of today we count 324 catalogs and 12290 patterns - 12280 of which are translated into English (US/in).
We work hard to bring you the best knitting and crochet have to offer, inspiration and advice as well as great quality yarns at incredible prices! Would you like to use our patterns for other than personal use? You can read what you are allowed to do in the Copyright text at the bottom of all our patterns. Happy crafting!
Post a comment to pattern DROPS 80-18
We would love to hear what you have to say about this pattern!
If you want to leave a question, please make sure you select the correct category in the form below, to speed up the answering process. Required fields are marked *.