
Popular categories
Looking for a yarn?


Comments / Questions (7)
![]() Anne wrote:
Anne wrote:
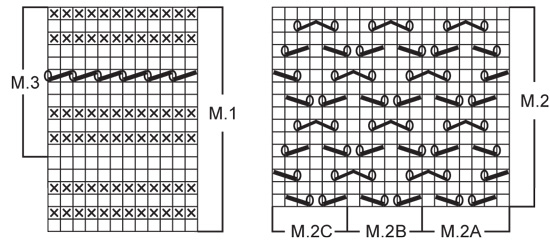
I'm having trouble understanding the chart instructions: Stockinette st/knit (as seen from the right side) - do I knit on the right side and purl on the wrong side? Reverse stockinette/purl (as seen from the right side) - when do I purl? Right side or wrong side? Thanks
23.03.2025 - 14:41DROPS Design answered:
Dear Anne, the charts are shown as seen from the right side, so the white square always looks like a knit stitch and the crossed square always looks like a purl stitch. The white square is worked in stocking stitch, which means that you knit on the right side and purl on the wrong side. The crossed square is reverse stocking stitch, which means that you purl from the right side and knit from the purl side. Happy knitting!
23.03.2025 - 20:01
![]() Martine Berlan wrote:
Martine Berlan wrote:
Bonjour j' aimerais faire ce modèle mais avec un devant et dos qui fait 50 cm de hauteur combien de grammes en plus je dois prévoir ? Merci Martine
25.02.2024 - 19:30DROPS Design answered:
Bonjour Mme Berlan, vous pouvez vous inspirer d'un modèle de même tension et de forme similaire pour évaluer la quantité supplémentaire désirée pour la taille concernée, votre magasin saura également vous conseiller, même par mail ou téléphone. Bon tricot!
26.02.2024 - 09:36
![]() Jamie wrote:
Jamie wrote:
Hello, I want to make this pattern but I seem to be confused. I understand the casting on but I am having a hard time after you cast on. I don't know if I am just not understanding the diagrams but I have looked on the website page to understanding diagrams and still seems to be confused. After you cast on it says to work pattern 1 what is pattern 1 and what is pattern 2? Any help would be greatly appreciated!
10.04.2023 - 03:59DROPS Design answered:
Dear Jamie, Pattern 1 is M1 (chart at the left), Pattern 2 is M2 (chart at the right). The charts are after the pattern instructions. On the first row where you need to work the patterns, work the first row of each of the charts (the lowest row, read from right to left). Take into account that Pattern 2 is divided into sections; for example when it says Pattern 2C, then it means to work only the leftmost section of M2 (as indicated in the chart M.2C). In the same way, M.3 is only the upper rows of M.1, so if it says M.3 you just need to work these upper rows. Happy knitting!
10.04.2023 - 13:29
![]() Gabriela wrote:
Gabriela wrote:
Ich meinte das Diagramm M2!
18.02.2021 - 21:53DROPS Design answered:
Liebe Gabriela, wenn Sie M.2 stricken sollen Sie mit den 7 Maschen A.2A anfangen, dann die 6 Maschen in M.2B wiederholen (= 15-16-17-18-19 Mal insgesamt), dann enden Sie mit den 6 M in A.2C, dh: 1 Randmasche + 7 M (A.2A) + 15-16-17-18-19x6 M (A.2B = 90-96-102-108-114 M) + 6 M (A.2C) + 1 Randmasche = 105-111-117-123-129 Maschen. Kann das Ihnen helfen? Viel Spaß beim stricken!
19.02.2021 - 12:09
![]() Gabriela wrote:
Gabriela wrote:
Bei der 12-ten Reihe sind die Maschen falsch berechnet und dementsprechend für das weitere Stricken im Muster falsch aufgeteilt. Am Ende bleiben zwei Maschen übrig, die nicht in das Schema für Lochmuster passen.
09.02.2021 - 14:26DROPS Design answered:
Liebe Gabriela, bei welchem Diagram meinen Sie? Könnten Sie bitte uns mehr darüber sagen? Herzlichen Dank im voraus!
09.02.2021 - 16:36
![]() Manon wrote:
Manon wrote:
Bonjour , Je tente de trouver une laine de substitution pour la Muskat, le convertisseur ne m`en suggère aucune. Merci de me conseiller. Ravissant modèle !
03.02.2021 - 17:12DROPS Design answered:
Bonjour Manon, vous pouvez utiliser tous les fils du groupe B, comme Muskat - rappelez-vous juste que le résultat sera différent si vous utilisez un fil de composition différente - le convertisseur vous propose les qualités ainsi que les quantités correspondantes - découvrez ici comment l'utiliser. Bon tricot!
04.02.2021 - 09:02
![]() Irene wrote:
Irene wrote:
I don't understand the pattern after row 12. the stiches don't add up either. Thanks
06.01.2015 - 02:59DROPS Design answered:
Dear Irene, 12th row in M.1 (= 7th row in M.3) is worked (K2 tog, YO) accross - in M.2, you start with M.2A on the first 7 sts, then repeat M.2B until 6 sts remain, and work them in M.2C. In the lace patterns, you should always get the same number of sts, all dec are compensated by a YO. Happy knitting!
06.01.2015 - 09:25
|
|||||||||||||||||||
Endlessly Enamored |
|||||||||||||||||||
|
|
|||||||||||||||||||
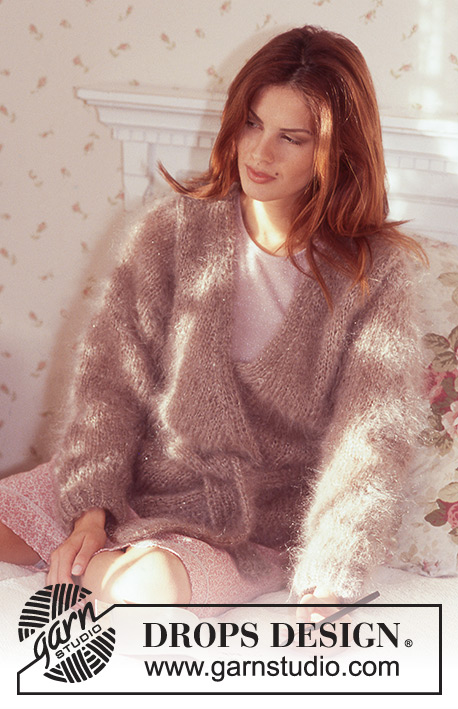
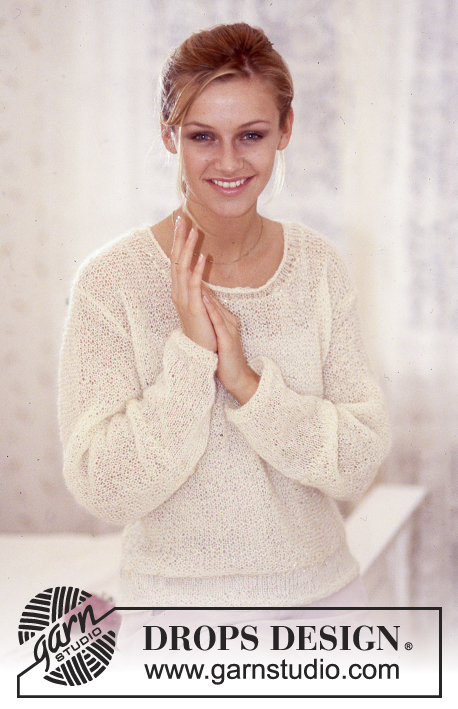
DROPS Wide Pullover in Muskat
DROPS 74-24 |
|||||||||||||||||||
|
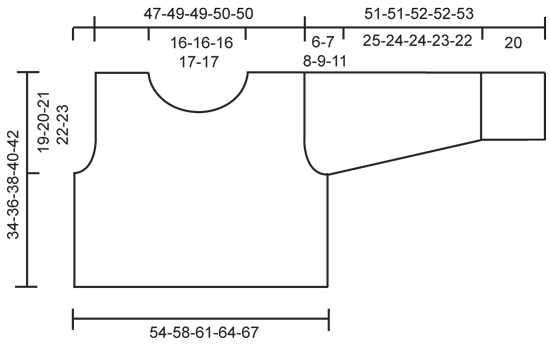
Gauge: 19 sts x 25 rows = 10 x 10 cm on larger needles in stockinette st. Pattern 2 must be knit on smaller needles in order to match gauge in width. Pattern: See charts. The pattern is seen from the right side. Garter st, when knitting flat: Knit all sts, all rows. Garter st, when knitting in the round: *Rnd 1, knit. Rnd 2, purl.* Repeat from * - *. ------------------------------------------------------------------ Front: Cast on 106-112-118-124-130 sts on larger needles and knit Pattern 1. Note: the 13th row of Pattern begins with K 1 (garter st edge st), K 2 tog, and ends with K 2 tog, K 1 (garter st edge st) = 105-111-117-123-129 sts. After Pattern 1 change to smaller needles, and knit Pattern 2 as follows: K 1 (edge st), Pattern 2 (= 7 sts), Pattern 2B over the following 90-96-102-108-114 sts, Pattern 2C (=6 sts), K 1 (edge st). After Pattern 2 change to larger needles, knit 4 rows garter st, and then knit stockinette st over all sts. At the same time when the piece measures 15-16-17-18-19 cm bind off for armhole at each side every other row: 3 sts 1-1-2-2-2 times, 2 sts 1-2-2-2-3 times and 1 st 3-2-2-4-5 times = 89-93-93-95-95 sts. Read entire next section before knitting: When the piece measures 25-27-28-30-32 cm bind off the center 15-15-15-17-17 sts for the neck. Then bind off at each neck edge every other row: 2 sts 3 times and 1 st 2 times = 29-31-31-31-31 sts remain on each shoulder. At the same time when the piece measures approx. 32-34-36-38-40 cm knit Pattern 3 keeping 1 st at neck edge and 2 sts at side edge in stockinette st. Bind off, the piece measures approx. 36-38-40-42-44 cm. Back: Cast on and knit the same as the front. Bind off for armhole as on front until the piece measures 32-34-36-38-40 cm. Bind off all sts. Sleeve: Cast on 52-52-52-58-58 sts on larger needles and knit Pattern 1 with K 1 (garter st edge st) at each side. Note: the 13th row of Pattern begins with K 1 (garter st edge st), K 2 tog, and ends with K 2 tog, K 1 (garter st edge st) = 51-51-51-57-57 sts. After Pattern 1 change to smaller needles, and knit Pattern 2 as follows: K 1 (garter st edge st), Pattern 2A (= 7 sts), Pattern 2B over the following 36-36-36-42-42 sts, Pattern 2C (= 6 sts), K 1 (garter st edge st). Knit Pattern 2 twice, then change to larger needles, knit 4 rows garter st and then stockinette st to finished measurements. At the same time after Pattern 2 (the piece measures approx. 20 cm) inc 1 st at each side a total of 9-11-13-12-14 times: Size S: every 7 rows. Size M: alternately every 5th and 6th row. Sizes L + XL: alternately every 4th and 5th row. Size XXL: every 4 rows = 69-73-77-81-85 sts. When sleeve measures 45-44-44-43-42 cm bind off for sleeve cap at each side every other row: 4 sts 1 time, 3 sts 2-2-1-2-2 times, 2 sts 2-2-2-2-3 times and 1 st 1-3-7-4-7 times, then bind off 2 sts at each side until the piece measures 51-51-52-52-52 cm and then bind off 3 sts 1 time. Bind off remaining sts, the piece measures approx. 51-51-52-52-53 cm. Assembly: Sew shoulder seams. Pick up approx. 82-92 sts around neck on smaller short circular needles and knit 4 rows garter st. Bind off. Sew in sleeves. Sew sleeve and side seams using edge sts as a seam allowance. |
|||||||||||||||||||
Diagram explanations |
|||||||||||||||||||
|
|||||||||||||||||||
 |
|||||||||||||||||||
 |
|||||||||||||||||||
Have you finished this pattern?Tag your pictures with #dropspattern or submit them to the #dropsfan gallery. Do you need help with this pattern?You'll find 20 tutorial videos, a Comments/Questions area and more by visiting the pattern on garnstudio.com. © 1982-2026 DROPS Design A/S. We reserve all rights. This document, including all its sub-sections, has copyrights. Read more about what you can do with our patterns at the bottom of each pattern on our site. |
|||||||||||||||||||


With over 40 years in knitting and crochet design, DROPS Design offers one of the most extensive collections of free patterns on the internet - translated to 17 languages. As of today we count 324 catalogs and 12290 patterns - 12280 of which are translated into English (US/in).
We work hard to bring you the best knitting and crochet have to offer, inspiration and advice as well as great quality yarns at incredible prices! Would you like to use our patterns for other than personal use? You can read what you are allowed to do in the Copyright text at the bottom of all our patterns. Happy crafting!
Post a comment to pattern DROPS 74-24
We would love to hear what you have to say about this pattern!
If you want to leave a question, please make sure you select the correct category in the form below, to speed up the answering process. Required fields are marked *.