
Popular categories
Looking for a yarn?


Comments / Questions (29)
![]() Gisela wrote:
Gisela wrote:
Hallo, Die folgende Anleitung für das Vorderteil verstehe ich nicht ganz: Nach 28-30-34 (39-43-46) cm abk. und gleichzeitig bei den 3 grössten Grössen über M3 gleichmässig verteilt 3 M. abk. - wenn die restlichen Maschen abk. werden, wie kann ich dann über M3 nur 3M abk?
28.07.2024 - 19:22DROPS Design answered:
Liebe Gisela, um die richtige Breite zu behalten muss man abnehmen wenn man die Maschen abkettet - siehe auch dieses Video. Viel Spaß beim Stricken!
29.07.2024 - 11:45
![]() Janke wrote:
Janke wrote:
Goedemiddag, Ik kan nergens ontdekken wat patroon 1 is? Ik neem aan dat het de boordsteek is?
14.10.2022 - 17:26DROPS Design answered:
Dag Janke,
Hiermee wordt patroon M.1 bedoeld; te vinden onderaan de beschrijving en boven de maattekening.
26.10.2022 - 09:53
![]() Yvonne Swart wrote:
Yvonne Swart wrote:
Beste....klopt het patroon vanaf nu wel? Ik ga dit vest breien maar wil niet steeds naar de opmerkingen kijken. Mvg. Yvonne Swart
11.09.2022 - 15:26DROPS Design answered:
Dag Yvonne,
We doen ons best om de patronen correct op de site te zetten, maar het is niet te voorkomen dat er soms een foutje in sluipt. Wanneer er een fout wordt gevonden wordt dit aangepast in het online patroon en aangegeven onderaan de beschrijving dat er een aanpassing in het online patroon is gedaan. Mocht je ergens niet uit komen, dan kun je een opmerking achter laten, zodat we je kunnen proberen te helpen.
14.09.2022 - 12:05
![]() Lene Fredeløkke wrote:
Lene Fredeløkke wrote:
Hej. Jeg kan ikke forstå, at rundingen på ærmet skal lukkes så hurtigt af.? Ærmerne bliver alt for korte i forhold til selve trøjen; der er noget som ikke er rigtig. Jeg strikker i det anbefalede garn.
07.09.2021 - 19:14DROPS Design answered:
Hei Lene. Har du den oppgitte strikkefastheten i høyden? Stemmer det med målene du ser på målskissen og hvilken str strikker du? mvh DROPS design
15.09.2021 - 13:37
![]() Anne wrote:
Anne wrote:
I am reading the American version of the pattern. For the body, after I knit the lower edge (pattern 1) , do I change to larger needles (from US2 to US4)? I notice on the directions for the sleeves, it says to changes to larger needles, but it does not mention that for the body. Thanks for your help.
15.07.2021 - 19:59DROPS Design answered:
Dear Anne, correct, you have to change to larger needle after the ribbing edge is finished (= when piece measures [1.5" - 1.5" - 1.5" (2" - 2" - 2")]) - thanks for noticing, this will be added asap. Happy knitting!
16.07.2021 - 08:24
![]() Jacqueline Camuso wrote:
Jacqueline Camuso wrote:
Is there a mistake in the division of stitches. The front seems to be 11 to 17 stitches wider than the back on the following sizes. Size 12/18 mos: 39for front, 67 for back, 39 for front. Size 3/4 yrs 49 for front, 81 for back, 49 for front. And in addition stitches are added to the front for the border making the front even wider than the back. Please help. Thank you.
15.07.2021 - 13:33DROPS Design answered:
Dear Jacqueline, the fronts have more stitches because cables in the fronts pull in the fabric, making it smaller. Happy Stitching!
15.07.2021 - 13:42
![]() Gitta wrote:
Gitta wrote:
PS: Okay...ich habe durch Zufall gesehen, dass es sich um eine Sattelschulter handelt. Das ging für mich aus der Skizze nicht hervor. Trotzdem meine Frage zum Abketten an der Schulter: es steht ...bei jeder 2. Reihe 6 Maschen x 2 .... heisst das beidseitig 6 Maschen?...und das 2x und dann noch 1mal? Wie kommt man dann auf 16 Maschen.
16.04.2021 - 22:52DROPS Design answered:
Liebe Gitta, Sie werden zuerst 6 Maschen am Anfang der 4 nächsten Reihen abketten (= Hin- + Rückreihen = 12 M beidseitig); dann werden Sie 6 Maschen am Anfang der 2 nächsten Reihe abketten (= insgesamt 18 M beidseitig) = 16 M sind jetzt übrig und jetzt noch 9.5 cm stricken. Viel Spaß beim stricken!
19.04.2021 - 07:47
![]() Gitta wrote:
Gitta wrote:
Hallo, ich verstehe die Anleitung für den Ärmel nicht. Ltd. Skizze ist die Jacke mit geradem Ärmelausschnitt gearbeitet. Der Ärmel soll aber ausgearbeitet werden: ... nach 19 cm ... 6 Maschen 2 mal und 6 Maschen 1mal abgekettet werden. Dann noch 9,5 cm stricken und abketten. Das sieht sehr unförmig aus. Ist denn das so richtig? Danke fürs Weiterhelfen!
16.04.2021 - 22:37DROPS Design answered:
Liebe Gitta, diese Jacke hat Sattelschulter, dh die letzte 9.5 cm am Ende der Ärmel werden für den Schulter sein - siehe die gestrichte Linie beim Schulter in der Skizze. Viel Spaß beim stricken!
19.04.2021 - 07:44
![]() Mirjam Goudswaard wrote:
Mirjam Goudswaard wrote:
Laat het antwoord maar zitten, ben er al uit. Maat 1/3 - 6/9 - 12/18 maanden: 1 kant st, 4 st van Patroon 5, 1 st av, Patroon 4, 1 st av, EN HIER GAAT HET FOUT-DIT MOET HIER TUSSEN: 5 st van Patroon 5, 1 st av, Patroon 3, 1 st av, 57-69-81 st van Patroon 5, 1 st av, Patroon 2, 1 av, 5 st van Patroon 5, 1 av, Patroon 4, 1 st av, 4 st van Patroon 5, 1 kant st en meerder TEGELIJKERTIJD 1 st middenachter zodat u een totaal heeft van 121-133-145 st. En zo klopt ie weer! Groetjes Mirjam
15.03.2021 - 15:06
![]() Mirjam Goudswaard wrote:
Mirjam Goudswaard wrote:
Ps. wordt het gehele rugpand in patroon M.5 gebreid zonder kabels? Groetjes Mirjam Goudswaard
12.03.2021 - 14:39DROPS Design answered:
Dag Mirjam,
Ja, klopt. Op het achterpand zijn geen kabels, alleen patroon M.5.
22.03.2021 - 21:09
|
||||||||||||||||
DROPS Baby 5-10 |
||||||||||||||||
 |
 |
|||||||||||||||
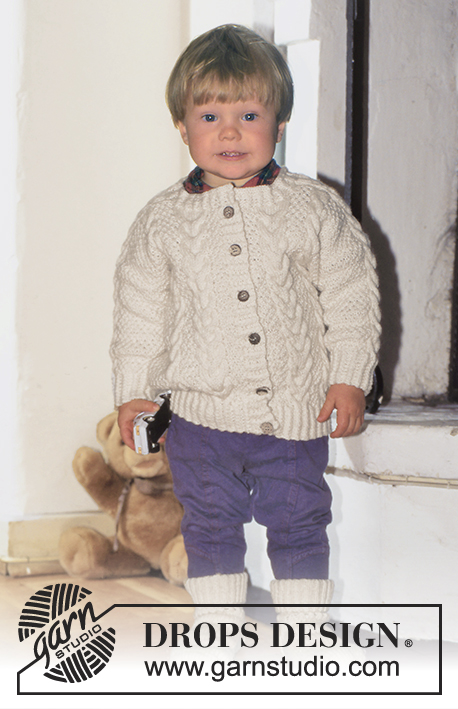
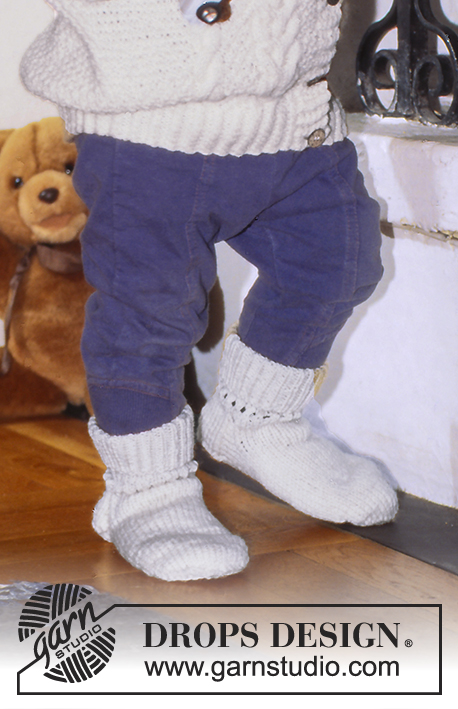
Cardigan and socks in Karisma or Cotton Merino with cables.
DROPS Baby 5-10 |
||||||||||||||||
|
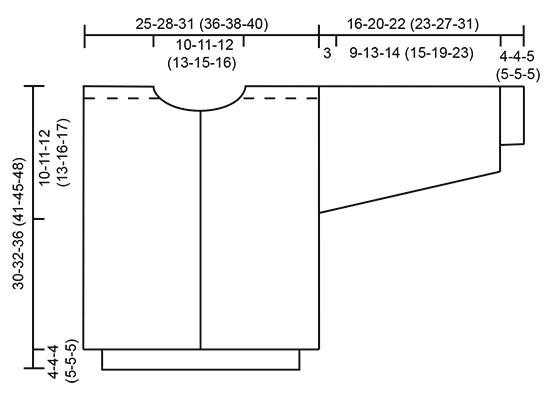
CARDIGAN Gauge: 21 sts and 28 rows on larger needles in Pattern 5 = 10 x 10 cm (4" x 4") Pattern: See chart. One chart equals one repeat of the pattern. The pattern is seen from the right side. BODY Cast on 120-132-144 (168-176-184) sts on smaller circular needles. Knit Pattern 1 (1st row is the right side) with 1 edge st on each side at the center front not worked in pattern for 4-4-4 (5-5-5) cm [1.5" - 1.5" - 1.5" (2" - 2" - 2")]. Then change to needle size 3,5 mm = US E/4 and work as follows: Size 1/3 - 6/9 - 12/18 months: 1 edge st, 4 sts of Pattern 5, purl 1, Pattern 4, purl 1, 83-95-107 sts of Pattern 5, purl 1, Pattern 4, purl 1, 4 sts of Pattern 5, 1 edge st and at the same time inc 1 st at the center back for a total of 121-133-145 sts. Size 2 - 3/4 - 5/6 years: 1 edge st, 4 sts of Pattern 5, purl 1, Pattern 4, purl 1, 5 sts of Pattern 5, purl 1, Pattern 3, purl 1, 107-115-123 sts of Pattern 5, purl 1, Pattern 2, purl 1, 5 sts of Pattern 5, purl 1, Pattern 4, purl 1, 4 sts of Pattern 5, 1 edge st and at the same time inc 3 sts evenly distributed on the row for a total of 171-179-187 sts. When the work measures 18-19-22 (26-27-29) cm [7" - 7.5" - 8-⅝" (10.25" - 10-⅝" - 11-⅜")], divide it as follows: 33-36-39 (47-49-51) sts for the front, 55-61-67 (77-81-85) sts for the back, 33-36-39 (47-49-51) sts for the front. Knit the rest of each part separately from this point. Front: 33-36-39 (47-49-51) sts. Work in pattern until the work measures 25-27-31 (36-40-43) cm [9-⅞" - 10-⅝" - 12.25" (14-⅛" - 15.75" - 16-⅞")]. Keeping in pattern, bind off at the neck edge every other row: 9-10-11 (12-14-15) sts 1 time, 3 sts 1 time, 2 sts 2 times. Bind off when the work measures 28-30-34 (39-43-46) cm [11" - 11.75" - 13-⅜" (15-⅜" - 16-⅞" - 18-⅛")] and at the same time, on the 3 largest sizes, dec 3 sts evenly distributed over Pattern 3 on the next to last row. Back: 55-61-67 (77-81-85) sts. When the work measures 27-29-33 (38-42-45) cm [10-⅝" - 11-⅜" - 13" (15" - 16.5" - 17.75")], bind off the center 17-19-21 (23-27-29) sts for the neck. Bind off 2 sts at each neck edge on the next row. Bind off the remaining 17-19-21 (25-25-26) sts for the shoulder when the work measures 28-30-34 (39-43-46) cm [11" - 11.75" - 13-⅜" (15-⅜" - 16-⅞" - 18-⅛")]. Sleeves: Cast on 40-44-44 (48-48-52) sts on smaller double pointed needles. Join, being careful not to twist the sts. Place a marker at the join and knit Pattern 1 for 4-4-5 (5-5-5) cm [1.5" - 1.5" - 2" (2" - 2" - 2")]. Change to larger double pointed needles and knit pattern over the 1st row as follows: 14-15-16 (17-17-19) sts on Pattern 5, purl 1, Pattern 4, purl 1, 14-15-16 (17-17-19) sts of Pattern 5 and at the same time inc 2-0-2 (0-0-0) sts evenly distributed on the 1st row. 42-44-46 (48-48-52) sts. At the same time, after Pattern 1 inc 1 st on each side of the marker 3-4-5 (6-13-13) times: Sizes 1/3 + 12/18 months: every 7th row. Size 6/9 months: every 8th row. Size 2 years: every 6th row. Size 3/4 years: alternately every 3rd and 4th row. Size 5/6 years: alternately every 4th and 5th row. = 48-52-56 (60-74-78) sts. When the work measures 13-17-19 (20-24-28) cm [5-⅛" - 6.75" - 7.5" (7-⅞" - 9.5" - 11")], bind off 2 sts on each side of the marker and knit the rest back and forth on the needles. Bind off on each side for sleeve caps every other row 5-5-6 (7-9-10) sts 2 times, 4-6-6 (6-9-9) sts 1 time. 16-16-16 (16-16-16) sts. Continue to knit the remaining sts in pattern as before for 7.5-8.5-9.5 (11.5-11.5-12) cm [3" - 3-⅜" - 3.75" (4-⅝" - 4-⅝" - 4.75")] more (this is a strip for a saddle shoulder). Bind off. Assembly: Sew on the sleeves. Sew the shoulder seams from the body to Pattern 4 from the sleeve. Sew the sleeves together at the center back. Pick up approx. 63-67-79 (91-99-107) sts (divisible by 4 sts + 2 sts + 1 edge st against the neck) along the left front on smaller needles and knit Pattern 1 for 2.5 cm [1"]. Bind off. Repeat along the right front, but after 1 cm [3/8"] make 5-6 buttonholes evenly distributed on the row (1 buttonhole = bind off 2 sts and cast on 2 new sts over the bound-off sts on the next row). Pick up approx. 110-122 sts around the neck (divisible by 4 sts + 2 sts) on smaller needles and purl 1 row (seen from the right side) and then knit Pattern 1 (1st row = right side) back and forth on the needles for 2 cm [0.75"], knit 2 rows stockinette st and bind off. Sew on buttons. SOCKS Sock's foot length: 10-11-12 (14-15-17) cm [4" - 4-⅜" - 4.75" (5.5" - 5-⅞" - 6.75")]. DROPS 2.5 mm/US 1 and 3.5 mm/US 4 double pointed needles, or sizes needed to obtain correct gauge. Gauge: 21 sts and 28 rows on larger needles in stockinette st = 10 x 10 cm (4" x 4") Rib: * knit 1, purl 1 *. Repeat from * - *. SOCKS Cast on 46-48-50 (52-54-56) sts on smaller double pointed needles. Join, being careful not to twist the sts. Place a marker at the join and knit 12-13-13 (13-14-14) cm [4.75" - 5-⅛" - 5-⅛" (5-⅛" - 5.5" - 5.5")] in rib. Change to larger double pointed needles. Continue with rib and dec 12-14-14 (16-18-18) sts evenly distributed on the first row. 34-34-36 (36-36-38) sts. If you want an eyelet border to pull a strand through afterwards knit the next row as follows: * K 2 tog, yarn over *; this is not necessary on larger sizes. Continue with the heel as follows: Heel: Knit 3-3.5-4 (4.5-5-5) cm [1.25" - 1.25" - 1.5" (1.75" - 2" - 2")] in stockinette st back and forth over 18 sts for the heel flap. Turn the heel starting with a right side row: Row 1: K 10 sts, K 2 tog into back of st, K 1, turn. Row 2: sl 1, P 4, P 2 tog, P 1, turn. Row 3: sl 1, K 5, K 2 tog into back of st, K 1, turn. Row 4: sl 1, P 6, P 2 tog, P 1, turn. Row 5: sl 1, K 7, K 2 tog into back of st, K 1, turn. Row 6: sl 1, P 8, P 2 tog, P 1, turn. Row 7: K 2 tog, K 8, K 2 tog into back of st. = 10 sts on needles. Pick up 6-7-8 (9-10-10) sts along each instep and put all sts on double pointed needles. 38-40-44 (46-48-50) sts. Dec 1 st on each side of the uppermost 18-18-20 (20-20-22) sts every row 3-4-5 (6-7-7) times. 32-32-34 (34-34-36) sts. When the foot measures 7-8-9 (10-11-13) cm [2.75" - 3-⅛" - 3.5" (4" - 4-⅜" - 5-1/8)] (from the beginning of the heel turn), decrease for the toe. Place a marker on each side and dec 1 st on each side of the markers (4 bind-offs in all per row) 6-6-7 (7-7-7) times an alternately every and every other row. 8-8-6 (6-6-8) sts. Pull the strand doubled through the last sts and sew. |
||||||||||||||||
Diagram explanations |
||||||||||||||||
|
||||||||||||||||
 |
||||||||||||||||
 |
||||||||||||||||
Have you finished this pattern?Tag your pictures with #dropspattern or submit them to the #dropsfan gallery. Do you need help with this pattern?You'll find 26 tutorial videos, a Comments/Questions area and more by visiting the pattern on garnstudio.com. © 1982-2026 DROPS Design A/S. We reserve all rights. This document, including all its sub-sections, has copyrights. Read more about what you can do with our patterns at the bottom of each pattern on our site. |
||||||||||||||||


With over 40 years in knitting and crochet design, DROPS Design offers one of the most extensive collections of free patterns on the internet - translated to 17 languages. As of today we count 320 catalogs and 12106 patterns - 12096 of which are translated into English (US/in).
We work hard to bring you the best knitting and crochet have to offer, inspiration and advice as well as great quality yarns at incredible prices! Would you like to use our patterns for other than personal use? You can read what you are allowed to do in the Copyright text at the bottom of all our patterns. Happy crafting!
Post a comment to pattern DROPS Baby 5-10
We would love to hear what you have to say about this pattern!
If you want to leave a question, please make sure you select the correct category in the form below, to speed up the answering process. Required fields are marked *.