
Popular categories
Looking for a yarn?


Comments / Questions (12)
![]() Jane wrote:
Jane wrote:
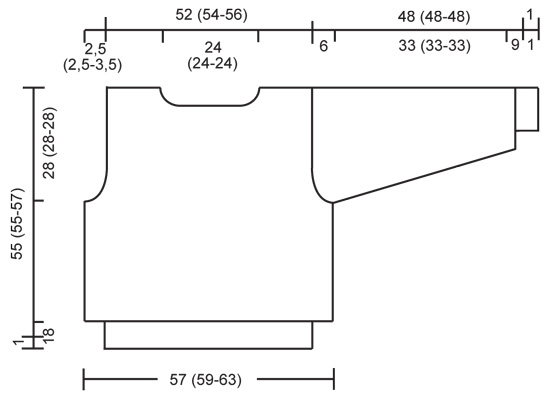
If I was to do just M1 for the first 10cm it would not look like the pattern as the cable begins at the neck. Just not getting this one. Have knitted lots of your patterns
16.09.2025 - 19:32DROPS Design answered:
Hi Jane, The pattern is worked bottom up, so 1 repeat of M.1 is worked at the bottom of the jumper. The neck is worked at the end of the project. Regards, Drops team.
17.09.2025 - 06:44
![]() Jane wrote:
Jane wrote:
At start of body it only mentions M1 to be repeated for 10 cm how do I incorporate the rest of the pattern to make it look like the picture. Sorry for not understanding
15.09.2025 - 21:59DROPS Design answered:
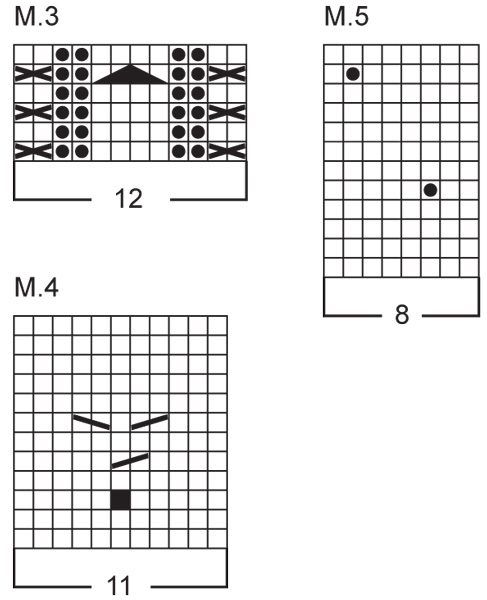
Hi Jane, After completing M1, you change needles and work the other patterns in the order given in the text (M.5 for the correct number of stitches for your size, M.4, M.3, M.2, M.3, M.4). This is repeated one more time on the round. M.5 is the pattern on each side of the jumper and the other diagrams give you the pattern you see on the front piece in the picture (as well as the back piece). Regards, Drops team
16.09.2025 - 06:46
![]() Julia wrote:
Julia wrote:
Hallo, ich habe eine Frage zu der Aneinanderreihung der Muster. Auf dem Bild des Pullis ist nicht ganz ersichtlich, ob die bobbles immer direkt übereinander sein sollen, v. A. Ganz unten am Rand. Wenn ich das Muster so stricke, wie vorgegeben, werden ab dem Zeitpunkt, wo ich mit dem Muster M5, M4... beginne, die bobbles versetzt zu den bereits gestrickten aus M1. Ist das richtig so?
27.02.2024 - 06:39DROPS Design answered:
Liebe Julia, nach M.1 werden die Noppen von den anderen Diagrammen nicht genau über die Noppen von M.1 anpassen, M.1 ist nur für die untere Rand. Hoffentlich misverstehe ich Ihre Frage nicht. Viel Spaß beim stricken!
27.02.2024 - 09:11
![]() Maria Sampaio wrote:
Maria Sampaio wrote:
Também não percebo como é que na frente tem 55 cm de altura conforme descreve "Arrematar as restantes malhas para o ombro a 55-55-57 cm de altura total" e na parte de trás apenas 53 cm "A 53-53-55 cm de altura total, arrematar as 48-48-48 malhas centrais para o decote e depois 2 malhas no lado do decote na carreira seguinte. Arrematar as restantes malhas como se fez para a frente"
23.10.2022 - 17:40DROPS Design answered:
Bom dia, À frente, o último remate (em que se rematam todas as malhas) para o ombro é feito a 55-55-57 cm. Nas costas, o primeiro remate para o decote é feito é a 53 cm (faz-se mais um remate e tricotam-se mais 4 carreiras). Bons tricõs!
25.10.2022 - 09:57
![]() Maria Sampaio wrote:
Maria Sampaio wrote:
Obrigada pela confirmação. Gostaria de colocar outra pergunta relativa aos remates da frente da peça. Quando indica "Arrematar para o decote no princípio da carreira, em todas as carreiras a partir do meio da frente: 1 vez 3 malhas , 2 vezes 2 malhas, e 2 vezes 1 malha.", significa que em todas as carreiras arremato 3 malhas juntas, na mesma carreira mais 2 vezes 2 malhas juntas e ainda na mesma carreira mais 2 vezes 1 malha ou estes arremates sao em carreiras diferentes?
23.10.2022 - 11:10DROPS Design answered:
Boa tarde, Estamos aqui para tentar ajudar. Em relação aos remates, eles são feitos em carreiras diferentes. Ou seja, remata-se 1 vez 3 malhas, tricota-se a carreira de ida, depois a carreira de volta (carreira do avesso) e, então, na carreira seguinte, remata-se 2 malhas. E repete-se para is restantes remates para criar a curva do decote. Bons tricôs!
23.10.2022 - 17:14
![]() Maria Sampaio wrote:
Maria Sampaio wrote:
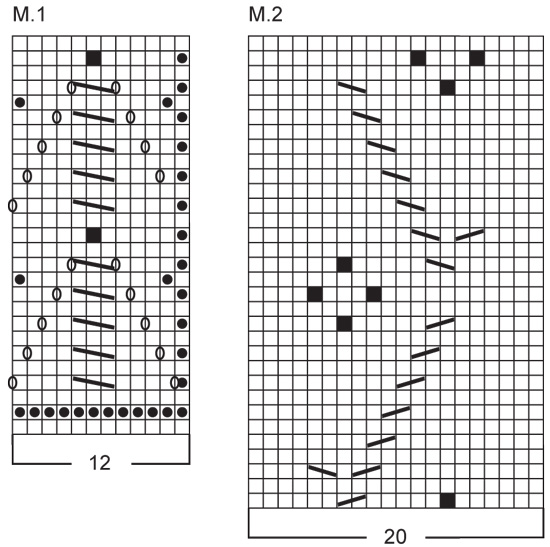
Boa noite, o gráfico M1 parece ter um erro na linha 16, pois falta-lhe uma laçada conforme encontramos na linha 4. Estou correta? Obrigada
15.09.2022 - 21:23DROPS Design answered:
Olá Maria, sim, parece haver um erro no diagrama. A linha 16 deve ser trabalhada como a linha 4. Enviaremos a correção ao departamento de design. Obrigada!
17.09.2022 - 16:47
![]() Maria Neumann wrote:
Maria Neumann wrote:
Hallo, ich habe eine Verständnisfrage. Die Zunahme bei den Ärmeln ist mir nicht ganz klar. Und vor allem wo nehme ich zu? Es sind doch pro 2. oder 3. Runde 2 Maschen. Allerdings sieht die Zunahme nicht schön aus. Also wie ist die gleichmäßige Zunahme zu verstehen? 2 M. X 31? Das sind dann 62 Maschen. Bei mir entsteht eine Art Naht. Sehr unschön. Gibt es da eine Lösung?
07.12.2020 - 17:55DROPS Design answered:
Liebe Frau Neumann, es werden zuerst 2 Maschen (= 50 M) regelmäßig verteilt zugenommen, dann nehmen Sie (mit Ihrer gewöhnlichen Technik) 2 Maschen in der Mitte unter die Ärmel, dh, stricken Sie bis 1 Masche bleibt vor Ende der Runde, nehmen Sie 1 Masche zu, stricken Sie 2 Maschen, nehmen Sie eine Masche zu. Dann stricken Sie 1 Runde ohne Zunahmen, 1 Runde mit Zunahmen, 2 Runde mit Zunahmen und diese 5 Reihen so wiederholen bis alle Zunahmen fertig sind. Viel Spaß beim stricken!
08.12.2020 - 08:29
![]() Fiona Cole wrote:
Fiona Cole wrote:
I have another query. Underneath the M1 chart it says 12m. Is this an abbreviation for the Norwegian word for stitch which translation hasn't picked up? In English 12 m would mean 12 metres so I know that it doesn't mean that.
08.04.2020 - 20:12DROPS Design answered:
Dear Mrs Cole, the m in the diagram is for "masker" ie the Norwegian word to "stitches" - your previous query has been forwarded to our design team. Thank you in advance for your patience.
09.04.2020 - 17:28
![]() Fiona Cole wrote:
Fiona Cole wrote:
Using M1 chart, pattern says to repeat M1 twice but this gives 4 lacy arrow heads instead of 2 that are in picture. The first part of M1 does not give a bobble like the picture of the jumper sleeve suggests. To achieve the effect shown in the picture it would seem that you do the second half of M1 twice which would give a bobble at the point of each lacy pattern. Are we reading the pattern incorrectly or is there a mistake in the instructions or in the chart?
08.04.2020 - 18:33DROPS Design answered:
Dear Mrs Cole, sorry for late answer - diagram M.1 has been edited to get 2 bobles and M.1 should be worked 1 time in height only . Happy knitting!
19.06.2020 - 10:55
![]() Laura wrote:
Laura wrote:
Hallo, ich habe eine Verständnisfrage. Ab der Passage "Die nächste R. wie folgt: * 52 (56-64) M. von M5, M4, M3, M2, M3, M4 * von *-* wiederholen. In der Mitte der 52 (56-64) M. M1 einen Markierungsfaden einziehen = Seite und in der Mitte von M2 einen Markierungsfaden einziehen = vordere und hintere Mitte." Versteh ich irgendwie nicht so richtig, wie ich nun stricken soll. Könnten Sie diesen Teil vielleicht etwas näher erklären? Liebe Grüße Laura
16.09.2019 - 13:16DROPS Design answered:
Liebe Laura, die Runden beginnen nicht an der Seite; Sie stricken: *52-56-64 M von M.5 und setzen Sie eine Markierung in der Mitte dieser Maschen für die Seite = nach 26-28-32 Maschen; dann stricken Sie M.4, M.3, M.2 (= eine Markierung in der Mitte M.2 einsetzen = Mitte Vorderteil/Rückenteil), M.3, M.4*, und jetzt stricken Sie noch einmal von *bis* = es sind jetzt 4 Markierungen: 1 für jede Seite (= in der Mitte M.5) und 1 in der Mitte von beidem M.2 (= mitte Vorder- bzw Rückenteil). Viel Spaß beim stricken!
16.09.2019 - 15:14
|
||||||||||||||||||||||||||||
Darling Smile#darlingsmilesweater |
||||||||||||||||||||||||||||
 |
 |
|||||||||||||||||||||||||||
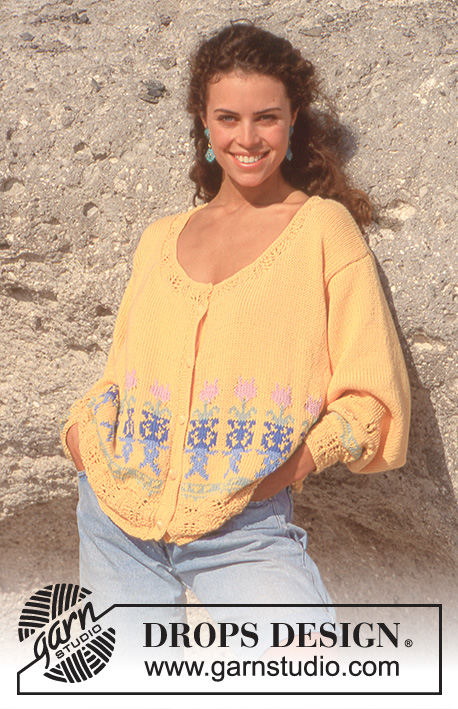
DROPS jumper with bobbles in “Muskat”. Size S – L.
DROPS 34-7 |
||||||||||||||||||||||||||||
|
Pattern: See diagram. The diagram is seen from the RS. Bobble: Worked from RS. Inc to 3 sts in 1 st, work 3 rows stockinette st back and forth on these 3 sts, on next row K3 tog. Garter st, in the round: K 1 round, P 1 round Body: The jumper is worked in the round on circular needle. Cast on 192-192-204 sts on circular needle size 3 mm / US 2.5 with off-white and work 4 round garter st, then 2 vertical repeats of M.1 = 8 cm / 3⅛". Change to circular needle size 4 mm / US 6, at the same time inc 44-52-56 sts evenly on round = 236-244-260 sts. Work next round as follows: * 52-56-64 sts of M.5, M.4, M.3, M.2, M.3, M.4 *, repeat from *-*. Insert a marker in the middle of the 52-56-64 sts of M.5 = the sides, and in the middle of M.2 = mid front and mid back. Continue in pattern like this. REMEMBER THE GAUGE! When piece measures 27-27-29 cm bind off 4 sts each side for armhole and complete front and back pieces separately. Front piece: = 114-118-126 sts. Bind off to shape the armhole each side on every other row: 2 sts 1 time, 1 st 1-1-3 times = 108-112-116 sts. When piece measures 48-48-50 cm bind off the middle 34-34-34 sts for neck and complete each side separately. Bind off to shape the neckline at the beg of every row from mid front: 3 sts 1 time, 2 sts 2 times, 1 st 2 times. Bind off remaining sts on shoulder when piece measures 55-55-57 cm. Back piece: = 114-118-126 sts. Bind off for armhole each side as described for front piece = 108-112-116 sts. When piece measures 53-53-55 cm bind off the middle 48-48-48 sts for neck and bind off 2 sts on neckline on next row. Bind off remaining sts on shoulder as described for front piece. Sleeve: Cast on 48-48-48 sts on double pointed needles size 3 mm / US 2.5 with off-white and work 4 rounds garter st, and then 2 vertical repeats of M.1 = 8 cm / 3⅛". Change to double pointed needles size 4 mm / US 6 and continue in M.5, at the same time inc 2-2-2 sts evenly on first round = 50-50-50 sts. At the same time inc 2 sts mid under arm a total of 31-31-31 times on * every other and 3rd * round alternately = 112-112-112 sts. When piece measures 42-42-42 cm bind off 6 sts mid under arm and complete piece back and forth on needle. Bind off to shape the sleeve cap each side on every other row: 5 sts 6 times, and bind off remaining sts. Sleeve measures approx 48 cm. Assembly: Sew shoulder seams. Pick up approx 110 sts around the neck on needle size 3 mm / US 2.5 with off-white and work 4 rounds garter st. Bind off. Now crochet a border along bottom edge, round sleeve edges and round the neck as follows: 1 sc, *3 ch, 1 dc in the first of these ch, skip 2 sts, 1 sc *, repeat from *-*. Set in sleeves. |
||||||||||||||||||||||||||||
Diagram explanations |
||||||||||||||||||||||||||||
|
||||||||||||||||||||||||||||
 |
||||||||||||||||||||||||||||
 |
||||||||||||||||||||||||||||
 |
||||||||||||||||||||||||||||
Have you finished this pattern?Tag your pictures with #dropspattern #darlingsmilesweater or submit them to the #dropsfan gallery. Do you need help with this pattern?You'll find 36 tutorial videos, a Comments/Questions area and more by visiting the pattern on garnstudio.com. © 1982-2026 DROPS Design A/S. We reserve all rights. This document, including all its sub-sections, has copyrights. Read more about what you can do with our patterns at the bottom of each pattern on our site. |
||||||||||||||||||||||||||||


With over 40 years in knitting and crochet design, DROPS Design offers one of the most extensive collections of free patterns on the internet - translated to 17 languages. As of today we count 325 catalogs and 12298 patterns - 12288 of which are translated into English (US/in).
We work hard to bring you the best knitting and crochet have to offer, inspiration and advice as well as great quality yarns at incredible prices! Would you like to use our patterns for other than personal use? You can read what you are allowed to do in the Copyright text at the bottom of all our patterns. Happy crafting!
Post a comment to pattern DROPS 34-7
We would love to hear what you have to say about this pattern!
If you want to leave a question, please make sure you select the correct category in the form below, to speed up the answering process. Required fields are marked *.