
Popular categories
Looking for a yarn?


Comments / Questions (5)
![]() Lynne wrote:
Lynne wrote:
I have not knitted on a circular needed before. How do I know what length circular needle I need for this pattern in small size. thank you.
06.03.2020 - 18:18DROPS Design answered:
Hi Lynne, We recommend circular needle so that you have enough room for all the stitches. Each piece is knitted separately, so you could either use a 60 cm or an 80 cm length circular needle. Happy kntting!
07.03.2020 - 13:43Maria wrote:
Sorry, I'm still lost. Pattern: Repeat dec Size Med: alternately every 4th & 6th rows 7 times" 86sts - When work measures 10cm, dec 1 st at each marker (84 sts) Rows1,2,3=no dec/Row4=dec (82sts)/Rows5,6,7,8,9=no dec/Row10=dec (80sts) Rows11,12,13=no dec/Row14=dec (78sts)/Rows15,16,17,18,19=no dec/Row20=dec(76st) Rows21,22,23=no dec/Row24=dec (74sts)/Rows25,26,27,28,29=no dec/Row30=dec(72sts) Rows31,32,33=no dec/Row 34=dec(70sts) Also 34 rows = approx. 15 cm? 10+15=25 not 19.
24.09.2018 - 15:21DROPS Design answered:
Dear Maria, there is a mistake in the English pattern, you should decrease alternately every 2nd and 3rd row - pattern will be edited and a correction added. Thanks for your feedback. Happy knitting!
25.09.2018 - 09:01Maria wrote:
Please help my confusion. For the Back - "Repeat decreases: Size Med: alternately every 4th and 6th rows 7 times" Does that mean to decrease from the 4th row after joining the right, mid and left pieces together or from 10cm? Also do I decrease on rows 4, 6, 10, 12, 16, 18, 22? If I decrease from 10cm and on the rows shown that equals 20cm -10cm + 10cm (10cm = 22 rows).
22.09.2018 - 09:29DROPS Design answered:
Dear Maria, this applies from the last decrease, after this row with decrease *work 3 row without dec, work 1 row with dec (= every 4th row), work 5 rows without dec, work 1 row with dec (every 6th row)*, repeat from *-* a total of 3 times, then work 3 rows without dec and next row with dec = you have decrease a total of 7 times every 4th and 6th row alternately. Happy knitting!
24.09.2018 - 08:11
![]() Dalby wrote:
Dalby wrote:
Bonjour, quand vous dites : = 68-72-74 m. Continuer droit jusqu'à 19-18-19 cm de hauteur totale. Augmenter ensuite aux marqueurs de la même façon que les diminutions",ça veut dire que les augmentations je les commence après 18cm, moi, je les aurai fait en même temps d'après la photo ?
11.03.2013 - 12:17DROPS Design answered:
Bonjour Madame Dalby, les augmentations se font aux marqueurs à 19-18-19 cm de hauteur totale, ça doit se situer très peu de temps après la dernière diminution. Bon tricot !
11.03.2013 - 14:02
![]() Dalby44 wrote:
Dalby44 wrote:
Bonjour, au début, quand je tricote la partie centrale, il faut mettre les mailles en attente puis tricoter les parties gauche et droite ça veut dire que je monte les mailles avec une autre pelote de laine à chaque fois et que je réunis le tout ? sur le coup, j'ai deux fils en trop que je coupe ? merci de votre aide
03.03.2013 - 17:12DROPS Design answered:
Bonjour Dalby44, effectivement, vous commences les 3 pièces séparément et les réunissez ensuite pour former la largeur totale du dos, donc on coupe le fil après chacune des 2 premières parties. Bon tricot !
04.03.2013 - 10:04
|
|
Highland Dancer#highlanddancercardigan |
|
|
|
|
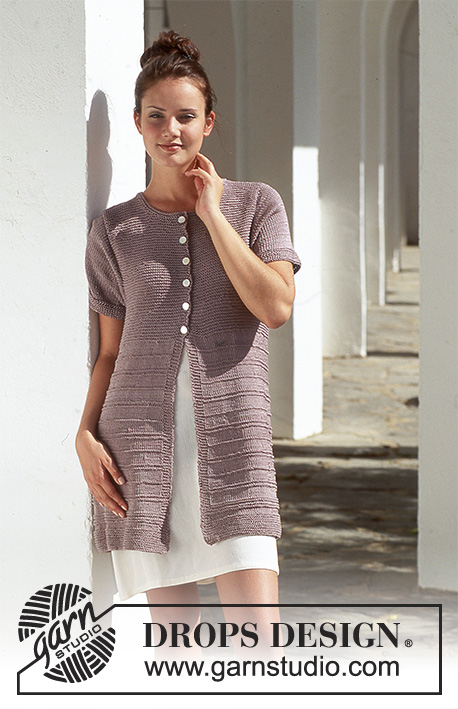
DROPS Cardigan in Silke.
DROPS 51-14 |
|
|
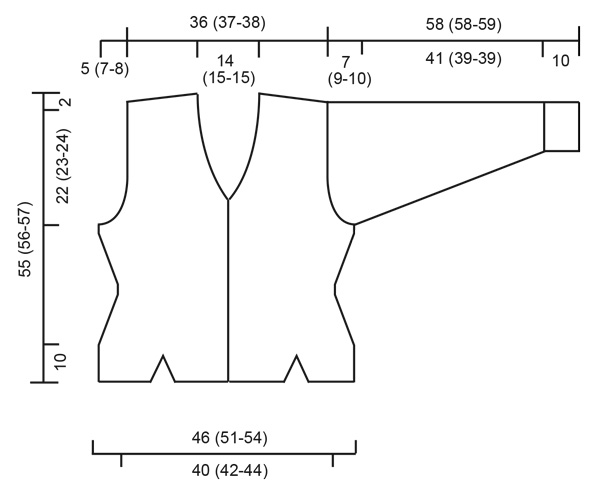
Gauge: 17 sts x 22 rows in stockinette st = 10 x 10 cm (4" x 4") Note: Gauge is very important in working with silk. If it is knit too loosely, it will sag and stretch. Seed st (on an uneven number of stitches): All rows: K 1 *P 1, K 1* Seed st (on an even number of stitches): Row 1: *K 1, P 1*; Row 2: * P 1, K 1 * Seed st (worked in the round): Row 1: * knit 1, purl 1 * Row 2: * knit the purl sts from the previous row and purl the knit sts from the previous row * Back: Mid piece: Cast on 34 (34-34) sts and knit 2 rows seed st. Then inc 1 st at each side edge every 3rd row 7 times - but after 8 rows change to stockinette st, keeping the 5 sts at each side edge in seed st. After the last increase there should be 48 (48-48) sts on the needle. Put the work aside. Left Side piece: Cast on 8 (12-15) sts and knit 2 rows seed st. Then inc 1 st at the right edge every 3rd row 7 times - but after 8 rows change to stockinette st keeping the 5 sts on the right side (the increase edge) in seed st. After the last increase there should be 15 (19-22) sts on the needle. Put the work aside. Right Side piece: Cast on and knit like the left side piece, but reversing the shaping. Put all three parts on the same needle so that the right piece is on the right side of mid piece and the left piece is on the left side = 78 (86-92) sts on needle. Put a marker at each join and continue all sts in stockinette st. When the work measures 10 cm (4"), dec 1 st at each marker, working the dec so that the shaping is reversed (at one marker k2 tog; at the other marker sl1, k1, psso). Repeat decreases: Size Small: every 3rd row 5 times Size Med: alternately every 2nd and 3rd rows 7 times Size Large: every other row 9 times = 68 (72-74) sts. Work even until the work measures 19 (18-19) cm [7.5" (7" - 7.5")]. Now increase inside the markers in a corresponding manner to the decreases: Size Small: every 6th row 5 times Size Medium: alternately every 4th and 6th rows 7 times Size Large: every 4th row 9 times = 78 (86-92) sts. When the work measures 31 cm (12.25«) shape armholes: bind off at each side edge every other row: 3 sts 0 (1-1) times, 2 sts 3 (3-3) times, dec 1 st 3 (3-5) times = 60 (62-64) sts. When the work measures 51.5 (52.5-53.5) cm (20.25" (20⅝"-21")), knit the center 24 (26-26) sts in seed st. Bind off the center 20 (22-22) sts for the neck, then bind off 2 sts at each neck edge on the next row. Keep the 3 sts at each neck edge in seed st. Shoulder: Bind off on every other row 9 sts 2 (2-1) times, 10 sts 0 (0-1) time. Right front: Buttonholes: When the work measures 1 (1-1), 10.5 (11-11), 20.5 (21-21.5), 30.5 (31-32) and 40 (41-42) cm, [⅜" (⅜"-⅜"), 4⅛" (4.25"-4.25"), 8" (8.25"-8.5"), 12" (12.25"-12⅝"), 15.75" (16⅛"-16.5")] make buttonholes on the right front as follows: Bind off the 3rd and 4th sts and cast on 2 new sts over the bound-off sts on the next row. Middle front: Cast on 22 (22-22) sts and knit 2 rows seed st (remember the buttonholes - see instructions above). Then inc 1 st at the left edge every 3rd row 7 times - but after 8 rows of seed st change to stockinette st, keeping the 5 edge sts for the front band in seed st. After the last increase there are 29 (29-29) sts on needle. Put the work aside. Side piece: Cast on 8 (12-15) sts and knit 2 rows seed st. Then inc 1 st at the right edge every 3rd row 7 times - but after 8 rows of seed st change to stockinette st, keeping the 5 sts at the right edge (increase edge) in seed st. After the last increase 15 (19-22) sts are on the needle. Put both parts of the front on the same needle = 44 (48-51) sts on needle. Put a marker at the join and work in stockinette st, keeping the front band sts in seed st. When the work measures 10 cm (4"), dec 1 st at the marker (k 2 tog) on the side closest to the front band: Size Small: every 3rd row 5 times Size Med: alternately every 2nd and 3rd row 7 times Size Large: every 2nd row 9 times = 39 (41-42) sts. Work even until the piece measures 19 (18-19) cm [7.5" (7" - 7.5")]. Now increase inside the markers in a corresponding manner to the decreases: Size Small: every 6th row 5 times Size Med: alternately every 4th and 6th row 7 times Size Large: every 4th row 9 times = 44 (48-51) sts. When the work measures 31 cm (12.25«), shape armholes: at the side edge bind off 3 sts 0 (1-1) times, 2 sts 3 (3-3) times, dec 1 st 3 (3-5) times = 35 (36-37) sts. When the work measures 41 (42-43) cm (16⅛" (16.5"-16⅞") bind off 2 sts over the front band, so that 3 sts of seed st remain. Then shape the neck by decreasing on the inside of the 3 seed sts every other row: 2 sts 3 times, 1 st 9 (10-10) times. (Dec 2 sts as follows: sl 1, k 2 tog, psso. Dec 1 st: sl 1, k 1, psso.) When the work measures 53 (54-55) cm bind off for the shoulder every other row 9 sts 2 (2-1) times, 10 sts 0 (0-1) time. Left front: Cast on and knit as for the right front, but reversing all shaping and eliminating buttonholes on the front band. Work decreases at the marker on the side closest to the front band: sl 1, k 1, psso. When shaping the neck inside the seed st sts, dec 2 sts by k 3 tog, and dec 1 st by k 2 tog. Sleeves: Cast on 36 (40-40) sts on double pointed needles; join and place a marker at the join. Work in seed st for 10 cm (4"). Change to stockinette st and inc 1 st each side of marker 20 (20-21) times: Sizes S and M: every 4th row Size L: alterrnately every 3rd and 4th row = 76 (80-82) sts. When the work measures 51 (49-49) cm (19.75" (19.25"-19.25") bind off 2 (3, 3) sts each side of marker and knit the rest back and forth on the needle. Shape sleeve caps: bind off at each side every other row: 3 (3-2) sts 7 (9-10) times, bind off remaining sts. The work measures 58 (58-59) cm (22⅞" (22⅞"-23.25"). Assembly: Sew shoulder seams and side seams. Sew on sleeves and buttons. |
|
 |
|
Have you finished this pattern?Tag your pictures with #dropspattern #highlanddancercardigan or submit them to the #dropsfan gallery. Do you need help with this pattern?You'll find 20 tutorial videos, a Comments/Questions area and more by visiting the pattern on garnstudio.com. © 1982-2026 DROPS Design A/S. We reserve all rights. This document, including all its sub-sections, has copyrights. Read more about what you can do with our patterns at the bottom of each pattern on our site. |


With over 40 years in knitting and crochet design, DROPS Design offers one of the most extensive collections of free patterns on the internet - translated to 17 languages. As of today we count 324 catalogs and 12285 patterns - 12275 of which are translated into English (US/in).
We work hard to bring you the best knitting and crochet have to offer, inspiration and advice as well as great quality yarns at incredible prices! Would you like to use our patterns for other than personal use? You can read what you are allowed to do in the Copyright text at the bottom of all our patterns. Happy crafting!
Post a comment to pattern DROPS 51-14
We would love to hear what you have to say about this pattern!
If you want to leave a question, please make sure you select the correct category in the form below, to speed up the answering process. Required fields are marked *.