
Popular categories
Looking for a yarn?


|
||||||||||
Country Walk |
||||||||||
|
|
||||||||||
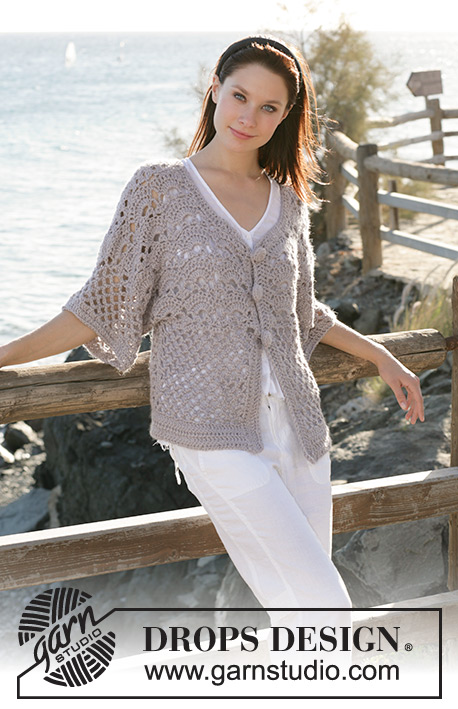
DROPS crochet jacket in Muskat. Size XS - XXL
DROPS 99-18 |
||||||||||
|
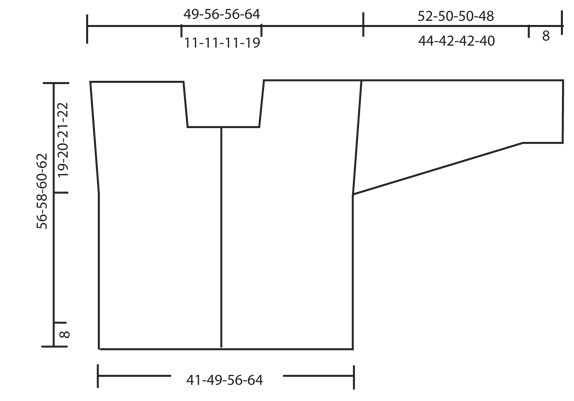
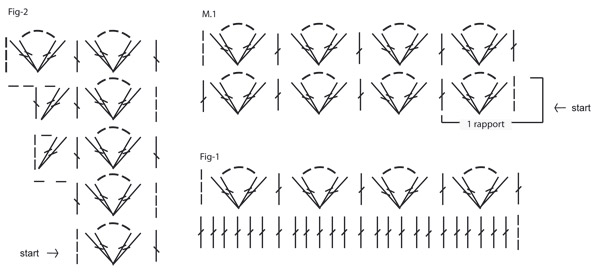
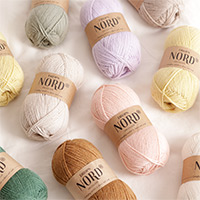
Crochet tension: 16 tr x 10 rows on hook size 4mm with Muskat = 10 x 10 cm Pattern: See Fig. 1 for the transition between tr’s and M.1. See diagram M.1. Crochet info: At the beg of each row replace the 1st tr with 3 ch. At the end of row crochet the last tr in 3rd ch from beg of previous row. Decreasing tip (apply to sleeve): Dec 1 tr each side of the tr-section by crochet tog the last 2 tr as follows: crochet the first tr, crochet the second but without pulling the thread trough the last time, make a yo and pull thread trough all 3 loops on crochet hook. Casting off tip (apply to pockets): Cast off as follows at beg of row: crochet 1 sl st over the first tr Cast off as follows at the end of row: Turn the piece when 1 tr left on row Buttonholes: 1 buttonhole = crochet 1 ch instead of the third tr on front band. On return row crochet 1 tr in ch. Crochet buttonholes on right front band when piece measures: Size XS/S: 13, 21 and 29 cm Size M/L: 13, 21 and 29 cm Size L/XL: 14, 22 and 30 cm Size XXL: 14, 22 and 30 cm Back and front piece: Crochet back and forth from mid front – remember buttonholes on right front band. Crochet 189-221-253-285 ch (incl 3 ch to turn with) on crochet hook size 4 mm. Now crochet 1 tr in 4th ch from the hook, 1 tr in next ch, *1 tr in each of the next 3 ch, skip 1 ch*, repeat from *-* = 141-165-189-213 tr (incl 7 tr each side for front band). Continue with 1 tr in each tr until piece measures 8 cm – read Crochet info! Crochet next row as follows: 7 tr (front band), M.1 on the next 127-151-175-199 tr and finish with 7 tr (front band) = 21-25-29-33 repeats of M.1. See Fig.1 for the transition between tr’s and M.1. Continue like this until piece measures 37-38-39-40 cm and now divide piece for front and back pieces as follows: right front piece = 7 tr on front band + 5-6-7-8 repeats in M.1, back piece = 11-13-15-17 repeats in M.1, left front piece = 5-6-7-8 repeats in M.1 + 7 tr on front band. Right front piece: Crochet from mid front towards the side. Size XS/S and M/L: Inc 1 repeat at side for wide shoulder – see Fig. 2 = 6-7-7-8 repeats (no inc for wide shoulder in size L/XL and XXL). At the same time when piece measures 44-45-46-47 cm only crochet on the outermost 5-6-6-6 repeats at the side (front band and 1-1-1-2 repeats towards mid front = neckline). Cut the thread when piece measures approx 56-58-60-62 cm. Left front piece: Like right front piece, but mirrored. To make sure the 2 front pieces are identical, also crochet from mid front towards the side, i.e first row is from the WS. Back piece: Size XS/S and M/L: Inc 1 repeat each side for wide shoulder – see Fig. 2 = 13-15-15-17 repeats (no inc for wide shoulder in size L/XL and XXL). When piece measures 54-56-58-60 cm (1 row left of M.1) only crochet on the outermost 5-6-6-6 repeats each side (middle 3-3-3-5 repeats = neckline). Cut the thread when piece measures approx 56-58-60-62 cm. Assembly: Sew shoulder seams with neat sts. Sleeve: Crochet from armhole and down. Crochet the sleeve around. Crochet 6-6-7-7 repeats of M.1 mid upper sleeve + 24-28-24-28 extra tr evenly distributed mid under arm (= 12-14-12-14 tr on each side of mid under arm). When sleeve measures 10 cm dec 2 tr in the tr-section under arm on every 3-3-3-2.5 cm a total of 11 times – read Decreasing tip = 6-6-7-7 repeats of M.1 + 2-6-2-6 extra tr. When sleeve measures 44-42-42-40 cm crochet tr until finish. Crochet as follows in each repeat: 1 tr in first tr from M.1, 1 tr in between the next 2 tr, 3 tr in ch-loop, 1 tr between the next 2 tr = 38-42-44-48 tr. Cut the thread when sleeve measures 52-50-50-48 cm (shorter sleeve in larger sizes because of wider shoulder pieces). Collar: Crochet approx 60 to 90 tr along neckline. NB! Do not crochet on front bands (7 tr each side) – make sure there is enough tr at the corners so it is not to tight. Crochet 3 rows with 1 tr in each tr, on next row inc 1 tr in each corner, on each shoulder and mid back (crochet 2 tr in 1 tr). Continue with 1 tr in each tr until collar measures 12-12-13-13 cm. Cut the thread. Button covers: Crochet covers for 11 buttons on crochet hook size 4 mm as follows 1st round: 2 ch, 14 tr in the first ch and finish with 1 sl st in first tr 2nd round: 1 dc in each tr and finish with 1 sl st in dc from beg of round 3rd round: 1 tr in every other dc and finish with 1 sl st in tr from beg of round = 7 tr Put button inside cover, sew round the opening and pull tight. Sew on buttons as follows: 3 buttons on left front band, 2 buttons on each sleeve (1 and 6 cm from bottom edge), fold down collar and place a button each side. Pockets: Crochet 28 ch (incl 3 ch to turn with) on crochet hook size 4 mm with Muskat. Turn and crochet 1 tr in 4th ch from crochet hook, *1 tr in each of the next 3 ch, skip 1 ch*, repeat from *-* = 20 tr. Continue with 1 tr in each tr until piece measures 14 cm. Now cast off 1 tr each side on every row a total of 8 times – see Casting off tip = 4 tr left. Cut the thread. Crochet a border round the flap, i.e. where the dec beg, as follows: 1 dc in the first tr, *2 ch, skip 1 cm, 1 dc, 2 ch, 1 dc in the same dc, skip 0.5 cm, 1 dc*, repeat from *-*. Fold the flaps over the pocket and attach with a button. Sew the pockets to front pieces, approx 10 cm from bottom edge. Crochet border: Crochet a border round all edges including the sleeves on crochet hook size 4 mm with Muskat as follows: 1dc in the first tr, *2 ch, skip 1 cm, 1 dc, 2 ch, 1 dc in the same dc, skip 0.5 cm, 1 dc*, repeat from *-*. English explanation to pattern diagram: In M.1: 1 rapport = 1 repeat |
||||||||||
Diagram explanations |
||||||||||
|
||||||||||
|
||||||||||
|
||||||||||
|
Have you made this or any other of our designs? Tag your pictures in social media with #dropsdesign so we can see them! Do you need help with this pattern?You'll find tutorial videos, a Comments/Questions area and more by visiting the pattern on garnstudio.com. © 1982-2024 DROPS Design A/S. We reserve all rights. This document, including all its sub-sections, has copyrights. Read more about what you can do with our patterns at the bottom of each pattern on our site. |
||||||||||


With over 40 years in knitting and crochet design, DROPS Design offers one of the most extensive collections of free patterns on the internet - translated to 17 languages. As of today we count 304 catalogues and 11422 patterns - 11422 of which are translated into English (UK/cm).
We work hard to bring you the best knitting and crochet have to offer, inspiration and advice as well as great quality yarns at incredible prices! Would you like to use our patterns for other than personal use? You can read what you are allowed to do in the Copyright text at the bottom of all our patterns. Happy crafting!
Comments / Questions (37)
Bij het Country walk vest klopt het proeflapje precies maar als ik het vest ga haken zou ik volgens mij beginnen met voor- en achterpand en na de 1ste toer is het al duidelijk dat het wel 2 x zo ruim wordt als mijn omvang. Hoe kan dat ?
19.03.2024 - 16:35DROPS Design answered:
Dag Rina,
Na de eerste toer heb je 141-165-189-213 steken op de toer voor de voorpanden en het achterpand samen, inclusief de overslag voor de knoopbies. Als ik kijk naar de stekenverhouding en de afmetingen in de maattekening, dan zou dit moeten kloppen.
20.03.2024 - 10:47What does M.1 mean in crochet terms? Thanks
08.03.2024 - 15:50DROPS Design answered:
Dear Toni, M.1 is the name of the diagram/pattern you will work - read more about crochet diagrams here. Happy crocheting!
08.03.2024 - 16:06Hola, muy agradecida por los patrones, pero tengo una duda con la funda para botones. Dice 14 puntos altos y terminar con p.e. Cuál punto es el p.e. ? De antemano muchas gracias .
26.08.2023 - 01:53DROPS Design answered:
Hola Lilian, p.e = punto enano o punto bajísimo.
28.08.2023 - 00:18Hur ökar jag hålmönstrat i sidan. Förstår inte mönstret 🙏
04.07.2023 - 13:25DROPS Design answered:
Hej Madelene, jo du ökar sist på varvet, efter sista st, virkar du 6 lm, 2 st i lm-bågen, sedan 1 st i sista st från förra varvet (nu har du ökat ½ st-grupp i ena sidan :)
05.07.2023 - 08:17Hola, me encantan tus patrones pero ya hice el delantero derecho y no sé cómo retomar para hacer el delantero izquierdo. Me podrías explicar por favor. Muchas gracias
05.04.2023 - 03:42DROPS Design answered:
Hola Lilian, antes de empezar el delantero derecho deberías haber dividido la labor para el delantero derecho, delantero izquierdo y la espalda. Para retomar el delantero izquierdo, corta el hilo del delantero derecho y añade un hilo en el delantero izquierdo en el primer punto para empezar a trabajar. Para trabajar a la inversa la primera fila se trabajará por el lado revés, por lo que trabajas desde el lateral hacia el centro del delantero, siguiendo las instrucciones del delantero derecho.
06.04.2023 - 23:31I'm working this pattern No.99-18. I understand how to do the pattern so far, but am curious about what (M.1) and (rapport) means in crochet. In knitting M.1 means make one. Rapport I don't know and I couldn't find anything about either one.
04.12.2022 - 03:52I could not find how to work the back after pattern is divided for front sections and back. also the underarm area, i am all the way to this point and stuck.
06.01.2020 - 22:45DROPS Design answered:
Dear Mrs Krzyszton, after dividing piece, you first work Right front piece, then Left front piece, then Back piece. Back piece = 11-13-15-17 repeats in M.1 increasing 1 stitch in size XS/S and M/L as in Fig 2 = 13-15-15-17 repeats in width. Happy crocheting!
07.01.2020 - 08:54Where do I begin the join for starting the back panel having done both side panels please? I\\\'ve seen an errata for this but that didn\\\'t really help. Do I begin in the three chain space either side of the two dcs or in the same stitch that the front panel end stitch is? Without a diagram and clear instructions, this is guesswork. Do I follow Fig 2 for this so I get a match with front panels?
13.10.2018 - 17:29DROPS Design answered:
Dear 1111232likdlHFDKJhnkj, yes you will start the back piece so that pattern matches as before and is the same as before = first 3 chains will be worked in the same st as front piece and last st on back piece will be worked in the same st as on other front piece. Work then increase as explained in your size following fig 2. Happy crocheting!
15.10.2018 - 09:08Jag snubblar redan på uppläggningsvarvet! 221 lm första st i 4:e m och en st i nästa lm sen 3 st. Det blir med de 3 m man vänder med = 6st. Sen ska det bli 165 st totalt men jag får inte 6st i slutet. Det står lägg upp 221 lm, sen innan parantes inklusive 3 lm för vändningen. Är det 221 lm PLUS 3 lm alltså 224 i upplägget? Senare står det att det är inkl 7 lm som är kanten. Men man startar ju med 6 st i kanten! Jag är så förvirrad. Hjälp
03.06.2017 - 01:01Bonjour, Je n arrive pas à faire l augmentation d un motif de chaque coté pour le dos. En effet, la fig.2 ne montre que l augmentation d un coté en fin de rang.
11.05.2017 - 20:52DROPS Design answered:
Bonjour Mme Bakoly, ces augmentations se font en fin de rang, augmentez ainsi en fin de rang sur l'endroit puis de la même façon en fin de rang sur l'envers. Bon crochet!
12.05.2017 - 08:43