
Popular categories
Looking for a yarn?


Comments / Questions (43)
![]() Fabiula Sarti wrote:
Fabiula Sarti wrote:
Muito lindo !
13.05.2026 - 19:19
![]() María Del Carmen wrote:
María Del Carmen wrote:
Buen día. Sería más fácil si pusieran el gráfico clásico, el que todos entendemos y mejor todavía, pongan un vídeo y no haremos preguntas, pues sus respuestas mayoritariamente no nos aclaran nada. Si ustedes quieren vender más, pongan una de las soluciones que les propongo. Un saludo, Carmen
25.11.2022 - 18:10
![]() Tranisabelle wrote:
Tranisabelle wrote:
Bonjour J aime beaucoup ce modèle et j ai déjà acheté la laine Drops Je ne comprends pas ce que veut dire le point structuré. Pourriez vous me donner des explications plus claires ou autrement pour comprendre ? En tout ce modèle se crochete combien de lignes (de haut en bas) ? Sans compter les bordures. Auriez vous 1 grille ou 1 schéma pour m aider avec les explications ? Merci beaucoup pour votre aide Isabelle
10.04.2022 - 23:57DROPS Design answered:
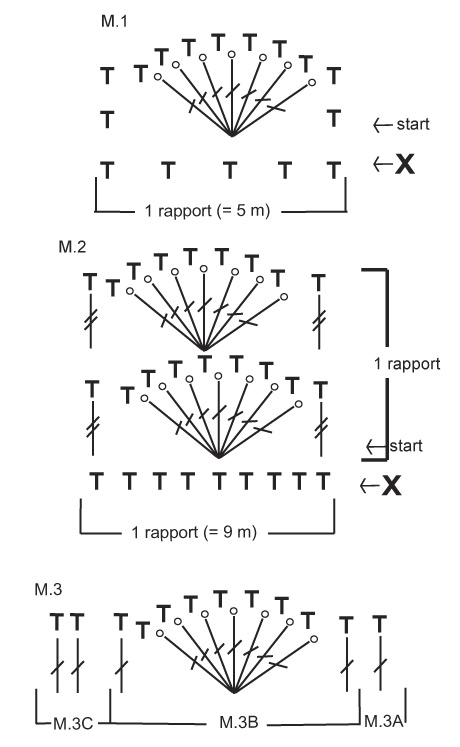
Bonjour Isabelle, le point structuré se crochète sur les mailles augmentées entre les coquilles, autrement dit, vous crochetez les mêmes mailles que les diagrammes: soit 1 maille serrée ou 1 double-bride, tout comme les mailles de bordure de chaque côté. Suivez bien les diagrammes M.1, M.2 et M.3 - cette leçon vous aidera à comprendre comment lire ces diagrammes. Bon crochet!
19.04.2022 - 08:05
![]() Dollie Rials wrote:
Dollie Rials wrote:
How do you increase this to a size 3x
09.08.2020 - 17:42DROPS Design answered:
Dear Mrs Rials, we are unfortunately not able to adjust every pattern to every single request, please contact your DROPS store or any crochet forum for any individual assistance. Happy crocheting!
10.08.2020 - 09:30
![]() Marianela wrote:
Marianela wrote:
Me encanta Ojalá pudieran traducirlo al español
28.04.2020 - 15:15DROPS Design answered:
Hola Marianela. Está traducido. Aquí tienes el línk: https://www.garnstudio.com/pattern.php?id=3820&cid=23
28.04.2020 - 16:24
![]() Isa wrote:
Isa wrote:
Je comprends bien pour les augmentations mais au rang 3, le nombre de DB augmente t- il pour faire en sorte que les coquilles soient alignées ?
11.11.2019 - 17:28DROPS Design answered:
Bonjour Isa, comme vous augmentez entre les coquilles, elles seront toujours alignées, c'est simplement le nombre de mailles entre les coquilles qui va augmenter. Bon crochet!
12.11.2019 - 08:11
![]() Isa wrote:
Isa wrote:
Décidément, beaucoup de questions sur ce modèle. Au rang 3 de M2, entre chaque coquille, il y a toujours que 2 doubles brides ? C'est ce que j'obtiens quand je suis les directives mais au bout d'un moment les coquilles ne sont plus alignées. Merci de votre réponse
11.11.2019 - 15:29DROPS Design answered:
Bonjour Isa, on doit augmenter 5 fois 2 mailles entre les motifs de M.2 = on aura donc 10 ms/double-brides entre chaque M.2 quand toutes les augmentations sont faites - les augmentations se font entre chaque M.2, les coquilles doivent toujours être alignées. Bon crochet!
11.11.2019 - 16:09
![]() Isa wrote:
Isa wrote:
Si j'augmente au rang 1 et 3, j'augmente alors en faisant des doubles brides alors qu'il est marqué d'augmenter en faisant des mailles serrées (si je fais des mailles serrées sur les doubles brides, il s'agit des rangs 2 et 4). Je suis un peu perdu là. Merci de votre éclairage.
11.11.2019 - 12:15DROPS Design answered:
Bonjour Isa, effectivement, erreur de ma part, il semble que cette phrase devrait être supprimée (cela va être vérifié avant), vous augmentez tous les 2 rangs, autrement dit aux rangs de mailles serrées seulement, en commençant par le 2ème rang de M.2 = rang de ms, puis au 4ème rang de M.2, et ainsi de suite. Bon crochet!
11.11.2019 - 12:53
![]() Isa wrote:
Isa wrote:
Bonjour, Il est marqué de faire les augmentations sur les rangs 1, 3 et 5 de M2. Or, le motif M2 ne comprend que 4 rangs. Où se trouve le 5 ème rang ? Merci de votre réponse.
11.11.2019 - 11:29DROPS Design answered:
Bonjour Isa, vous augmentez aux rangs de double-brides, soit au rang 1 de M.2, puis au rang 3, puis au rang 5 (= le 5ème rang de M.2 qui sera le 1er rang quand on répète M.2 en hauteur). bon crochet!
11.11.2019 - 11:54
![]() Isa wrote:
Isa wrote:
Bonjour, J'ai acheté de la laine Népal pour réaliser ce modèle. Dois prendre un crochet n°5 comme préconisé pour Népal pour obtenir le même résultat ? Merci de votre réponse
22.10.2019 - 13:55DROPS Design answered:
Bonjour Isa, ce modèle se crochète en Eskimo (= laine du groupe E), alors que Nepal est du groupe C; il vous faudra crocheter avec 2 fils du groupe C, donc 2 fils Nepal pour le même résultat (2 fils C = 1 fil E); ajustez la taille du crochet pour obtenir l'échantillon et pensez à vérifier la quantité grâce à notre convertisseur - plus d'infos sur les alternatives ici. Bon crochet!
22.10.2019 - 14:35
|
||||||||||||||||
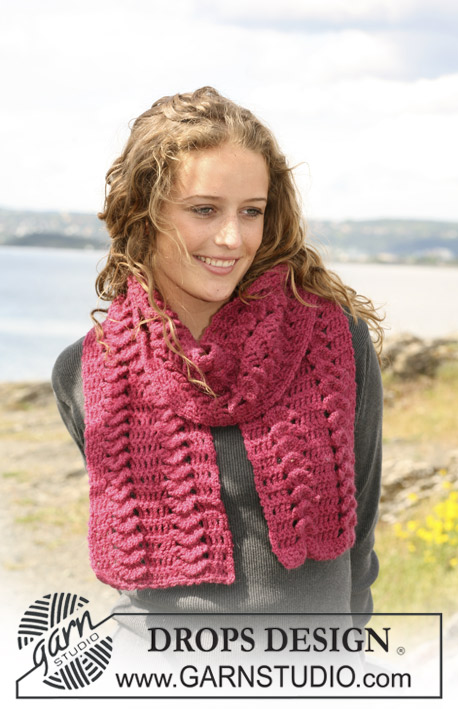
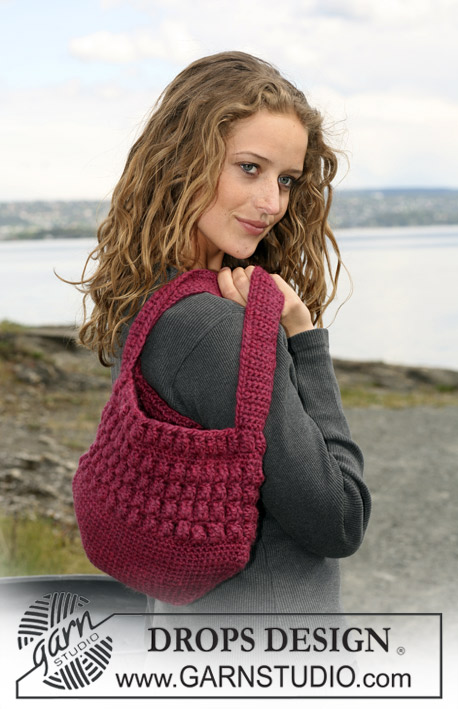
Shells on the Shore |
||||||||||||||||
|
|
||||||||||||||||
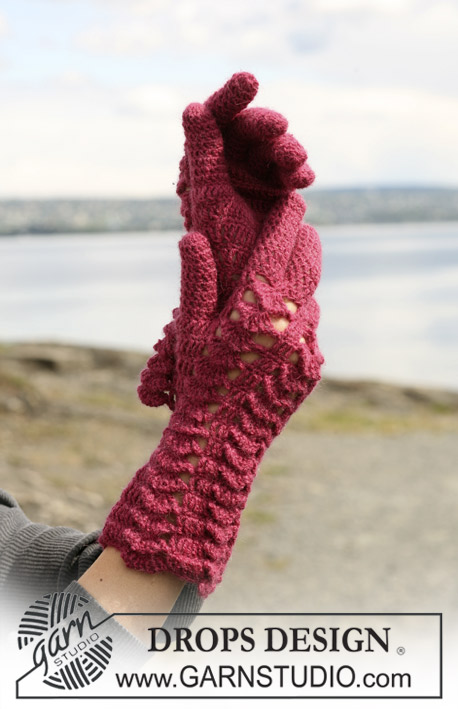
Crochet DROPS cape with shell pattern in ”Snow”. Size S - XL.
DROPS 110-9 |
||||||||||||||||
|
Crochet tip-1: Replace first dc on row with 1 ch. Replace first tr on row with 3 ch. Replace first dtr on row with 4 ch. Crochet tip-2: When working dc over dtr, crochet in dtr, but when working dc over shell with picots crochet between sts. Make sure the picot sits at the front of piece. Increasing tip: Inc 2 sts between each shell by working 2 dc in the first dtr/dc and the last dtr/dc in each repeat of M.2. Note! No inc towards mid front (i.e. do not inc at the beg of the first repeat of M.2 and at the end of the last repeat of M.2 on row). Shell pattern: See diagram M.1 to M.3. Textured pattern: Worked on all sts not included in M.2. The textured pattern follows the pattern in M.2, i.e. when working dc in M.2 work dc in textured pattern and when working shells in M.2 work dtr in textured pattern. Cape: Worked from top down, back and forth on needle towards mid front. Crochet 47-53 ch (includes 1 ch to turn with) on crochet hook size 8 mm with Snow. Work 1 dc in 2nd ch from hook and 1 dc in 3rd ch from hook, * skip 1 ch, 1 dc in each of the next 4 ch *, repeat from *-* until 4-5 ch remain, skip 1 ch and work 1 dc in each of the last 3-4 ch = 37-42 dc on row. Continue as follows from RS: See Crochet tip-1 and Textured pattern! 1 st in the first st, M.1 on the next 35-40 sts (7-8 repeats), 1 st in the last st on row. See Crochet tip-2! After 1 vertical repeat of M.1 (= 65-74 sts) continue in M.2. At the same time inc 2 sts between each of the 7-8 repeats on row of M.2, inc on dc-rows – see Increasing tip – a total of 5 times = 125-144 sts on row. Incorporate the inc sts in Textured pattern as you go along, i.e. no of sts between each repeat of M.2 increases. When all inc are complete continue as follows: 1 st in first st on row, * M.2 on the next 9 sts, 1 st in each of the next 10 sts *, repeat from *-* until 10 sts remain on row, M.2 on the next 9 sts and 1 st in the last st on row. After 9-10 vertical repeats of M.2 continue as follows: M.3A on the first st, * M.3B on the next 9 sts, M.3C on the next 10 sts *, repeat from *-* until 10 sts remain, M.3B on the next 9 sts and M.3A on the last st on row. See Crochet tip-2! After 1 vertical repeat of M.3 (2 rows) cut the thread. Front bands and neckline: Beg at the bottom of left front piece (1st row = WS). Crochet approx 100 to 120 dc with crochet hook size 8 mm and Snow up along left front piece, round neck and down along right front piece (make sure border isn’t too tight). Turn piece. Work 1 tr in each dc, at the same time make 2 buttonholes on right front piece, 1 approx 8 cm from neckline and 1 approx 1 cm from neckline by replacing 1 tr with 1 ch. On next row work 1 dc in each tr and in each ch for buttonhole. Sew on buttons. |
||||||||||||||||
Diagram explanations |
||||||||||||||||
|
||||||||||||||||
 |
||||||||||||||||
Have you finished this pattern?Tag your pictures with #dropspattern or submit them to the #dropsfan gallery. Do you need help with this pattern?You'll find 6 tutorial videos, a Comments/Questions area and more by visiting the pattern on garnstudio.com. © 1982-2026 DROPS Design A/S. We reserve all rights. This document, including all its sub-sections, has copyrights. Read more about what you can do with our patterns at the bottom of each pattern on our site. |
||||||||||||||||


With over 40 years in knitting and crochet design, DROPS Design offers one of the most extensive collections of free patterns on the internet - translated to 17 languages. As of today we count 325 catalogues and 12298 patterns translated into English (UK/cm).
We work hard to bring you the best knitting and crochet have to offer, inspiration and advice as well as great quality yarns at incredible prices! Would you like to use our patterns for other than personal use? You can read what you are allowed to do in the Copyright text at the bottom of all our patterns. Happy crafting!
Post a comment to pattern DROPS 110-9
We would love to hear what you have to say about this pattern!
If you want to leave a question, please make sure you select the correct category in the form below, to speed up the answering process. Required fields are marked *.