
Popular categories
Looking for a yarn?


Comments / Questions (127)
![]() Anke Crielaard wrote:
Anke Crielaard wrote:
Ik ben al een aardig eind op weg, maar vrees dat ik in de fout ben gegaan met het afkanten (7 st voor de hals). Aan welke kant moet ik die 7 steken afkanten? Ik heb het nu 6 x gedaan aan dezelfde kant als waar ik aan het meerderen ben….. kun je me zeggen of ik goed bezig ben? Zou een rampje zijn als ik dat allemaal moet uithalen! Help!
13.04.2026 - 20:10DROPS Design answered:
Dag Anke,
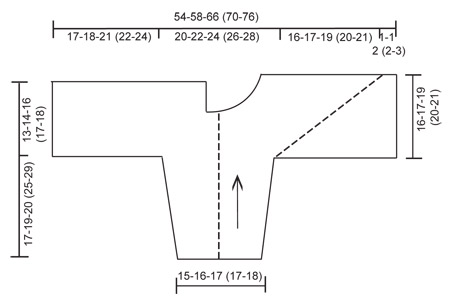
Die 7 steken kant je af bij de hals, dus aan het einde van de naald als je aan de goede kant bent, dus waar je de 9-10-10 (10-12) steken het dichtst bij het achterpand op de hulpdraad hebt laten staan. Zie ook de schematische weergave onderin. Deze minderingen zorgen voor de kwart cirkel die je daar ziet.
15.04.2026 - 11:49
![]() Pellorce wrote:
Pellorce wrote:
Les augmentations se font à partir du dessous du bras ou au bout des 43 mailles rajoutez,merci pour votre réponses
17.03.2026 - 14:24DROPS Design answered:
Bonjour Mme Pellorce, les augmentations du devant se font de chaque côté de la 2ème maille du rang (vu sur l'endroit), la maille avec le marqueur est la ligne en pointillé que l'on voit dans le schéma, on va ainsi augmenter le nombre de mailles avant et après cette maille avec un marqueur, le côté des 43 mailles montées en fin de rang sur l'endroit est pour le dos (à gauche, vu sur l'endroit). Bon tricot!
17.03.2026 - 16:11
![]() Lisa wrote:
Lisa wrote:
Thank you for the Killian Baby sweater instructions. I am excited to make it, but I am having trouble with the increase directions. Is there a video that explains this technique? What is the increase called in the US? How many stitches are actually created? Thanks! Lisa
07.03.2026 - 22:40DROPS Design answered:
Dear Lisa, to increase on front piece you will make a yarn over on each side of the stitch with the marker, on next row, ,work the yarn overs in the back loop to avoid holes; note that the number of sts on each side of the stitch with the marker will increase and the dotted line in the chart is matching the stitch with the marker. Check tab Videos to find some videos showing techniques used in that pattern. Happy knitting!
09.03.2026 - 08:58
![]() Lis wrote:
Lis wrote:
Jeg kan ikke finde knaphuller i opskriften ?
18.02.2026 - 12:17DROPS Design answered:
Hei Lis. Under FORSTK står det: .....SAMTIDIG når arb måler 14-15-17 (18-19) cm (fra der hvor udtagningen på forsk startede og mod midt foran) lukkes der af til 3-4-4 (5-5) knaphuller således (fra halsen, dvs fra vrangen): Strik 2 m, luk 2 m af, * strik 12-9-11 (9-10) m, luk 2 m af*, gentag fra *-* totalt 2-3-3 (4-4) gange, strik derefter ret p ud. På næste p slåes der 2 nye m op over alle de aflukkede. mvh DROPS Design
23.02.2026 - 15:26
![]() Laurence wrote:
Laurence wrote:
Bonjour, ce modèle est vraiment très joli, j’ai un petit doute sur une explication, comme on ne voit pas vraiment le dessin de la pièce que l’on tricote. Quand vous dites faire une augmentation de chaque côté du marqueur, ça veut dire donc deux augmentations ? Merci beaucoup.
02.02.2026 - 20:00DROPS Design answered:
Bonjour Laurence, lorsque vous augmentez 1 m de chaque côté de la maille avec un marqueur pour le devant, vous augmentez effectivement 2 mailles tous les rangs sur l'endroit. Le marqueur doit rester dans la même maille tout du long = c'est celle que l'on voit en pointillé dans le schéma (du haut de la manche jusqu'à environ le bas du devant). Bon tricot!
03.02.2026 - 17:33
![]() Irmgard wrote:
Irmgard wrote:
Bin eigentlich keine unerfahrene Strickerin, aber diese Angabe beim Halsausschnitt mit den 10 stillgelegten Maschen auf dem Hilfsfaden steigt über meine Grenzen. Ist leider auch sehr schlecht erklärt. Da würde ein Video sehr helfen! Sehr schade das ich das Projekt abbrechen muss. Schade um die ZEIT!
19.12.2025 - 09:23
![]() Irmgard wrote:
Irmgard wrote:
Liebe Fr. Kuhlmann sind sie dann mit der Erklärung von Drops zusammengekommen. Haben sie die Jacke beenden können. Lg Irmgard
18.12.2025 - 23:13
![]() Irmgard wrote:
Irmgard wrote:
Habe eine Frage zur Halsrundung. Die 10 Maschen die auf dem Hilfsfaden liegen werden bei jeder 4.R. total 7 mal abgekettet. Dann bleiben mir ja noch 2 Maschen auf dem Hilfsfaden übrig? Da blicke ich nicht durch. 🫣 Bitte um Hilfe! Danke Lg Irmi
18.12.2025 - 19:50DROPS Design answered:
Liebe Irmi, die 10 Maschen bleiben weiter stillgelegt, die Abnahmen machen Sie neben den stillgelegten Maschen. Die stillgelegten Maschen werden bei der Halsblende weitergestrickt. Viel Spaß beim Weiterstricken!
19.12.2025 - 10:35
![]() Jacqueline wrote:
Jacqueline wrote:
Muy lindo todos tus proyectos y cómo veo el paso a paso, pero en video? Saludos desde Chile 😘
25.10.2025 - 18:14
![]() Roswitha wrote:
Roswitha wrote:
In der Anleitung zu dem Vorderteil wird mehrmals der Ausdruck "gegen" verwendet, z.B. gegen den Hals, gegen das Vorderteil und gegen die vordere Mitte. Was ist damit gemeint? Ich benutze die Originalwolle Drops Fabel und komme ansonsten mit der Anleitung bisher gut klar.
16.10.2025 - 17:12
|
||||
Killian#killianset |
||||
|
|
||||
Set of knitted domino jacket in garter st in DROPS Fabel and pants in rib st in DROPS Alpaca for baby and children
DROPS Baby 18-25 |
||||
|
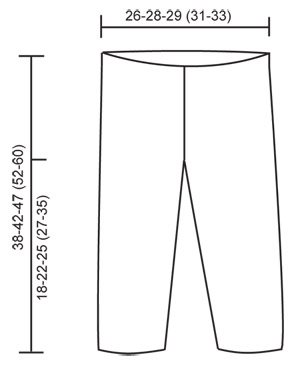
JACKET: INCREASING TIP: Inc 1 st on each side of st with marker by making 1 YO. On return row work YO into back of st in order to avoid a hole. ---------------------------------------------------------- JACKET: Worked from side to side from sleeve towards the middle of jacket, in 2 pieces sewn tog mid back afterwards. RIGHT HALF: Worked back and forth on circular needle in garter st. Cast on 36-38-40 (40-42) sts on circular needle size 3 mm with Fabel and work garter st. REMEMBER THE KNITTING TENSION! When piece measures 6-6-5 (5-6) cm inc 1 st each side and repeat the inc on every 8th row a total of 6-7-9 (11-13) times = 48-52-58 (62-68) sts. Continue until piece measures 17-19-20 (25-29) cm – adjust so that next row is from RS. BODY PIECE: K 1 row from RS, at the end of row cast on 41-43-50 (53-58) sts (= towards back piece) = 89-95-108 (115-126) sts. NOW MEASURE PIECE FROM HERE! Work return row. Insert a marker from RS in the second st on row (= right side of piece) and continue in garter st, AT THE SAME TIME inc 1 st on each side of st with marker on every other row a total of 38-40-46 (48-50) times – SEE INCREASING TIP. AT THE SAME TIME when piece measures 8½-9-10½ (11-12) cm continue on the last 60-65-74 (79-86) sts only on the left side of piece as seen from the RS (= back piece). Slip remaining sts on a stitch holder. BACK PIECE: Continue until piece measures 13-14-16 (17-18) cm (from where sts were cast on for back piece), and cast off. FRONT PIECE: Slip sts from stitch holder back on needle, but leave 9-10-10 (10-12) sts towards back piece on stitch holder for neckline. Continue to inc on every other row, AT THE SAME TIME cast off 1 st towards neckline on every 4th row a total of 6-7-7 (7-7) times. AT THE SAME TIME when piece measures 14-15-17 (18-19) cm (from where inc for front pieces beg) cast off for 3-4-4 (5-5) buttonholes as follows (from neckline, i.e. from WS): work 2 sts, cast off 2 sts, * work 12-9-11 (9-10) sts, cast off 2 sts *, repeat from *-* a total of 2-3-3 (4-4) times, and then work remaining sts on row. On return row cast on 2 new sts over the cast off sts. After dec and inc are complete there are 90-93-109 (115-121) sts on row. Now cast off 51-52-62 (66-70) sts from WS from neckline and down along front band = 39-41-47 (49-51) sts left on row. Continue in garter st back and forth on these sts for approx 1-1-2 (2-3) cm (fold piece double by shoulder to measure front piece to back piece) and cast off. LEFT HALF: Like right half, but without buttonholes – this half is assembled with WS out. ASSEMBLY: Place the 2 halves towards each other and sew tog mid back – edge to edge in order to avoid a chunky seam. Fold jacket double and sew under arm and side seams in outer loops of sts. Sew on buttons. NECKLINE: Pick up 55 to 75 sts (incl sts on stitch holders) round neckline on circular needle size 3 mm with Fabel. Work 3 rows garter st back and forth on needle and cast off. ---------------------------------------------------------- PANTS: INCREASING TIP: Inc 1 st on each side of the 2 K sts mid back (marker sits between these 2 sts). Inc by working 2 sts in 1 st and incorporate inc sts in rib as you go along. DECREASING TIP: Dec 1 st on each side of marker mid front. Dec as follows before marker: K2 tog. Dec as follows after marker: slip 1 st as if to K, K1, psso. LEG: Worked in the round on double pointed needles. Cast on 56-60-64 (68-72) sts on double pointed needles size 3 mm with Alpaca. Insert a marker at beg of round = inside of leg. Continue as follows: K1, * P2 / K2 *, repeat from *-* and finish with P2 and K1. When piece measures 4-6-4 (4-5) cm inc 1 st on each side of marker by K 2 sts in 1 st on every 5-6-8 (9-12) round a total of 8 times = 72-76-80 (84-88) sts. When leg measures 16-20-23 (25-33) cm divide the piece by marker and continue back and forth on needle (to make it easier to slip both legs on the same circular needle afterwards), AT THE SAME TIME cast on 1 new st each side for seam = 74-78-82 (86-90) sts. When piece measures 18-22-25 (27-35) cm cast off 5 sts each side (= 1 edge st, K1, P2 and K1) = 64-68-72 (76-80) sts. Put piece aside and knit the other leg in the same way. PANTS: Slip both legs on the same circular needle size 3 mm = 128-136-144 (152-160) sts. Insert 1 marker mid front and 1 marker mid back (both markers should sit between 2 K sts). Continue in rib, K2 / P2, AT THE SAME TIME inc mid back and dec mid front as follows: INC MID BACK: Inc 2 sts – SEE INCREASING TIP. Repeat the inc on every 4th round a total of 4 times. DEC MID FRONT: Dec 2 sts – SEE DECREASING TIP. Repeat the dec on every 4th round a total of 8 times. After all inc and dec are complete there are 120-128-136 (144-152) sts on round. Continue in rib until piece measures 38-42-47 (52-60) cm, cast off. ASSEMBLY: Sew inside of legs at the top inside 1 edge st. Sew opening between legs, front of leg towards back of leg. |
||||
Diagram explanations |
||||
|
||||
 |
||||
 |
||||
Have you finished this pattern?Tag your pictures with #dropspattern #killianset or submit them to the #dropsfan gallery. Do you need help with this pattern?You'll find 14 tutorial videos, a Comments/Questions area and more by visiting the pattern on garnstudio.com. © 1982-2026 DROPS Design A/S. We reserve all rights. This document, including all its sub-sections, has copyrights. Read more about what you can do with our patterns at the bottom of each pattern on our site. |
||||


With over 40 years in knitting and crochet design, DROPS Design offers one of the most extensive collections of free patterns on the internet - translated to 17 languages. As of today we count 325 catalogues and 12298 patterns translated into English (UK/cm).
We work hard to bring you the best knitting and crochet have to offer, inspiration and advice as well as great quality yarns at incredible prices! Would you like to use our patterns for other than personal use? You can read what you are allowed to do in the Copyright text at the bottom of all our patterns. Happy crafting!
Post a comment to pattern DROPS Baby 18-25
We would love to hear what you have to say about this pattern!
If you want to leave a question, please make sure you select the correct category in the form below, to speed up the answering process. Required fields are marked *.