
Popular categories
Looking for a yarn?


Comments / Questions (25)
![]() Bhuvana wrote:
Bhuvana wrote:
Thank you so much for the immediate response and sending the link to the videos!
24.04.2026 - 12:57
![]() Bhuvana wrote:
Bhuvana wrote:
Hi, I completely dropped the stitches I added on for the sleeves several rows down. I am not able to locate loose loops to trace back and fix the error. How do I put the stitches back on? Or is there a way to add the missing stitches some way? Please help! Thanks, Bhuvana
24.04.2026 - 02:28DROPS Design answered:
Dear Bhuvana, if you are missing the stitches for sleeves you might have to unravel to the last row with the correct number of stitches and start again from here, so that you are sure to get the correct number of stitches for each sleeve. You will also find some tips for dropped stitches here - maybe one of them can help you. Happy knitting!
24.04.2026 - 09:23
![]() Bhuvana wrote:
Bhuvana wrote:
Hi, I am beginning to knit Strawberry Sweet Kids design and would like to know what it is to cast on 1 edge stitch on each side . Thanks
29.03.2026 - 18:30DROPS Design answered:
Hi Bhuvana, Her is a link to our video showing you how to cast on stitches each side: https://www.garnstudio.com/video.php?id=94&lang=en This video and others which you might find useful, are found under "Videos" at the top of the page. Happy Easter!
30.03.2026 - 08:49
![]() Susan wrote:
Susan wrote:
Hej! Enligt beskrivningen ska maskor läggas upp för ärmen. Stämmer det att man ska lägga upp i slutet på varvet vilket innebär att man inte lägger upp för båda ärmarna samtidigt? Finns en video som beskriver hur man lägger upp maskor i slutet på varvet? Tack!//Susan
27.09.2025 - 19:54
![]() Maria wrote:
Maria wrote:
Jag har 21 maskor på provlappen. och det överstämmer med mönstret. Jag har prövat att sticka i 3 olika storlekar men ändå är den för stor i storleken. Dottern är snart 12 år och mönstret för 7 år är för stor.
06.06.2023 - 22:33
![]() Yves Hanssens wrote:
Yves Hanssens wrote:
Bonjour, Pourrais je avoir des patrons pour fille2/3 ans . Manteau , blouses à manches courtes et robes qui se tricotent avec des aiguilles droites. Beaucoup de vos modèles sont en aiguilles circulaires! Je suis débutante! Merci Martine de Belgique
20.01.2023 - 17:55DROPS Design answered:
Bonjour Mr Hanssens, retrouvez tous nos modèles en taille 2 ans ici dans la catégorie "layette" et là dans la catégorie "enfant". Cette leçon pourra vous aider avec les aiguilles circulaires. Bon tricot!
23.01.2023 - 08:31
![]() Véronique wrote:
Véronique wrote:
Bonjour, je suis occupée de tricoter ce modèle, et je me demandais si c'est normal que pour la taille 9/10 ans il faut augmenter 3 fois1 M (3) et 3 fois 2 m (6) = 9 mailles pour le manches? c'est pas trop peu? un grand merci pour votre réponse
16.08.2021 - 17:06DROPS Design answered:
Bonjour Véronique, non c'est effectivement juste ainsi en taille 9/10 ans, vous tricoterez après une bordure de manches de 3 cm en relevant les mailles du devant et du dos. Bon tricot!
17.08.2021 - 09:49
![]() Martine Plainevaux wrote:
Martine Plainevaux wrote:
Bonjour Je ne trouve pas les explications des manches comme sur le modele. Ici uniquement les augmentations des manches ?? Pourriez-vous m'expliquer, svp merci
21.02.2020 - 11:40DROPS Design answered:
Bonjour Mme Plainevaux, les mailles des manches sont montées à la fin de chaque rang de chaque côté, soit: 5-3-1-1 fois 1 m, 1-3-4-5 fois 2 m et 0-0-1-1 fois 3 m soit 7-9-12-14 mailles de chaque côté pour chacune des manches. On fait ensuite la bordure côtes en relevant les mailles le long des manches. Bon tricot!
21.02.2020 - 13:17
![]() Yvonne wrote:
Yvonne wrote:
Kan ik model ook met lang mouw maken, en hoe?
11.12.2017 - 09:59DROPS Design answered:
Hallo Yvonne, Dat zou kunnen door extra steken op te zetten voor de aangebreide mouwen. In het patroon staat dat je een aantal keren (afhankelijk van je maat) 1 steek opzet, een aantal keren 2 steken en een aantal keren 3 steken op beide kanten van beide panden. Na die drie steken doe je nog een aantal steken 21 steken per 10 cm extra mouwlengte (althans als je proeflapje klopt). Omdat je daardoor wel erg veel steken op de naald hebt, raad ik je aan om met een lange rondbreinaald heen en weer te breien.
13.12.2017 - 18:16
![]() Rita wrote:
Rita wrote:
Buon giorno, Invece di tenere in sospeso le maglie per lo scollo le ho chiuse. Volevo sapere se va bene riprenderle tutte da chiuse oppure devo ricomincire? Grazie Rita
02.05.2016 - 19:49DROPS Design answered:
Buonasera Rita, dal momento che vengono riprese anche le altre maglie potrebbe provare a riprenderle e vedere se le piace l'effetto finale, per queste m si assicuri di riprendere 1 m in ogni m. Buon lavoro!
02.05.2016 - 20:09
|
|
Strawberry Sweet Kids#strawberrysweetkidssweater |
|
|
|
|
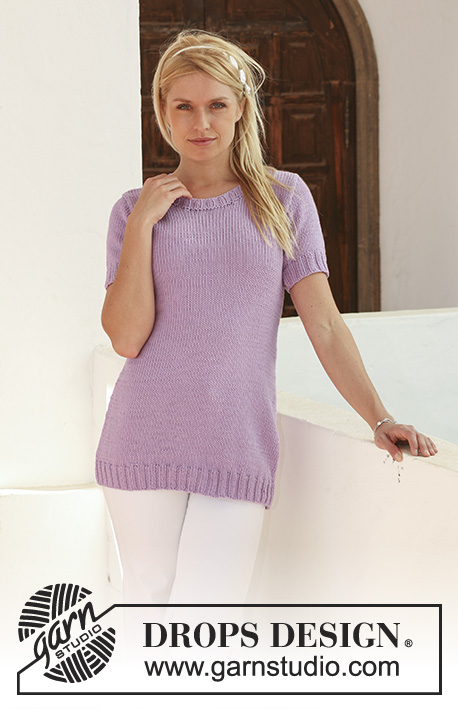
DROPS jumper with short sleeves in ”Muskat”. Size 7 -14 years.
DROPS 113-19 |
|
|
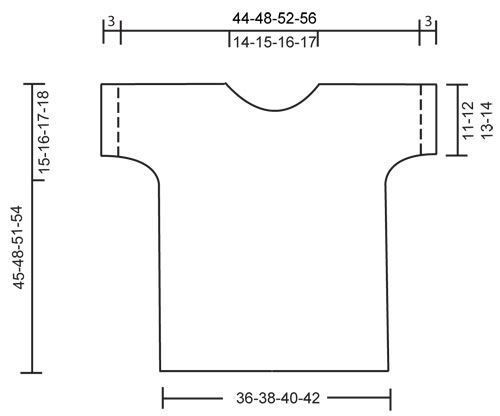
FRONT PIECE: Worked back and forth on needle. Cast on 86-92-98-104 sts (includes 1 edge st each side) on needle size 3.5 with Muskat. Work rib, K3-P3, with 1 edge st each side. When piece measures 5 cm K 1 row from RS, AT THE SAME TIME dec 8-10-12-14 sts evenly = 78-82-86-90 sts. K 1 row from WS. Change to needle size 4 mm and continue in stocking st. REMEMBER THE KNITTING TENSION! When piece measures 30-32-34-36 cm cast on new sts for sleeves each side at the end of every row: 1 st 5-3-1-1 times, 2 sts 1-3-4-5 times and 3 sts 0-0-1-1 time = 92-100-110-118 sts. When piece measures 39-42-44-47 cm slip the middle 16-18-20-22 sts on a stitch holder for neck and complete each shoulder/sleeve separately. Cast off to shape the neckline on every row from mid front: 2 sts 2 times and 1 st 3 times = 31-34-38-41 sts left on shoulder/sleeve. Cast off loosely when piece measures 45-48-51-54 cm. BACK PIECE: Cast on and work like front piece. Inc for sleeves as described for front piece and continue until piece measures 43-46-49-52 cm. Now cast off the middle 26-28-30-32 sts for neck and complete each shoulder/sleeve separately. Cast off on every row from neckline: 1 st 2 times = 31-34-38-41 sts left on shoulder/sleeve. Cast off loosely when piece measures 45-48-51-54 cm. ASSEMBLY: Sew shoulder seams. SLEEVE EDGES: Pick up 50-56-56-62 sts along sleeve edge on needle size 3.5 mm with Muskat. K 1 row from WS, K 1 row from RS and continue in rib, K3/P3, with 1 edge st each side. Cast off in rib when rib measures 3 cm. Repeat along the other sleeve edge. NECKLINE: Pick up approx 78 to 96 sts (divisible by 6, incl sts on stitch holder) round neckline on circular needle size 3.5 mm with Muskat. P 1 round, K 1 round, and continue in rib, K3/P3, for 3 cm. Cast off loosely in rib. ASSEMBLY: Sew side and under arm seams inside 1 edge st. |
|
 |
|
Have you finished this pattern?Tag your pictures with #dropspattern #strawberrysweetkidssweater or submit them to the #dropsfan gallery. Do you need help with this pattern?You'll find 15 tutorial videos, a Comments/Questions area and more by visiting the pattern on garnstudio.com. © 1982-2026 DROPS Design A/S. We reserve all rights. This document, including all its sub-sections, has copyrights. Read more about what you can do with our patterns at the bottom of each pattern on our site. |


With over 40 years in knitting and crochet design, DROPS Design offers one of the most extensive collections of free patterns on the internet - translated to 17 languages. As of today we count 325 catalogues and 12298 patterns translated into English (UK/cm).
We work hard to bring you the best knitting and crochet have to offer, inspiration and advice as well as great quality yarns at incredible prices! Would you like to use our patterns for other than personal use? You can read what you are allowed to do in the Copyright text at the bottom of all our patterns. Happy crafting!
Post a comment to pattern DROPS 113-19
We would love to hear what you have to say about this pattern!
If you want to leave a question, please make sure you select the correct category in the form below, to speed up the answering process. Required fields are marked *.