DROPS Cotton Merino
DROPS Cotton Merino
50% Wool, 50% Cotton
from 3.70 € /50g
Get the yarn to make this pattern from 25.90€.

The yarn cost is calculated from the pattern’s smallest size and the yarn’s cheapest product type. Looking for an even better price? You might find it on the DROPS Deals!

DROPS Super Sale

Butterfly Migration Wrap

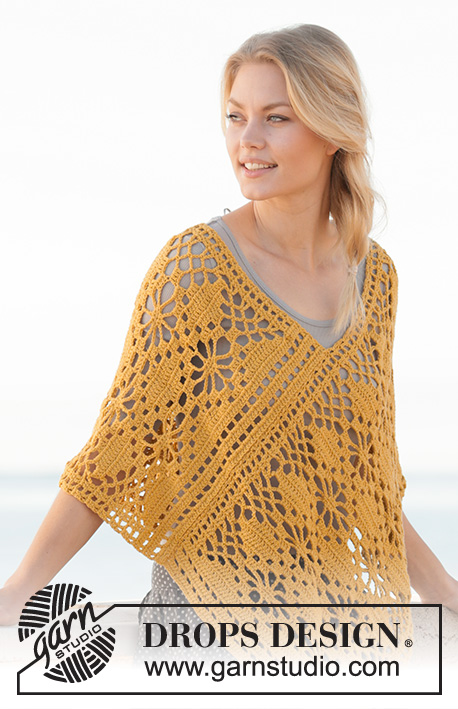
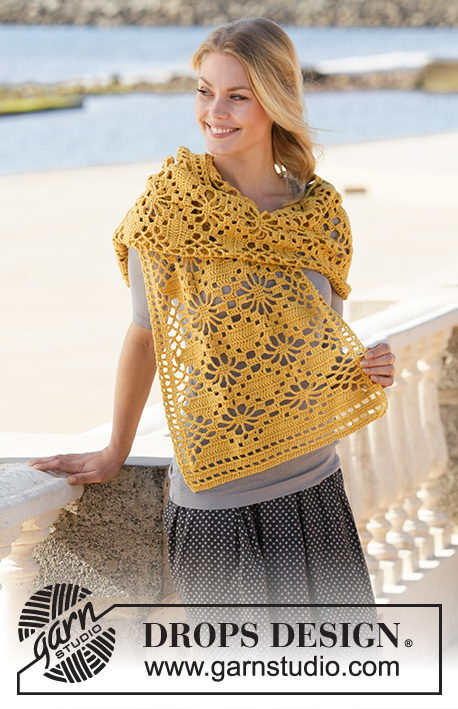
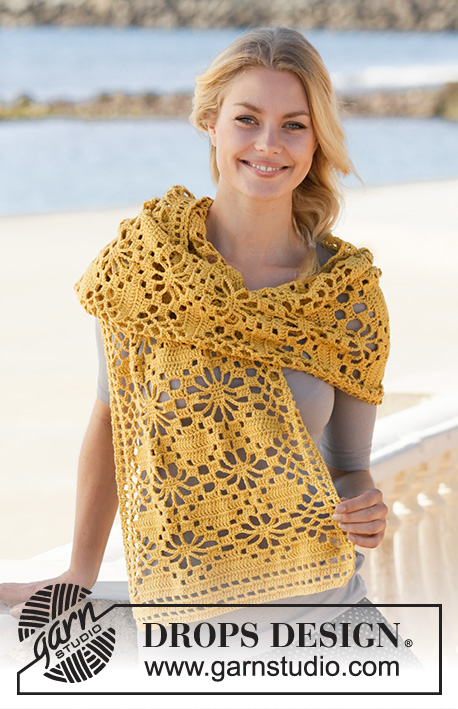
Crocheted stole in DROPS Cotton Merino. Piece is crocheted with lace pattern.

DROPS 200-34
DROPS design: Pattern cm-105
Yarn group B
----------------------------------------------------------

SIZE:
Measurements: approx. 40 cm x 162 cm

MATERIALS:
DROPS COTTON MERINO from Garnstudio (belongs to yarn group B)
350 g colour 15, mustard

CROCHET TENSION:
20 treble crochets in width and 10 rows vertically = 10 x 10 cm.

CROCHET HOOK:
DROPS CROCHET HOOK SIZE 3.5 mm
Hook size is only a suggestion! If you have too many stitches on 10 cm switch to larger hook. If you have too few stitches on 10 cm switch to smaller hook.

----------------------------------------------------------

-------------------------------------------------------

Alternative Yarn – See how to change yarns here
Yarn Groups A to F – Use the same pattern and change the yarn here
Yarn usage using an alternative yarn – Use our yarn converter here

-------------------------------------------------------

More like this:
Women Accessories Scarveslace
DROPS Cotton Merino
DROPS Cotton Merino
50% Wool, 50% Cotton
from 3.70 € /50g
Get the yarn to make this pattern from 25.90€.

The yarn cost is calculated from the pattern’s smallest size and the yarn’s cheapest product type. Looking for an even better price? You might find it on the DROPS Deals!

Pattern instructions

----------------------------------------------------------

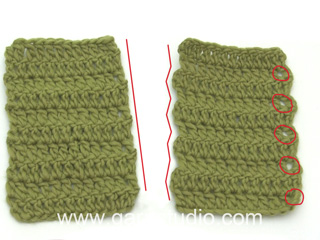
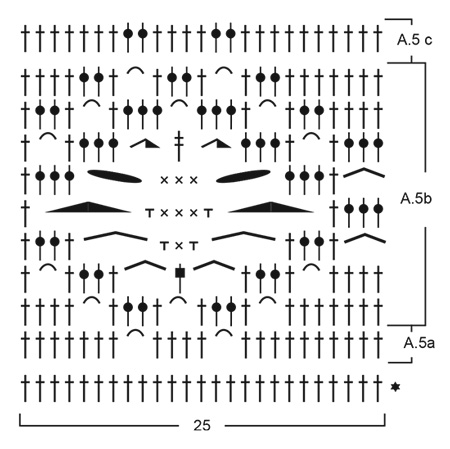
EXPLANATION FOR THE PATTERN:

----------------------------------------------------------

CROCHET INFORMATION:
Replace first treble crochet on every row with 3 chain stitches.

PATTERN: 
See diagrams A.1 to A.6.

----------------------------------------------------------

START THE PIECE HERE:

----------------------------------------------------------

STOLE - SHORT OVERVIEW OF THE PIECE:
Worked back and forth.

STOLE:
Work 94 chain stitches on hook size 3.5 mm with Cotton Merino.
Read CROCHET INFORMATION - Work A.1a over the first 2 chain stitches, repeat A.2a over the next 91 chain stitches (= 13 times in width) and finish with A.3a over the last chain stitch = 81 treble crochets. Continue on A.1b, A.2b and A.3b. REMEMBER THE CROCHET TENSION! When A.1b, A.2b and A.3b have been worked vertically, continue as follows:
Work A.4a over the first 14 stitches, A.5a over the next 50 stitches (= 2 times in width) and finish with A.6a over the last 17 stitches. Continue on A.4b, A.5b and A.6b. When A.4b, A.5b and A.6b have been worked, repeat A.4b, A.5b and A.6b vertically. When piece measures approx. 157 cm, finish after one whole repetition vertically. Then work A.4c, A.5c and A.6c = 81 treble crochets.
Work A.1b over the first 2 stitches, A.2b over the next 78 stitches (= 13 times in width and finish with A.3b over the last stitch = 81 treble crochets. Continue until A.1b, A.2b and A.3b has been worked vertically. Cut and fasten the yarn. Piece measures approx. 162 cm.

This pattern has been corrected.

Updated online: 30.07.2019
Correction: Work A.1a over the first 2 chain stitches, repeat A.2a over the next 81 chain stitches (= 13 times in width) and finish with A.3a over the last chain stitch = 81 treble crochets.
Updated online: 08.11.2021
STOLE:
Work 94 chain stitches on hook size 3.5 mm with Cotton Merino.
Read CROCHET INFORMATION - Work A.1a over the first 2 chain stitches, repeat A.2a over the next 91 chain stitches (= 13 times in width) and finish with A.3a over the last chain stitch = 81 treble crochets...
Updated online: 16.11.2021
Correction diagrams A.4 and A.6

Diagram

symbols = this row has already been worked
symbols = 1 chain stitch
symbols = 2 chain stitches
symbols = 3 chain stitches
symbols = 4 chain stitches
symbols = 5 chain stitches
symbols = 6 chain stitches
symbols = 7 chain stitches
symbols = double crochet in stitch
symbols = double crochet around chain space
symbols = treble crochet in stitch
symbols = treble crochet around chain space
symbols = double treble crochet in stitch
symbols = double treble crochet around chain space
diagram
diagram
diagram
Do you have a question? See a list of frequently asked questions (FAQ)

Knitting tension is what determines the final measurements of your work, and is usually measured per 10 x 10 cm. It is provided like so: number of stitches in width x number of rows in height - eg: 19 stitches x 26 rows = 10 x 10 cm.

The knitting tension is very individual; some people knit/crochet loosely while others work tightly. You adjust the knitting tension with the needle size, which is why the suggested needle size is only meant as a guide! You need to adjust this (up or down) to ensure that YOUR knitting tension matches the knitting tension provided in the pattern. If you work with a different knitting tension than provided you will have a different yarn consumption, and your work will have different measurements than what the pattern suggests.

The knitting tension also determines which yarns can replace each other. As long as you achieve the same knitting tension you can replace one yarn with another.

See DROPS lesson: How to measure your tension/gauge

See DROPS video: How to make a gauge tension swatch

The required amount of yarn is provided in grams, eg: 450 g. To calculate how many balls you’ll need you first need to know how many grams are in 1 ball (25g, 50g or 100g). This information is available if you click on the individual yarn quality on our pages. Divide the amount required with the amount of each ball. For example, if each ball is 50g (the most common amount), the calculation will be as follows: 450 / 50 = 9 balls.

The important thing when changing from one yarn to another is that the knitting/crochet tension remains the same. This is so that the measurements of the finished piece will be the same as on the sketch provided. It is easier to achieve the same knitting tension using yarns from the same yarn group. It is also possible to work with multiple strands of a thinner yarn to achieve the knitting tension of a thicker one. Please try our yarn converter. We recommend you to always work a test swatch.

Please NOTE: when changing yarn the garment might have a different look and feel to the garment in the photo, due to individual properties and qualities of each yarn.

See DROPS lesson: Can I use a different yarn than the one mentioned in the pattern?

All our yarns are categorised into yarn groups (from A to F) according to thickness and knitting tension – group A contains the thinnest yarns and group F the thickest. This makes it easier for you to find alternative yarns to our patterns, should you wish to switch yarn. All yarns within the same group have a similar knitting tension and can easily replace each other. However, different yarn qualities have different structures and properties which will give the finished work a unique look and feel.

Click here for an overview of the yarns in each yarn group

At the top of all our patterns you’ll find a link to our yarn calculator, which is a helpful tool should you wish to use a different yarn than suggested. By filling in the yarn quality you wish to replace, the amount (in your size) and number of strands, the calculator will present good alternative yarns with the same knitting tension. Additionally it will tell you how much you’ll require in the new qualities and whether you’ll need to work with multiple strands. Most skeins are 50g (some are 25g or 100g).

If the pattern is worked with multiple colours, every colour will have to be calculated separately. Similarly, if the pattern is worked with several strands of different yarns (for example 1 strand Alpaca and 1 strand Kid-Silk) you will have to find alternatives for each, individually.

Click here to see our yarn calculator

Since different yarns have different qualities and textures we have chosen to keep the original yarn in our patterns. However, you can easily find options among our available qualities by using our yarn calculator, or simply pick a yarn from the same yarn group.

It is possible that some retailers still have discontinued yarns in stock, or that someone has a few skeins at home that they would like to find patterns for.

The yarn calculator will provide both alternative yarn as well as required amount in the new quality.

If you think it's hard to decide what size to make, it can be a good idea to measure a garment you own already and like the size of. Then you can pick the size by comparing those measures with the ones available in the pattern's size chart.

You'll find the size chart at the bottom of the pattern.

See DROPS lesson: How to read size chart

The needle size provided in the pattern serves only as a guide, the important thing is to follow the knitting tension. And since knitting tension is very individual, you will have to adjust the needle size to ensure that YOUR tension is the same as in the pattern – maybe you’ll have to adjust 1, or even 2 needle sizes, up or down to achieve the correct tension. For this, we recommend that you work test swatches.

Should you work with a different knitting tension than the one provided, the measurements of the finished garment might deviate from the measurement sketch.

See DROPS lesson: How to measure your tension/gauge

See DROPS video: How to make a tension/gauge swatch

Working a garment top-down provides more flexibility and room for personal adjustment. For example it is easier to try the garment on while working, as well as making adjustments to length of yoke and shoulder caps.

The instructions are carefully explaining every step, in the correct order. Diagrams are adjusted to the knitting direction and are worked as usual.

The diagram depicts all rows/rounds, and every stitch seen from the right side. It is read from bottom to top, from right to left. 1 square = 1 stitch.

When working back and forth, every other row is worked from the right side and every other row is worked from the wrong side. When working from the wrong side, the diagram will have to be worked reversed: from left to right, knit stitches are purled, purl stitches are knit etc.

When working in the round every round is worked from the right side and the diagram are worked from right to left on all rounds.

See DROPS lesson: How to read knitting diagrams

The diagram depicts all rows/rounds, and every stitch seen from the right side. It is worked from bottom to top, from right to left.

When working back and forth every other row is worked from the right side: from right to left and every other row is worked from the wrong side: from left to right.

When working in the round, every row in the diagram are worked from the right side, from right to left.

When working a circular diagram you start in the middle and work your way outwards, counter clockwise, row by row.

The rows usually start with a given number of chain stitches (equivalent to the height of the following stitch), this will either be depicted in the diagram or explained in the pattern.

See DROPS lesson: How to read crochet diagrams

Instructions for working several diagrams after each other on the same row/round, will often be written like so: “work A.1, A.2, A.3 a total of 0-0-2-3-4 times". This means you work A.1 once, then A.2 is worked once, and A.3 is repeated (in width) the number of times provided for your size – in this case like so: S = 0 times, M = 0 times, L=2 times, XL= 3 times and XXL = 4 times.

The diagrams are worked as usual: begin with the first row in A.1, then work the first row in A.2 etc.

See DROPS lesson: How to read knitting diagrams

See DROPS lesson: How to read crochet diagrams

The total width of the garment (from wrist-to-wrist) will be larger in the larger sizes, despite the actual sleeves being shorter. The larger sizes have longer sleeve caps and wider shoulders, so there will be a good fit in all sizes.

The measurement sketch/schematic drawing provides information regarding the full length of the garment. If it’s a jumper or a jacket the length is measured from the highest point on the shoulder closest to the neckline, and straight down to the bottom of the garment. It is NOT measured from the tip of shoulder. Similarly, the length of yoke is measured from the highest point on the shoulder and down to where yoke is split into body and sleeves.

On a jacket measures are never taken along bands, unless specifically stated. Always measure inside band stitches when measuring the length.

See DROPS lesson: How to read a schematic drawing

Diagrams are often repeated on the round or in height. 1 repeat is the diagram the way it appears in the pattern. If it says to work 5 repeats of A.1 in the round, then you work A.1 a total of 5 times after/next to each other in the round. If it says to work 2 repeats of A.1 vertically/in height you work the entire diagram once, then begin again at the start and work the entire diagram one more time.

Chain stitches are slightly narrower than other stitches and to avoid working the cast-on edge too tight, we simply chain more stitches to begin with. The stitch count will be adjusted on the following row to fit the pattern and measurement sketch.

The rib edge is more elastic and will contract slightly compared to, for example, stocking stitch. By increasing before the rib edge, you avoid a visible difference in width between the rib edge and the rest of the body.

It’s very easy to cast off too tightly, and by making yarn overs while casting off (and simultaneously casting these off) you avoid a too tight cast off edge.

See DROPS video: How to bind off with yarn overs (yo)

To achieve an even increase (or decrease) you can increase on, for example: every 3rd and 4th row alternately, like so: work 2 rows and increase on the 3rd row, work 3 rows and increase on the 4th. Repeat this until the increase is complete.

See DROPS lesson: Increase or decrease 1 st on every 3rd and 4th row alternately

Should you prefer to work in the round instead of back and forth, you may of course adjust the pattern. You’ll need to add steeks mid-front (usually 5 stitches), and follow the instructions. When you would normally turn and work from the wrong side, simply work across the steek and continue in the round. At the end you’ll cut the piece open, pick up stitches to work bands, and cover the cut edges.

See DROPS video: How to knit steeks and cut open

Should you prefer to work back and forth instead of in the round, you may of course adjust the pattern so you work the pieces separately and then assemble them at the end. Divide the stitches for the body in 2, add 1 edge stitch in each side (for sewing) and work the front and back pieces separately.

See DROPS lesson: Can I adapt a pattern for circular needles into straight needles?

Pattern repeats can vary slightly in the different sizes, in order to get the correct proportions. If you’re not working the exact same size as the garment in the photo, yours might deviate slightly. This has been carefully developed and adjusted so that the complete impression of the garment is the same in all sizes.

Make sure to follow instructions and diagrams for your size!

If you have found a pattern you like which is available in women’s size it’s not very difficult to convert it to men’s size. The biggest difference will be the length of sleeves and body. Start working on the women size that you think would fit across the chest. The additional length will be worked right before you cast off for the armhole/sleeve cap. If the pattern is worked top-down you can add the length right after the armhole or before the first decrease on sleeve.

Regarding additional yarn amount, this will depend on how much length you add, but it is better with a skein too many than too few.

All yarns will have excess fibres (from production) that might come off as lint or shedding. Brushed yarns (ie hairier yarns) have more of these loose, excess fibres, causing more shedding.

Shedding also depends on what is worn under or over the garment, and whether this pulls at the yarn fibres. It’s therefore not possible to guarantee that there will be no shedding

Below are some tips on how to get the best result when working with hairier yarns:

1. When the garment is finished (before you wash it) shake it vigorously so the looser hairs come off. NOTE: do NOT use a lint roller, brush or any method that pulls at the yarn.

2. Place the garment in a plastic bag and put it in your freezer - the temperature will cause the fibres to become less attached to each other, and excess fibres will come off easier.

3. Leave in the freezer for a few hours before taking it out and shaking it again.

4. Wash the garment according to the instructions on the yarn label.

Pilling is a natural process that happens to even the most exclusive of fibers. It's a natural sign of wear and tear that is hard to avoid, and that is most visible in high friction areas of your garment like a sweater's arms and cuffs.

You can make your garment look as new by removing the pilling, using a fabric comb or a pill/lint remover.

Still can't find the answer you need? Then scroll down and leave your question so one of our experts can try to help you. This will be done normally within 5 to 10 working days.
In the meantime, you can read the questions and answers that others have left to this pattern or join the DROPS Workshop on Facebook to get help from fellow knitters/crocheters!

You might also like...

Post a comment to pattern DROPS 200-34

We would love to hear what you have to say about this pattern!

If you want to leave a question, please make sure you select the correct category in the form below, to speed up the answering process. Required fields are marked *.

Comments / Questions (26)

country flag Martine wrote:

Bonjour, MERCI . Dommage pour moi, mon écharpe est terminée. Mais cela sera utile pour les crocheteuses suivantes. De plus, je n'ai malheureusement pas eu suffisamment de laine pour terminer le dernier rang ! Ces deux petites mailles en trop accumulées sont peut-être responsables.... Mais bon, motif fort joli ! Bonne journée

29.02.2020 - 13:49

country flag Martine wrote:

Bonjour, pour finir l'ouvrage, avant la bordure, au dernier rang de A6b, ne faudrait-il pas faire 3 ml en l'air au lieu des 5ml indiquées sur le diagramme ? Merci d'avance

28.02.2020 - 00:19

DROPS Design answered:

Bonjour Martine, c'est possible, et c'est pareil dans A.4b, votre suggestion a été transmises à nos stylistes qui vont vérifier cela dès que possible et corriger si besoin. Bon crochet!

28.02.2020 - 08:40

country flag Martine wrote:

Bonjour, Dommage qu'on ne puisse pas effacer ses bêtises ! Ne pas tenir compte de ma question précédente....qui était trop vite posée. Merci

05.02.2020 - 00:29

country flag Martine wrote:

Bonjour, tout au début, répéter A2a n'est-ce pas 13fois 7 mailles, donc 91 mailles…? Au lieu de 81 m.... MERCI D'AVANCE

04.02.2020 - 19:02

DROPS Design answered:

Bonjour Martine, il semble effectivement qu'il y ait une erreur, on va répéter 13 fois les 7 mailles soit au-dessus des 91 mailles en l'air suivante (on saute 1 maillle en l'air au 1er rang de A.2a) et au aura donc bien 81 brides à la fin de A.2a. La correction sera faite dès que possible. Bon crochet!

05.02.2020 - 08:08

country flag Anita wrote:

Bij mij gaat het al mis bij rij 1. Ik snap niet hoe ik van 94 lossen tot 81 stokjes kom. Ik ben al voor de 2 de keer opnieuw begonnen, maar ik heb er echt teveel. Klopt het dat bij a2 elke 4de losse wordt overgeslagen?

05.12.2019 - 20:18

DROPS Design answered:

Dag Anita,

Klopt, elke 4e losse wordt overgeslagen in A.1 en het eerste stokje wordt vervangen door 3 lossen, dus nadat je de 94 lossen hebt gehaakt, haak je nog 3 lossen, dan haak je een stokje in de 4e losse van de haaknaald en dan is A.1 dus al klaar.

06.12.2019 - 16:52

country flag Rabab wrote:

Hej, hvad betyder stjerne tegne hvor den er beskrevet at ( denne række et allerede hæklet)

18.11.2019 - 13:53

DROPS Design answered:

Hei Rabab. Det betyr at den er allerede heklet når du skal heklte etter det aktuelle diagrammet. God Fornøyelse!

18.11.2019 - 14:30

country flag Gerdy Sestig-Akkermans wrote:

Hoeveel bolletjes heb ik hier voor nodig

06.09.2019 - 11:37

DROPS Design answered:

Dag Gerdy,

Bovenaan bij de materialen staat hoeveel gram garen je hiervoor nodig hebt. In dit geval is dat 350 gram. Omdat Cotton Merino 50 gram per bol weegt, heb je dus 7 bollen nodig.

08.09.2019 - 13:18

country flag Aino Gunnarsen wrote:

Står fast på oppskriften etter femte rad.

17.08.2019 - 22:26

country flag Jo Spicer wrote:

Hello, can someone please explain row 1 to me? I'm trying to follow your pattern as written in Crochet Now Magazine page 79 and I'm pulling my hair out. It says as follows: "Starting in 4th chain from hook, 1tr, (3tr, miss 1 Ch, 3tr) 13 times, 1tr" I cannot get this instruction to work, no matter what I do. Please tell me how you would work the above instruction stitch by stitch. Thanks, Jo

14.08.2019 - 20:26

DROPS Design answered:

Dear Mrs Spicer, work the 94 chains as shown in first row in diagrams: 3 chain (= 1st tr), 1 tr in 4th ch from hook (= A.1 = 2 tr), then work: *1 tr in the next 3 ch, skip next ch, 1 tr in the next 3 ch*, repeat from*-* (= you get 6 tr in each A.2 worked over 7 ch - read more here), and finish with A.3 = 1 tr in last ch. You have now: 2 tr (incl. 3 ch) + 6 tr x 13 (= 78 tr) + 1 tr = 81 tr. Happy crocheting!

15.08.2019 - 10:10

country flag Vicki wrote:

This are the strangest instructions I have ever seen. Everyone else writes stitch by stitch-this is totally bizarre! Too bad because it looks cute, but not going to try it only to have it come out wrong because the pattern is too confusing :(

08.08.2019 - 00:40

DROPS Design answered:

Dear Vicky, The DROPS patterns are knitted and crocheted by thousands and thousands of people  around the world. We understand however that in certain countries, with different knitting/crochet traditions than Scandinavia, our patterns might be written in a way that differs from what some are used to. But of course we want everyone to understand our patterns, so that’s why we have created an extensive library of tutorial videos as well as step by step lessons that explain how to follow the techniques we use and how to read the diagrams in our patterns. Give them a try!

08.08.2019 - 10:16