DROPS Alpaca
DROPS Alpaca
100% Alpaca
from 3.65 € /50g
Get the yarn to make this pattern from 32.85€.

The yarn cost is calculated from the pattern’s smallest size and the yarn’s cheapest product type. Looking for an even better price? You might find it on the DROPS Deals!

DROPS Super Sale

Talvik

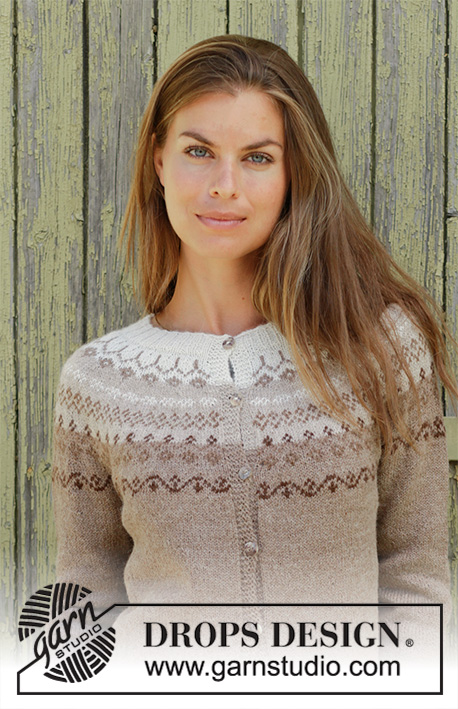
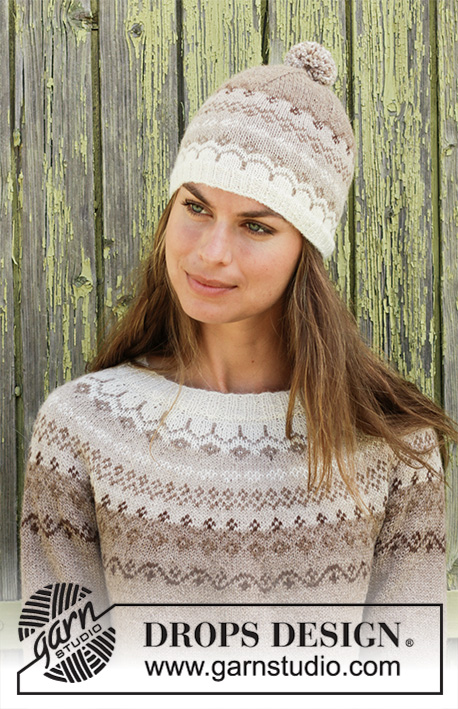
Knitted jumper with round yoke in DROPS Alpaca. Piece is knitted top down with Nordic pattern. Size: S - XXXL Knitted hat with Nordic pattern and pompom in DROPS Alpaca.

DROPS 197-10
DROPS design: Pattern z-831
Yarn group A
----------------------------------------------------------

YARN FOR THE ENTIRE SET:
Size: S - M - L - XL - XXL - XXXL
Head circumference: 54/56 - 54/56 - 54/56 - 58/60 - 58/60 - 58/60 cm
Materials:
DROPS ALPACA from Garnstudio (belongs to yarn group A)
250-300-300-350-400-400 g colour 618, light beige
50-50-50-50-50-50 g colour 100, off white
50-50-50-50-50-50 g colour 607, light beige brown
50-50-50-50-50-50 g colour 2020, light camel
50-50-50-50-50-50 g colour 403, medium brown

YARN FOR JUMPER:
Size: S - M - L - XL - XXL - XXXL
Materials:
DROPS ALPACA from Garnstudio (belongs to yarn group A)
250-300-300-350-350-400 g colour 618, light beige
50-50-50-50-50-50 g colour 100, off white
50-50-50-50-50-50 g colour 607, light beige brown
50-50-50-50-50-50 g colour 2020, light camel
50-50-50-50-50-50 g colour 403, medium brown

YARN FOR HAT:
Size: S/M – L/XL
Head circumference: approx. 54/56 - 58/60 cm
Materials:
DROPS ALPACA from Garnstudio (belongs to yarn group A)
50-50 g colour 618, light beige
50-50 g colour 100, off white
50-50 g colour 607, light brown
50-50 g colour 2020, light camel
50-50 g colour 403, medium brown

----------------------------------------------------------
ACCESSORIES FOR THE PIECE:

JUMPER:

KNITTING TENSION:
24 stitches in width and 32 rows vertically in stocking stitch/Nordic pattern = 10 x 10 cm.

NEEDLES:
DROPS DOUBLE POINTED NEEDLES SIZE 3 mm: for stocking stitch/Nordic pattern.
DROPS CIRCULAR NEEDLE SIZE 3 mm: length 40 and 80 cm for stocking stitch/Nordic pattern.
DROPS DOUBLE POINTED NEEDLES SIZE 2.5 mm for rib
DROPS CIRCULAR NEEDLE SIZE 2.5 mm: length 40 and 80 cm for rib.
Needle size is only a suggestion! If you have too many stitches on 10 cm switch to larger needles. If you have too few stitches on 10 cm switch to smaller needles.

HAT:

KNITTING TENSION:
24 stitches in width and 32 rows vertically in stocking stitch/Nordic pattern = 10 x 10 cm.

NEEDLES:
DROPS DOUBLE POINTED NEEDLES SIZE 3 mm: for stocking stitch/Nordic pattern.
DROPS CIRCULAR NEEDLE SIZE 3 mm: length 40 cm for stocking stitch/Nordic pattern.
DROPS CIRCULAR NEEDLE SIZE 2.5 mm, length 40 cm for rib.
Needle size is only a suggestion! If you have too many stitches on 10 cm switch to larger needles. If you have too few stitches on 10 cm switch to smaller needles.

----------------------------------------------------------

-------------------------------------------------------

Alternative Yarn – See how to change yarns here
Yarn Groups A to F – Use the same pattern and change the yarn here
Yarn usage using an alternative yarn – Use our yarn converter here

-------------------------------------------------------

DROPS Alpaca
DROPS Alpaca
100% Alpaca
from 3.65 € /50g
Get the yarn to make this pattern from 32.85€.

The yarn cost is calculated from the pattern’s smallest size and the yarn’s cheapest product type. Looking for an even better price? You might find it on the DROPS Deals!

Pattern instructions

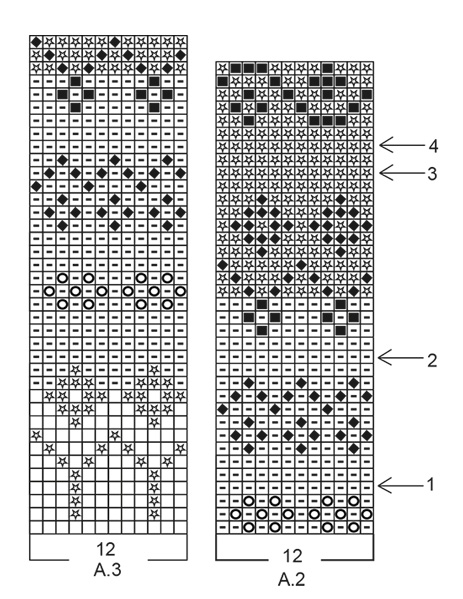
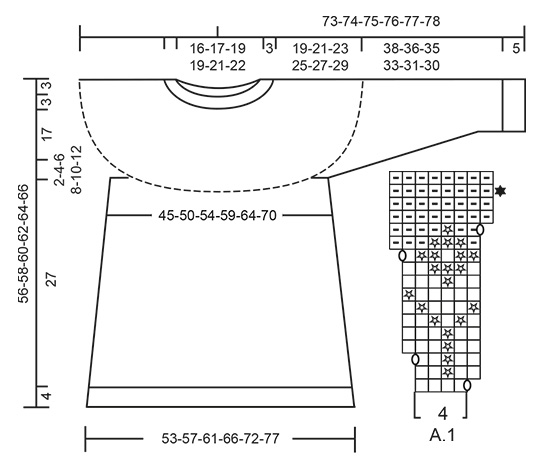
EXPLANATION FOR THE PATTERN:

----------------------------------------------------------

PATTERN: 
Jumper: See diagrams A.1 and A.2.
Hat: See diagram A.3.
Work all stitches in stocking stitch.

DECREASE/INCREASE TIP (evenly):
To calculate how to decrease/increase evenly, use the total number of stitches on round (e.g. 124 stitches) and divide stitches by number of decreased/increases to be done (e.g. 20) = 6.2. In this example decrease by knitting approx. every 5th and 6th stitch together. 
When increasing make a yarn over after approx. every 6th stitch. On next round work yarn over twisted to avoid hole.

KNITTING TIP:
To avoid the knitting tension to tighten when working pattern, it is important not to tighten the strands on back side of piece. Switch to a higher needle number when working pattern if the pattern is somewhat tight.

INCREASE TIP (applies to sides of body):
Work until 2 stitches remain before marker thread, make 1 yarn over, knit 4 (marker thread is in the middle of these stitches), make 1 yarn over (= 2 stitches increased). On next round knit yarn over twisted to avoid holes. Then work the new stitches in stocking stitch. 

DECREASE TIP-1 (applies to mid under sleeve):
Decrease 1 stitch on each side of marker thread as follows: Work until 4 stitches remain before marker and knit 2 together, knit 4 (marker thread is between these 4 stitches), slip 1 stitch knitwise, knit 1, pass slipped stitch over stitch worked (= 2 stitches decreased).

DECREASE TIP-2 (applies to hat):
Work until 2 stitches remain before marker thread, knit the next 2 stitches together (= 1 stitch decreased). Repeat at each of the remaining marker threads.

----------------------------------------------------------

START THE PIECE HERE:

----------------------------------------------------------

JUMPER - SHORT OVERVIEW OF THE PIECE:
Worked in the round on circular needle from mid back, work top down. Work sleeves in the round on double pointed needles/a short circular needle.

NECK EDGE:
Cast on 124-128-136-140-148-152 stitches on a short circular needle size 2.5 mm with off white. Knit 1 round. Now work rib (= knit 2/purl 2) for 3 cm. Knit 1 round while decreasing 20-20-20-20-20-20 stitches evenly - read DECREASE/INCREASE TIP = 104-108-116-120-128-132 stitches. Knit 1 round.

YOKE:
Switch to circular needle size 3 mm. Read KNITTING TIP and REMEMBER THE KNITTING TENSION! 
Now work pattern A.1 (= 4 stitches) 26-27-29-30-32-33 times in total on round. On round with black star in A.1 increase 20-24-20-24-32-36 stitches evenly – remember DECREASE/INCREASE TIP = 228-240-252-264-288-300 stitches (including the 4 stitches increased in every repetition of A.1.
Now work pattern A.2 in the round, AT THE SAME TIME on round with arrow increase evenly as follows:
ARROW-1: Increase 24-36-36-36-36-36 stitches = 252-276-288-300-324-336 stitches.
ARROW-2: Increase 24-24-36-36-36-36 stitches = 276-300-324-336-360-372 stitches.
ARROW-3: Increase 24-24-24-36-36-36 stitches = 300-324-348-372-396-408 stitches.
ARROW-4: Increase 12-24-24-24-24-24 stitches = 312-348-372-396-420-432 stitches.
When entire A.2 has been worked vertically, piece measures 20 cm from cast-on edge. Now work piece in light beige and stocking stitch, AT THE SAME TIME on first round
increase 14-10-14-17-20-14 stitches evenly. Increase like this every 4th-4th-5th-6th-8th-8th round 1-2-2-2-2-4 times in total = 326-368-400-430-460-488 stitches. Then work until piece measures 22-24-26-28-30-32 cm from cast-on edge. Work next round as follows: Knit 49-54-58-64-70-75 (= half back piece), slip the next 64-75-83-86-90-93 stitches on a stitch holder for sleeve, cast on 10-10-12-12-14-16 new stitches on needle (= in the side under sleeve), knit 99-109-117-129-140-151 (= front piece), slip the next 64-75-83-86-90-93 stitches on a stitch holder for sleeve, cast on 10-10-12-12-14-16 new stitches on needle (= in the side under sleeve) and knit the remaining 50-55-59-65-70-76 stitches (= half back piece). Finish body and sleeves separately. NOW MEASURE PIECE FROM HERE!

BODY:
= 218-238-258-282-308-334 stitches. Insert 1 marker thread in the middle of the 10-10-12-12-14-16 new stitches that were cast on under sleeves. Move the marker threads upwards when working. Continue in the round with light beige and stocking stitch. When piece measures 4 cm from division, increase 1 stitch on each side of both marker threads - read INCREASE TIP (= 4 stitches increased). Increase like this every 8th round 9 times in total = 254-274-294-318-344-370 stitches. Continue like this until piece measures 27 cm. Knit 1 round while increasing 82-86-94-106-116-122 stitches evenly - remember DECREASE/INCREASE TIP = 336-360-388-424-460-492 stitches. Switch to circular needle size 2.5 mm and work rib = knit 2/purl 2 for 4 cm. Cast off with knit over knit and purl over purl but to avoid at tight cast-off edge make 1 yarn over after every 4th stitch (cast off yarn overs as stitches). Jumper measures approx. 56-58-60-62-64-66 cm from shoulder and down.

SLEEVE:
Slip the 64-75-83-86-90-93 stitches from stitch holder in one side of piece double pointed needles/a short circular needle size 3 mm and pick in addition up 1 stitch in each of the 10-10-12-12-14-16 new stitches cast on under sleeve = 74-85-95-98-104-109 stitches. Insert 1 marker thread in the middle of the 10-10-12-12-14-16 stitches under sleeve. Begin round here and work in stocking stitch in the round. When sleeve measures 4 cm from division, decrease 2 stitches mid under sleeve - read DECREASE TIP-1! Decrease like this every 10th-8th-6th-6th-6th-4th round 7-3-9-5-1-18 times and every 8th-6th-4th-4th-4th-2nd round 4-12-10-14-20-4 times = 52-55-57-60-62-65 stitches. When sleeve measures 38-36-35-33-31-30 cm from division (shorter measurements in the larger sizes because of longer yoke), knit 1 round while increasing 16-17-19-20-18-19 stitches evenly - remember DECREASE/INCREASE TIP = 68-72-76-80-80-84 stitches. Switch to double pointed needles size 2.5 mm and work rib in the round = knit 2/purl 2. When rib measures 5 cm, cast off with knit over knit and purl over purl but to avoid a tight cast-off edge make 1 yarn over after every 4th stitch (cast off yarn overs as regular stitches). Sleeve measures approx. 43-41-40-38-36-35 cm from division. Work the other sleeve the same way.

----------------------------------------------------------

HAT - SHORT OVERVIEW OF THE GARMENT:
Work in the round on a short circular needle. Switch to double pointed needles when needed.

HAT:
Cast on 120-132 stitches on circular needle size 2.5 mm with off white. Knit 1 round. Then work rib (= knit 2/purl 2) for 2 cm. Switch to circular needle size 3 mm and work pattern A.3 (= 12 stitches) 10-11 times in total on round. REMEMBER THE KNITTING TENSION! When A.3 has been worked vertically, piece measures approx. 14-14 cm. Then work in stocking stitch in the round with light beige. When piece measures 15-15 cm, insert 6 marker threads in the piece, 20-22 stitches apart each marker thread. On next round, decrease 1 stitch before every marker thread – read DECREASE TIP-2. Decrease like this every other round 14-17 times in total = 36-30 stitches. Knit 2 and 2 stitches together until there are 9-8 stitches on needle. Cut the yarn and pull it through the remaining stitches, tighten tog and fasten. Hat measures approx. 24-26 cm. Make a pompom approx. 6 cm in diameter. Use 3 strand light camel, 1 strand off white and 1 strand light beige to make pompom and fasten at the top of hat.

Diagram

symbols = off white
symbols = off white
symbols = light camel
symbols = light beige
symbols = light brown
symbols = medium brown
symbols = between 2 stitches make 1 yarn over. On next round knit yarn over twisted to avoid holes.
symbols = increase round - read explanation in pattern
symbols = ncrease round - read explanation in pattern
diagram
diagram

Each of our patterns has specific tutorial videos to help you.

Do you have a question? See a list of frequently asked questions (FAQ)

Knitting tension is what determines the final measurements of your work, and is usually measured per 10 x 10 cm. It is provided like so: number of stitches in width x number of rows in height - eg: 19 stitches x 26 rows = 10 x 10 cm.

The knitting tension is very individual; some people knit/crochet loosely while others work tightly. You adjust the knitting tension with the needle size, which is why the suggested needle size is only meant as a guide! You need to adjust this (up or down) to ensure that YOUR knitting tension matches the knitting tension provided in the pattern. If you work with a different knitting tension than provided you will have a different yarn consumption, and your work will have different measurements than what the pattern suggests.

The knitting tension also determines which yarns can replace each other. As long as you achieve the same knitting tension you can replace one yarn with another.

See DROPS lesson: How to measure your tension/gauge

See DROPS video: How to make a gauge tension swatch

The required amount of yarn is provided in grams, eg: 450 g. To calculate how many balls you’ll need you first need to know how many grams are in 1 ball (25g, 50g or 100g). This information is available if you click on the individual yarn quality on our pages. Divide the amount required with the amount of each ball. For example, if each ball is 50g (the most common amount), the calculation will be as follows: 450 / 50 = 9 balls.

The important thing when changing from one yarn to another is that the knitting/crochet tension remains the same. This is so that the measurements of the finished piece will be the same as on the sketch provided. It is easier to achieve the same knitting tension using yarns from the same yarn group. It is also possible to work with multiple strands of a thinner yarn to achieve the knitting tension of a thicker one. Please try our yarn converter. We recommend you to always work a test swatch.

Please NOTE: when changing yarn the garment might have a different look and feel to the garment in the photo, due to individual properties and qualities of each yarn.

See DROPS lesson: Can I use a different yarn than the one mentioned in the pattern?

All our yarns are categorised into yarn groups (from A to F) according to thickness and knitting tension – group A contains the thinnest yarns and group F the thickest. This makes it easier for you to find alternative yarns to our patterns, should you wish to switch yarn. All yarns within the same group have a similar knitting tension and can easily replace each other. However, different yarn qualities have different structures and properties which will give the finished work a unique look and feel.

Click here for an overview of the yarns in each yarn group

At the top of all our patterns you’ll find a link to our yarn calculator, which is a helpful tool should you wish to use a different yarn than suggested. By filling in the yarn quality you wish to replace, the amount (in your size) and number of strands, the calculator will present good alternative yarns with the same knitting tension. Additionally it will tell you how much you’ll require in the new qualities and whether you’ll need to work with multiple strands. Most skeins are 50g (some are 25g or 100g).

If the pattern is worked with multiple colours, every colour will have to be calculated separately. Similarly, if the pattern is worked with several strands of different yarns (for example 1 strand Alpaca and 1 strand Kid-Silk) you will have to find alternatives for each, individually.

Click here to see our yarn calculator

Since different yarns have different qualities and textures we have chosen to keep the original yarn in our patterns. However, you can easily find options among our available qualities by using our yarn calculator, or simply pick a yarn from the same yarn group.

It is possible that some retailers still have discontinued yarns in stock, or that someone has a few skeins at home that they would like to find patterns for.

The yarn calculator will provide both alternative yarn as well as required amount in the new quality.

If you think it's hard to decide what size to make, it can be a good idea to measure a garment you own already and like the size of. Then you can pick the size by comparing those measures with the ones available in the pattern's size chart.

You'll find the size chart at the bottom of the pattern.

See DROPS lesson: How to read size chart

The needle size provided in the pattern serves only as a guide, the important thing is to follow the knitting tension. And since knitting tension is very individual, you will have to adjust the needle size to ensure that YOUR tension is the same as in the pattern – maybe you’ll have to adjust 1, or even 2 needle sizes, up or down to achieve the correct tension. For this, we recommend that you work test swatches.

Should you work with a different knitting tension than the one provided, the measurements of the finished garment might deviate from the measurement sketch.

See DROPS lesson: How to measure your tension/gauge

See DROPS video: How to make a tension/gauge swatch

Working a garment top-down provides more flexibility and room for personal adjustment. For example it is easier to try the garment on while working, as well as making adjustments to length of yoke and shoulder caps.

The instructions are carefully explaining every step, in the correct order. Diagrams are adjusted to the knitting direction and are worked as usual.

The diagram depicts all rows/rounds, and every stitch seen from the right side. It is read from bottom to top, from right to left. 1 square = 1 stitch.

When working back and forth, every other row is worked from the right side and every other row is worked from the wrong side. When working from the wrong side, the diagram will have to be worked reversed: from left to right, knit stitches are purled, purl stitches are knit etc.

When working in the round every round is worked from the right side and the diagram are worked from right to left on all rounds.

See DROPS lesson: How to read knitting diagrams

The diagram depicts all rows/rounds, and every stitch seen from the right side. It is worked from bottom to top, from right to left.

When working back and forth every other row is worked from the right side: from right to left and every other row is worked from the wrong side: from left to right.

When working in the round, every row in the diagram are worked from the right side, from right to left.

When working a circular diagram you start in the middle and work your way outwards, counter clockwise, row by row.

The rows usually start with a given number of chain stitches (equivalent to the height of the following stitch), this will either be depicted in the diagram or explained in the pattern.

See DROPS lesson: How to read crochet diagrams

Instructions for working several diagrams after each other on the same row/round, will often be written like so: “work A.1, A.2, A.3 a total of 0-0-2-3-4 times". This means you work A.1 once, then A.2 is worked once, and A.3 is repeated (in width) the number of times provided for your size – in this case like so: S = 0 times, M = 0 times, L=2 times, XL= 3 times and XXL = 4 times.

The diagrams are worked as usual: begin with the first row in A.1, then work the first row in A.2 etc.

See DROPS lesson: How to read knitting diagrams

See DROPS lesson: How to read crochet diagrams

The total width of the garment (from wrist-to-wrist) will be larger in the larger sizes, despite the actual sleeves being shorter. The larger sizes have longer sleeve caps and wider shoulders, so there will be a good fit in all sizes.

The measurement sketch/schematic drawing provides information regarding the full length of the garment. If it’s a jumper or a jacket the length is measured from the highest point on the shoulder closest to the neckline, and straight down to the bottom of the garment. It is NOT measured from the tip of shoulder. Similarly, the length of yoke is measured from the highest point on the shoulder and down to where yoke is split into body and sleeves.

On a jacket measures are never taken along bands, unless specifically stated. Always measure inside band stitches when measuring the length.

See DROPS lesson: How to read a schematic drawing

Diagrams are often repeated on the round or in height. 1 repeat is the diagram the way it appears in the pattern. If it says to work 5 repeats of A.1 in the round, then you work A.1 a total of 5 times after/next to each other in the round. If it says to work 2 repeats of A.1 vertically/in height you work the entire diagram once, then begin again at the start and work the entire diagram one more time.

Chain stitches are slightly narrower than other stitches and to avoid working the cast-on edge too tight, we simply chain more stitches to begin with. The stitch count will be adjusted on the following row to fit the pattern and measurement sketch.

The rib edge is more elastic and will contract slightly compared to, for example, stocking stitch. By increasing before the rib edge, you avoid a visible difference in width between the rib edge and the rest of the body.

It’s very easy to cast off too tightly, and by making yarn overs while casting off (and simultaneously casting these off) you avoid a too tight cast off edge.

See DROPS video: How to bind off with yarn overs (yo)

To achieve an even increase (or decrease) you can increase on, for example: every 3rd and 4th row alternately, like so: work 2 rows and increase on the 3rd row, work 3 rows and increase on the 4th. Repeat this until the increase is complete.

See DROPS lesson: Increase or decrease 1 st on every 3rd and 4th row alternately

Should you prefer to work in the round instead of back and forth, you may of course adjust the pattern. You’ll need to add steeks mid-front (usually 5 stitches), and follow the instructions. When you would normally turn and work from the wrong side, simply work across the steek and continue in the round. At the end you’ll cut the piece open, pick up stitches to work bands, and cover the cut edges.

See DROPS video: How to knit steeks and cut open

Should you prefer to work back and forth instead of in the round, you may of course adjust the pattern so you work the pieces separately and then assemble them at the end. Divide the stitches for the body in 2, add 1 edge stitch in each side (for sewing) and work the front and back pieces separately.

See DROPS lesson: Can I adapt a pattern for circular needles into straight needles?

Pattern repeats can vary slightly in the different sizes, in order to get the correct proportions. If you’re not working the exact same size as the garment in the photo, yours might deviate slightly. This has been carefully developed and adjusted so that the complete impression of the garment is the same in all sizes.

Make sure to follow instructions and diagrams for your size!

If you have found a pattern you like which is available in women’s size it’s not very difficult to convert it to men’s size. The biggest difference will be the length of sleeves and body. Start working on the women size that you think would fit across the chest. The additional length will be worked right before you cast off for the armhole/sleeve cap. If the pattern is worked top-down you can add the length right after the armhole or before the first decrease on sleeve.

Regarding additional yarn amount, this will depend on how much length you add, but it is better with a skein too many than too few.

All yarns will have excess fibres (from production) that might come off as lint or shedding. Brushed yarns (ie hairier yarns) have more of these loose, excess fibres, causing more shedding.

Shedding also depends on what is worn under or over the garment, and whether this pulls at the yarn fibres. It’s therefore not possible to guarantee that there will be no shedding

Below are some tips on how to get the best result when working with hairier yarns:

1. When the garment is finished (before you wash it) shake it vigorously so the looser hairs come off. NOTE: do NOT use a lint roller, brush or any method that pulls at the yarn.

2. Place the garment in a plastic bag and put it in your freezer - the temperature will cause the fibres to become less attached to each other, and excess fibres will come off easier.

3. Leave in the freezer for a few hours before taking it out and shaking it again.

4. Wash the garment according to the instructions on the yarn label.

Pilling is a natural process that happens to even the most exclusive of fibers. It's a natural sign of wear and tear that is hard to avoid, and that is most visible in high friction areas of your garment like a sweater's arms and cuffs.

You can make your garment look as new by removing the pilling, using a fabric comb or a pill/lint remover.

Still can't find the answer you need? Then scroll down and leave your question so one of our experts can try to help you. This will be done normally within 5 to 10 working days.
In the meantime, you can read the questions and answers that others have left to this pattern or join the DROPS Workshop on Facebook to get help from fellow knitters/crocheters!

You might also like...

Talvik

Cheryl, United States

Talvik

Antje, Germany

Talvik

Zsuzsa, Austria

Talvik

Bożena, Poland

a Talvik Sweater

Cindy, Netherlands

Post a comment to pattern DROPS 197-10

We would love to hear what you have to say about this pattern!

If you want to leave a question, please make sure you select the correct category in the form below, to speed up the answering process. Required fields are marked *.

Comments / Questions (83)

country flag Phyllis Estenson wrote:

I knit a Talvik hat 197-10. I CO 132 sts for ribbing. I'm knitting a adult L/XL size. The ribbing is pretty small about 30 inches.I used the yarn called for and size 2.5 circular needles. Can I unravel the ribbing , from the bottom of the design and add more sts and knit from Cast On to the beginning of the chart A.3

22.05.2021 - 05:00

DROPS Design answered:

Dear Phyllis, if you knitted the ribbed part with the given gauge, it should fit you. However, if you need, you ccan take off the ribbed part and reknit, but the general experience says that it is pretty difficult to unravel the ribbing upside down, if you must take it off, you need to take out the last ribbed row, and frog from there. Please always check your gauge before starting to knit a piece. Happy Knitting!

23.05.2021 - 02:18

country flag Lilian Lund wrote:

Jag stickar Talvik och tycker det är konstigt att man skall öka så mycket från ärmhålen och ner. Har nu maskat av 360 m nertill i resår, tröjan blir väldigt vid.?.? Har jag gjort rätt??

27.04.2021 - 05:59

DROPS Design answered:

Hej Lilian. Du ökar i sidorna på tröjan för att den ska få en A-form. De maskorna som ökas innan resåren är för att resåren inte ska strama jämfört med resten (och resåren stickas också med mindre stickor). Har du bara följt beskrivningen och har rätt stickfasthet så tror jag nog att du har gjort rätt. Mvh DROPS Design

27.04.2021 - 10:04

country flag Angelica wrote:

Hej! Jag ska precis börja på rapport A1 jag har nu 108 maskor, (medium storlek) det står ” (=4 maskor) totalt 27 gånger runt på varvet, men as det att jag ska öka 108 maskor då? Och vart ökar man dem isf? Nästa fråga är på varvet med svart stjärna ökas det 24 maskor jämt fördelat kom ihåg övningstips = 240 maskor (inklusive de 4 maskorna som ökades i varje rapport A1 hoppas någon kan hjälpa mig hur jag ska läsa detta :)

25.04.2021 - 17:40

DROPS Design answered:

Hej Angelica. Om du tittar på mönster/diagram A.1 längst ner i mönstret så ser du att det på varv 1 är ett omslag längst till höger. Du gör alltså ett omslag först och stickar sedan 4 maskor slätstickning i natur. Efter hela första varvet har du alltså ökat 27 maskor. Sedan ökar du enligt diagrammet på varv 3, 11 och 13. På näst sista varvet i diagrammet ökar du 24 maskor jämnt fördelat. När hela diagrammet är färdigt ska du ha 240 m på stickan. Mvh DROPS Design

27.04.2021 - 09:45

country flag Inna wrote:

Hei! Ser at fargene i mønsteret og fargene på illustrasjonsbildet ikke samsvarer. Det gjelder diagram A.2. ca. rett etter økning 2. På bildet er ser det ut til at det er strikket med natur, i diagrammet er det lys camel. Stemmer dette? Eller er det lyset til bildene som gjør noen rart her. Vil også anbefale dere å legge til fargenummer bak forklaringen nederst i oppskriften. Så slipper man å rulle opp for å finne ut hvilken farge man trenger, for så å rulle ned igjen.

16.04.2021 - 20:49

DROPS Design answered:

Hei Inna. Bildet samsvarer med diagrammet, kan ikke se at det skal være brukt natur. Men dette kan avvik litt fra skjerm fra skjerm. mvh DROPS design

26.04.2021 - 14:58

country flag Eva Röstman wrote:

Hej! Jag stickar Talvik197/10modellz831 Har kommit till mönsterA1. Där har jag fastnat. Det ska ökas 4maskor i var rapport. Vad menas med rapport och när ska jag g öka? Vänligen Eva

21.02.2021 - 14:45

country flag MONICA wrote:

Disculpad, ya lo he encontrado. COLOR BLANCO HUESO.

17.12.2020 - 23:24

country flag MONICA wrote:

PATRON GORRO A3, fila 18 empezando por abajo, no encuentro la layenda del segundo punto, que es un círculo. ¿Me pueden explicar qué hay que hacer en ese segundo punto? Muchas gracias

17.12.2020 - 18:04

DROPS Design answered:

Hola Monica! Me alegro que ya esté claro. Buen trabajo!

18.12.2020 - 11:14

country flag Birgit wrote:

Diesen wunderschönen Pullover habe ich genau nach Anleitung, mit der angegebenen Alpakawolle gestrickt; obwohl ich schon einige Übung und sorgfältig gearbeitet habe, ist das Maschenbild leider sehr unregelmäßig. Ist es sinnvoll, den Pullover jetzt, nach Fertigstellung, nach Maßskizze feucht aufzuspannen, ändert sich dann das Maschenbild ?

20.11.2020 - 11:47

DROPS Design answered:

Liebe Birgit, waschen und spannen nach Maßskizze kann immer helfen, eine schöneres Maschenbild bei dem farbigen Muster zu haben. Ihr Laden hat sicher noch weitere Tips dazu und kann Ihnen gerne mit Ihnen - auch telefonisch oder per E-Mail mitteilen. Viel Spaß beim stricken!

20.11.2020 - 14:29

country flag Laila Elisabeth Stavland wrote:

Enig med flere andre som har kommentert her. Olaug . Karin. Shiva. Må være feil i oppskriften. Blir altfor kort og altfor vid. Hilsen Laila

04.11.2020 - 20:01

country flag Veronica wrote:

S, M, L etc are common to all your patterns but how do I know what they are in cms or ins? You have some lovely patterns but I do not want to knit if I end up with the wrong size.

01.11.2020 - 12:10

DROPS Design answered:

Dear Veronica, behind the photo, you can change the language: in UK/English the measurements are in cm; in US/English the measurements are in inches. If you check the sketch at the bottom of the pattern for the measurements, they are always in cm (in both versions). Also, if you're in between 2 sizes, it's always recommended to knit the larger size. Happy knitting!

01.11.2020 - 16:25