
Popular categories
Looking for a yarn?


|
|||||||||||||
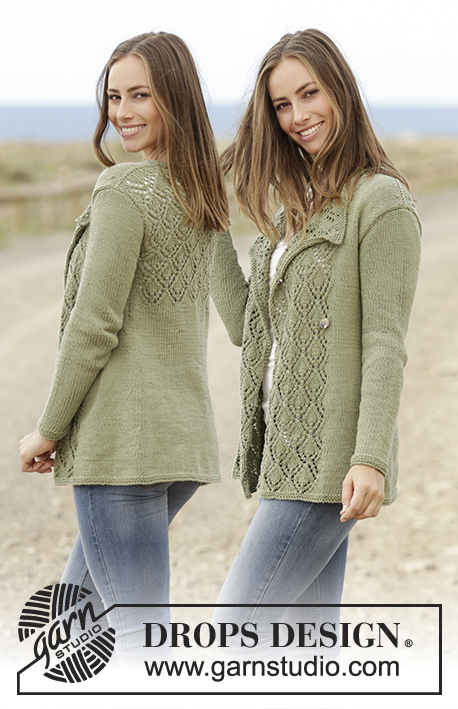
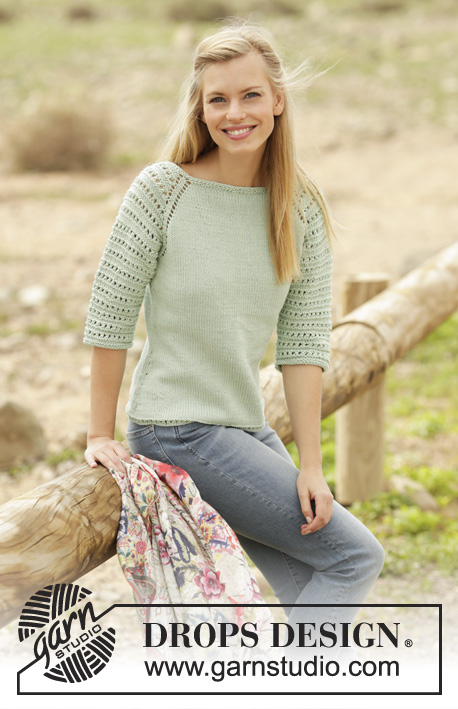
Petronella Top |
|||||||||||||
|
|
|||||||||||||
Knitted top with raglan and lace pattern, worked top down in DROPS Muskat. Sizes S - XXXL.
DROPS 175-32 |
|||||||||||||
|
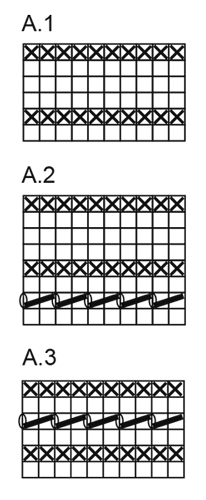
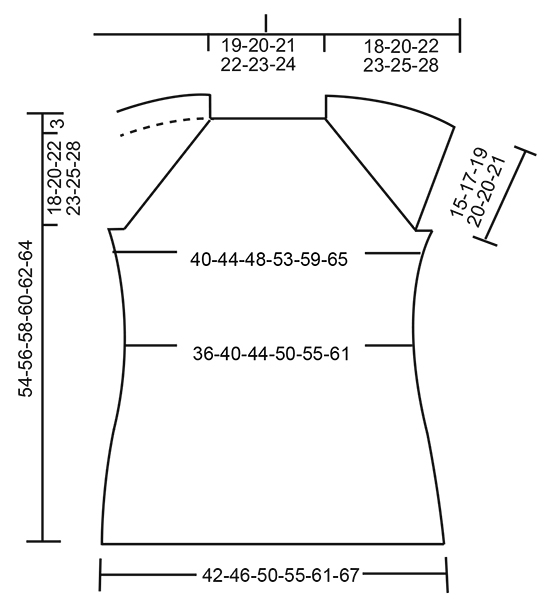
RIDGE/GARTER STITCH (worked in the round): 1 ridge = 2 rounds. Knit 1 round and purl 1 round. PATTERN: See diagrams A.1, A.2 and A.3. The diagrams show all the rows in the pattern from the right side. RAGLAN: Increase every 2nd round as follows: Increase as follows before the marker thread: Start 1 stitch before the marker thread: Make 1 yarn over, knit 1, marker thread. Increase as follows, after the marker thread: Marker thread, knit 1, make 1 yarn over. On the next round work the yarn overs knit, there will be holes. Increase every 4th round as follows: Increase as follows before the marker thread: ROUND 1: Start 1 stitch before the marker thread: Make 1 yarn over, knit1, marker thread. ROUND 2: The yarn overs are worked knit, there will be holes. ROUND 3: Start 3 stitches before the marker thread: Knit 2 together, make 1 yarn over, knit1, marker thread. No increases, but the row of holes continues as before. ROUND 4: The yarn overs are worked knit, there will be holes. Increase as follows, after the marker thread: ROUND 1: Marker thread, knit 1, make 1 yarn over. ROUND 2: The yarn overs are worked knit, there will be holes. ROUND 3: Marker thread, knit 1, make 1 yarn over, slip 1 stitch as if to knit, knit 1, pass the slipped stitch over the knitted stitch. No increases, but the row of holes is continued as before. ROUND 4: Work the yarn overs knit, there will be holes. DECREASE TIP: Start 3 stitches before the marker thread: Knit 2 together, knit 2 (the marker thread sits between these 2 stitches), slip 1 stitch as if to knit, knit 1, pass the slipped stitch over the knitted stitch = 2 stitches decreased. INCREASE TIP: Work until there is 1 stitch left before the marker thread. Make 1 yarn over, knit 2 (the marker thread sits between these 2 stitches) and make 1 yarn over. On the next round work the yarn overs twisted knit to prevent holes (the increased stitches are worked in stocking stitch). --------------------------------------------------------- TOP: The piece is worked in the round with circular needle from mid back, top down. YOKE: Cast on 80-84-88-92-96-100 stitches with circular needle size 4 mm and Muskat. Work 2 RIDGES – see description above, on the last round of the ridges increase 20 stitches evenly along the round = 100-104-108-112-116-120 stitches. Insert 4 marker threads in the piece as follows: first marker thread after 19-20-21-22-23-24 stitches (= half the back piece), second marker thread after 12 new stitches (= sleeve), third marker thread after 38-40-42-44-46-48 new stitches (= front piece), fourth marker thread after 12 new stitches (= sleeve), there are 19-20-21-22-23-24 stitches left on the needle after the last marker thread (= half the back piece). Begin with the increases to RAGLAN as described above and work stocking stitch across the stitches on the back piece and front piece and A.1 across all the sleeve stitches. READ THIS WHOLE SECTION BEFORE WORKING! The increases are different on the front piece/back piece and the sleeves as follows: FRONT PIECE/BACK PIECE: Increase every 2nd round 12-15-17-25-30-35 times, then every 4th round 7-7-7-4-3-2 times. SLEEVES: Increase every 2nd round 18-23-27-29-26-25 times, then every 4th round 4-3-2-2-5-7 times. When A.1 has been completed 1 time in height, repeat A.2 in height. The increased stitches on the sleeves are worked in to the pattern as you go. After the next to last increase on the sleeve (there are 4 rounds left), continue by working garter stitch across the stitches on each sleeve, the stitches on the front piece/back piece are continued in stocking stitch as before. REMEMBER THE KNITTING TENSION! After all the increases to raglan there are 264-296-320-352-372-396 stitches on the needle. The next round is worked as follows: Work 38-42-45-51-56-61 stitches (= half the back piece), cast off the next 56-64-70-74-74-76 stitches, work the next 76-84-90-102-112-122 stitches (= front piece), cast off the next 56-64-70-74-74-76 stitches, work the next 38-42-45-51-56-61 stitches (= half the back piece). BODY: Continue working as follows: work half the back piece, cast on 8-8-10-10-12-14 new stitches, work the front piece, cast on 8-8-10-10-12-14 new stitches, work half the back piece. There are now 168-184-200-224-248-272 stitches on the body. Insert a marker thread in each side, in the middle of the new stitches which were cast on. THE PIECE IS NOW MEASURED FROM HERE. Continue with stocking stitch, but across the 8-8-10-10-12-14 new stitches in each side work 2 ridges, then work stocking stitch across all stitches. When the piece measures 4 cm decrease 1 stitch on each side of the marker threads (= 4 stitches decreased), decrease every 3 cm in total 4 times – READ DECREASE TIP = 152-168-184-208-232-256 stitches. When the piece measures 19-19-19-18-18-19 cm increase 1 stitch on each side of the marker threads (= 4 stitches increased), increase every 2 cm in total 6 times– READ INCREASE TIP = 176-192-208-232-256-280 stitches. When the piece measures 32-32-32-33-33-32 cm work A.3 across all stitches. Then cast off in knit, the piece measures approx. 54-56-58-60-62-64 cm from the shoulder. |
|||||||||||||
Diagram explanations |
|||||||||||||
|
|||||||||||||
|
|||||||||||||
|
|||||||||||||
|
Have you made this or any other of our designs? Tag your pictures in social media with #dropsdesign so we can see them! Do you need help with this pattern?You'll find tutorial videos, a Comments/Questions area and more by visiting the pattern on garnstudio.com. © 1982-2024 DROPS Design A/S. We reserve all rights. This document, including all its sub-sections, has copyrights. Read more about what you can do with our patterns at the bottom of each pattern on our site. |
|||||||||||||


With over 40 years in knitting and crochet design, DROPS Design offers one of the most extensive collections of free patterns on the internet - translated to 17 languages. As of today we count 304 catalogues and 11422 patterns - 11422 of which are translated into English (UK/cm).
We work hard to bring you the best knitting and crochet have to offer, inspiration and advice as well as great quality yarns at incredible prices! Would you like to use our patterns for other than personal use? You can read what you are allowed to do in the Copyright text at the bottom of all our patterns. Happy crafting!
Comments / Questions (96)
Just below the raglan info there are 2 paragraphs. Increase every 4 round as follows: and Increase as follows, after the marker thread: Is the 1st paragraph for the body and the 2nd paragraph for the sleeve?
02.05.2020 - 22:55DROPS Design answered:
Dear Mrs Medhus, these both p aragraphs apply to the increases, first it explains how to increase for raglan on every other round, then how to increase for raglan on every 4th round before the marker thread, then how to increase on 4th round after the marker thread. You will increase for body and sleeve first on every other round then on every 4th round. You will increase on each piece (front, back and sleeves) first after the marker (raglan) then before the marker (next raglan). Happy knitting!
04.05.2020 - 12:28Porfavor si pudieran contestar la última pregunta 🙏🙏🙏\r\nMuchas gracias
08.02.2020 - 18:34Buen día, después de aumentar cada dos vueltas 12 veces (talla s) en delantero espalda sigo aumentando solo en mangas por 6 veces más, y luego cuando termine estos aumentos en mangas comienzo simultáneamente aumentando cada 4 vueltas? O cuando termine de hacer los aumentos cada dos vueltas de espalda /delantero comienzo inmediatamente cada 4 vueltas? En la foto el raglán no deja de tener agujeros, y si no sigo con los aumentos no quedarán agujeros Muchas gracias
04.02.2020 - 12:03DROPS Design answered:
Hola Maria Jose. Los aumentos en el raglán se trabajan sin interrupciones, es decir, cuando termines de aumentar cada 2ª vuelta, continuamos aumentando en cada 4ª vuelta. Los aumentos en el cuerpo y en las mangas se trabajan diferente, no se trabajan simultáneamente. La linea de raglán no se interrumpe en ningún momento.
09.02.2020 - 19:26En el diagrama A.1 las líneas horizontales representan las vueltas 2,4,6,8 .. etc o es vuelta 1,2,3,4,5,6 ...y terminado A.1 realizar A.2 y luego repetir A.1 y así sucesivamente?
24.01.2020 - 23:23DROPS Design answered:
Hola María Jose. El diagrama representa todas las filas del patrón vistas por el lado derecho, es decir la fila 1 (= lado derecho) se lee de derecho a izquierda y se trabaja como se presentan los puntos, la fila 2 (= lado revés) se lee de izquierda a derecho y los puntos se trabajan al contrario de lo que ves ( si ves un derecho debes trabajar un revés).
26.01.2020 - 21:02En raglán dice aumentar en 2 da vuelta, y luego en 4ta vuelta, no entiendo como contar las vueltas para hacer raglán, si luego se va repitiendo, o se hace solo una vez, la verdad me confunde un poco las vueltas El delantero/espalda aumentar 12 veces y cada 4 vueltas 7 veces? Soy talla s , porfavor si pudieran explicarme mejor el tema de las vueltas. Gracias
19.01.2020 - 15:58DROPS Design answered:
Hola Maria José. Los aumentos para el raglán se trabajan como sigue: aumentar cada 2ª vuelta ( es decir, trabajar una vuelta sin aumentos y la siguiente con aumentos) y repetir para la talla S 18 veces en las mangas y 12 veces en el cuerpo (delantero/espalda), después cada 4ª vuelta ( es decir, 3 vueltas sin aumentos y 1 vuelta con aumentos) las veces indicada según el patrón y la talla.
19.01.2020 - 23:36Hei. Jeg sliter litt med å forstå hva jeg skal gjøre. Det står at jeg skal øke ved hver merketråd hver andre omgang under der det står om erme/raglan. Slik jeg da forstår det skal jeg øke før og etter merketråden, altså tilsammen 8 ganger hver andre runde. Det står også under forstykke og bakstykke at jeg skal øke hver andre omgang. Betyr det før og etter merketråden? For det er jo det jeg allerede skal gjøre når jeg øker for ermet. Eller skal det økes en annen plass?
11.09.2019 - 16:28DROPS Design answered:
Hej Iselin, det er fordi du skal øke til raglan lidt forskelligt på selve ærmet og på ryg og forstykket. I starten øker du på hver 2.omgang på hver side af alle mærketråde. Men på bolen øker du på hver 4. omgang lidt tidligere end på ærmerne alt efter hvilken størrelse du strikker: FORSTYKKE/BAKSTYKKE: Øk på hver 2.omgang 12-15-17-25-30-35 ganger, deretter på hver 4.omgang 7-7-7-4-3-2 ganger. ERMER: Øk på hver 2.omgang 18-23-27-29-26-25 ganger, deretter på hver 4.omgang 4-3-2-2-5-7 ganger.
02.10.2019 - 12:12I wish I had looked at this pattern before I bought yarn for it. I cannot understand how to read this at all!? What are the diagrams about? Why isn\'t it written with the usual standard abbreviations so it\'s legible? Does anyone have a translation/rewrite to make this clearer/more like a normal pattern? I keep trying to read it and figure it out but I am totally lost. Might have to find something else to do with the yarn, I doubt I can return it because I ordered internationally. Argh.
28.08.2019 - 04:40DROPS Design answered:
Dear Cori, The DROPS patterns are knitted and crocheted by thousands and thousands of people around the world. We understand however that in certain countries, with different knitting/crochet traditions than Scandinavia, our patterns might be written in a way that differs from what some are used to. But of course we want everyone to understand our patterns, so that’s why we have created an extensive library of tutorial videos as well as step by step lessons that explain how to follow the techniques we use and 28.08.2019 - 08:58
I'm stuck at the beginning of this pattern. Knitting size M I've made the 20 stitches evenly, now trying to place my markers, what are the 12 new stiches mentioned for the second and fourth marker. Where are they written in the pattern please?
25.07.2019 - 12:25DROPS Design answered:
Hi Caroline, after increasing 20 stitches evenly you have 104 stitches in size M. Now you will place 4 marker threads to separate the different parts of your work: starting from mid back count 20 stitches, first marker (mid-back); 12 stitches between the first and second marker = left sleeve; 40 stitches between the second and third marker = front; 12 stitches between the third and fourth marker = right sleeve; and 20 last stitches after fourth marker = mid back (in total 104 stitches in the round). Happy knitting!
25.07.2019 - 18:26Hei. Denne toppen er veldig søt. Har lest gjennom oppskriften og kommentarfeltene. Jeg sliter med beskrivelsen av «øk på hver 2 omg 12-15-17 osv ganger» har vurdert om det er antal masker, men da blir antallet for mange totalt. Kan dere vennligst utdype.
07.07.2019 - 18:15DROPS Design answered:
Hei Charlotte, Du øker til raglan som beskrevet på toppen av oppskriften; Det økes forskjellige antall ganger på ermene og på for/bak-stykkene som beskrevet. Du øker på begge sider av hvert merketråd slik at det blir 4 masker økt på ermene og 4 masker økt på for/bak-stykkene hver øke-omgang. Håper dette hjelper og god fornøyelse!
08.07.2019 - 07:26Grazie mille della risposta. Ora mi è chiaro come procedere
28.06.2019 - 21:06