DROPS Merino Extra Fine
100% Wool
from 3.50 £ /50g
Get the yarn to make this pattern from 42.00£.

The yarn cost is calculated from the pattern’s smallest size and the yarn’s cheapest product type. Looking for an even better price? You might find it on the DROPS Deals!

DROPS SS24

Irish Plaits

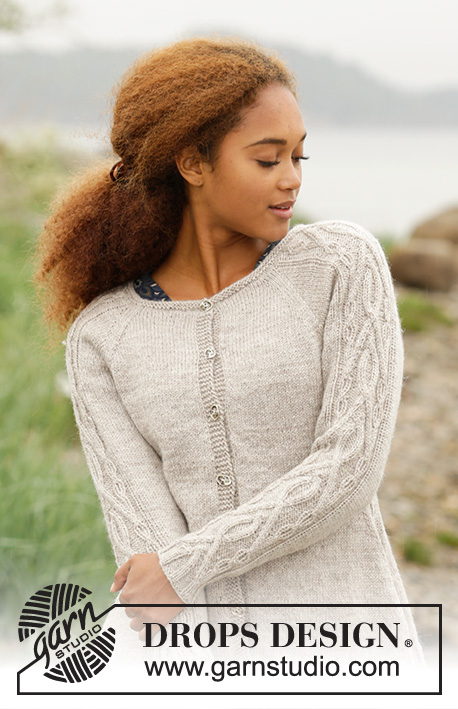
Knitted DROPS jumper with cables on sleeves, worked top down in ”Merino Extra Fine”. Size: S - XXXL.

DROPS 173-2
DROPS design: Pattern no me-098
Yarn group B
----------------------------------------------------------
Size: S - M - L - XL - XXL - XXXL
Materials:
DROPS MERINO EXTRA FINE from Garnstudio
600-650-700-800-850-950 g colour no 08, light beige

DROPS DOUBLE POINTED NEEDLES AND CIRCULAR NEEDLE (60 and 80 cm) SIZE 4 mm - or size needed to get 21 sts x 28 rows in stocking st = 10 x 10 cm.
DROPS DOUBLE POINTED NEEDLES AND CIRCULAR NEEDLE (40 and 80 cm) SIZE 3.5 mm for garter st/rib - or size needed to get 22 sts x 30 rows in stocking st = 10 x 10 cm.
DROPS CABLE NEEDLE - for cables.

-------------------------------------------------------

Alternative Yarn – See how to change yarns here
Yarn Groups A to F – Use the same pattern and change the yarn here
Yarn usage using an alternative yarn – Use our yarn converter here

-------------------------------------------------------

DROPS Merino Extra Fine
100% Wool
from 3.50 £ /50g
Get the yarn to make this pattern from 42.00£.

The yarn cost is calculated from the pattern’s smallest size and the yarn’s cheapest product type. Looking for an even better price? You might find it on the DROPS Deals!

Pattern instructions

NOTE: This pattern is written in British English. All measurements in charts are in cm. For conversion from cm to inches - click here. There are different terms for crocheting in British and American English. If this pattern includes crochet, click for "crochet terms" here. For this pattern in American English, please click here.
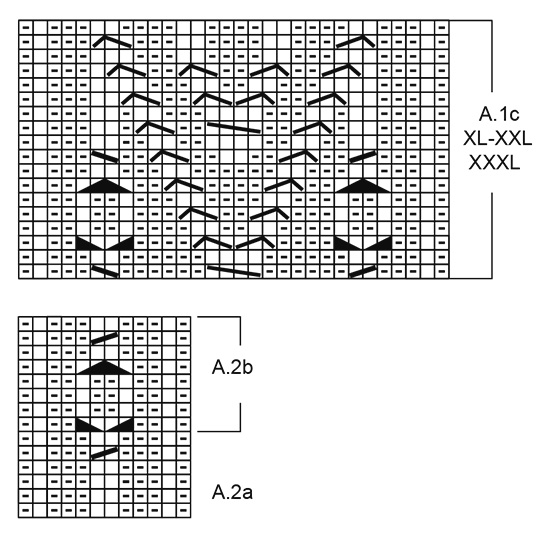
GARTER ST (worked in the round):
1 ridge = 2 rounds. * K 1 round and P 1 round *, repeat from *-*.

PATTERN:
See diagram A.1 (see diagram for correct size) and A.2.

RAGLAN:
Inc for raglan before marker and 2 sts K.
Inc for raglan after marker and 2 sts K.
Inc 1 st by making a YO. On next round K YOs twisted to avoid holes.

DECREASE TIP:
Work until 4 sts remain before A.2a/A.2b, K 2 tog, K 2, work A.2a/A.2b, K 2, slip 1 st as if to K, K 1, psso.

INCREASE TIP-1 (evenly spaced):
To calculate how often inc should be done, use the total no of sts on row (e.g. 105 sts) and divide these sts with no of inc to be done (e.g. 11) = 9.5. I.e. in this example inc 1 st for every 9th and 10th st.
INCREASE TIP-2:
Work until 2 st remains before A.2b, 1 YO, K 2, A.2b, K 2, 1 YO. Repeat inc in the other side = 4 sts inc on round. On next round K YO twisted to avoid holes. Then K the new sts.

CAST-OFF TIP:
If cast-off edge is tight, cast off on a needle ½ size larger.
----------------------------------------------------------

JUMPER:
Worked in the round on circular needle, top down. Rounds start mid back.

YOKE:
Cast on 105-109-113-120-124-130 sts on circular needle size 3.5 mm with Merino Extra Fine. Work 2 ridges in GARTER ST – see explanation above, then work as follows: K 1 round while inc 11-15-27-32-32-38 sts evenly - READ INCREASE TIP-1 = 116-124-140-152-156-168 sts. Switch to circular needle size 4 mm. Now work an elevation in back of neck, back and forth on needle in stocking st as follows: Work 22-24-30-33-34-35 sts, turn and work 44-48-60-66-68-70 sts, turn and work 49-53-65-71-73-75 sts, turn and work 54-58-70-76-78-80 sts. Continue back and forth like this over 5 sts more on every turn until a total of 8 short rows have been worked, turn and work until mid back again. Now work in the round with pattern from mid back as follows: K the first 16-18-20-23-24-25 sts (= half back piece), insert a marker, K 2, work A.1a (choose diagram for correct size) over the next 22-22-26-26-26-30 sts, K 2 (= sleeve), insert a marker, K the next 32-36-40-46-48-50 sts (= front piece), insert a marker, K 2, work A.1a (choose diagram for correct size) over the next 22-22-26-26-26-30 sts, K 2 (= sleeve), insert a marker, K the next 16-18-20-23-24-25 sts (= half back piece). REMEMBER THE KNITTING TENSION Continue pattern like this. When the 2 rows in A.1a have been worked, repeat A.1b over A.1a, AT THE SAME TIME on first round in A.1b beg inc for RAGLAN – see explanation above, on each side of every marker. NOTE: Inc differently on body and sleeves.

RAGLAN BODY:
Inc like this every round 0-0-0-2-2-6 times, and every other round 24-26-28-28-32-32 times. K the new sts.

RAGLAN SLEEVES:
Inc like this every other round 16-24-25-27-25-23 times, and every 4th round 4-1-1-1-4-6 times. In size S-XXL work the new sts in pattern A.1b until there is room for the entire pattern (= 30 sts). Then K the new sts. In size XXXL K all the new sts.

When all inc are done there are 292-328-356-384-408-436 sts on round. Piece measures 22-24-26-27-30-32 cm from shoulder. Work next round as follows: Work the first 40-44-48-53-58-63 sts, slip the next 66-76-82-86-88-92 sts on a stitch holder (= sleeve), cast on 8-8-10-10-12-14 sts under sleeve, work the next 80-88-96-106-116-126 sts, slip the next 66-76-82-86-88-92 sts on a stitch holder (= sleeve), cast on 8-8-10-10-12-14 sts under sleeve, work the remaining 40-44-48-53-58-63 sts on round.

BODY:
There are now 176-192-212-232-256-280 sts for body. NOW MEASURE THE PIECE FROM HERE. Now work pattern as follows:
K 38-42-47-52-58-64 sts, work A.2a (= 12 sts), K 76-84-94-104-116-128 sts, work A.2a, K 38-42-47-52-58-64 sts. When A.2a has been worked vertically, repeat A.2b vertically over A.2a. When piece measures 4 cm, dec on each side of every repetition of A.2a - READ DECREASE TIP! Dec like this every 6th-6th-4th-4th-6th-6th round 4-4-5-5-4-4 times in total = 160-176-192-212-240-264 sts. When piece measures 13 cm in all sizes, inc 1 st in each side of A.2b - READ INCREASE TIP-2! Inc like this every other round a total of 23 times in all sizes = 252-268-284-304-332-356 sts. Continue until piece measures 34-34-34-35-34-34 cm adjust so that one whole repetition of A.2b has been worked vertically.

Now inc evenly, beg from mid back as follows: K the first 57-61-65-70-77-83 sts while inc 9-7-8-8-9-8 sts evenly, work K over K and P over P over the next 12 sts, K the next 114-122-130-140-154-166 sts while inc 18-15-17-17-18-16 sts evenly, work K over K and P over P over the next 12 sts, K the next 57-61-65-70-77-83 sts while inc 9-8-9-9-9-8 sts evenly = 288-298-318-338-368-388 sts. Switch to circular needle size 3.5 mm and K until first repetition of A.2b. Now work rib as follows: * work K over K and P over P over the first 12 sts, work (K 2, P 3) over the next 130-135-145-155-170-180 sts, K the next 2 sts *, repeat from *-* 1 more time.
When rib measures 2 cm, inc 1 P st in every section with 3 P = 344-356-380-404-440-464 sts. Continue with rib until rib measures 4 cm in total. Cast off with K over K and P over P - READ CAST-OFF TIP. Fasten off.

SLEEVES:
Worked in the round on double pointed needles.
NOW MEASURE THE PIECE FROM HERE. Slip the 66-76-82-86-88-92 sts from stitch holder back on double pointed needles size 4 mm and pick up 1 st in each of the 8-8-10-10-12-14 new sts cast on under sleeve = 74-84-92-96-100-106 sts. Insert a marker in the middle of these new sts (= 4-4-5-5-6-7 new sts on each side of marker). Continue in the round with pattern A.1b over the 30 sts in the middle of sleeve and work A.2a (= 12 sts) mid under sleeve (i.e. 6 sts of pattern A.2a on each side of marker). K the remaining sts. When A.2a has been worked vertically, repeat A.2b vertically over A.2a. When piece measures 4 cm, dec 1 st on each side of A.2b under sleeve - remember decrease tip. Dec like this every 7th-5th-4th-4th-4th-3rd round 14-18-21-22-23-25 times in total = 46-48-50-52-54-56 sts. When A.1b has been worked 6 times in total vertically (incl pattern on yoke), continue with A.1c (- see diagram for correct size). When entire A.1c has been worked vertically, continue with K over K and P over P over these sts. When piece measures 44-42-42-42-40 cm – adjust so that A.2b has been worked 1 time vertically. Switch to double pointed needles size 3.5 mm. Now work rib, beg from the 12 sts in A.2b mid under sleeve: Work K over K and P over P over the first 12 sts (= A.2b), P 0-0-0-1-1-2, K 2-3-4-3-4-3, P 0-0-0-1-1-2, work K over K and P over P over the next 30 sts, P 0-0-0-1-1-2, K 2-3-4-3-4-3, P 0-0-0-1-1-2. When rib measures 3 cm, cast off with K over K and P over P. Fasten off. Knit another sleeve the same way.

This pattern has been corrected.

Updated online: 30.09.2016
Correction in diagram A.1b - row 6 and 8 and A.1c - row 6 (all sizes).
Updated online: 18.10.2016
New diagram A.2a/A.2b
Updated online: 04.05.2017
Correction: Diagram A.2b has been updated.

Diagram

symbols = K
symbols = P
symbols = slip 1 st on cable needle behind piece, K 1, P 1 from cable needle

symbols = = slip 1 st on cable needle in front of piece, P 1, K 1 from cable needle
symbols = = slip 1 st on cable needle in front of piece, K 1, K 1 from cable needle
symbols = = slip 1 st on cable needle behind piece, K 1, K 1 from cable needle
symbols = = slip 2 sts on cable needle in front of piece, K 2, K 2 from cable needle
symbols = = slip 2 sts on cable needle in front of piece, P 1, K 2 from cable needle
symbols = = slip 1 st on cable needle behind piece, K 2, P 1 from cable needle
diagram
diagram
diagram

Each of our patterns has specific tutorial videos to help you.

Do you have a question? See a list of frequently asked questions (FAQ)

Knitting tension is what determines the final measurements of your work, and is usually measured per 10 x 10 cm. It is provided like so: number of stitches in width x number of rows in height - eg: 19 stitches x 26 rows = 10 x 10 cm.

The knitting tension is very individual; some people knit/crochet loosely while others work tightly. You adjust the knitting tension with the needle size, which is why the suggested needle size is only meant as a guide! You need to adjust this (up or down) to ensure that YOUR knitting tension matches the knitting tension provided in the pattern. If you work with a different knitting tension than provided you will have a different yarn consumption, and your work will have different measurements than what the pattern suggests.

The knitting tension also determines which yarns can replace each other. As long as you achieve the same knitting tension you can replace one yarn with another.

See DROPS lesson: How to measure your tension/gauge

See DROPS video: How to make a gauge tension swatch

The required amount of yarn is provided in grams, eg: 450 g. To calculate how many balls you’ll need you first need to know how many grams are in 1 ball (25g, 50g or 100g). This information is available if you click on the individual yarn quality on our pages. Divide the amount required with the amount of each ball. For example, if each ball is 50g (the most common amount), the calculation will be as follows: 450 / 50 = 9 balls.

The important thing when changing from one yarn to another is that the knitting/crochet tension remains the same. This is so that the measurements of the finished piece will be the same as on the sketch provided. It is easier to achieve the same knitting tension using yarns from the same yarn group. It is also possible to work with multiple strands of a thinner yarn to achieve the knitting tension of a thicker one. Please try our yarn converter. We recommend you to always work a test swatch.

Please NOTE: when changing yarn the garment might have a different look and feel to the garment in the photo, due to individual properties and qualities of each yarn.

See DROPS lesson: Can I use a different yarn than the one mentioned in the pattern?

All our yarns are categorised into yarn groups (from A to F) according to thickness and knitting tension – group A contains the thinnest yarns and group F the thickest. This makes it easier for you to find alternative yarns to our patterns, should you wish to switch yarn. All yarns within the same group have a similar knitting tension and can easily replace each other. However, different yarn qualities have different structures and properties which will give the finished work a unique look and feel.

Click here for an overview of the yarns in each yarn group

At the top of all our patterns you’ll find a link to our yarn calculator, which is a helpful tool should you wish to use a different yarn than suggested. By filling in the yarn quality you wish to replace, the amount (in your size) and number of strands, the calculator will present good alternative yarns with the same knitting tension. Additionally it will tell you how much you’ll require in the new qualities and whether you’ll need to work with multiple strands. Most skeins are 50g (some are 25g or 100g).

If the pattern is worked with multiple colours, every colour will have to be calculated separately. Similarly, if the pattern is worked with several strands of different yarns (for example 1 strand Alpaca and 1 strand Kid-Silk) you will have to find alternatives for each, individually.

Click here to see our yarn calculator

Since different yarns have different qualities and textures we have chosen to keep the original yarn in our patterns. However, you can easily find options among our available qualities by using our yarn calculator, or simply pick a yarn from the same yarn group.

It is possible that some retailers still have discontinued yarns in stock, or that someone has a few skeins at home that they would like to find patterns for.

The yarn calculator will provide both alternative yarn as well as required amount in the new quality.

If you think it's hard to decide what size to make, it can be a good idea to measure a garment you own already and like the size of. Then you can pick the size by comparing those measures with the ones available in the pattern's size chart.

You'll find the size chart at the bottom of the pattern.

See DROPS lesson: How to read size chart

The needle size provided in the pattern serves only as a guide, the important thing is to follow the knitting tension. And since knitting tension is very individual, you will have to adjust the needle size to ensure that YOUR tension is the same as in the pattern – maybe you’ll have to adjust 1, or even 2 needle sizes, up or down to achieve the correct tension. For this, we recommend that you work test swatches.

Should you work with a different knitting tension than the one provided, the measurements of the finished garment might deviate from the measurement sketch.

See DROPS lesson: How to measure your tension/gauge

See DROPS video: How to make a tension/gauge swatch

Working a garment top-down provides more flexibility and room for personal adjustment. For example it is easier to try the garment on while working, as well as making adjustments to length of yoke and shoulder caps.

The instructions are carefully explaining every step, in the correct order. Diagrams are adjusted to the knitting direction and are worked as usual.

The diagram depicts all rows/rounds, and every stitch seen from the right side. It is read from bottom to top, from right to left. 1 square = 1 stitch.

When working back and forth, every other row is worked from the right side and every other row is worked from the wrong side. When working from the wrong side, the diagram will have to be worked reversed: from left to right, knit stitches are purled, purl stitches are knit etc.

When working in the round every round is worked from the right side and the diagram are worked from right to left on all rounds.

See DROPS lesson: How to read knitting diagrams

The diagram depicts all rows/rounds, and every stitch seen from the right side. It is worked from bottom to top, from right to left.

When working back and forth every other row is worked from the right side: from right to left and every other row is worked from the wrong side: from left to right.

When working in the round, every row in the diagram are worked from the right side, from right to left.

When working a circular diagram you start in the middle and work your way outwards, counter clockwise, row by row.

The rows usually start with a given number of chain stitches (equivalent to the height of the following stitch), this will either be depicted in the diagram or explained in the pattern.

See DROPS lesson: How to read crochet diagrams

Instructions for working several diagrams after each other on the same row/round, will often be written like so: “work A.1, A.2, A.3 a total of 0-0-2-3-4 times". This means you work A.1 once, then A.2 is worked once, and A.3 is repeated (in width) the number of times provided for your size – in this case like so: S = 0 times, M = 0 times, L=2 times, XL= 3 times and XXL = 4 times.

The diagrams are worked as usual: begin with the first row in A.1, then work the first row in A.2 etc.

See DROPS lesson: How to read knitting diagrams

See DROPS lesson: How to read crochet diagrams

The total width of the garment (from wrist-to-wrist) will be larger in the larger sizes, despite the actual sleeves being shorter. The larger sizes have longer sleeve caps and wider shoulders, so there will be a good fit in all sizes.

The measurement sketch/schematic drawing provides information regarding the full length of the garment. If it’s a jumper or a jacket the length is measured from the highest point on the shoulder closest to the neckline, and straight down to the bottom of the garment. It is NOT measured from the tip of shoulder. Similarly, the length of yoke is measured from the highest point on the shoulder and down to where yoke is split into body and sleeves.

On a jacket measures are never taken along bands, unless specifically stated. Always measure inside band stitches when measuring the length.

See DROPS lesson: How to read a schematic drawing

Diagrams are often repeated on the round or in height. 1 repeat is the diagram the way it appears in the pattern. If it says to work 5 repeats of A.1 in the round, then you work A.1 a total of 5 times after/next to each other in the round. If it says to work 2 repeats of A.1 vertically/in height you work the entire diagram once, then begin again at the start and work the entire diagram one more time.

Chain stitches are slightly narrower than other stitches and to avoid working the cast-on edge too tight, we simply chain more stitches to begin with. The stitch count will be adjusted on the following row to fit the pattern and measurement sketch.

The rib edge is more elastic and will contract slightly compared to, for example, stocking stitch. By increasing before the rib edge, you avoid a visible difference in width between the rib edge and the rest of the body.

It’s very easy to cast off too tightly, and by making yarn overs while casting off (and simultaneously casting these off) you avoid a too tight cast off edge.

See DROPS video: How to bind off with yarn overs (yo)

To achieve an even increase (or decrease) you can increase on, for example: every 3rd and 4th row alternately, like so: work 2 rows and increase on the 3rd row, work 3 rows and increase on the 4th. Repeat this until the increase is complete.

See DROPS lesson: Increase or decrease 1 st on every 3rd and 4th row alternately

Should you prefer to work in the round instead of back and forth, you may of course adjust the pattern. You’ll need to add steeks mid-front (usually 5 stitches), and follow the instructions. When you would normally turn and work from the wrong side, simply work across the steek and continue in the round. At the end you’ll cut the piece open, pick up stitches to work bands, and cover the cut edges.

See DROPS video: How to knit steeks and cut open

Should you prefer to work back and forth instead of in the round, you may of course adjust the pattern so you work the pieces separately and then assemble them at the end. Divide the stitches for the body in 2, add 1 edge stitch in each side (for sewing) and work the front and back pieces separately.

See DROPS lesson: Can I adapt a pattern for circular needles into straight needles?

Pattern repeats can vary slightly in the different sizes, in order to get the correct proportions. If you’re not working the exact same size as the garment in the photo, yours might deviate slightly. This has been carefully developed and adjusted so that the complete impression of the garment is the same in all sizes.

Make sure to follow instructions and diagrams for your size!

If you have found a pattern you like which is available in women’s size it’s not very difficult to convert it to men’s size. The biggest difference will be the length of sleeves and body. Start working on the women size that you think would fit across the chest. The additional length will be worked right before you cast off for the armhole/sleeve cap. If the pattern is worked top-down you can add the length right after the armhole or before the first decrease on sleeve.

Regarding additional yarn amount, this will depend on how much length you add, but it is better with a skein too many than too few.

All yarns will have excess fibres (from production) that might come off as lint or shedding. Brushed yarns (ie hairier yarns) have more of these loose, excess fibres, causing more shedding.

Shedding also depends on what is worn under or over the garment, and whether this pulls at the yarn fibres. It’s therefore not possible to guarantee that there will be no shedding

Below are some tips on how to get the best result when working with hairier yarns:

1. When the garment is finished (before you wash it) shake it vigorously so the looser hairs come off. NOTE: do NOT use a lint roller, brush or any method that pulls at the yarn.

2. Place the garment in a plastic bag and put it in your freezer - the temperature will cause the fibres to become less attached to each other, and excess fibres will come off easier.

3. Leave in the freezer for a few hours before taking it out and shaking it again.

4. Wash the garment according to the instructions on the yarn label.

Pilling is a natural process that happens to even the most exclusive of fibers. It's a natural sign of wear and tear that is hard to avoid, and that is most visible in high friction areas of your garment like a sweater's arms and cuffs.

You can make your garment look as new by removing the pilling, using a fabric comb or a pill/lint remover.

Still can't find the answer you need? Then scroll down and leave your question so one of our experts can try to help you. This will be done normally within 5 to 10 working days.
In the meantime, you can read the questions and answers that others have left to this pattern or join the DROPS Workshop on Facebook to get help from fellow knitters/crocheters!

You might also like...

Irish Plaits

Minna, Germany

Irish Plaits

Anna, Sweden

Post a comment to pattern DROPS 173-2

We would love to hear what you have to say about this pattern!

If you want to leave a question, please make sure you select the correct category in the form below, to speed up the answering process. Required fields are marked *.

Comments / Questions (56)

country flag Emma wrote:

Bonjour, Je n'ai toujours pas eu de réponse à ma question du 21 novembre. Merci

06.01.2017 - 07:30

DROPS Design answered:

Bonjour Emma, votre question a bien été transmise à nos stylistes, merci pour votre patience.

06.01.2017 - 08:34

country flag Daniela wrote:

Hallo liebes Drops-Team. Ich komme mit der Verteilung der Raglanzunahmen nicht zu Recht. Wäre es möglich, mir etwas genauer für die ersten Runde zu sagen? Dankeschön

13.12.2016 - 22:38

DROPS Design answered:

Liebe Daniela, die Raglanzunahmen werden in einem unterschiedlichen Rythmus gestrickt, am Rumpfteil sollen Sie zuerst bei jede Rd (in den 3 grösseren Größe) und dann jede 2. Rd zunehmen, bei den Ärmel werden Sie zuerst jede 2. Rd und dann jede 4. Rd zunehmen, dh Sie werden manchmal 4 M zunehmen (nur am Rumpfteil) oder 8 M zunehmen (Rumpfteil + Ärmel). Viel Spaß beim stricken!

14.12.2016 - 09:04

country flag Isabel wrote:

Buenos dias! Tengo una duda sobre el raglan para las mangas. No comprendo a que se refiere cuando dice: "RAGLÁN PARA LAS MANGAS: Aum de la misma manera cada 2ª vta 16-24-25-27-25-23 vcs y cada 4ª vta 4-1-1-1-4-6 vcs. " Trabajando en aguja circular, a que se refiere cuando dice " cada segunda vuelta" y "cada quarta vuelta"? Muchas grácias!

12.12.2016 - 13:56

DROPS Design answered:

Hola Isabel. En las mangas aumentamos primero cada 2ª vta (es decir, una vta se trabaja normal sin aumentos y otra vta se trabaja con los aumentos) y, después de terminar con los aumentos cada 2ª vta, comenzamos a aumentar cada 4ª vta de la misma manera ( 3 vtas sin aumentos y en la 4ª vta trabajar los aumentos).

18.12.2016 - 15:16

country flag Emma wrote:

Ou alors il faut supprimer le dernier rang du diagramme pour avoir 1 seul rg de chaque côté de celui avec une maille croisée ?

21.11.2016 - 14:35

country flag Emma wrote:

Bonjour. Le diagramme A2b est étrange (motif non symétrique). Il faut tricoter le motif de médaillon (sur 5 rgs) / UN rang simple / 1 rg avec m. croisée / DEUX rangs simples / médaillon etc. Il manque 1 rang pour avoir 2 rgs autour de celui avec une maille croisée.

21.11.2016 - 14:34

DROPS Design answered:

Bonjour Emma, votre question a été transmise à nos stylistes. Merci d'avance pour votre patience.

21.11.2016 - 15:05

country flag Mieke Baras wrote:

Ik verwijs naar eerdere opmerkingen aangaande de meer dan 100st extra op het einde van het lijf. Ik brei maat L, maar toen ik aan de boord begon met nld 3.5, werd het werk niet strakker hoor! Gevolg: alles uitgetrokken tot na de minderingen en vanaf 13cm om de 4nld terug gemeerderd. Om de andere nld zorgt voor een soepjurk!

18.11.2016 - 17:18

country flag Mieke Baras wrote:

Ik had graag een antwoord gekregen op mijn opmerking betreffende diagram A2b!

14.11.2016 - 17:27

DROPS Design answered:

Hoi Mieke. En dat krijg je als ik tijd heb gehad om naar te kijken ;-)

15.11.2016 - 13:32

country flag Emma wrote:

Bonjour Je ne suis pas sûre de bien comprendre lez explications une fois qu'on a terminé l'empiècement. Il faut tricoter une seule fois A2a, et après on répète uniquement A2b ? Est ce normal que A2a soit sur 9 rangs d'après le diagramme ? Merci.

14.11.2016 - 00:13

DROPS Design answered:

Bonjour Emma, vous tricotez 1 fois le diagramme entièrement (= A.2a) puis répétez simplement la partie encadrée (= A.2b = 9 rangs) en hauteur. Bon tricot!

14.11.2016 - 10:32

country flag Mieke Baras wrote:

Het gecorrigeerde A1b en A2b schema verschillen nog steeds van elkaar. Kijk naar de eerste 8st van A1a/b : tussen de 1ste nld en de 3de nld van A1b zit maat 1nld zonder kruisingen. In A2b zitten er 2 nld tussen, nl de 15de en 16de nld, waarna je herhaalt vanaf 8ste nld.

13.11.2016 - 09:23

country flag Mieke Baras wrote:

Het lijf: na de steken vd mouwen apart te hebben gezet : is het de bedoeling dat we, na A2a gebreid te hebben, enkel A2b moeten herhalen of moet je A2a én A2b telkens herhalen? Sorry, nogmaals, de uitleg bij deze trui is bijzonder verwarrend!

08.11.2016 - 17:10

DROPS Design answered:

Zie mijn antwoord hieronder ;-)

09.11.2016 - 14:17