DROPS Delight
DROPS Delight
75% Wool, 25% Polyamide
Discontinued
find alternatives
DROPS Alpaca
DROPS Alpaca
100% Alpaca
from 3.40 £ /50g
DROPS SS24

Frosty Morning

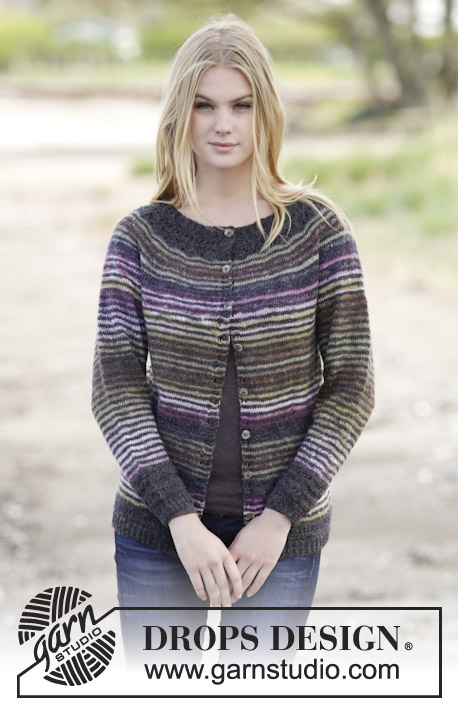
Knitted DROPS fitted jumper with stripes, lace pattern, raglan and round yoke in ”Delight” and ”Alpaca”. Size: S - XXXL.

DROPS 165-44
DROPS design: Pattern no de-142
Yarn group A
----------------------------------------------------------
Size: S - M - L - XL - XXL - XXXL
Materials:
DROPS DELIGHT from Garnstudio
150-200-200-200-250-250 g colour no 05, beige/grey/pink
And use:
DROPS ALPACA from Garnstudio
200-250-250-300-300-350 g colour no 506, dark grey

DROPS DOUBLE POINTED NEEDLES AND CIRCULAR NEEDLE (60 and 80 cm) SIZE 3 mm - or size needed to get 24 sts x 32 rows in stocking st = 10 x 10 cm.
DROPS DOUBLE POINTED NEEDLES and CIRCULAR NEEDLE (60 and 80 cm) SIZE 2.5 mm - for edge.

-------------------------------------------------------

Alternative Yarn – See how to change yarns here
Yarn Groups A to F – Use the same pattern and change the yarn here
Yarn usage using an alternative yarn – Use our yarn converter here

-------------------------------------------------------

DROPS Delight
DROPS Delight
75% Wool, 25% Polyamide
Discontinued
find alternatives
DROPS Alpaca
DROPS Alpaca
100% Alpaca
from 3.40 £ /50g

Pattern instructions

NOTE: This pattern is written in British English. All measurements in charts are in cm. For conversion from cm to inches - click here. There are different terms for crocheting in British and American English. If this pattern includes crochet, click for "crochet terms" here. For this pattern in American English, please click here.
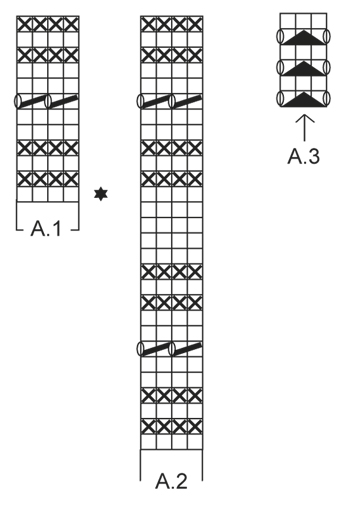
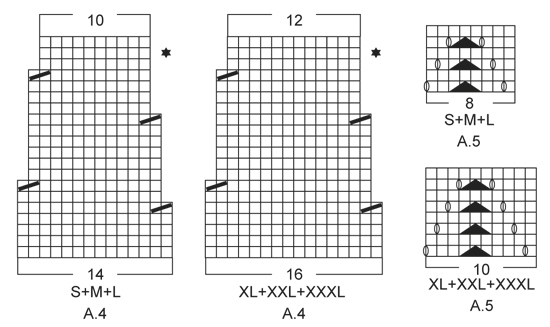
GARTER ST (worked in the round):
1 ridge = 2 rounds. * K 1 round and P 1 round *, repeat from *-*.

PATTERN:
See diagrams A.1-A.5.

STRIPES:
* Work 2 rounds with Alpaca, work 2 rounds with Delight *, repeat from *-*.

WAIST:
Dec for waist at the 4 markers.
Dec as follows when 2 sts remain before 1st and 3rd marker: Slip 1 st as if to K, K 1, psso.
Dec as follows after 2nd and 4th marker: K 2 tog.

INCREASE TIP 1:
Inc at the 4 markers (= waist).
Inc as follows: Make 1 YO before 1st and 3rd marker and after 2nd and 4th marker. On next row K YOs twisted to avoid holes.

INCREASE TIP 2:
Inc as follows mid under sleeves: Work until 1 st remains before marker, 1 YO, 2 sts in stocking st, 1 YO. On next round K YO twisted, i.e. work in the back loop of st instead of front to avoid holes.

RAGLAN:
Dec for raglan on each side of A.3 in every transition between sleeves and body.
Dec as follows after A.3: Slip 1 st as if to K, K 1, psso.
Dec as follows 2 sts before A.3: K 2 tog.
----------------------------------------------------------

BODY:
Worked in the round on circular needle. Rounds start mid back.
Cast on 213-231-252-276-300-327 sts on circular needle size 2.5 mm with Alpaca. Work rib (= K 1/P 2). When rib measures 3 cm, work 2 rows in stocking st. Then work A.1, AT THE SAME TIME on 1st row dec 13-11-12-12-12-11 sts evenly = 200-220-240-264-288-316 sts.
When A.1 has been worked vertically, switch to circular needle size 3 mm and work in stocking st and STRIPES. REMEMBER THE KNITTING TENSION
When piece measures 8-8-8-8-10-10 cm, insert 4 markers in piece as follows:
Insert 1st marker after 26-27-29-30-30-31 sts, 2nd marker after 48-56-62-72-84-96 sts, 3rd marker after 52-54-58-60-60-62 sts and 4th marker after 48-56-62-72-84-96 sts (26-27-29-30-30-31 sts remain on round after last marker). On next round dec for WAIST – see explanation above (= 4 sts dec). Repeat dec every 4th round 6-6-6-6-5-5 more times = 172-192-212-236-264-292 sts. When piece measures 22 cm in all sizes, inc before 1st and 3rd marker and after 2nd and 4th marker – READ INCREASE TIP 1 (= 4 sts inc). Repeat inc every 4th-4th-6th-6th-8th-8th round 6-6-6-6-5-5 more times = 200-220-240-264-288-316 sts. Continue to work until piece measures 38-39-39-40-41-43 cm. Adjust so that next round is 2nd round with Delight. Now work as follows: Work 45-50-55-60-66-73 sts (= half the back piece), cast off 10-10-10-12-12-12 sts for armhole, work 90-100-110-120-132-146 sts in stocking st (= front piece), cast off 10-10-10-12-12-12 sts for armhole and work the last 45-50-55-60-66-73 sts (= half the back piece). Put piece aside and knit the sleeves.

SLEEVE:
Worked in the round on double pointed needles.
Cast on 57-57-60-60-63-66 sts on double pointed needles size 2.5 mm with Alpaca and work rib as follows: * K 1, P 2 *, repeat from *-* until rib measures 3 cm. Now work 2 rounds in stocking st AT THE SAME TIME on 1st round dec 1-1-2-0-1-2 sts evenly = 56-56-58-60-62-64 sts. Then continue pattern according to diagram A.2. When A.2 has been worked 1 time vertically, switch to double pointed needles size 3 mm. Insert 1 marker at beg of round (= mid under sleeve). Continue in stocking st and with stripes, AT THE SAME TIME on next round inc 1 st on each side of marker under sleeve - READ INCREASE TIP 2! Repeat inc every 9th-7th-7th-6th-6th-5th round 12-14-14-16-16-17 times in total = 80-84-86-92-94-98 sts. When piece measures 41-39-39-38-38-38 cm (NOTE: Shorter measurements in the larger sizes because of wider shoulders) - adjust so that next round is 2nd round with Delight, cast off the middle 10-10-10-12-12-12 sts under sleeve (i.e. cast off 5-5-5-6-6-6 sts on each side of marker) = 70-74-76-80-82-86 sts. Put piece aside and knit another sleeve.

YOKE:
Slip sleeves on to same circular needle as body as follows: Continue with stripes and work sts from first sleeve AT THE SAME TIME insert 1 marker in first st and 1 marker in last st on sleeve, work sts from front piece, work sts from the other sleeve AT THE SAME TIME insert 1 marker in first st and 1 marker in last st on sleeve and work sts from back piece = 320-348-372-400-428-464 sts and 4 markers in piece.
Now work A.3 in every transition between body and sleeves (arrow in diagram should fit against st with marker) and dec for RAGLAN - see explanation above, (= 8 sts dec). Repeat dec every 4th round 5-6-7-7-8-8 more times = 272-292-308-336-356-392 sts. After last dec work 1 round while dec 20-26-28-32-36-40 sts evenly = 252-266-280-304-320-352 sts. Now work and dec according to A.4 – choose diagram for correct size. On next to last round in diagram dec 4-6-8-28-30-44 st evenly = 176-184-192-200-210-220 sts. Now continue with Alpaca until finished measurements. Now work A.5 over all sts – choose diagram for correct size. When A.5 has been worked vertically, switch to circular needle size 2.5 mm. Now work A.1 over A.5, AT THE SAME TIME on 1st round in diagram dec 32-32-32-30-40-40 sts evenly = 144-152-160-170-170-180 sts. When A.1 has been worked vertically, work an elevation in the back of neck in garter st as follows: Insert 1 marker mid front. Beg mid back and K until 14-14-16-16-18-20 sts remain before marker. Turn, K back until 14-14-16-16-18-20 sts remain before marker in the other side. Turn, K until 30-30-34-34-38-42 sts remain before marker. Turn, K back until 30-30-34-34-38-42 sts remain before marker in the other side. Turn and K back to beg of round. Work 2 rounds in stocking st over all sts AT THE SAME TIME adjust no of sts to 144-153-159-168-168-177. Now work rib = K 1/P 2 for 2 cm. Cast off sts with K over K and P over P. The jumper measures approx. 56-59-60-62-64-66 cm from shoulder and down.

ASSEMBLY:
Sew the openings under the sleeves.

Diagram

symbols = K
symbols = P
symbols = 1 YO between 2 sts
symbols = K 2 tog
symbols = slip 1 st as if to K, K 2 tog, psso
symbols = decrease round - see explanation in pattern
diagram
diagram
diagram

Each of our patterns has specific tutorial videos to help you.

Do you have a question? See a list of frequently asked questions (FAQ)

Knitting tension is what determines the final measurements of your work, and is usually measured per 10 x 10 cm. It is provided like so: number of stitches in width x number of rows in height - eg: 19 stitches x 26 rows = 10 x 10 cm.

The knitting tension is very individual; some people knit/crochet loosely while others work tightly. You adjust the knitting tension with the needle size, which is why the suggested needle size is only meant as a guide! You need to adjust this (up or down) to ensure that YOUR knitting tension matches the knitting tension provided in the pattern. If you work with a different knitting tension than provided you will have a different yarn consumption, and your work will have different measurements than what the pattern suggests.

The knitting tension also determines which yarns can replace each other. As long as you achieve the same knitting tension you can replace one yarn with another.

See DROPS lesson: How to measure your tension/gauge

See DROPS video: How to make a gauge tension swatch

The required amount of yarn is provided in grams, eg: 450 g. To calculate how many balls you’ll need you first need to know how many grams are in 1 ball (25g, 50g or 100g). This information is available if you click on the individual yarn quality on our pages. Divide the amount required with the amount of each ball. For example, if each ball is 50g (the most common amount), the calculation will be as follows: 450 / 50 = 9 balls.

The important thing when changing from one yarn to another is that the knitting/crochet tension remains the same. This is so that the measurements of the finished piece will be the same as on the sketch provided. It is easier to achieve the same knitting tension using yarns from the same yarn group. It is also possible to work with multiple strands of a thinner yarn to achieve the knitting tension of a thicker one. Please try our yarn converter. We recommend you to always work a test swatch.

Please NOTE: when changing yarn the garment might have a different look and feel to the garment in the photo, due to individual properties and qualities of each yarn.

See DROPS lesson: Can I use a different yarn than the one mentioned in the pattern?

All our yarns are categorised into yarn groups (from A to F) according to thickness and knitting tension – group A contains the thinnest yarns and group F the thickest. This makes it easier for you to find alternative yarns to our patterns, should you wish to switch yarn. All yarns within the same group have a similar knitting tension and can easily replace each other. However, different yarn qualities have different structures and properties which will give the finished work a unique look and feel.

Click here for an overview of the yarns in each yarn group

At the top of all our patterns you’ll find a link to our yarn calculator, which is a helpful tool should you wish to use a different yarn than suggested. By filling in the yarn quality you wish to replace, the amount (in your size) and number of strands, the calculator will present good alternative yarns with the same knitting tension. Additionally it will tell you how much you’ll require in the new qualities and whether you’ll need to work with multiple strands. Most skeins are 50g (some are 25g or 100g).

If the pattern is worked with multiple colours, every colour will have to be calculated separately. Similarly, if the pattern is worked with several strands of different yarns (for example 1 strand Alpaca and 1 strand Kid-Silk) you will have to find alternatives for each, individually.

Click here to see our yarn calculator

Since different yarns have different qualities and textures we have chosen to keep the original yarn in our patterns. However, you can easily find options among our available qualities by using our yarn calculator, or simply pick a yarn from the same yarn group.

It is possible that some retailers still have discontinued yarns in stock, or that someone has a few skeins at home that they would like to find patterns for.

The yarn calculator will provide both alternative yarn as well as required amount in the new quality.

If you think it's hard to decide what size to make, it can be a good idea to measure a garment you own already and like the size of. Then you can pick the size by comparing those measures with the ones available in the pattern's size chart.

You'll find the size chart at the bottom of the pattern.

See DROPS lesson: How to read size chart

The needle size provided in the pattern serves only as a guide, the important thing is to follow the knitting tension. And since knitting tension is very individual, you will have to adjust the needle size to ensure that YOUR tension is the same as in the pattern – maybe you’ll have to adjust 1, or even 2 needle sizes, up or down to achieve the correct tension. For this, we recommend that you work test swatches.

Should you work with a different knitting tension than the one provided, the measurements of the finished garment might deviate from the measurement sketch.

See DROPS lesson: How to measure your tension/gauge

See DROPS video: How to make a tension/gauge swatch

Working a garment top-down provides more flexibility and room for personal adjustment. For example it is easier to try the garment on while working, as well as making adjustments to length of yoke and shoulder caps.

The instructions are carefully explaining every step, in the correct order. Diagrams are adjusted to the knitting direction and are worked as usual.

The diagram depicts all rows/rounds, and every stitch seen from the right side. It is read from bottom to top, from right to left. 1 square = 1 stitch.

When working back and forth, every other row is worked from the right side and every other row is worked from the wrong side. When working from the wrong side, the diagram will have to be worked reversed: from left to right, knit stitches are purled, purl stitches are knit etc.

When working in the round every round is worked from the right side and the diagram are worked from right to left on all rounds.

See DROPS lesson: How to read knitting diagrams

The diagram depicts all rows/rounds, and every stitch seen from the right side. It is worked from bottom to top, from right to left.

When working back and forth every other row is worked from the right side: from right to left and every other row is worked from the wrong side: from left to right.

When working in the round, every row in the diagram are worked from the right side, from right to left.

When working a circular diagram you start in the middle and work your way outwards, counter clockwise, row by row.

The rows usually start with a given number of chain stitches (equivalent to the height of the following stitch), this will either be depicted in the diagram or explained in the pattern.

See DROPS lesson: How to read crochet diagrams

Instructions for working several diagrams after each other on the same row/round, will often be written like so: “work A.1, A.2, A.3 a total of 0-0-2-3-4 times". This means you work A.1 once, then A.2 is worked once, and A.3 is repeated (in width) the number of times provided for your size – in this case like so: S = 0 times, M = 0 times, L=2 times, XL= 3 times and XXL = 4 times.

The diagrams are worked as usual: begin with the first row in A.1, then work the first row in A.2 etc.

See DROPS lesson: How to read knitting diagrams

See DROPS lesson: How to read crochet diagrams

The total width of the garment (from wrist-to-wrist) will be larger in the larger sizes, despite the actual sleeves being shorter. The larger sizes have longer sleeve caps and wider shoulders, so there will be a good fit in all sizes.

The measurement sketch/schematic drawing provides information regarding the full length of the garment. If it’s a jumper or a jacket the length is measured from the highest point on the shoulder closest to the neckline, and straight down to the bottom of the garment. It is NOT measured from the tip of shoulder. Similarly, the length of yoke is measured from the highest point on the shoulder and down to where yoke is split into body and sleeves.

On a jacket measures are never taken along bands, unless specifically stated. Always measure inside band stitches when measuring the length.

See DROPS lesson: How to read a schematic drawing

Diagrams are often repeated on the round or in height. 1 repeat is the diagram the way it appears in the pattern. If it says to work 5 repeats of A.1 in the round, then you work A.1 a total of 5 times after/next to each other in the round. If it says to work 2 repeats of A.1 vertically/in height you work the entire diagram once, then begin again at the start and work the entire diagram one more time.

Chain stitches are slightly narrower than other stitches and to avoid working the cast-on edge too tight, we simply chain more stitches to begin with. The stitch count will be adjusted on the following row to fit the pattern and measurement sketch.

The rib edge is more elastic and will contract slightly compared to, for example, stocking stitch. By increasing before the rib edge, you avoid a visible difference in width between the rib edge and the rest of the body.

It’s very easy to cast off too tightly, and by making yarn overs while casting off (and simultaneously casting these off) you avoid a too tight cast off edge.

See DROPS video: How to bind off with yarn overs (yo)

To achieve an even increase (or decrease) you can increase on, for example: every 3rd and 4th row alternately, like so: work 2 rows and increase on the 3rd row, work 3 rows and increase on the 4th. Repeat this until the increase is complete.

See DROPS lesson: Increase or decrease 1 st on every 3rd and 4th row alternately

Should you prefer to work in the round instead of back and forth, you may of course adjust the pattern. You’ll need to add steeks mid-front (usually 5 stitches), and follow the instructions. When you would normally turn and work from the wrong side, simply work across the steek and continue in the round. At the end you’ll cut the piece open, pick up stitches to work bands, and cover the cut edges.

See DROPS video: How to knit steeks and cut open

Should you prefer to work back and forth instead of in the round, you may of course adjust the pattern so you work the pieces separately and then assemble them at the end. Divide the stitches for the body in 2, add 1 edge stitch in each side (for sewing) and work the front and back pieces separately.

See DROPS lesson: Can I adapt a pattern for circular needles into straight needles?

Pattern repeats can vary slightly in the different sizes, in order to get the correct proportions. If you’re not working the exact same size as the garment in the photo, yours might deviate slightly. This has been carefully developed and adjusted so that the complete impression of the garment is the same in all sizes.

Make sure to follow instructions and diagrams for your size!

If you have found a pattern you like which is available in women’s size it’s not very difficult to convert it to men’s size. The biggest difference will be the length of sleeves and body. Start working on the women size that you think would fit across the chest. The additional length will be worked right before you cast off for the armhole/sleeve cap. If the pattern is worked top-down you can add the length right after the armhole or before the first decrease on sleeve.

Regarding additional yarn amount, this will depend on how much length you add, but it is better with a skein too many than too few.

All yarns will have excess fibres (from production) that might come off as lint or shedding. Brushed yarns (ie hairier yarns) have more of these loose, excess fibres, causing more shedding.

Shedding also depends on what is worn under or over the garment, and whether this pulls at the yarn fibres. It’s therefore not possible to guarantee that there will be no shedding

Below are some tips on how to get the best result when working with hairier yarns:

1. When the garment is finished (before you wash it) shake it vigorously so the looser hairs come off. NOTE: do NOT use a lint roller, brush or any method that pulls at the yarn.

2. Place the garment in a plastic bag and put it in your freezer - the temperature will cause the fibres to become less attached to each other, and excess fibres will come off easier.

3. Leave in the freezer for a few hours before taking it out and shaking it again.

4. Wash the garment according to the instructions on the yarn label.

Pilling is a natural process that happens to even the most exclusive of fibers. It's a natural sign of wear and tear that is hard to avoid, and that is most visible in high friction areas of your garment like a sweater's arms and cuffs.

You can make your garment look as new by removing the pilling, using a fabric comb or a pill/lint remover.

Still can't find the answer you need? Then scroll down and leave your question so one of our experts can try to help you. This will be done normally within 5 to 10 working days.
In the meantime, you can read the questions and answers that others have left to this pattern or join the DROPS Workshop on Facebook to get help from fellow knitters/crocheters!

You might also like...

Post a comment to pattern DROPS 165-44

We would love to hear what you have to say about this pattern!

If you want to leave a question, please make sure you select the correct category in the form below, to speed up the answering process. Required fields are marked *.

Comments / Questions (30)

country flag Belinda wrote:

De mouwen van deze trui heb ik langer gemaakt. Ik heb patroon M gebreid en er staat 39 cm voor de mouwen. Met 43 cm is het goed, het had zelfs nog langer gekund. Ik ben zelf 1.70 lang. Verder kan je ook met een bol delight minder. Aan de achterkant komt ene soort streep door het wisselen van de kleuren. Zelf vind ik dit niet zo mooi, maar verder is het een fijne en mooie trui. Mooier dan op de foto vind ik zelf. De kleuren zijn warmer. Het is een herfsttrui, niet zo heel dik.

12.01.2018 - 11:32

country flag Eva wrote:

Om man ska minska (insnitt) vid alla 4 markörer, så blir väl minskningen inte bara i sidan utan även mitt fram/bak. Eller har jag missförstått?

04.01.2018 - 15:12

DROPS Design answered:

Ja, det stämmer att det ska minskas även mitt fram och bak.

05.01.2018 - 14:11

country flag Mara Ferraris wrote:

Buonasera, sto terminando lo sprone. Non vedo sulle spiegaziini a che punto ritornare al solo filo grigio per lo scollo del collo. È con il diagramma A1? Grazie

19.09.2017 - 22:38

DROPS Design answered:

Buonasera Mara. Abbiamo inserito l'indicazione mancante. Lavora con il grigio a partire dal diagramma A.5. La ringraziamo per la segnalazione. Buon lavoro!

19.09.2017 - 22:54

country flag Agnete Holmen Bechmann wrote:

Hei! Skal kastene i A3 mønsteret mellom bol og ermer strikkes rett slik at det blir hull i overgangene?

11.09.2017 - 09:55

DROPS Design answered:

Hei Agnete, Nei, de skal strikkes vridd så det ikke blir hull. God fornøyelse

11.09.2017 - 10:26

country flag Jeanne Pedersen wrote:

Hej Drops. Er nybegynder og vil gerne starte med den her bluse. Kan jeg godt springe hulmønsteret over og bare lave den i ret og vrang? Ændrer det antal masker, mål osv?

30.01.2017 - 12:10

DROPS Design answered:

Hej Jeanne. Ja, du kan aendre det, men jeg tror at en rib med 1 r/1 vr vil traekke mere sammen end hulmönstret. Du kan eventuelt strikke en pröve med begge mönstre og se om det passer nogenlunde i bredde og höjde.

30.01.2017 - 15:17

country flag Maucorps Ghislaine wrote:

Je desire faire le modèle 165-44 avec des aiguilles du 3 et 3.5en doublant le fil suggéré pouvez m'établir une transformation des directives pour le réaliser?

15.12.2016 - 12:15

DROPS Design answered:

Bonjour Mme Maucorps, nous ne sommes malheureusement pas en mesure de pouvoir ajuster chaque modèle à chaque demande individuelle, toutefois, vous trouverez ici tous les modèles de pull avec empiècement arrondi et une tension de 17 m pour 10 cm (équivalent à 2 fils du groupe A) pour vous inspirer. Bon tricot!

15.12.2016 - 13:07

country flag Solveig Holvik wrote:

Hei. Jeg sliter litt med å forstå mønsteret til Frosty Morning genser. Jeg er ferdig med å strikke A1 på bolen. Hvor kommer A2 inn? Er det bare på ermene jeg skal strikke A2? Hvordan veksler jeg mellom Alpaca og Delight? Hvilke farge skal strikkes vrangt? På forhånd takk mvh Solveig Holvik

15.03.2016 - 11:05

DROPS Design answered:

Hej Solveig, Det er lettere at forstå når du strikker det. A2 strikkes på ærmerne. Du strikker ifølge "STRIPER" 2 omg med Alpaca og 2 omg med Delight og det gør du uanset hvilken pind du er på ifølge diagrammet. God fornøjelse!

15.03.2016 - 16:06

country flag Karin wrote:

Hallo, ich habe eine Frage zur Passe. Soll A3 bis zum Ende der Passe gestrickt werden, oder nur so lang, bis die Raglanabnahmen beendet sind? Vielen Dank und weiter so.

09.02.2016 - 19:29

DROPS Design answered:

A.3 wird nur bis zum Ende der Raglanabnahmen gestrickt, dann folgt A.4 über alle M.

15.02.2016 - 10:50

country flag Chantal Garnier wrote:

Je ne comprends pas comment faire A3 tous les 2 rangs et les diminutions raglan tous les 4 rangs, c'est à dire, comment les faire ensemble sur un même rang? merci

31.01.2016 - 14:53

DROPS Design answered:

Bonjour Mme Garnier, A.3 se tricote à chaque transition entre le dos/le devant et les manches. Tricotez ces mailles tous les tours (1 tour ajouré, 1 tour jersey), en même temps, diminuez 1 m avant et 1 m après A.3 6-9 fois tous les 4 tours (voir "Raglan"). Bon tricot!

01.02.2016 - 10:37

country flag Åsa B wrote:

Hej. Stickas denna tröja uppifrån och ner eller nerifrån och upp? Jag har kollat lite snabbt i mönstret men blir inte riktigt klok, det är ganska länge sen jag stickade :) MVH Åsa.

07.01.2016 - 11:38

DROPS Design answered:

Hej. Den stickas nerifrån och upp. Lycka till!

08.01.2016 - 08:17